RDK Resources
[*RDK Preferred*]
Code Management Facility
RDK Forums
[RDK Conferences]
RDK Support
Archives
Papers & Presentations Archive![]()
Papers & Presentations Archive![]()
| HideElements | ||
|---|---|---|
|
| Table of Contents | ||
|---|---|---|
|
This manual contains information on how to use Tata Elxsi Accelerator UI, which is an user interface for Video Accelerator devices.
Home screen UI with following options:
Metrological Apps
Video on Demand (VOD)
Bluetooth Settings
Volume Control
This section provides details on how the user can launch Tata Elxsi Accelerator UI by choosing either of the following 3 options:
| Anchor | ||||
|---|---|---|---|---|
|
Note:
Using pre-deployed url (option 1) is the easiest way, but NOT the recommended way as DEV version is deployed which undergo continuous development. Preferred option is to setup a build locally from Github code - Option 3
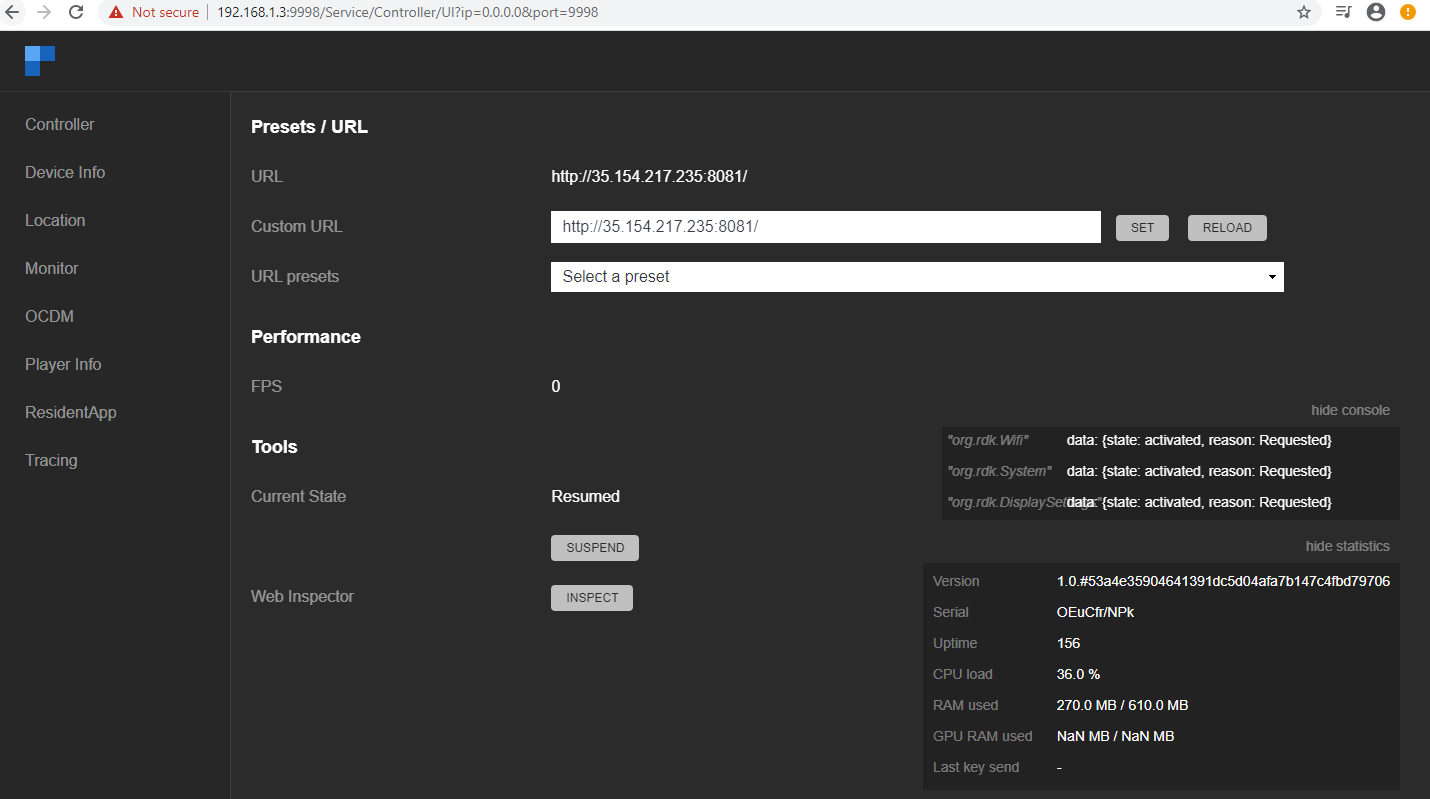
(Above figure shows setting URL in the Resident App)
| Anchor | ||||
|---|---|---|---|---|
|
Point Resident app to the deployed URL of Accelerator Application. On boot up, Accelerator app will be launched immediately after displaying the box console screen . Default video will be played on launching the Accelerator App. (For RPI RDKV image, we need to add the URL in /opt/residentapp.conf. *** It may vary depends on the builds )
1.1) Installation of Node.js and npm.
(Latest stable node V12.18.3 is preferred)
https://nodejs.org/en/download/
1.2) and Lightning-CLI
npm install -g @lightningjs/cli
      (Use sudo in case of permission issues like this:
      npm ERR! code EACCES
      npm ERR! syscall access)

      Ignore npm warnings like this:
      npm WARN deprecated core-js@2.6.11: core-js@<3 is no longer maintained and not recommended
      npm WARN deprecated rollup-plugin-babel@4.4.0: This package has been deprecated
2. Clone the Accelerator-UI project
git clone git@github.com:rdkcentral/AcceleratorUI.git
3. Navigate to the project location in terminal
cd AcceleratorUI
4. Run: npm install
It downloads all the dependent packages.
![]() In case of errors from Husky like this:
In case of errors from Husky like this:
husky > Setting up git hooks
ENOENT: no such file or directory, mkdir 'node_modules/husky/.git/hooks'
husky > Failed to install
![]() Please upgrade git version by following below mentioned steps and repeat npm install
Please upgrade git version by following below mentioned steps and repeat npm install
sudo add-apt-repository ppa:git-core/ppa -y
sudo apt-get update
sudo apt-get install git -y
git --version
![]() npm warnings like the ones mentioned below can be ignored
npm warnings like the ones mentioned below can be ignored
npm WARN deprecated request-promise@4.2.6: request-promise has been deprecated because it extends the now deprecated
npm WARN deprecated har-validator@5.1.5: this library is no longer supported
npm WARN deprecated core-js@2.6.11: core-js@<3 is no longer maintained and not recommended for usage
5. lng build : will create a standalone bundle that you can run in the browser.
6. lng serve : will start a local webserver and run the App.
The port information of the server will be shown in the terminal.
Application will be up and running at (http://<hostIP>:8080)
eg: http://127.0.0.1:8080 and http://<host_ip>:8080
As mentioned in Launch the pre-deployed Lightning UI on accelerator section, Launch Controller UI in your web browser by giving the URL in specified format.
In Controller UI, navigate to Resident tab and Enter the Application URL ( URL of the application getting from 'lng serve' ) in 'Custom URL' field and click on 'SET' button.
The Lightning accelerator UI will get loaded in the Resident App(webkit browser instance)
To configure this as the default UI on bootup:
Follow steps mentioned in Configure the pre-deployed Accelerator UI as the default UI to configure your locally deployed application (http://<IPaddress>:8080) as the default UI on STB boot up
| Buttons used in Remote | Keys used in Keyboard |
|---|---|
Home | Backspace |
Up Arrow | Up Arrow |
Down Arrow | Down Arrow |
Right Arrow | Right Arrow |
Left Arrow | Left Arrow |
OK | Enter |
Volume Up | - |
Volume Down | - |
Mute | - |
Live video playback will be running by default on the screen. Dash, HLS and MP4 format of videos are supported by the media player.

(The above figure shows an instance of video playback before the user launches the UI.)
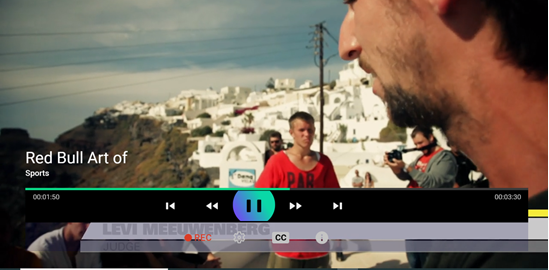
(The above figure shows the player control UI)
On pressing ‘Down Arrow’ key, Player control UI will be displayed. It has two rows of controls.
Following keys are used for navigation in Player control UI
Up/Down | To navigate between rows |
Right/Left | To navigate between Player options |
Enter | To select Player controls |
Top row has following functionalities
Player controls | Functionalities |
|---|---|
Previous button | To go to previous channel |
Rewind button | To reduce the fast-forwarded streaming speed |
Play - Pause button | To play and pause the video |
Forward button | To fasten the streaming speed more than that of the actual speed |
Next button | To go to next channel |
Bottom row has following functionalities
Recording option | To be Implemented |
Settings | To be Implemented |
Closed captions | To be Implemented |
Info | To be Implemented |
Along with the Player control UI, channel name and channel logo also appear on top of the screen.

(The above figure shows an example of the Channel Info)
Network information also appears along with the Player control UI. Time, Wi-Fi, Bluetooth and weather information should appear on top right corner of the screen (functionality- to be implemented)

(The above figure shows the Network info appearing on the screen )
On pressing ‘Home’ key (or ← key) from the live playback (or Backspace from keyboard), the Accelerator UI will get launched. Exiting from the UI at any stage is also done in the similar fashion by pressing ‘Home/Backspace’ key.
(The above figure shows the launched Accelerator UI on the screen)
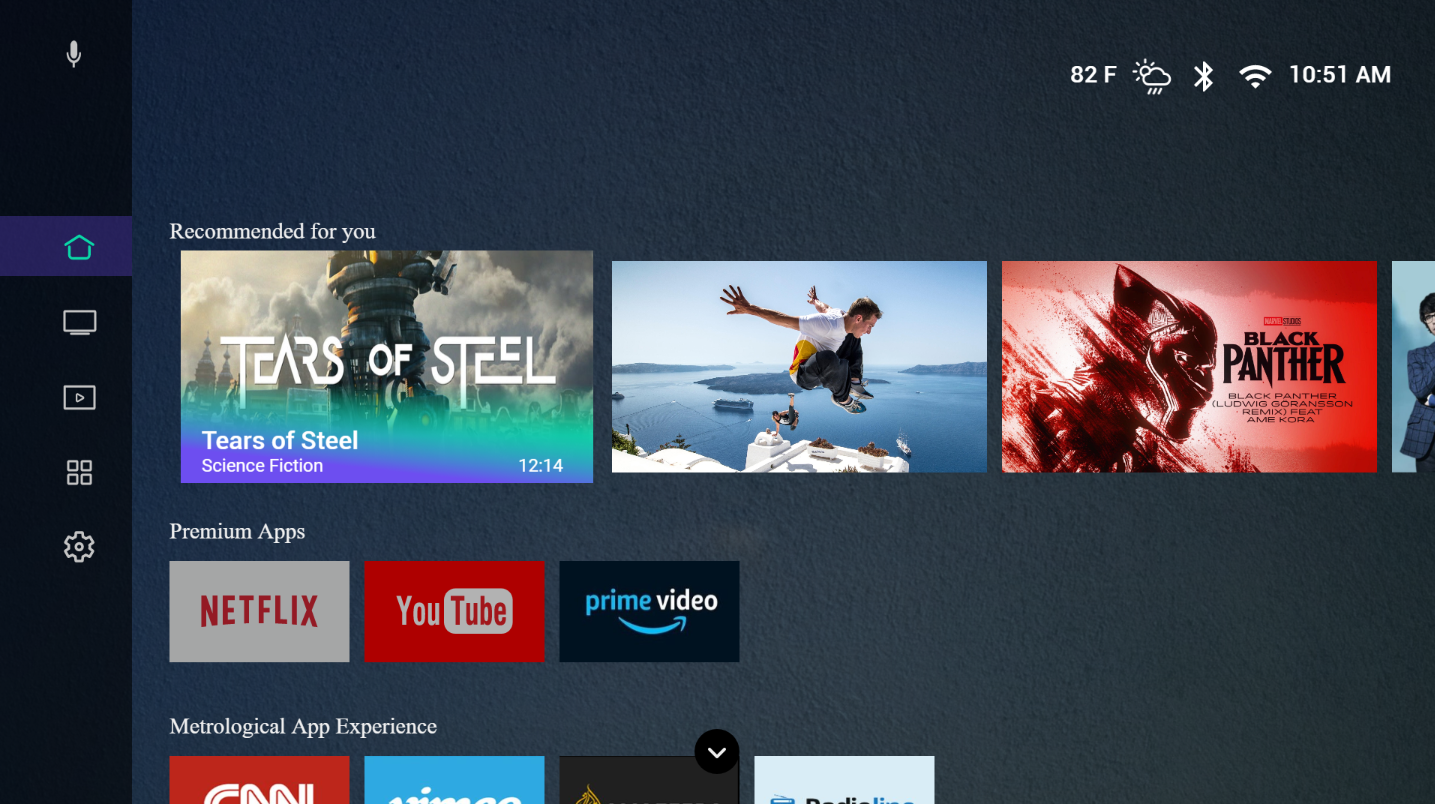
In the Accelerator UI that has launched, the user will be in Home screen by default. On Pressing ‘Enter’ key from the home menu on Sidebar, the focus will be on Recommended for you. Underneath Recommended for you, there are rows corresponding to Premium Apps and Metrological Apps. The user can navigate into various rows using Up- ‘Down Arrow’ keys.
In the second row there is Premium Apps, in which Youtube and Amazon Prime Apps is supported. The user can launch YouTube / Amazon prime by pressing ‘OK /Enter’ key from the tiles.
Launching of all Applications in the third row is achieved by pressing ‘OK/Enter’ key from the tiles in Metrological Apps. To exit from metro apps, press on 'Home' button.
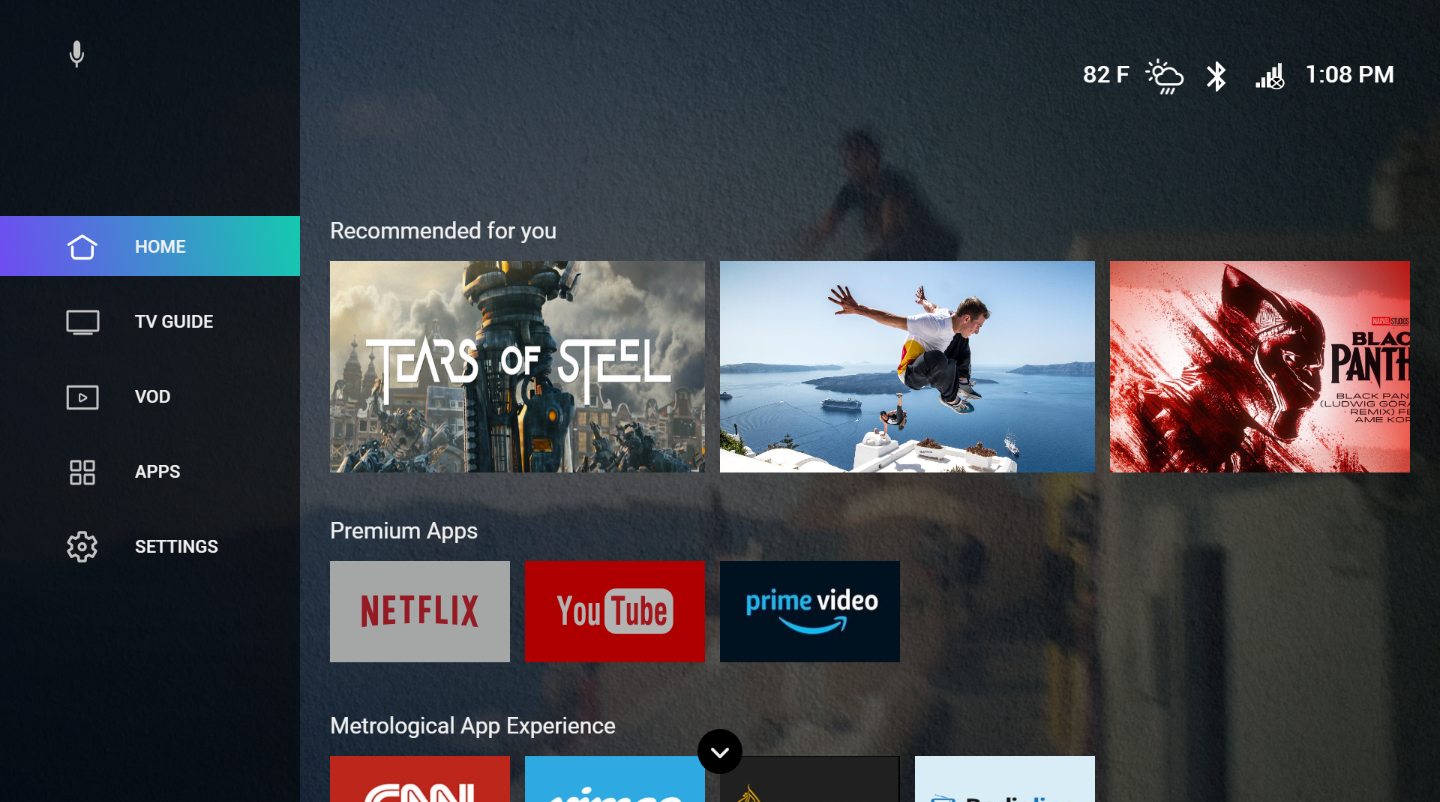
On launching the Home screen, Side bar would be visible on the left-hand side of the screen which comprises of menu items like Home, TV guide, App, VOD and Settings. By pressing ‘Left Arrow’ key from Home screen, the Side Menu will expand.
If the user goes back to Player from any menu other than Home screen and then launch back using ‘Menu/Back Space’ key, then the application is not launched to the default screen (Home screen), instead it launches to the previous state.
Following keys are used to navigate in side menu:
‘Up’ and ‘Down Arrow’ keys | To navigate into each side menu item. |
‘Enter/OK’ key | To navigate into corresponding screens of the selected menu item. |
‘Left Arrow’ key | To bring focus on sidebar or to navigate back into sidebar from any launched screen. |
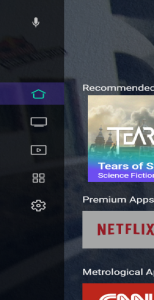
(The above figure shows the Side Menu on launching the Home screen )
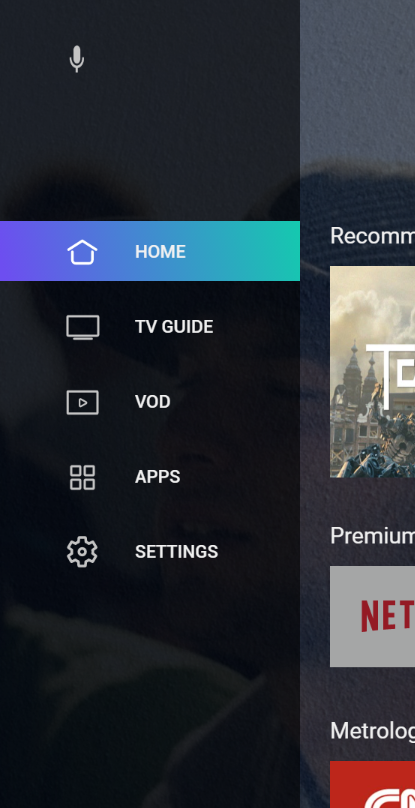
(The above figure shows the expanded Side Menu on pressing ‘Left Arrow’ key)
Information like Bluetooth & Wi-Fi connectivity, weather information and time are displayed in Info bar seen on the top right corner of the Home screen. InfoBar appears along with the launching of Player controls UI. This information status toggles with the logo, and once in every 2 mins logo is shown


For navigating into TV guide, press ‘Enter’ key from the TV guide menu on Sidebar and thus the TV guide UI appears.
Navigate Down through the Side bar menu and press ‘Enter’ key on VOD and the VOD screen appears. On the top of the screen, the list of categories of videos will be available. Among them FOR YOU category will be highlighted.
Navigation through each category is possible by using ‘Left Arrow’ and ‘Right Arrow’ keys. Pressing ‘Enter’ key from any such categories will display the videos on that category as rows of tiles.
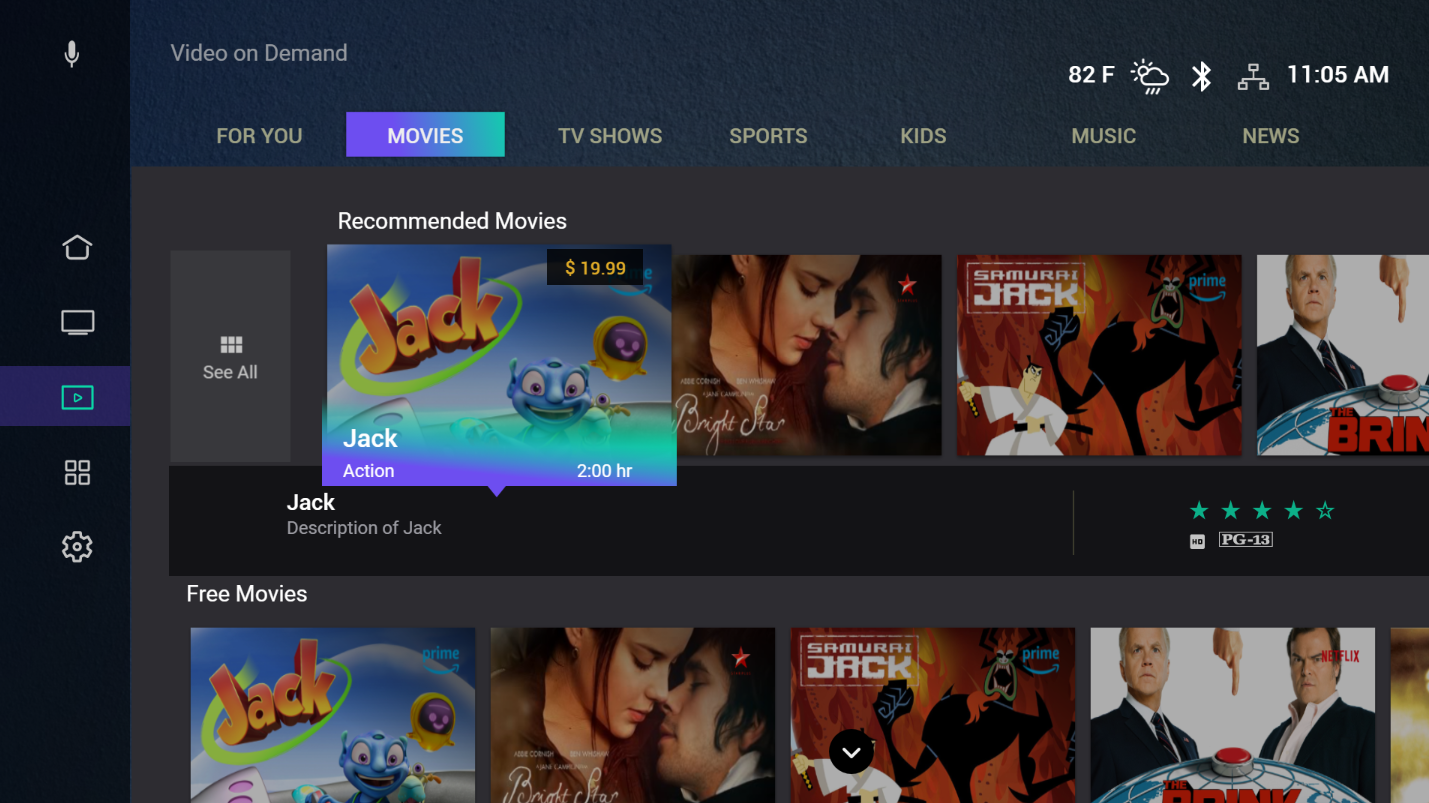
As shown in the above figure, tiles corresponding to the selected category will be displayed on the top. Only three rows of categories are supported by now. Pressing ‘Down Arrow’ key from entered category will navigate you to all rows and focus will be on ‘See All’ tile. Streaming of the video is initiated by pressing the ‘Enter’ key from the desired tile.
Following keys are used to navigate in VOD:
‘Left/Right Arrow’ key | 1.To navigate in to different categories 2.To navigate through tiles in each row |
‘Up/Down Arrow’ key | To navigate through different rows |
‘OK/ Enter’ key | 1.Streaming of the video from the desired tile. 2.To get the rows corresponding to selected category on top. |
While navigating through VOD tiles, the description box showing the description about the video along with its ratings and quality will appear at the bottom of each tile as shown in the figure. The cost of each video will be visible while that particular tile is on highlight but the purchase options are not yet implemented.
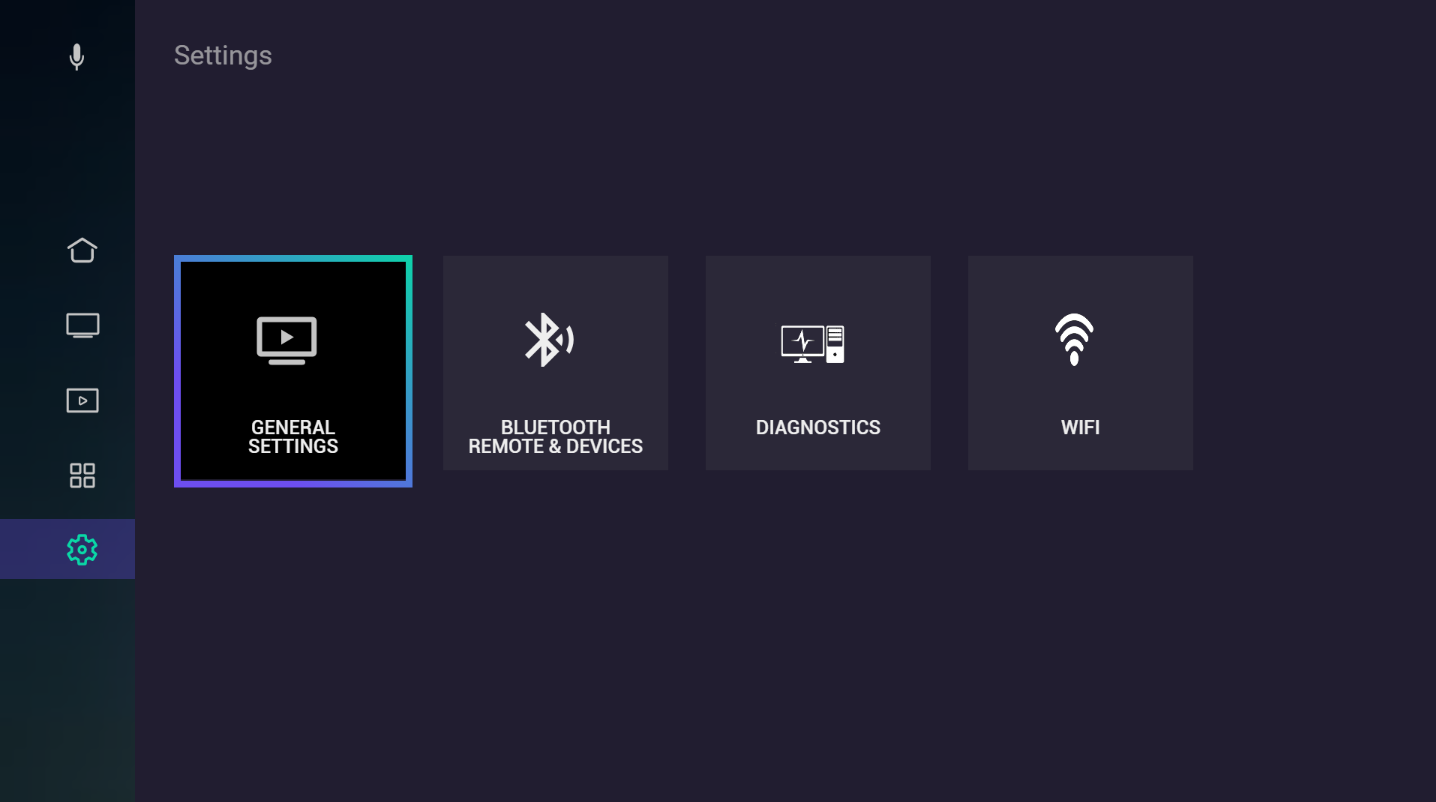
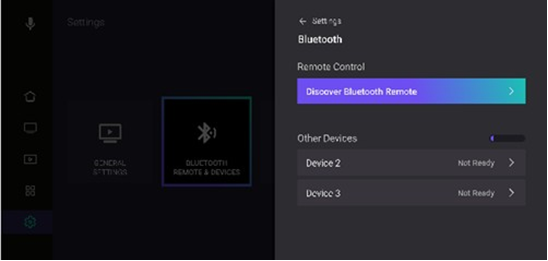
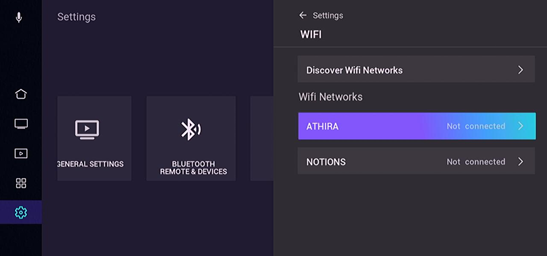
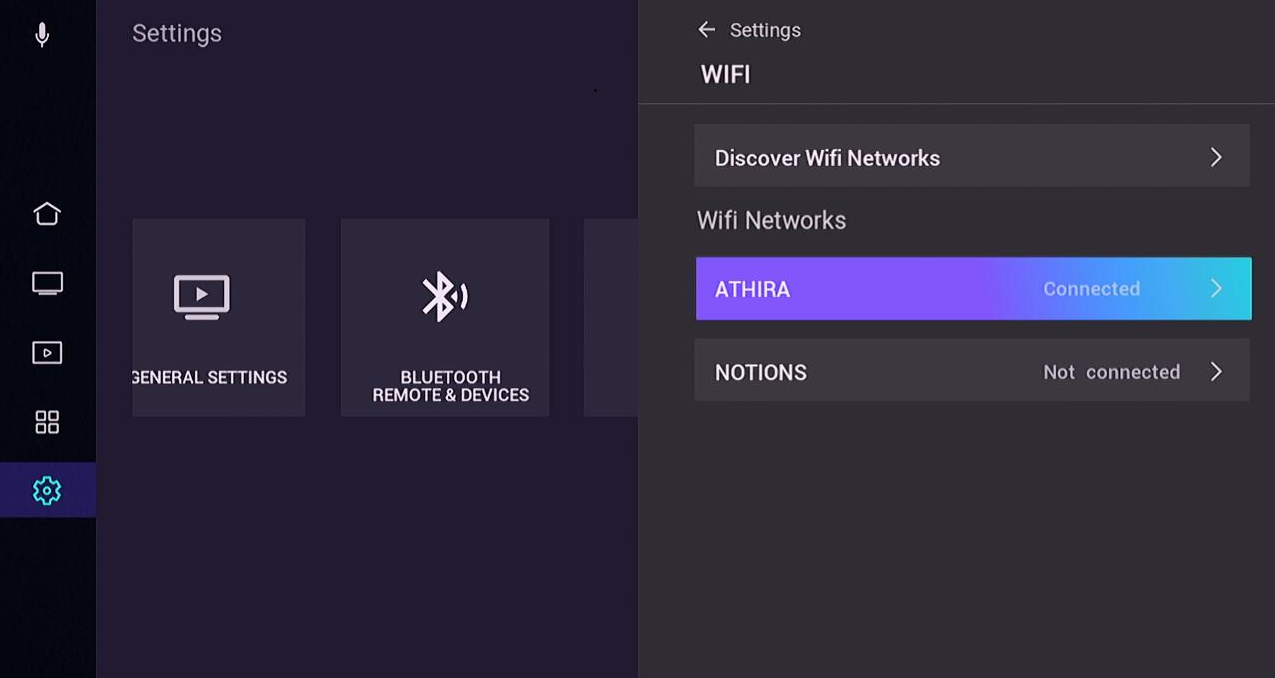
Navigate down through Sidebar menu and press ‘Enter’ key on settings menu to get settings window. Settings window comprise of General Settings, Bluetooth Remote & Devices, Network Interfaces , Diagnostics and Wifi
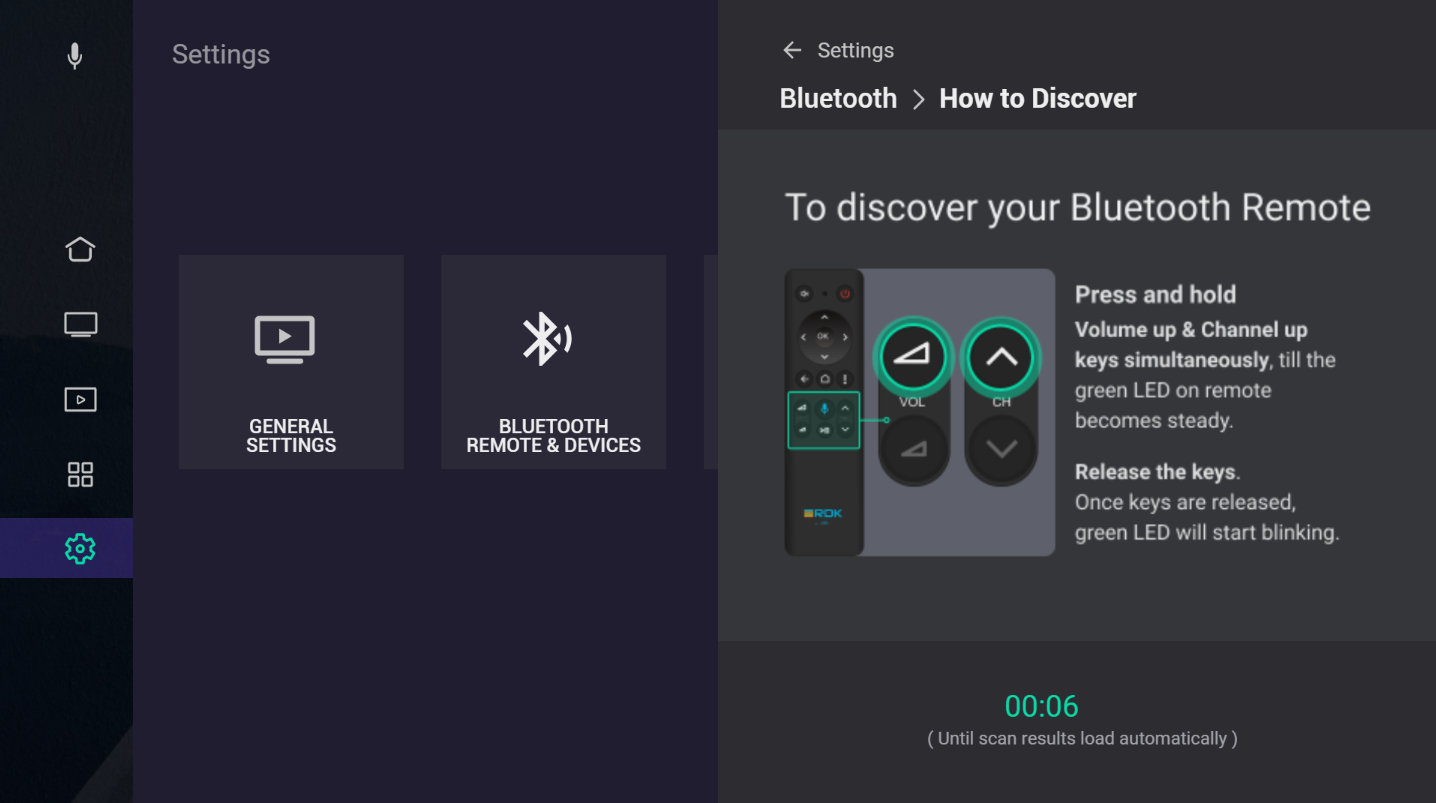
Press ‘Enter’ key on ‘Discover Bluetooth Remote' to navigate in to instructions window. On pressing ‘Enter’ key, the system starts scanning for devices. Along with that press and hold ‘Volume Up’ and ‘Channel Up’ keys simultaneously till the green LED on the remote gets steady. Once the keys are released, green LED will start blinking. The instructions to discover Bluetooth remote are displayed for 10 seconds while the scanning process goes on in background. The countdown ends on successful scanning or after 10 seconds and lists the devices discovered and shows the connection status as ‘Not Ready’.
(The above figure shows settings window)
General Settings will be in highlight by default. Using ‘Left Arrow’ and ‘Right Arrow’ keys, the navigation through each settings tile can be achieved.
Press ‘Enter’ key on ‘Bluetooth Remote and Devices’ to go to submenu related to Bluetooth settings.
For pairing and connecting the scanned devices, press ‘Enter’ key from corresponding device in the list. This gives ‘Pair and connect’ window as shown below.
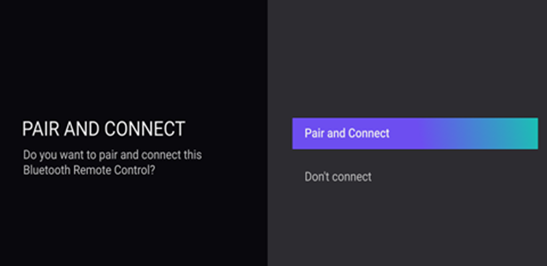
On Pressing ‘Enter’ key from ‘Pair and Connect’, the user can connect the device and gets navigated into ‘Discover window’ in which the connection status will be updated as ‘Ready’. On Pressing ‘Enter’ key from ‘Disconnect’, the user can disconnect the selected device.
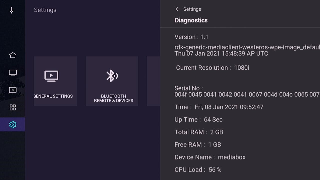
Diagnostics screen will provide device information like version, serial number, time , Up time etc. Device info will be displayed when we press enter from the 'Diagnostics' tile.
Press ‘Enter’ key on ‘Wifi’ to go to submenu related to Wifi settings. A screen appear from the right side and Wifi scan starts automatically. (On power on, make sure that box/RPI is not connected to Ethernet). On completion of scan, a list of available networks (access points) will be visible and if no networks were found, user can try again by using the "Discover WiFi" button on screen.
On choosing a network, it will be directed to a screen with "Connect" and "OK" options. Selecting the "OK" option takes the control back to the previous screen
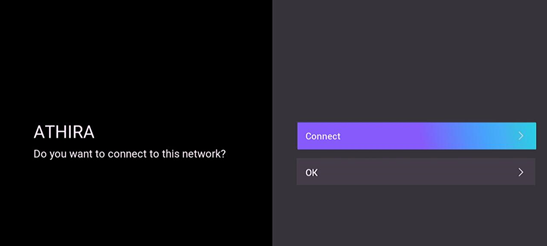
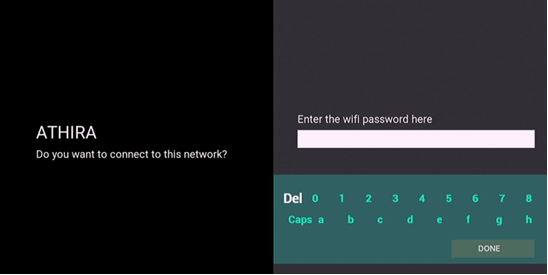
For an open network, the "Connect" option connects to the network. For a secure network, user will be prompted for the password. A numerical keyboard is implemented for this purpose. A "Done" button lets user submit the password and connect to the network and if the password is wrong, a text is provided to let the user know of the same
On successful connection, it is returned back to the previous screen with the list of available networks and user can see that the device has been connected to the desired network. On choosing the connected network from the list again, user shall be able to view the details of this network such as ssid, bssid, rate, noise, security, signal strength and frequency. It also gives the option to disconnect from this network and on disconnect a new scan starts automatically

(The above figure shows volume control UI )
The volume level of the videos played is controlled by the volume control UI which will be visible by pressing ‘Volume Up’ key. Increasing and decreasing of the volume level are done by using ‘Volume Up’ and ‘Volume Down’ keys respectively.
Following keys are used in Volume control UI:
Volume UP | To increase the volume level |
Volume Down | To decrease the volume level |
MUTE | To mute and unmute |
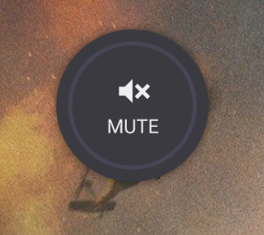
(The above figure shows the volume control UI when in mute)
Following features are not yet implemented in this release
"See All" option in VOD
Purchase option in VOD screen
Rows corresponding to fourth category onwards in VOD screen
App gets stuck randomly if we launch metro apps back to back
Only numeric keyboard is available in Wifi Settings now. User won't be able to enter passwords with alphabets
Accelerator App crash observed on launching the app in Commscope box(Not observed in RPi and Realtek devices). App crash issue observed for other app URL also (https://jira.rdkcentral.com/jira/browse/VIP7802-159)
Work around:
We were able to launch the app only after doing the following steps as a workaround-
te_rdkm_lightningui@tataelxsi.co.in
Anchor References References