Introduction
The Raspberry Pi 3 Model B+ featuring a 64-bit quad core processor running at 1.4 Ghz. R-Pi3 B+ supports the dual band 2.4GHz and 5GHz IEEE 802.11.b/g/n/ac wireless LAN which provides an high edge for the broadband developer community to test the RDK-B stack with Router, WiFi functionalities.
Build Instructions
Repo setup
In order to install Repo make sure you have a /bin directory in your home directory and that it is included in your path
| Code Block |
|---|
| language | bash |
|---|
| theme | RDark |
|---|
| title | Repo Setup Steps |
|---|
|
$ mkdir ~/bin
$ PATH=~/bin:$PATH
Download the repo tool and ensure that it is executable
$ curl http://commondatastorage.googleapis.com/git-repo-downloads/repo > ~/bin/repo
$ chmod a+x ~/bin/repo |
Note: it is also recommended to put credentials in .netrc when interacting with repo.
A sample .netrc file is illustrated below
| Code Block |
|---|
| language | bash |
|---|
| theme | RDark |
|---|
| title | .netrc |
|---|
|
machine code.rdkcentral.com
login YOUR_USERNAME
password YOUR_PASSWORD |
Yocto Build Steps
Note : RPI-3 B and B+ have same Build instructions and testing procedure
...
To build, follow below instructions
| Code Block |
|---|
| language | bash |
|---|
| theme | Midnight |
|---|
| title | Build Steps |
|---|
|
$ mkdir <workspace dir> |
...
...
$ repo init -u https://code.rdkcentral.com/r/manifests -b rdk-next -m rdkb-extsrc.xml |
...
$ repo sync -j4 --no-clone-bundle |
...
$ source meta-cmf-raspberrypi/setup-environment (Select option raspberrypi-rdk-broadband.conf) |
...
$ bitbake rdk-generic-broadband-image |
Introduction
The Raspberry Pi 3 Model B+ is the latest production Raspberry Pi 3 featuring a 64-bit quad core processor running at 1.4 Ghz. R-Pi3 B+ supports the dual band 2.4GHz and 5GHz IEEE 802.11.b/g/n/ac wireless LAN which provides an high edge for the broadband developer community to test the WiFi functionalities
Required Hardware
The equipment listed below is required for complete functionality of the standalone environment. The only devices that are tested to work properly in this solution are the specific brands and models listed below. Support for other types of equipment is not available at this time.
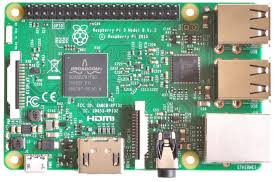 Image Removed
RPI 3B
 Image Removed
RPI 3B+
- Raspberry Pi 3 b or Raspberry Pi 3 b+ device
Standard USB keyboard
Television set/monitor with HDMI input.
Ethernet cables
USB-Ethernet Adapter
SD Card ( Preferably 8GB or more )
- Tp-link dongles
- USB to Serial Debugging Adaptor ( Needed only for serial debugging )
USB to Serial Debug converter Link and set up
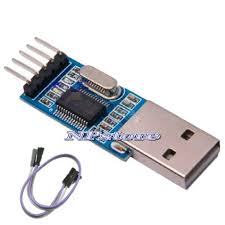 Image Removed
Purchase Link(PL2303) - USB to Serial
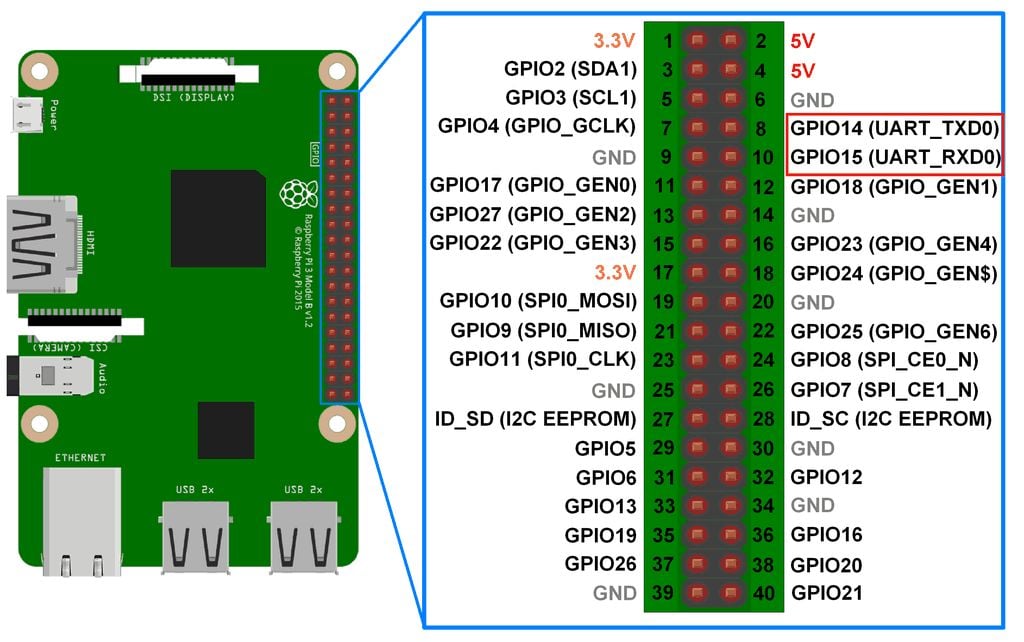 Image Removed
RPI 3 Pin Diagram
The above mentioned adaptor (PL2303) will support Linux host machine ( ubuntu ) with proper connection between RPI (for both 3B and B+) as below
- Connect GND (Pin 6) of RPI with PL2303 GND Pin
- Connect GPIO14 (Pin 8) of RPI with PL2303 RX Pin
- Connect GPIO15 (Pin 10) of RPI with PL2303 TX Pin
After connection, please run minicom in host machine to establish serial connection with RPI
https://help.ubuntu.com/community/Minicom
Note : In usual, adaptor will have device name as ttyUSB0 after connected to host PC ( can be checked using dmesg command in host ). Please configure minicom accordingly.
Dongles Information Links
...
Hardware and Setup Information
Note : RPI-3 B and B+ have same Build instructions and testing procedure
Flashing Procedure
Following command can be used to flash the RPI image to sd card using linux machine . dd tool should be available in linux
| Code Block |
|---|
| theme | Midnight |
|---|
| title | Flash command |
|---|
|
sudo dd if=<path to ImageName.rpi-sdimg> of=<path to SD card space> bs=4M
Example:
$ sudo dd if=rdk-generic-broadband-image-raspberrypi-rdk-broadband.rpi-sdimg of=/dev/sdb bs=4M |
https://www.balena.io/etcher/ can be used to flash RPI image in sd card using windows
RDK-B Bootup Sequence
 Image Added
- GwProvApp-Ethwan is the entry point for RDK-B stack middleware. It does all gateway initialization as above
- Responsible to initiate the registration of all services on boot -up. Responsible for all provisioning of LAN,FIREWALL(iptables),BRIDGE,etc
- GwProvApp-EthWan is specifically designed for Ethernet only Input feed for WAN Network Connection(i,e erouter0)
Router Profile Test Bed using RPI
 Image Added
Router Functionality Use Case - Internet connectivity for Wired and Wireless Client(s)
- Ethernet Port of RPI should be connected to WAN Network
- Connect WiFi Dongle to RPI ( Please refer to supported dongle here RDKB RPI Setup Information#DonglesInformationLinks )
- Client PC(s) should be connected to RPI through Usb2Ethernet Adaptor which should be supported by RPI ( Please refer to https://elinux.org/RPi_USB_Ethernet_adapters for supported usb to ethernet adapter by RPI ). Ethernet switch is an optional in between usb2ethernet adapter and Client PC
- Once powered on, RPI should be able to list interfaces erouter0,brlan0 and wlan0 after boot up
- Logs can be verified under /rdklogs/logs folder
- Now, client pc should be able to get private ip in the rage 10.0.0.x range
- Two radios are supported by RPI (2.4 and 5 GHz) respectively. By default following SSID's are broadcasted by RPI under respective radio
- 2.4GHz (Private WiFi)
- SSID name - "RPI3_RDKB-AP0"
- Password - "rdk@1234"
- 5 GHz (Xfinity WiFi)
- SSID name - "RPI3_RDKB-AP1"
- Password - "rdk@1234"
- Connect mobile with above default SSID name and password for respective radio. Any one radio should be used for establishing connection in mobile
- Now, mobile should be able to get private ip in the rage 10.0.0.x range
- To get Internet for both mobile and wired client pc , user should configure captive portal by accessing any url or 10.0.0.1 from mobile browser or PC browser. When RPI image is flashed for the first time captive portal will be enabled which will auto redirect to captive portal page and asks user to re-configure the default SSID name and password of radio(s) . Please refer to Captive Portal in R-Pi User Manual for more information.
- Client PC should be able to connect to internet now. Ping test can also be done by connecting gateway ip 10.0.0.1
- Since reconfiguration is done for default SSID username and password in webUI, provide the reconfigured SSID and password in mobile for reconnection with RPI
- Now, mobile and wired client pc should be able to browse the internet. Please refer to Clients Connection and its set up Diagram in RPI - User Manual for more information regarding the same for both wired and wireless connection information
- Connected client(s) PC and mobile information can be verified through webui by executing URL 10.0.0.1 in Client PC Browser and login with following credentials
- Username : admin
- Password : password
- Please refer to link Webui Functions for various features that can be controlled through webui
...
Lists of Supported Features
- DHCP Gateway Configuration
- Connected Devices (Wired/Wireless)
- Private Wifi 2g/5g
- Xfinity-wifi 2g/5g
- Parental Control(Managed Devices,Managed Sites,Managed Services)
- Port Forwarding
- Remote Management ( Available only with http support )
- DMZ
- Factory-Reset
- Captive Portal
- Password-Reset
- Test and Diagnostics
- Bridge Mode
- Webpa
- WPS
- Bootchart
- MAC Filtering
- Firewall Settings
- Log level control through EthLogAgentCcspLogAgent
- Firmware Upgrade using Dual bank
- Log Rotation Support
Supported Features User manual
Additional Links
- RDK-B Components - covers components supported by RDKB
- Utopia covers basic routing features of RDKB Webui provides the snapshot of RDKB-RPI-webui and control options for routing functionality
Yocto Modification for RDK B+ Support
- Back port of Linux kernel from sumo branch(4.14.68) to morty branch in meta-raspberrypi layer
- Modified linux-firmware bbappend in meta-raspberrypi layer to bring up wireless interface
- Modified bcm2835-bootfiles bbappend and rdk-rpi.inc (added dtb files) in meta-cmf-raspberrypi layer to boot up RPI B+ Board