RDK Resources
[*RDK Preferred*]
Code Management Facility
RDK Forums
[RDK Conferences]
RDK Support
Archives
Papers & Presentations Archive![]()
Papers & Presentations Archive![]()
...
| Component | Recommendation |
|---|---|
System/OS | Ubuntu 18.04.1 LTS 64 bit |
| Disk space | > 5GB |
| GIT | Version 2.17.1 |
| Python | 2.7x |
| Maven | 3.6.0 |
| Java/JDK | Java 8 (JDK version 1.8.0_282) |
...
We can download the latest xconfserver code from https://github.com/rdkcentral/xconfserver. The latest version of the code is available in main branch.
Create a folder
$ : mkdir xconf
Step into the folder & clone the repo
$ cd xconf/
$ git clone https://github.com/rdkcentral/xconfserver.git -b main
...
$ wget -c https://archive.apache.org/dist/cassandra/3.11.9/apache-cassandra-3.11.9-bin.tar.gz
Unpack the tarball :
$ tar -xvf  apache-cassandra-3.11.9-bin.tar.gz
$ cd apache-cassandra-3.11.9$ sudo bin/cassandra$ bin/nodetool status...
$ bin/cqlsh -f { path-to-the-schem.cql file}
eg : $ bin/cqlsh -f ~/xconf/xconfserver/xconf-angular-admin/src/test/resources/schema.cql
bin/cqlsh $ bin/cqlsh
          cqlsh>  USE "demo";

         cqlsh>  DESCRIBE KEYSPACE;
cqlsh> quit
...
        $   cd apache-cassandra-3.11.9
        $   sudo bin/cassandra
$ bin/nodetool status
Build and run steps mentioned below is based on these steps - https://github.com/rdkcentral/xconfserver#run-application.
...
$ cd ~/xconf/xconfserver
$ mvn clean install
For first time application deployment, create a "service.properties" file under the path xconfserver/xconf-angular-admin/src/main/resources/service.properties with the following contents.
The sample service.properties file will be available in xconf-angular-admin/src/test/resources/service.properties, the below content is
...
copied from the sample with a modification in cassandra port.
...
| Code Block | ||||
|---|---|---|---|---|
|
...
cassandra.keyspaceName=demo |
...
cassandra.contactPoints=127.0.0.1 |
...
cassandra.username= |
...
cassandra.password= |
...
cassandra.port=9042 |
...
cassandra.authKey= |
...
dataaccess.cache.tickDuration=60000 |
...
dataaccess.cache.retryCountUntilFullRefresh=10 |
...
dataaccess.cache.changedKeysTimeWindowSize=900000 |
...
dataaccess.cache.reloadCacheEntries=false |
...
dataaccess.cache.reloadCacheEntriesTimeout=1 |
...
dataaccess.cache.reloadCacheEntriesTimeUnit=DAYS |
...
dataaccess.cache.numberOfEntriesToProcessSequentially=10000 |
...
dataaccess.cache.keysetChunkSizeForMassCacheLoad=500 |
...
dataaccess.cache.changedKeysCfName=XconfChangedKeys4 |
$ cd cd ~/xconf/xconfserver/xconf-angular-admin
$ mvn jetty:run -DappConfig=${path-to-service-properties} -f pom.xml
For first time run only, we need to specify the path to service.properties . For the subsequent runs execute the below command in the folder xconfserver/xconf-angular-admin: mvn
$ mvn jetty:run
To run the admin UI launch it as http://<XCONF-SERVER-IP>:19093/admin/ in any browser. This will redirect to the login page.
...
If the user wants only read permissions ,then enter username and password for the login as user and user respectively.
For first time application deployment, create a "service.properties" file under the path xconfserver/xconf-dataservice/src/main/resources/service.properties with the following contents. The sample service.properties file will be available in xconf-dataservice/src/test/resources/service.properties, the below content is taken from there and modified with change in cassandra port.
| Code Block | ||||
|---|---|---|---|---|
| ||||
cassandra.keyspaceName=demo |
...
cassandra.contactPoints=127.0.0.1 |
...
cassandra.username= |
...
cassandra.password= |
...
cassandra.port=9042 |
...
cassandra.authKey= |
...
dataaccess.cache.tickDuration=60000 |
...
dataaccess.cache.retryCountUntilFullRefresh=10 |
...
dataaccess.cache.changedKeysTimeWindowSize=900000 |
...
dataaccess.cache.reloadCacheEntries=false |
...
dataaccess.cache.reloadCacheEntriesTimeout=1 |
...
dataaccess.cache.reloadCacheEntriesTimeUnit=DAYS |
...
dataaccess.cache.numberOfEntriesToProcessSequentially=10000 |
...
dataaccess.cache.keysetChunkSizeForMassCacheLoad=500 |
...
dataaccess.cache.changedKeysCfName=XconfChangedKeys4 |
$ cd cd ~xconf/xconfserver/xconf-dataservice
$ mvn jetty:run -DappConfig=${path-to-service-properties} -f pom.xml
For first time run only, we need to specify the path to service.properties . For the subsequent runs execute the below command in the folder xconfserver/xconf-dataservice:
     $    mvn jetty:run
  run
To launch the application go to http://<XCONF-SERVER-IP>:19092/queries/environments . To verify, add an entry in the environments tab of the xconf Xconf admin application and check whether the same is updated here in data service.
https://github.com/rdkcentral/xconfserver#endpoints
NOTE: To run the Admin UI and data service applications in background start jetty server as follows: nohup mvn jetty:run &
...
Below exceptions
...
may be observed during the mvn clean install . This is an exception from unit test , but the tests will run successfully.
...
Build process may stall for some time but the build will be successful and the application can be launched successfully. So it can be
...
ignored as well.
| Code Block | ||||
|---|---|---|---|---|
| ||||
[INFO] Running com.comcast.xconf.CompleteTestSuite |
...
no libsigar-amd64-linux.so in java.library.path |
...
org.hyperic.sigar.SigarException: no libsigar-amd64-linux.so in java.library.path |
...
at org.hyperic.sigar.Sigar.loadLibrary(Sigar.java:172) |
...
at org.hyperic.sigar.Sigar.<clinit>(Sigar.java:100) |
...
at org.apache.cassandra.utils.SigarLibrary.<init>(SigarLibrary.java:47) |
...
at org.apache.cassandra.utils.SigarLibrary.<clinit>(SigarLibrary.java:28) |
...
at org.apache.cassandra.service.StartupChecks$7.execute(StartupChecks.java:216) |
...
at org.apache.cassandra.service.StartupChecks.verify(StartupChecks.java:112) |
...
at org.apache.cassandra.service.CassandraDaemon.setup(CassandraDaemon.java:196) |
...
at org.apache.cassandra.service.CassandraDaemon.activate(CassandraDaemon.java:601) |
...
at org.cassandraunit.utils.EmbeddedCassandraServerHelper$1.run(EmbeddedCassandraServerHelper.java:133) |
...
at java.util.concurrent.ThreadPoolExecutor.runWorker(ThreadPoolExecutor.java:1149) |
...
at java.util.concurrent.ThreadPoolExecutor$Worker.run(ThreadPoolExecutor.java:624) |
...
at java.lang.Thread.run(Thread.java:748) |
...
Solution : This exception can be resolved by copying the .so file to the path /usr/lib.
...
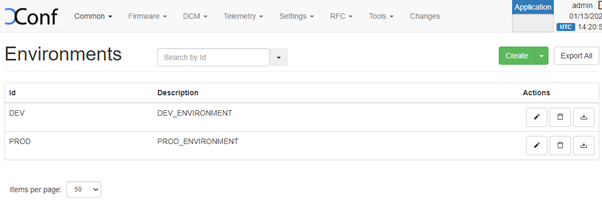
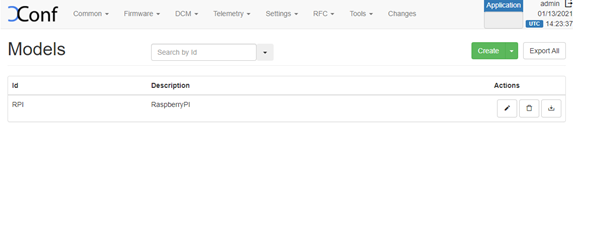
Below steps will affect all the features in xconf Xconf system and should be configured after initial setup. Go to the steps given in site navigation step and press on create button to create new entries.
| Panel | ||
|---|---|---|
| ||
|
| Panel | ||
|---|---|---|
| ||
|
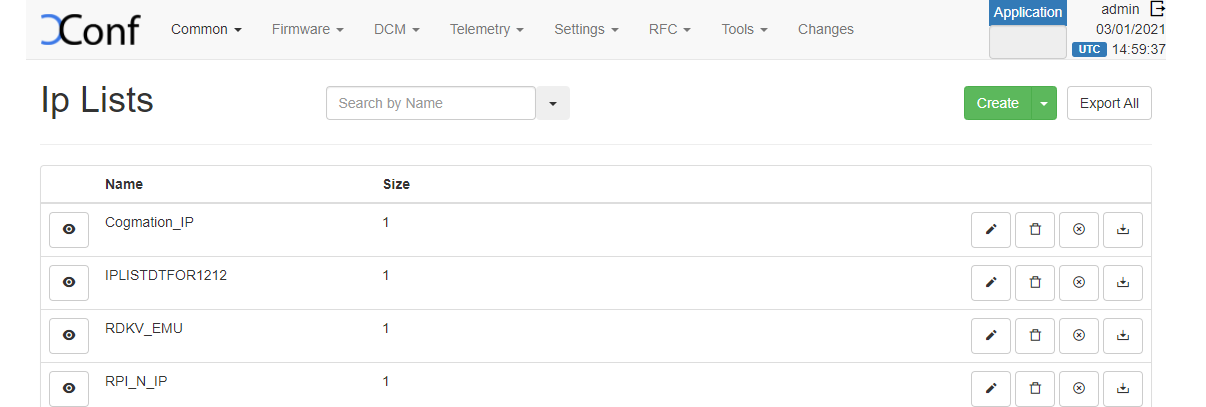
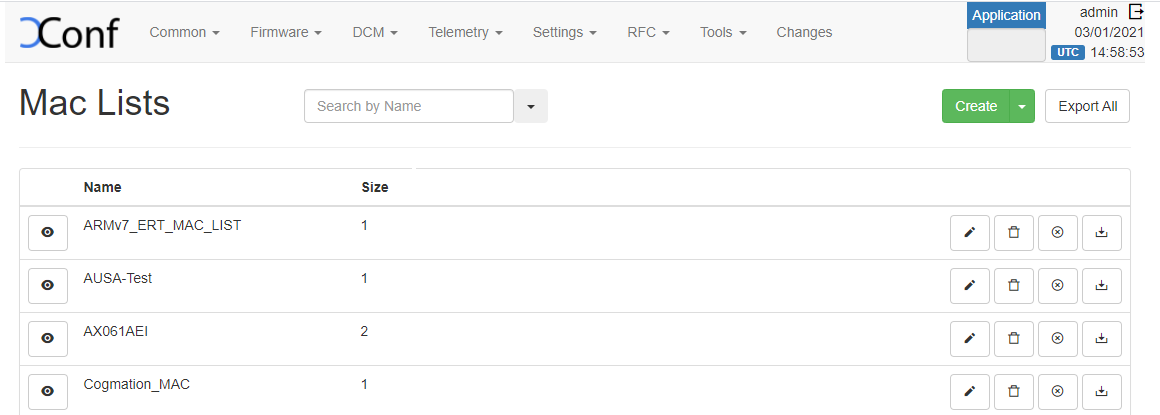
(This will be used to target certain list of MACs against a particular feature configuration)
...
| Panel | ||
|---|---|---|
| ||
 |
| Panel | ||
|---|---|---|
| ||
|
RDK Feature control configuration can be added by adding below 2 sections
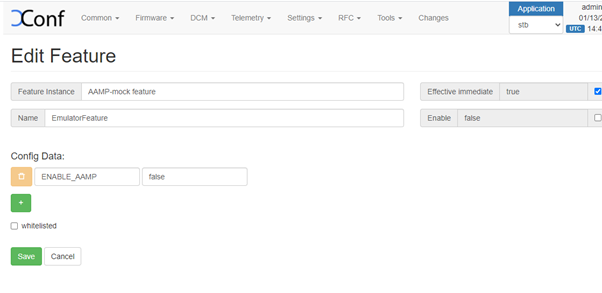
A new feature can be defined via RFC-> Feature -> Create. 'Feature Name' should be unique and understandable, 'Config data' should be key value pairs.
| Panel | ||
|---|---|---|
| ||
|
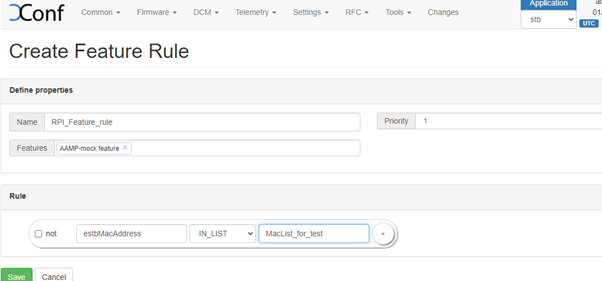
Feature rule is to map devices to a particular feature. A new feature rule can be created via RFC->feature rule -> Create
| Panel | ||
|---|---|---|
| ||
|
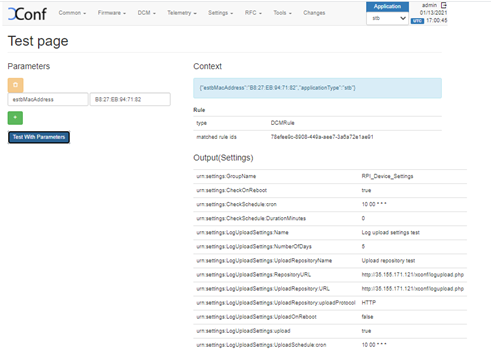
a. Verification of feature and feature rule via test page.
After creating the feature and feature rule, go to RFC->Test page and give a parameter that will match the one of the rules that you have created. Then The matched rule and the json JSON response will be displayed like similar to below example.
| Panel | ||
|---|---|---|
| ||
|
2b. Verification via curl command
The curl command mocks the request being sent from an STB like below and sample response is also given. It can be given as a curl command or as a get request via postman or browser
eg :
$ curl 'http://<XCONF_IP>:19092/featureControl/getSettings?estbMacAddress= B8:27:EB:94:71:82’
(Here the feature rule mapped to this particular mac address will be obtained)
Sample Response:
{
...
| Code Block |
|---|
{ "featureControl": { |
...
"features": [ |
...
{
...
{ "name": "EmulatorFeature", |
...
"effectiveImmediate": |
...
true, "enable": |
...
false, |
...
"configData": { |
...
"ENABLE_AAMP": "false" |
...
}, |
...
"featureInstance": "AAMP-mock feature" |
...
            }
        ]
    }
} ] } } |
Verification and setup from RPI
| CURL Command | curl 'http://<XCONF_IP>:19092/featureControl/getSettings?estbMacAddress=B8:27:EB:FF:54:95&firmwareVersion=rdk-generic-hybrid-wpe-image_default_20190702100618&env=pi&model=RPI&ecmMacAddress=B8:27:EB:FF:54:95&controllerId=2504&channelMapId=2345&vodId=15660&partnerId=&accountId=Unknown&version=2' |
|---|---|
| CPE Script (RDK-V) | /lib/rdk/RFCbase.sh |
| CPE Service (RDK-V) | /lib/systemd/system/rfc-config.service |
...
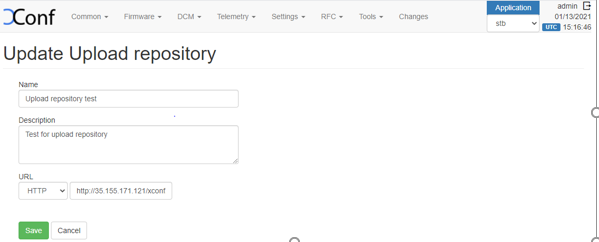
1. Create upload repository via DCM->Upload repository -> Create. Here we can add where to configure the log upload, ie i.e. the upload url URL and its protocol.
| Panel | ||
|---|---|---|
| ||
|
...
5. Edit the Log upload Setting (Create schedule & Add the upload repository created beforehand).
a.Verification of log upload settings test page.
After creating the feature and feature rule, go to DCM->Test page and give a parameter that will match the one of the formulas that you have created. Then matched rule and the settings will be displayed like below
| Panel | ||
|---|---|---|
| ||
|
2b. Verification via curl command
The curl command mocks the request being sent from an STB like below and sample response is also given. It can be given as a curl command or as a get request via postman or browser
eg :
$ curl 'http://<XCONF_IP>: 19092/loguploader/getSettings?estbMacAddress=B8:27:EB:94:71:82’.
Sample response :
| Code Block |
|---|
{ |
...
"urn:settings:GroupName": "RPI_Device_Settings", |
...
"urn:settings:CheckOnReboot": |
...
true, "urn:settings:CheckSchedule:cron": "10 00 * * *", |
...
"urn:settings:CheckSchedule:DurationMinutes": 0, |
...
"urn:settings:LogUploadSettings:Message": |
...
null, |
...
"urn:settings:LogUploadSettings:Name": "Log upload settings test", |
...
"urn:settings:LogUploadSettings:NumberOfDays": 5, |
...
"urn:settings:LogUploadSettings:UploadRepositoryName": "Upload repository test", |
...
"urn:settings:LogUploadSettings:RepositoryURL": "http://35.155.171.121/xconf/logupload.php", |
...
"urn:settings:LogUploadSettings:UploadOnReboot": |
...
false, "urn:settings:LogUploadSettings:UploadImmediately": |
...
false, "urn:settings:LogUploadSettings:upload": |
...
true, "urn:settings:LogUploadSettings:UploadSchedule:cron": "10 00 * * *", |
...
"urn:settings:LogUploadSettings:UploadSchedule:levelone:cron": |
...
null, "urn:settings:LogUploadSettings:UploadSchedule:leveltwo:cron": |
...
null, "urn:settings:LogUploadSettings:UploadSchedule:levelthree:cron": |
...
null, "urn:settings:LogUploadSettings:UploadSchedule:DurationMinutes": 0, |
...
"urn:settings:VODSettings:Name": |
...
null, "urn:settings:VODSettings:LocationsURL": |
...
null, "urn:settings:VODSettings:SRMIPList": |
...
null } |
| CURL Command | curl 'http://<XCONF_IP>:19092/loguploader/getSettings?estbMacAddress=B8:27:EB:FF:54:95&firmwareVersion=rdk-generic-hybrid-wpe-image_default_20190702100618&env=dev&model=RPI&ecmMacAddress=B8:27:EB:FF:54:95&controllerId=2504&channelMapId=2345&vodId=15660&timezone=&partnerId=&accountId=Unknown&version=2' |
|---|---|
| CPE Script (RDK-V) | /lib/rdk/StartDCM.sh /lib/rdk/DCMscript.sh |
| CPE Service (RDK-V) | /lib/systemd/system/dcm-log.service |
...
| Panel | ||
|---|---|---|
| ||
|
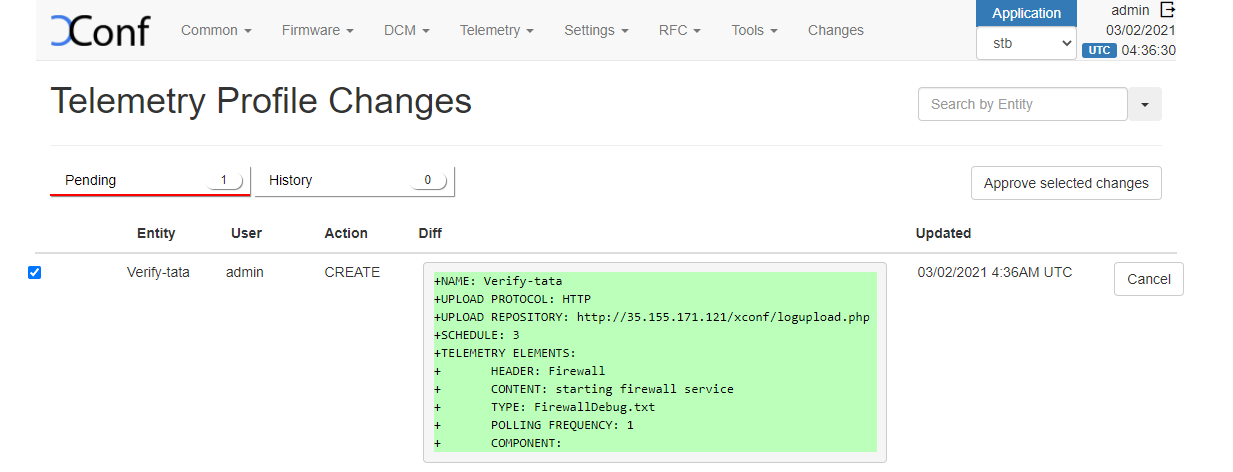
3. Create Create targeting rule via Telemetry -> Targeting rules. Targeting rules is to map the profiles with rules.
| Panel | ||
|---|---|---|
| ||
|
a. Verification of telemetry test page.
After creating the permanent profile and targeting rules, go to Telemetry->Test page and give a parameter that will match the one of the rule that you have created. Then matched rule will be displayed like below.
| Panel | ||
|---|---|---|
| ||
|
2b. Verification via curl command
The curl command mocks the request being sent from an STB like below and sample response is also given. It can be given as a curl command or as a get request via postman or browser. The same url used for logupload verification is used here, the response will have telemetry settings data like below (urn:settings:TelemetryProfile)
eg :
$ curl 'http://<XCONF_IP>: 19092/loguploader/getSettings?estbMacAddress=B8:27:EB:94:71:82’
Sample Response :
| Code Block |
|---|
{ |
...
"urn:settings:GroupName": "RPI_Device_Settings", |
...
"urn:settings:CheckOnReboot": |
...
true, "urn:settings:CheckSchedule:cron": "10 00 * * *", |
...
"urn:settings:CheckSchedule:DurationMinutes": 0, |
...
"urn:settings:LogUploadSettings:Message": |
...
null, |
...
"urn:settings:LogUploadSettings:Name": "Log upload settings test", |
...
"urn:settings:LogUploadSettings:NumberOfDays": 5, |
...
"urn:settings:LogUploadSettings:UploadRepositoryName": "Upload repository test", |
...
"urn:settings:LogUploadSettings:RepositoryURL": "http://35.155.171.121/xconf/logupload.php", |
...
"urn:settings:LogUploadSettings:UploadOnReboot": |
...
false, "urn:settings:LogUploadSettings:UploadImmediately": |
...
false, "urn:settings:LogUploadSettings:upload": |
...
true, "urn:settings:LogUploadSettings:UploadSchedule:cron": "10 00 * * *", |
...
"urn:settings:LogUploadSettings:UploadSchedule:levelone:cron": |
...
null, "urn:settings:LogUploadSettings:UploadSchedule:leveltwo:cron": |
...
null, "urn:settings:LogUploadSettings:UploadSchedule:levelthree:cron": |
...
null, "urn:settings:LogUploadSettings:UploadSchedule:DurationMinutes": 0, |
...
"urn:settings:VODSettings:Name": |
...
null, "urn:settings:VODSettings:LocationsURL": |
...
null, "urn:settings:VODSettings:SRMIPList": |
...
null, |
...
"urn:settings:TelemetryProfile": { |
...
"id": "b160a5a8-c753-4e71-b267-992965a4437b", |
...
"telemetryProfile": [ |
...
{ |
...
"header": "Firewall", |
...
"content": "starting firewall service", |
...
"type": "FirewallDebug.txt", |
...
"pollingFrequency": "1" |
...
}
...
} ], |
...
"schedule": "5", |
...
"expires": 0, |
...
"telemetryProfile:name": "Permanent profile test", |
...
"uploadRepository:URL": "http://35.155.171.121/xconf/logupload.php", |
...
"uploadRepository:uploadProtocol": "HTTP" |
...
} |
...
} |
| CURL Command | curl 'http://<XCONF_IP>:19092/loguploader/getSettings?estbMacAddress=B8:27:EB:FF:54:95&firmwareVersion=rdk-generic-hybrid-wpe-image_default_20190702100618&env=dev&model=RPI&ecmMacAddress=B8:27:EB:FF:54:95&controllerId=2504&channelMapId=2345&vodId=15660&timezone=&partnerId=&accountId=Unknown&version=2' |
|---|---|
| CPE Script (RDK-V) | /lib/rdk/DCMscript.sh /lib/rdk/dca_utility.sh |
| CPE Service (RDK-V) | /lib/systemd/system/dcm-log.service |
...
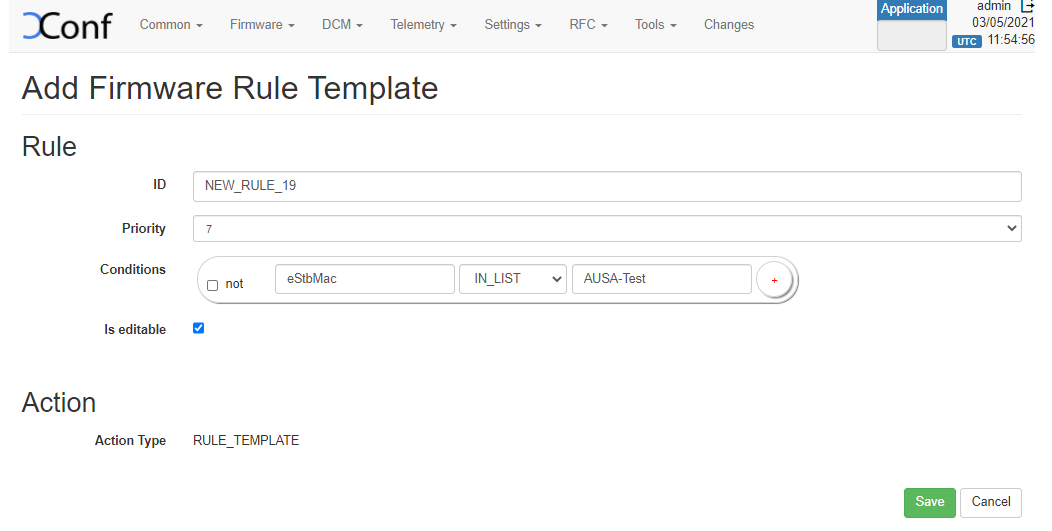
2. To create a firmware template, go to Firmware → Firmware templates. Enter the ID name. Select priority from the 'Priority' drop down menu. Add conditions
| Panel | ||
|---|---|---|
| ||
|
...
3. Firmware rule can be create via Firmware -> Firmware rules -> Create. On clicking on Create button, a list of templates will be presented. We can select the required template (There will be default templates like ENV_MODEL_RULE, IP_RULE, MAC_RULE etc. and also the custom templates created from Firmware->Firmware template -> Create).
| Panel | ||
|---|---|---|
| ||
|
...
We can import and export all the configuration data from the UI itself. This feature can be primarily used for transferring the configuration data from one xconfserver setup to the other one.
The export and import data need to be done separately for the Application - stb, xhome , and rdkcloud and sky for all the pages except those in Common tab.
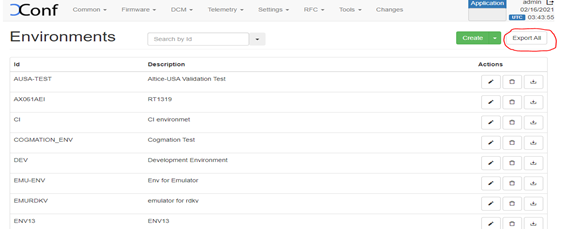
To export data from a page, Click on ‘Export All’ button in that page. The configuration data will be downloaded as a json JSON file.
To import data :
...