RDK Resources
[*RDK Preferred*]
Code Management Facility
RDK Forums
[RDK Conferences]
RDK Support
Archives
Papers & Presentations Archive![]()
Papers & Presentations Archive![]()
...
Below table lists are the components/code used with the RDK Alexa solution and the origin/owner for distribution. components
...
...
| Module | Artifact Name | Purpose | Location | CurrentVersion | Owned by |
|---|---|---|---|---|---|
| AVS SDK | wpe-alexa-lib.bb | Build support for AVS Device SDK | CMF Hosted (meta-rdk-voice) | 1.15 | RDKM |
| avs-device-sdk | Source code for AVS Device SDK | https://github.com/aws/aws-sdk-cpp | Amazon | ||
| RDK Skill Mapper | skillmapper.bb | Build support for skill mapper module | CMF Hosted (meta-rdk-voice) | RDKM | |
| alexa_skill_mapper | RDK component to:
| CMF Hosted | RDKM | ||
| AWS SDK | aws-cpp-sdk.bb | Build support for AWS CPP SDK module | CMF Hosted (meta-rdk-voice) | RDKM | |
| aws-cpp-sdk | Provides APIS to integrate AWS services such as SQS, Lambda, cognito etc. to RDK client devices. | https://github.com/aws/aws-sdk-cpp | 1.6.53 | Amazon | |
| KWD Detector | pryonlite_2.3.0.bb | Build support for Amazon KWD engine. | CMF Hosted (meta-rdk-voice) | RDKM | |
| PryonLite pre-built library | Provides a Wake Word Engine that can be used with the Alexa plugin. This is useful for devices with far-field/microphone. | Distributed by Amazon | 2.3.0 | Amazon | |
| AVS Plugin | wpeframework-plugins.bb | Build support for the Amazon voice thunder plugin | Hosted in rdkcentral GitHub | RDKM | |
| thunder-services.bb | Build support for the AVS plugin with RDK services | CMF Hosted | RDKM | ||
| AVS plugin | Amazon voice thunder plugin for Alexa service, uses AVS SDK & smart screen SDK APIS as part of the implementation | Hosted in Metrological GitHub | Metrological | ||
| Lambda Demo code | lambda-code.zip | Reference implementation for receiving video skill directives from Alexa and routing it to the RDK device. Uses lambda & SQS services. | For Reference Only | ||
| AVS Smart Screen SDK | alexa-ss-sdk_git.bb | Main recipe to build Alexa smart screen SDK | CMF Hosted (meta-rdk-voice) | RDKM | |
| alexa-smart-screen | Source code for the smart screen SDK | https://github.com/alexa/alexa-smart-screen-sdk/ | 2.0.1 | Amazon | |
| avs-voice-chrome | Source code to add voice chrome support over smart screen UI | Distributed by Amazon | 2.1 | Amazon | |
| APL Core | apl-core_git.bb | Recipe to build Alexa Presentation Language | CMF Hosted (meta-rdk-voice) | RDKM | |
| APL Core Library | Source code for rendering of screen layouts at runtime for the Alexa Presentation Language | https://github.com/alexa/apl-core-library | 1.2 | Amazon | |
| WebSocket++ | websocketpp_0.8.1.bb | Recipe to build the C++ websocket client library | CMF Hosted (meta-rdk-voice) | RDKM | |
C++ websocket client/server library | https://github.com/zaphoyd/websocketpp | 0.8.1 | Open source | ||
...
| ASIO | asio_1.10.6.bb | recipe to build C++ Network library | meta-openembedded | 1.10.6 | Open source |
| Feature | Handler | How to? |
|---|---|---|
| General skills | Alexa | Audio will be played for generic skills such as time, news and weather |
| Youtube | Alexa → Cobalt |
| Command will be routed to Thunder | |
App Launch (metrological codebase) | Alexa → UX |
| Command will be routed |
| from skill mapper To UX browser via Controller | ||
App Launch (Firebolt codebase) | Alexa → RDK Shell → LightningApp | Commands routed from skill mapper to LightningApp or HtmlApp browser instances via RDK Shell |
| Google search | Alexa → UX | Interactive command handled by Alexa and routed to Thunder |
| Player controls | Alexa → App | Play/pause/back commands routed to app |
| Smart Screen UI | AVS Plugin → WebKitbrowser | Invoked by AVS plugin & UI launched using WebKit browser instance |
Please refer to below page on integrating the Alexa Video Skill Kit with RDK
...
| Code Block |
|---|
1. Initialize and download the code base - Example for RaspberryPi: $ repo init -u https://code.rdkcentral.com/r/manifests -m rdkv-nosrc.xml -b thunder-next $ repo sync 2. Download the meta-rdk-voice layer in project root $ git clone https://code.rdkcentral.com/r/components/generic/rdk-oe/meta-rdk-voice 3. Enable the below DISTRO feature to build AVS plugin $ vi meta-rdk-voice/conf/layer.conf - enable the below commented line #DISTRO_FEATURES_append = " alexa-plugin" 4. Optionally if wanted to use MIC based implementation (Ignore if using BLE voice remote) $ vi meta-rdk-voice/conf/layer.conf - enable the below commented line #DISTRO_FEATURES_append = " alexa_ffv" 5. - ToFollow usethe pryonsection lite(Enable KWDKeyword engineDetector) for devicesusing withamazon MICprovided input Note: Source code need to be obtained from amazon separately a. Set the KWD support flag to "ON" in meta-rdk-voice/recipes-wpe/wpeframework/include/avs.inc b. include the KWD detector recipe to build. - enable the commented line #PREFERRED_PROVIDER_virtual/alexa-kwd-detector = "pryonlite" # Please follow the steps mentioned in section #3.2 to enable USB audio kernel parameters (Not required for RaspberryPI). 5. Optionally For the external source builds (such as some Broadcom platforms) add below line in manifest/auto.conf - In <Manifest>.xml <project name=KWD # Please follow the steps mentioned in section #3.2 to enable USB audio kernel parameters (Not required for RaspberryPI). 5. Optionally For the external source builds (such as some Broadcom platforms) add below line in manifest/auto.conf - In <Manifest>.xml <project name="components/generic/avs/alexa_skill_mapper" revision="rdk-next"/> - In auto.conf (where brcmexternalsrc is enabled) BRCMEXTERNALSRC_pn-wpe-alexa += "components/generic/avs/alexa_skill_mapper" revision="rdk-next"/> - In auto.conf (where brcmexternalsrc is enabled) BRCMEXTERNALSRC_pn-wpe-alexa += "components/generic/avs/alexa_skill_mapper" SRCPV_pn-wpe-alexa = "${BRCMEXTERNAL-SRCPV-CMF}" $ repo sync 6 .Build the image target - Example for RaspberryPi $ source meta-cmf-raspberrypi/setup-environment ### select meta-cmf-raspberrypi/conf/machine/raspberrypi-rdk-hybridthunder-thundermc.conf ### $ bitbake rdk-generic-hybrid-thundermediaclient-image |
| Code Block |
|---|
1. Initialize and download the code base - Example for RaspberryPi: $ repo init -u https://code.rdkcentral.com/r/manifests -m rdkv-nosrc.xml -b thunder-next $ repo sync 2. Download the meta-rdk-voice layer in project root $ git clone https://code.rdkcentral.com/r/components/generic/rdk-oe/meta-rdk-voice 3. AddOptionally if wanted to BBLAYERSuse MIC based implementation (Ignore if using BLE voice remote) $ vi meta-rdk-voice/conf/bblayerslayer.conf.sample BBLAYERS += "${@'${RDKROOT}/meta-rdk-voice' if os.path.isfile('${RDKROOT}/meta-rdk-voice/conf/layer.conf') else ''}" 4. Optionally if wanted to use MIC based implementation (Ignore if using BLE voice remote) $ vi meta-rdk-voice/conf/layer.conf - enable the below commented line #DISTRO_FEATURES_append = " alexa_ffv" # Please follow the steps mentioned in section #3.2 to enable USB audio kernel parameters (Not required for RaspberryPI). 5. Optionally For the external source builds (such as some Broadcom platforms) add below line in manifest/auto.conf - In <Manifest>.xml <project name= - enable the below commented line #DISTRO_FEATURES_append = " alexa_ffv" # Please follow the steps mentioned in section #3.2 to enable USB audio kernel parameters (Not required for RaspberryPI). 4. Optionally For the external source builds (such as some Broadcom platforms) add below line in manifest/auto.conf - In <Manifest>.xml <project name="components/generic/avs/alexa_skill_mapper" revision="rdk-next"/> - In auto.conf (where brcmexternalsrc is enabled) BRCMEXTERNALSRC_pn-wpe-alexa += "components/generic/avs/alexa_skill_mapper" revision="rdk-next"/> - In auto.conf (where brcmexternalsrc is enabled) BRCMEXTERNALSRC_pn-wpe-alexa += "components/generic/avs/alexa_skill_mapper::git/VoiceToApps" SRCPV_pn-wpe-alexa = "${BRCMEXTERNAL-SRCPV-CMF}" $ repo sync 65 .Build the image target - Example for RaspberryPi $ source meta-cmf-raspberrypi/setup-environment ### select meta-cmf-raspberrypi/conf/machine/raspberrypi-rdk-hybridthunder-thundermc.conf ### $ bitbake rdk-generic-hybridmediaclient-thunder-image |
...
| Code Block |
|---|
Note: This configuration is not required for RaspberryPi platforms
# If FFV profile is enabled (DISTRO_FEATURES_append = " alexa_ffv") & we want to simulate audio input using a USB mic the below kernel configuration need to be enabled for non RPI platforms:

CONFIG_SND_HWDEP=m
CONFIG_SND_RAWMIDI=m
CONFIG_SND_USB_AUDIO=m

# After enabling the above kernel configs, recompile the kernel so that the support for USB audio will be enabled |
DISTRO Features : alexa_smart_screen
DISTRO Features: voice-chrome
Please refer the wiki link AVS Developer Account and Skill Creation Guidelines for RDK for creating a developer account.
Modify below section to map with relevant developer account.
| Code Block |
|---|
1. Login to the device
 $ ssh root@<RDKV-Client-IP>

2. Edit the Configuration file
 $ cd /home/root
 $ vi Alexa_SDK/Integration/AlexaClientSDKConfig.json
     "deviceInfo":{
        // Unique device serial number. e.g. 123456
        "deviceSerialNumber":"<SERIAL_NO>",
        // The Client ID of the Product from developer.amazon.com
        "clientId":"<CLIENT_ID>",
        // Product ID from developer.amazon.com
        "productId":"<PRODUCT_ID>",
        // The name of the device manufacturer.
        "manufacturerName": "<MANUFACTURER_NAME>",
        // The description of the device which should contain the manufacturer name or how the device is connected.
        "description": "<DESCRIPTION"
}, |
Prerequisite : Alexa Client uses IOConnector plugin to set different LED notifications, so IOConnector need to be enabled for the platform
https://github.com/rdkcentral/ThunderNanoServices/tree/master/IOConnector
| Code Block |
|---|
$ cd /home/root
$ vi Alexa_SDK/Integration/AlexaCurl.json
Set below GPIO to appropriate value
   "PinOne":"9",
   "PinTwo":"10",
   "PinThree":"11"

Example: For RaspberryPi we can use the Traffic light LED where GPIO PIN 9, 10, 11 represents the Red, Yellow & Green LEDS |
| Note |
|---|
|
This Feature consists two mode "General Mode" and "Skill Mode",
One can switch from the "General Mode" to "Skill Mode" by using steps mentioned in the section "skill invocation enable" and you can switch back to "General Mode" following the steps in the section "skill invocation disable".
Note: By default when device is booted it will be in the general mode
...
1. To use pryon lite KWD engine for devices with MIC input
 Note: Source code need to be obtained from amazon separately
2. Set the KWD support flag to "ON"
  $ vi meta-rdk-voice/recipes-wpe/wpeframework/include/avs.inc
    AVS_KWD_SUPPORT ?= "ON"
3. include the KWD detector recipe to build.
 - enable the commented line
 #PREFERRED_PROVIDER_virtual/alexa-kwd-detector = "pryonlite"
4. Create a bbappend file in platform layer and provide artifact location
e.g.
 $ vi meta-rdk-oem-<OEMNAME>/meta-<MACHINE>/recipes-avs/pryonlite/pryonlite_2.3.0.bbappend
SRC_URI = "file://pryon_lite_2.3.0-metrological-2019.12.23.2344.zip" |
| Code Block |
|---|
# If FFV profile is enabled (DISTRO_FEATURES_append = " alexa_ffv") & we want to simulate audio input using a USB mic the below kernel configuration need to be enabled for the platforms:

CONFIG_SND_HWDEP=m
CONFIG_SND_RAWMIDI=m
CONFIG_SND_USB_AUDIO=m

# After enabling the above kernel configs, recompile the kernel so that the support for USB audio will be enabled |
| Code Block |
|---|
$ vi meta-rdk-voice/conf/layer.conf
 - enable the below commented DISTRO_FEATURE
#DISTRO_FEATURES_append = " alexa_smart_screen" |
| Code Block |
|---|
1. Enable DISTRO options
$ vi meta-rdk-voice/conf/layer.conf
 - enable the below commented DISTRO_FEATURE
  #DISTRO_FEATURES_append = " voice-chrome"
2. Provide artifact location
 - Add an .bbappend file for alexa-ss-sdk and over-write the SRC_URI
e.g.
 $ vi meta-rdk-oem-OEMNAME/meta-<MACHINE>/recipes-avs/alexa-smart-screen/alexa-ss-sdk_git.bbappend
   SRC_URI_remove = "https://operator-artifact-url.com/location/SmartScreenSDKVoiceChrome-2.1.tar;name=voicechrome;subdir=voicechrome"
SRC_URI += "file://SmartScreenSDKVoiceChrome-2.1.tar;name=voicechrome;subdir=voicechrome" |
How to run the service
You should already have a developer account, Please refer the wiki link AVS Developer Account and Skill Creation Guidelines for RDK for creating a developer account.
Modify below section to map with relevant developer account.
| Code Block |
|---|
1. Login to the device
 $ ssh root@<RDKV-Client-IP>

2. Edit the Configuration file
 $ cd /usr/share/WPEFramework/AVS
 $ vi AlexaClientSDKConfig.json
     "deviceInfo":{
        // Unique device serial number. e.g. 123456
        "deviceSerialNumber":"<SERIAL_NO>",
        // The Client ID of the Product from developer.amazon.com
        "clientId":"<CLIENT_ID>",
        // Product ID from developer.amazon.com
        "productId":"<PRODUCT_ID>",
        // The name of the device manufacturer.
        "manufacturerName": "<MANUFACTURER_NAME>",
        // The description of the device which should contain the manufacturer name or how the device is connected.
        "description": "<DESCRIPTION"
}, |
| Note |
|---|
|
Prerequisite : Alexa Client uses IOConnector plugin to set different LED notifications, so IOConnector need to be enabled for the platform
https://github.com/rdkcentral/ThunderNanoServices/tree/master/IOConnector
| Code Block |
|---|
$ cd /home/root
$ vi Alexa_SDK/Integration/AlexaCurl.json
Set below GPIO to appropriate value
   "PinOne":"9",
   "PinTwo":"10",
   "PinThree":"11"

Example: For RaspberryPi we can use the Traffic light LED where GPIO PIN 9, 10, 11 represents the Red, Yellow & Green LEDS |
How To give voice Input:
This Feature can be divided as : General skills , Custom Skills Or Video Skill,
One can switch from the "General Mode" to "Skill Mode" by using steps mentioned in the section "skill invocation enable" and you can switch back to "General Mode" following the steps in the section "skill invocation disable".
Note: By default when device is booted it will be in the general mode
On first time launch, we need to authorize the device with a amazon account. This steps will not be required for subsequent application launch.
We can check the authorization code using below command:
$ systemctl status alexa
$ tail -f /opt/logs/wpeframework.log
We will be able to see a message similar to below format. Note the code that appears in console window, this will be required while authorizing with developer account.
| Code Block |
|---|
##################################
#       NOT YET AUTHORIZED       #
##################################
#       To authorize, browse to: 'https://amazon.com/us/code' and enter the code: EXEA99
###############################################################
#       Checking for authorization (1)...       #
################################################# |

Note: If there is a prompt for OTP at this stage, Get it from linked phone number.
| Code Block |
|---|
########################################
#       Alexa is currently idle!       #
######################################## |
At this stage, we can provide voice commands to Alexa.
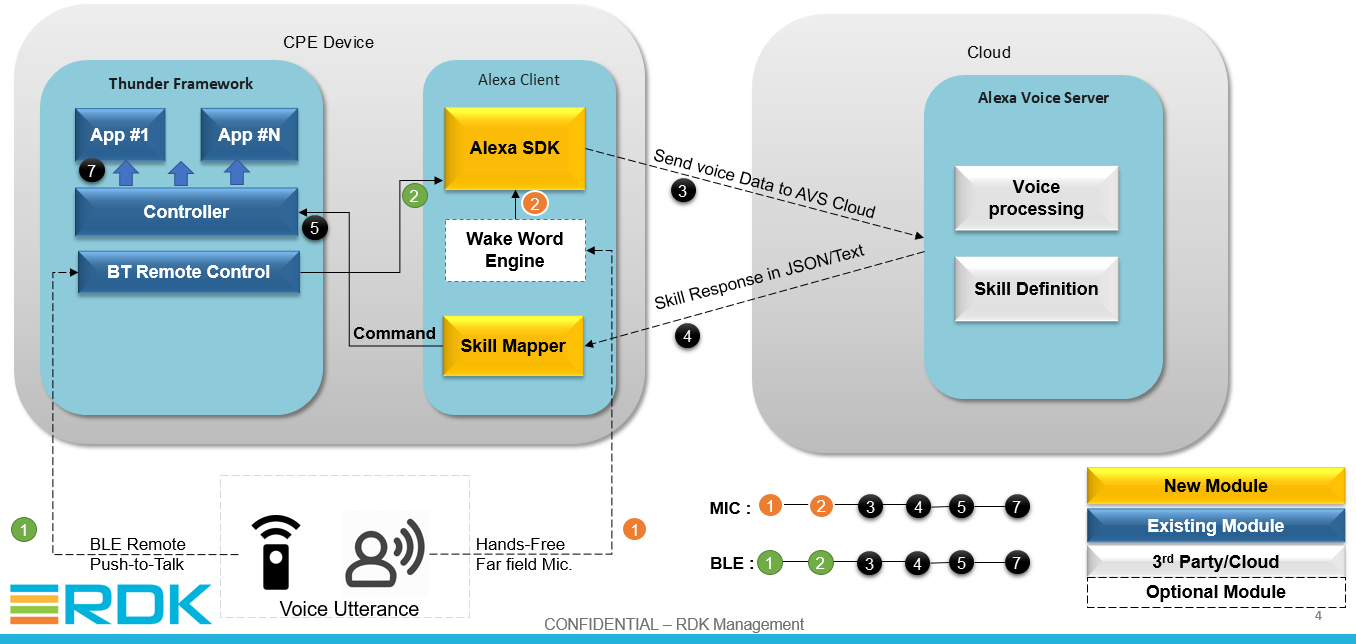
The Alexa Smart Screen SDK extends the AVS Device SDK to support visual display for screen-based Alexa Built-in products that complement Alexa voice responses with rich visual experiences.
The Alexa Smart Screen implementation for RDK involves below components:
Below are few screen shots which gives an idea about the smart screen integration for different scenarios:
a) Weather Information:
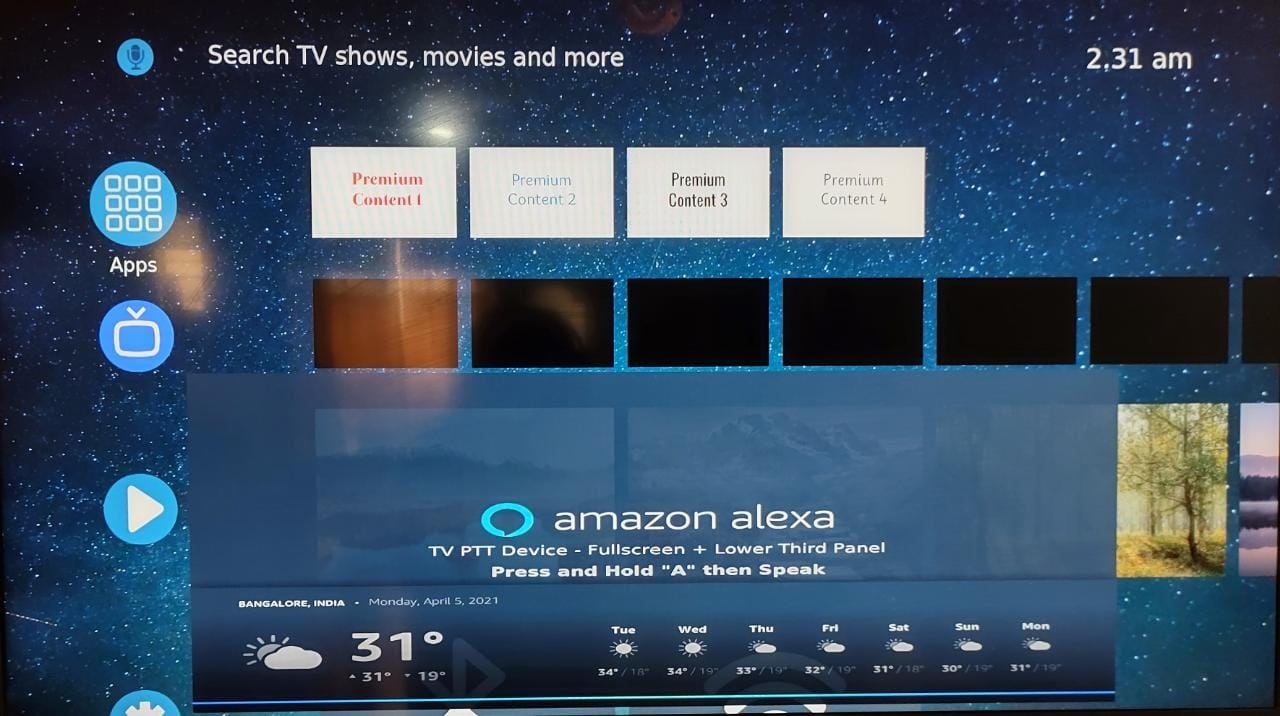
b) Music Playback

a) General Usage
ex: 1) User: what is the the time?
Alexa: respond with current time
2) User : what is the weather outside ?
Alexa: it will ask for you location
User: Provides the Location
On first time launch, we need to authorize the device with a amazon account. This steps will not be required for subsequent application launch.
We can check the authorization code using below command:
$ systemctl status alexa
$ tail -f /opt/logs/wpeframework.log
We will be able to see a message similar to below format. Note the code that appears in console window, this will be required while authorizing with developer account.
| Code Block |
|---|
##################################
#       NOT YET AUTHORIZED       #
##################################
#       To authorize, browse to: 'https://amazon.com/us/code' and enter the code: EXEA99
###############################################################
#       Checking for authorization (1)...       #
################################################# |
Note: If there is a prompt for OTP at this stage, Get it from linked phone number.
| Code Block |
|---|
########################################
#       Alexa is currently idle!       #
######################################## |
At this stage, we can provide voice commands to alexa.
a) General Usage
ex: 1) User: what is the the time?
Alexa: respond with current time
2) User : what is the weather outside ?the climate in the current location.
In case smart screen support enabled, the overlay will render the weather tiles.
b) Using video skill launch application
ex: 1) Launching YouTube
Alexa: it will ask for you location User: Alexa, Launch YouTube
User: if give the Location Alexa: Getting Youtube from Accelerator
Alexa: respond with the climate in the current location.Output: Youtube is launched on the device
cb) Using the custom skill to Launching Metro Applications
...
...
| Feature | Status |
|---|---|
| Upgrade Alexa SDKs to latest version: ADSDK (1.21), Smart Screen (2.5) | Planned in April-21 Sprint |
| Extending support to 2 new platforms | Planned for next sprint |
| Context specific functionalities | Planned support for some apps initially |
| Multi room Music | Open |
...