Versions Compared

Key

  • This line was added.
  • This line was removed.
  • Formatting was changed.

...

  1. Open XAMPP Control Panel and Click the Start button for Apache and MySQL modules
     Image RemovedImage Added

  2. Click on the Admin button on the MySQL module to launch the phpMyAdmin dashboard on browser
    Image RemovedImage Added


  3. Follow the steps given below for Importing Database through phpMyAdmin page
    1. Click on the Import tab in the top menu of phpMyAdmin dashboard
      Image RemovedImage Added
    2. Click on Choose File then select the shared database zip file (accelerator.sql.zip) and click on Go button to import the database
      Image Removed
      Image Added 
    3. Click on the accelerator Database from the side bar to verify the Database tables

  4. Configure the XAMPP Tomcat server by following the steps below 
    1. Copy the war file attached (CustomUI.war) and paste the same inside  “xampp\tomcat\webapps”
    2. Start Tomcat in XAMPP Control Panel and click on the Admin button next to the start button to view the tomcat server home page in the browser 
      Image RemovedImage Added

Client setup 

The steps to connect to the server is given below: 

...

  1. Click on the customer_list Table from the list of tables available inside accelerator database as shown below.Image RemovedImage Added
  2. Click the Insert button to insert the contents in the Table and enter the data in the respective fields.

...

           customer_logo -> path of required logo (/static/images/info/Logo.png) 

Image RemovedImage Added


2. Steps to Enable a Premium App for a customer 

  1. Click on the customer_menu_app_list table through phpMyAdmin page.
    Image Removed
    Image Added
  2. Click on the Insert button to add Customer data.
  3. Premium apps feature in main menu of Accelerator UI app can be enabled by setting 6 in the menu_id field.
    [6 here refers to the Premium app content against that customer id]
  4. Individual Premium apps in the Accelerator UI app can be enabled by setting the app_id field.
    [values for app_id can be referred from app_list table, see picture below with YouTube is 1, Netflix is 2 etc]
    Image Removed
    Image Added 

e.g. For enabling YouTube in first position 
      click on customer_menu_app_list -> click on insert 
      ->Add → menu_id : 6 
                 → app_id : 1 
                 → app_position :1 
                 →customer_id : boxid (serial_number) 

...

  1. Click on the customer_menu_app_list table. 
    Image Removed
    Image Added
  2. Click on the Insert button to add Customer data .
  3. Metro apps feature can be enabled by setting 7 in the menu_id field.
    [7 here refers to the Metro app content in 
    menu_list table] 
     
  4. Individual Metro apps can be enabled by setting the value in app_id field.
    [values for 
    app_id can be referred from app_list table] 
     

...

  1. Click on the customer_recommended_list table through phpMyAdmin page. Image Added
  2. Click on the Insert button to add Customer data. 
  3. Recommended For You content in main menu of demo app can be added for a particular customer by setting the required recommended_content_id against that customer_id.
    [values of
     
    recommended_content_id  can be referred from recommended_list table, see the picture below]

...

  1. Image Added

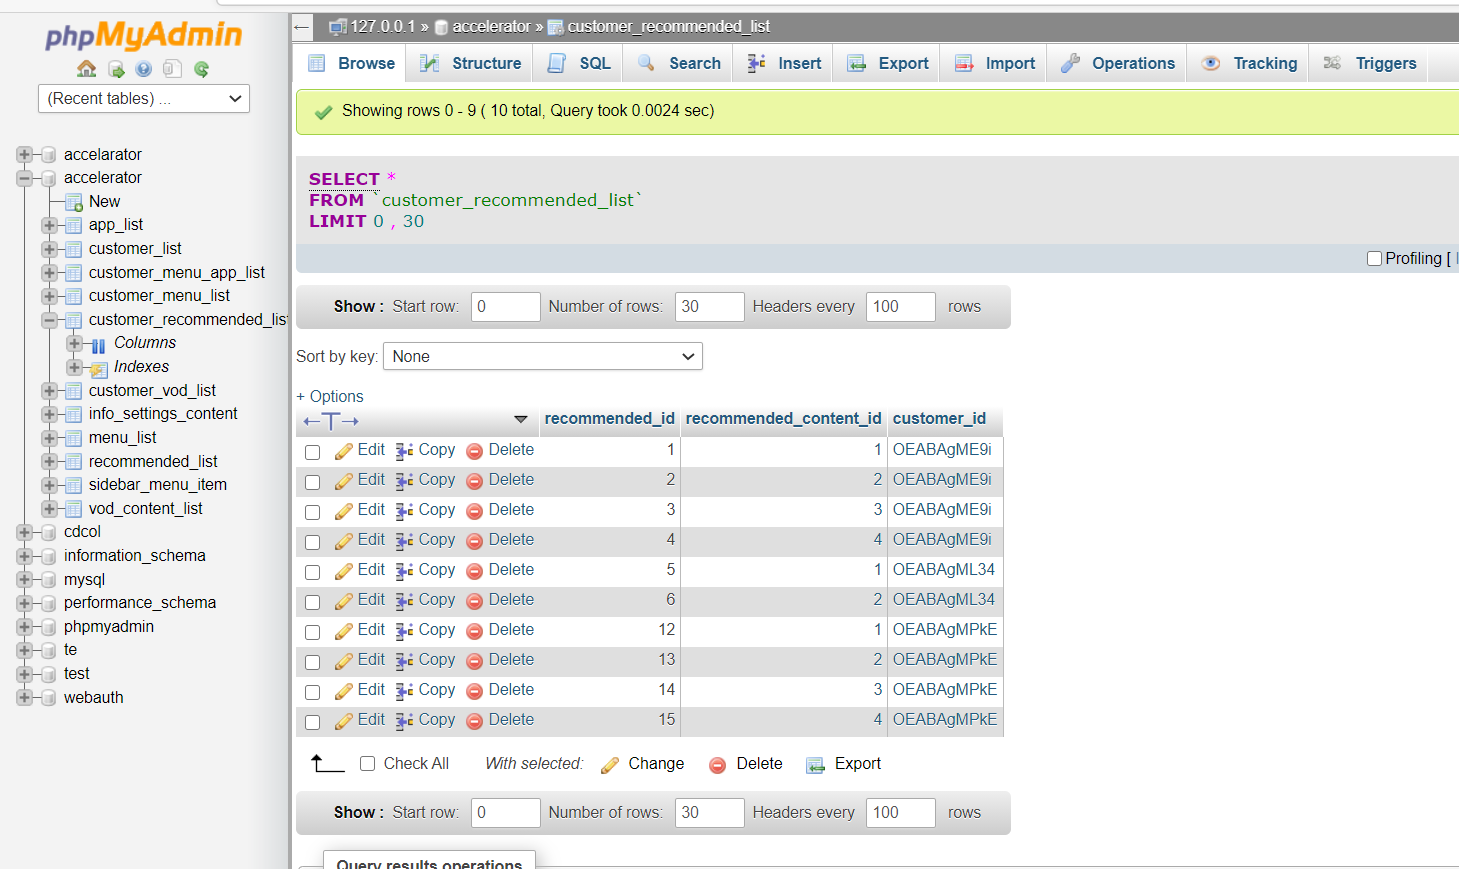
eg. For enabling Tears of steel.
     click on customer_recommended_list→  click on insert  
     → Add → recommended_content_id : 1 
                → customer_id : boxid (serial_number) 

...

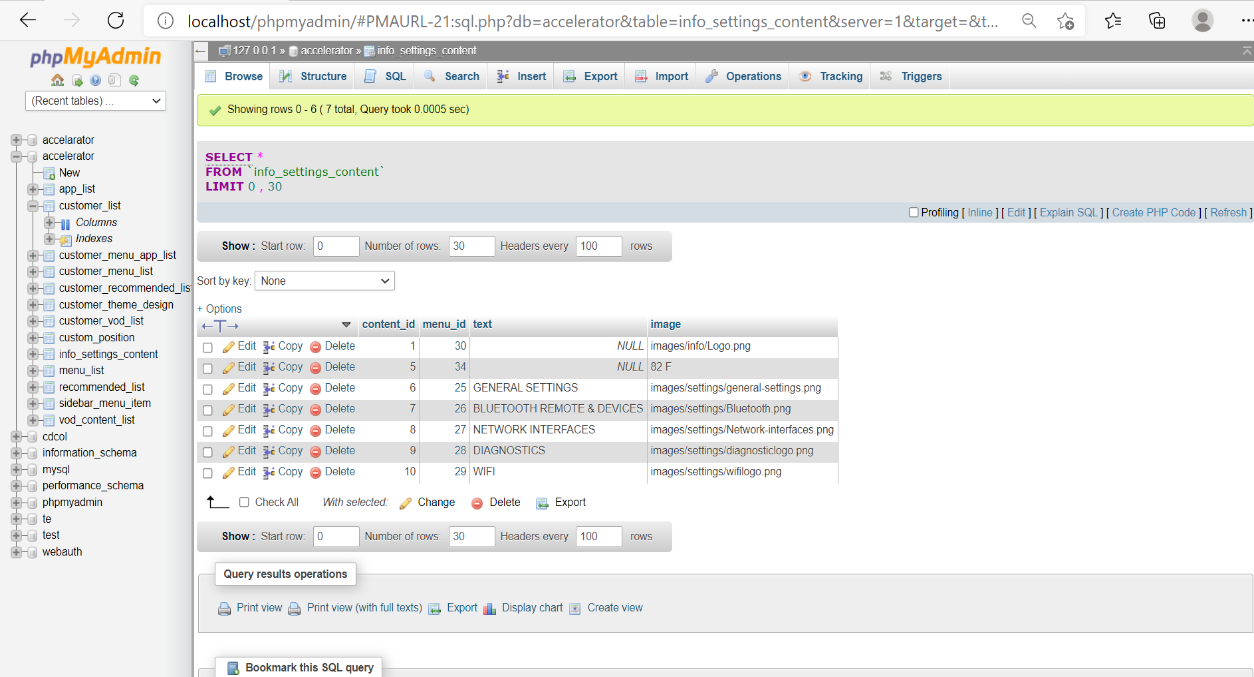
  e.g. For adding bluetooth icon to the infobar.
        click on info_settings_content table-> click on insert  
        →  Add  → menu_id : 32 (corresponding to Bluetooth InfoBar icon from  menu_list table) 
                     → Image: 'images/info/bluetooth.png' (Add the local path of the icon in static folder )

Image Removed      Image Added

10. Steps to delete an icon from the Infobar for a customer 

...

Note: If both bg_image and bg_color are configured in the table , preference is given to bg_image.
Image Removed
       Image Added

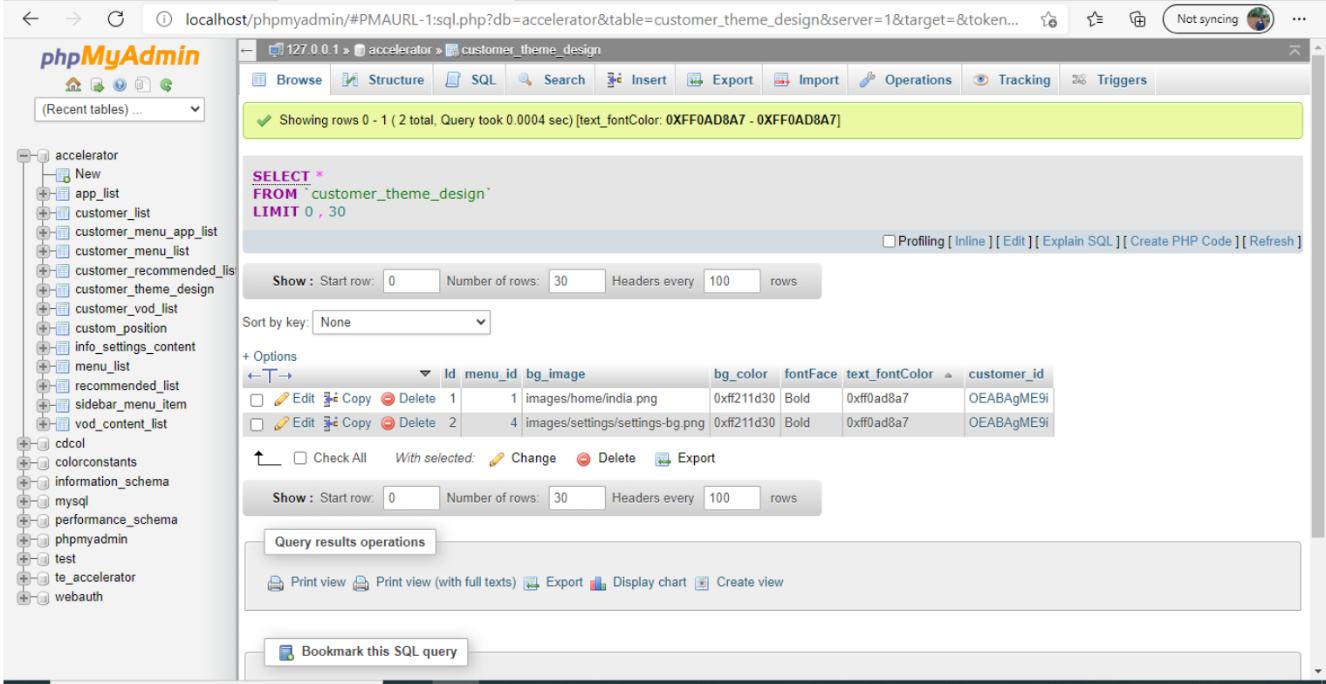
e.g.  For Adding bg_color/bg_image , font face and font color for home screen .
      click on customer_theme_design →  click on insert  
     ->Add menu_id : 1 
                 → bg_image : images/settings/settings-bg.png 
                 → bg_color : 0xff211d30
                 
→ FontFace : bold
                 → text_fontColor: 0xff211d30
                 → customer_id: boxid(serial_number)  

...