RDK Resources
[*RDK Preferred*]
Code Management Facility
RDK Forums
[RDK Conferences]
RDK Support
Archives
Papers & Presentations Archive![]()
Papers & Presentations Archive![]()
...
Automatics jenkins setup documentation can be found in the page : Automatics Jenkins Setup
Table of Contents
What is Jenkins Pipeline?
...
For automating the deployment and parser jobs for Automatics, a new Pipeline job is introduced. What this pipeline job will do is it will invoke the existing jenkins freestyle jobs which does the deployment and API scanning in the correct order. The overview of jenkins pipeline job as well as the steps to create the Automatics pipeline job below
In simple words, Jenkins Pipeline is a combination of plugins that supports the integration and implementation of continuous delivery pipelines using Jenkins. A pipeline has an extensible automation server for creating simple or complex delivery pipelines "as code," via pipeline DSL (Domain-specific Language).
What is Jenkins File?
Jenkins pipelines can be defined using a text file called Jenkins File. You can implement pipeline as code using Jenkins File, and this can be defined by using a domain specific language (DSL). With Jenkins File, you can write the steps needed for running a Jenkins pipeline.
The benefits of using Jenkins File are:
Jenkins File can be defined by either Web UI or with a Jenkins File.
Declarative versus Scripted pipeline syntax:
There are two types of syntax used for defining your Jenkins File.
Declarative:
Declarative pipeline syntax offers an easy way to create pipelines. It contains a predefined hierarchy to create Jenkins pipelines. It gives you the ability to control all aspects of a pipeline execution in a simple, straight-forward manner.
Scripted:
Scripted Jenkins pipeline runs on the Jenkins master with the help of a lightweight executor. It uses very few resources to translate the pipeline into atomic commands. Both declarative and scripted syntax are different from each other and are defined totally differently.
Why use Jenkins pipeline?
...
Term | Description |
Pipeline | The pipeline is a set of instructions given in the form of code for continuous delivery and consists of instructions needed for the entire build process. With pipeline, you can build, test, and deliver the application. |
Node | The machine on which Jenkins runs is called a node. A node block is mainly used in scripted pipeline syntax. |
Stage | A stage block contains a series of steps in a pipeline. That is, the build, test, and deploy processes all come together in a stage. Generally, a stage block is used to visualize the Jenkins pipeline process. |
Step | A step is nothing but a single task that executes a specific process at a defined time. A pipeline involves a series of steps. |
URL:<<Jenkins url>>
After created a jenkins job user will genereted a github link. Go to the Dashboard of after logging in to Jenkins UI.


Based on the jobs we need to select the type of projects. Once project created it will be listed in job list
User can find all the results in stage view of all utils and parser for kind reference.


Let's now create a pipeline job using the below Groovy script:
Click on New Item in the Jenkins dashboard.
Set the “Job Name” as parent Job
Select the “Job Type” as Pipeline project.
Add the Groovy script as explained above and save the job.
...
| language | groovy |
|---|---|
| theme | DJango |
...
| Code Block | ||||||||
|---|---|---|---|---|---|---|---|---|
| ||||||||
node {

      stage('Deployment DEPLOY_AUTOMATICS_CORE') {
           echoecho "Calling RDKM_DEPLOY_AUTOMATICS_CORECI-Automatics-Core Job"
           buildbuild job: 'RDKM_DEPLOY_AUTOMATICS_CORECI-Automatics-Core', wait: true, propagate: true
      }

      stage('Deployment RDKM_DEPLOY_RDKB_TEST_UTILS') {
           echoecho "Calling RDKM_DEPLOY_RDKB_TEST_UTILSCI-RDKB-Utils Job"
           buildbuild job: 'RDKM_DEPLOY_RDKB_TEST_UTILSCI-RDKB-Utils', wait: true, propagate: true
      }

      stage('Deployment RDKM_DEPLOY_RDKV_TEST_UTILS') {
           echoecho "Calling RDKM_DEPLOY_RDKV_TEST_UTILSCI-RDKV-Utils Job"
           buildbuild job: 'RDKM_DEPLOY_RDKV_TEST_UTILSCI-RDKV-Utils', wait: true, propagate: true
      }

        stagestage('Run utility parser for Automatics Core') {
           echoecho "Calling RDKM_AUTOMATICS_API_SCAN_FOR_AUTOMATICS_CORE Job"
           buildbuild job: 'RDKM_AUTOMATICS_API_SCAN_FOR_AUTOMATICS_CORE', wait: true, propagate: true
      }

      stage('Run utility parser for Scriptless Automation') {
           echoecho "Calling RDKM_AUTOMATICS_API_SCAN_FOR_SCRIPTLESS_AUTOMATION Job"
           buildbuild job: 'RDKM_AUTOMATICS_API_SCAN_FOR_SCRIPTLESS_AUTOMATION', wait: true, propagate: true
      }

         stage('Run utility parser for RDKB Test Utils') {
           echoecho "Calling RDKM_AUTOMATICS_API_SCAN_FOR_RDKB_UTILS Job"
           buildbuild job: 'RDKM_AUTOMATICS_API_SCAN_FOR_RDKB_UTILS', wait: true, propagate: true
      }

      stage('Run utility parser for RDKV Test Utils') {
           echoecho "Calling RDKM_AUTOMATICS_API_SCAN_FOR_RDKV_UTILS Job"
           buildbuild job: 'RDKM_AUTOMATICS_API_SCAN_FOR_RDKV_UTILS', wait: true, propagate: true
      }
} |
Steps to create a separate job.
Inside the Repository URL mention the gerrit link of the specific project.

In Branch specifier user needs to be mention the correct branch

Root POM? should be pom.xml
Following command should be entered inside Goals and options field.
![]()
| Code Block | ||||
|---|---|---|---|---|
| ||||
clean package -DskipTests exec:java -Dautomatics.properties.file="xxx" |
Once user entered all the details successfully. Job creation done successfully.
Dummy job creation
Now, it’s time to give your job something to do. Click on the Build tab on the configure page.

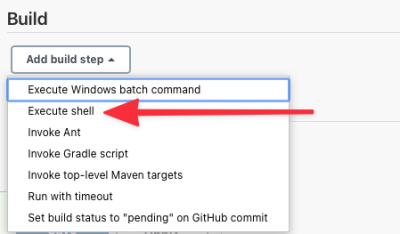
This will take you to the build section. Click on the Add build step menu and select Execute shell.
We’re going to use a one-line shell step for this job.
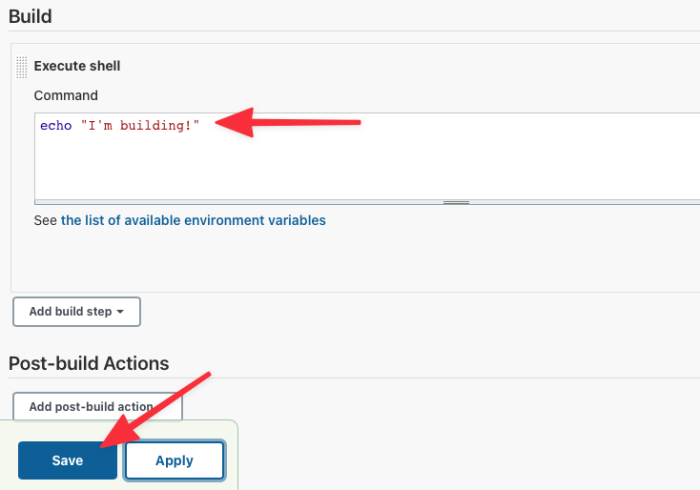
Enter the single line of shell code and click Save.
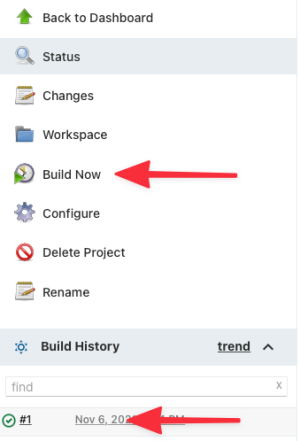
Click Build Now. The job will run and complete almost immediately. Next, click the build number to see your results.
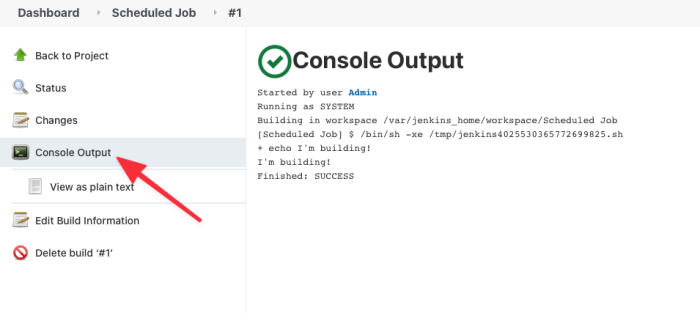
Next, click on Console Output, and you’ll see the shell message.
Your job is ready for scheduling!
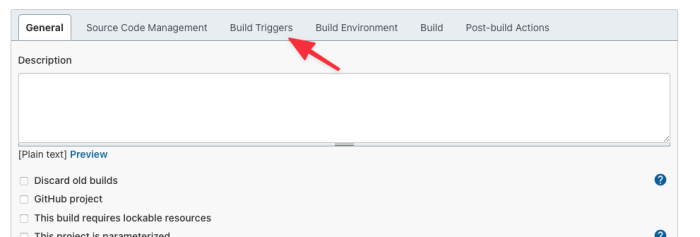
Head back to the job configuration and click the Build Triggers tab.
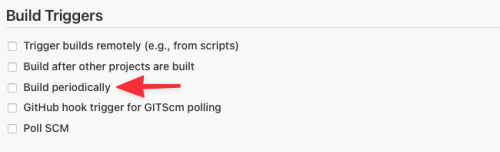
Now, check the Build periodically box in the Build Triggers section.
This will open the scheduling text area.

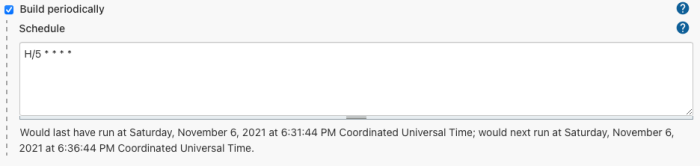
Next, let’s set the job to run every five minutes.
Enter H/5 * * * * into the box, click Save, and reopen the configuration. Jenkins will show you when the job will run.
Save the job again and wait a few minutes. Depending on the value Jenkins selects for H, the job will run after a few minutes.
Here is a screenshot of a couple of builds on our system. You can see that the first build corresponds to the time shown above on the configure page.

The timestamps show that you’ve scheduled a job to run every five minutes.
Wait for a bit longer and you will see that it continues to run every five minutes.
...
 }
}
|