RDK Resources
[*RDK Preferred*]
Code Management Facility
RDK Forums
[RDK Conferences]
RDK Support
Archives
Papers & Presentations Archive![]()
Papers & Presentations Archive![]()
| Children Display |
|---|
| Table of Contents |
|---|
libcamera is an open source camera stack for many platforms with a core user space library, and support from the Linux kernel APIs and drivers already in place. It aims to control the complexity of embedded camera hardware by providing an intuitive API and method of separating untrusted vendor code from the open source core.libcamera aims to encourage the development of new embedded camera applications by limiting the complexity that developers have to deal with. The interface is designed around the way that modern embedded camera hardware works.
This page dedicated to bringing up and validation of Continuous video recording functionality in RPI-0/validating raw video captured using libcamerasrc using gst-launch-1.0 in RPI-3 B+ board using imx219 camera.
CVR uses Kinesis Video Streams and supporting 24/7 video recording support.Allows the feature of storing the recorded content locally or in any AWS server.
Refer below link to build camera image
RDK-C rdk-next Yocto 3.1 dunfell build for Raspberrypi
STEP 1:
Can't able to validate without AWS account. so,Refer below link to create AWS account.
Procedure To Create AWS Account
After AWS account creation ,Refer same link to create Access key ID ,Secret Access Key and Region Name.
STEP 2:
Follow below steps to create kinese video stream or refer below link.
https://docs.aws.amazon.com/kinesisvideostreams/latest/dg/gs-createstream.html
| Code Block | ||||
|---|---|---|---|---|
| ||||
1.Sign in to the AWS Management Console and open the Kinesis console at https://eu-west-1.console.aws.amazon.com/kinesisvideo/home?region=eu-west-1#/.
2.On the Video streams page, choose Create video stream.
3.On the Create a new video stream page, type ExampleStream for the stream name. Leave the Default configuration radio button selected.
4.Choose Create video stream.
5.After Kinesis Video Streams creates the stream, review the details on the ExampleStream page.
|
STEP 1:
Add require SSID and PSK in /etc/wpa_supplicant.conf file in below format
network={
ssid="username"
psk="password"
}
| Code Block | ||||
|---|---|---|---|---|
| ||||
ctrl_interface=/var/run/wpa_supplicant
ctrl_interface_group=0
update_config=1

network={
ssid="RDK"
psk="Comcast1"
}
|
STEP 2:
Reboot the Target
After Reboot don't do step 1 and 2.
Note : Step 1 & 2 is only applicable for fresh target boot-up with new image.
STEP 3:
WiFi connection is must needed for CVR-AWS validation.
Check WiFi connection by using below command.
ifconfig
| Code Block | ||||
|---|---|---|---|---|
| ||||
root@raspberrypi0-rdk-camera:~# ifconfig
lo        Link encap:Local Loopback
          inet addr:127.0.0.1  Mask:255.0.0.0
          inet6 addr: ::1/128 Scope:Host
          UP LOOPBACK RUNNING  MTU:65536  Metric:1
          RX packets:87 errors:0 dropped:0 overruns:0 frame:0
          TX packets:87 errors:0 dropped:0 overruns:0 carrier:0
          collisions:0 txqueuelen:1000
          RX bytes:4552 (4.4 KiB)  TX bytes:4552 (4.4 KiB)

wlan0     Link encap:Ethernet  HWaddr B8:27:EB:2E:72:2B
          inet addr:192.168.43.246  Bcast:192.168.43.255  Mask:255.255.255.0
          UP BROADCAST RUNNING MULTICAST  MTU:1500  Metric:1
          RX packets:23 errors:0 dropped:0 overruns:0 frame:0
          TX packets:44 errors:0 dropped:0 overruns:0 carrier:0
          collisions:0 txqueuelen:1000
          RX bytes:2893 (2.8 KiB)  TX bytes:5887 (5.7 KiB)
|
STEP 4:
Export Created Stream Name,Access key id, Secret access key and Region name in RPI target.
export STREAM_NAME="samplestream"
export ACCESS_KEY="XXXXXXXXXXXXXX"
export SECRET_KEY="yyyyyyyyyyyyyyyyyyyyyyyy"
export AWS_DEFAULT_REGION="eu-west-1"
| Code Block | ||||
|---|---|---|---|---|
| ||||
root@raspberrypi0-rdk-camera:~# export STREAM_NAME="Samplestream"
root@raspberrypi0-rdk-camera:~# export ACCESS_KEY="XXXXXXXXXXXXX"
root@raspberrypi0-rdk-camera:~# export SECRET_KEY="yyyyyyyyyyyyyyyyyyyyyyyyy"
root@raspberrypi0-rdk-camera:~# export AWS_DEFAULT_REGION="eu-west-1" |
STEP 5:
Check exported Access key id,Secret access key,Stream name and Region name by using below command.
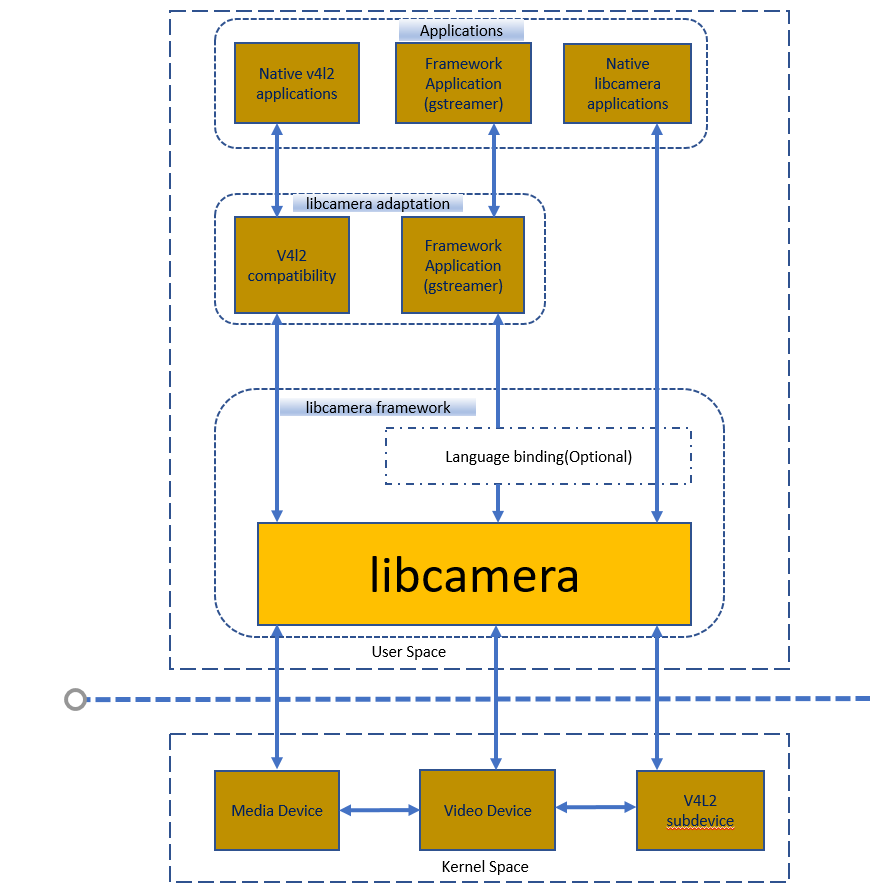
The camera stack comprises four software layers. From bottom to top:
The kernel drivers control the camera hardware and expose a low-level interface to user space through the Linux kernel V4L2 family of APIs (Media Controller API, V4L2 Video Device API and V4L2 Subdev API).
The libcamera framework is the core part of the stack. It handles all control of the camera devices in its core component, libcamera, and exposes a native C++ API to upper layers. Optional language bindings allow interfacing to libcamera from other programming languages. Those components live in the same source code repository and all together constitute the libcamera framework.
The libcamera adaptation is an umbrella term designating the components that interface to libcamera in other frameworks. Notable examples are a V4L2 compatibility layer, a gstreamer libcamera element, and an Android camera HAL implementation based on libcamera. Those components can live in the libcamera project source code in separate repositories, or move to their respective project’s repository (for instance the gstreamer libcamera element).
The applications and upper level frameworks are based on the libcamera framework or libcamera adaptation, and are outside of the scope of the libcamera project
Refer below link to connect camera to pi board
connecting camera to Raspberry pi board
Refer below link to build camera image
RDK-C rdk-next Yocto 3.1 dunfell build for Raspberrypi
| Code Block | ||||
|---|---|---|---|---|
| ||||
1.Stop rms-launcher and mst-launcher using below command(this are temporary procedure to validate raw video content.)
 #systemctl disable rms-launcher
 #systemctl disable mst-launcher
2.Add below lines to /boot/config.txt
  dtoverlay=imx219
  core_min_freq=300
3.Save the file and reboot the target.
|
STEP 1:
Execute below command inside target.printenv
| Code Block | ||||
|---|---|---|---|---|
| ||||
root@raspberrypi0-rdk-camera:~# printenv
PLAYERSINKBIN_USE_WESTEROSSINK=1
WAYLAND_DISPLAY=wayland-0
SHELL=/bin/sh
TERM=xterm
LD_PRELOAD=/usr/lib/libopenmaxil.so:/usr/lib/libwayland-client.so.0
HUSHLOGIN=FALSE
USER=root
SYSTEMD_PAGER=/bin/cat
ACCESS_KEY=XXXXXXXXXXXXXX
STREAM_NAME=samplestream
MAIL=/var/spool/mail/root
PATH=/usr/local/bin:/usr/bin:/bin:/usr/local/sbin:/usr/sbin:/sbin
AWS_DEFAULT_REGION=eu-west-1
SECRET_KEY=yyyyyyyyyyyyyyyyyyyyyyyy
PWD=/home/root
EDITOR=vi
PS1=\u@\h:\w\$
SHLVL=1
HOME=/home/root
LOGNAME=root
XDG_RUNTIME_DIR=/run
_=/usr/bin/printenv
|
STEP 6:
Before triggering CVR binary we should stop rms binary and mediastreamer binary with below command because currently we can't able to validate RMS and CVR feature at the same time.
systemctl stop rms-launcher
systemctl stop mst-launcher
STEP 7:
Preload the below library files for omxh264enc plugin.
export LD_PRELOAD=/usr/lib/libwayland-client.so.0:/usr/lib/libwayland-egl.so:/usr/lib/libopenmaxil.so
STEP 8:
Before start the CVR binary please check the current date and time in RPI with "date" command, If you get wrong date and time please manually set current date and time with the below command.
date -s "Mon Nov 30 03:42:44 UTC 2020"
| Code Block | ||||
|---|---|---|---|---|
| ||||
root@raspberrypi3-rdk-camera:~# date -s "Mon Nov 30 03:42:44 UTC 2020"
Mon Nov 30 03:42:44 UTC 2020
root@raspberrypi3-rdk-camera:~# date
Mon Nov 30 03:43:55 UTC 2020 |
STEP 9:
Run cvr-gst-rpi binary to transmit data into AWS server.
cvr-gst-rpi
| Code Block | ||||
|---|---|---|---|---|
| ||||
root@raspberrypi0-rdk-camera:~# cvr-gst-rpi
Conf file /etc/debug.ini open success
rdk_logger_init /etc/debug.ini Already Stack Level Logging processed... not processing again.
200430-10:37:21.578891 [mod=GSTREAMER, lvl=DEBUG] [tid=7305] /usr/src/debug/cvr/git-r0/git/cvr-gst-rpi/cvr_gst_rpi.c(176):Element linking succes
s for pipelin |
STEP 10:
Enter into AWS account and select the corresponding video stream service which was we created for streaming.
Press "Media Playback" option on the video stream player.
Streaming video content should decode properly on AWS.

...
| |
#gst-launch-1.0 libcamerasrc ! video/x-raw,width=1280,height=720,framerate=30/1,format=NV12 ! videoconvert ! v4l2h264enc ! queue ! filesink location=libcamerasrc.h264
|
STEP 2:
copy the libcamerasrc.h264 file to computer(DESKTOP)
STEP 3
play video using vlc player
| View file | ||||
|---|---|---|---|---|
|