Introduction
A server is to be setup for migrating the application control to cloud. Client-Server Setup for Application Customization is described below.
It is mandatory to setup the application server to configure the applications for the box which are available in that box.
Only the applications configured against a box Tata Elxsi Accelerator UI Application can be customized based on the operator requirement using our CustomUI application (Customer Login Page ) .Only the applications and contents configured against a particular operator id will be available to that boxoperator.
Overview
This document provides the following details:
- Prepare the environment (Pre-requisite) Login to CustomUI Application
- Configure Customize the web server and database for application
- Box configuration
- Configure the box to connect to server
- Customize the application
Server Setup
Login
The steps to login as a new operator to the CustomUI Application The server setup is listed here:
...
Steps to Login
Follow the steps listed here to setup the environment for application server.
- Install Java JDK in your system (check “java –version” in command prompt) and the release is tested using java 15.0.1 2020-10-20.
- Download the Xampp installer (xampp-win32-1.8.2-2-VC9-installer.exe).
- Follow steps 1 to 10 from the link: https://www.ionos.com/digitalguide/server/tools/xampp-tutorial-create-your-own-local-test-server/#c42765.
- After successful installation execute xampp-control.exe in XAMPP folder from c://<pathtoXampp>/ xampp-control.exe and then the Xampp control panel appears.
- Download the attached war file (CustomUI.war) and database (accelerator.sql).
Initial Settings
Ensure the following are set before proceeding further:
- Copy the Tata Elxsi Accelerator UI build folder to the box into /opt/www/ .
- Application server address and serial number is configured in the box inside /opt/www/build/static/server/Serverconfig.json as described in section 3 of the document.
- Firewalls are configured (or disabled) in the server machine to allow access from box.
XAMPP Server Setup
Start the Apache server and MySQL server components as described below:
login as an existing Operator
- Click on Customer Login Page or Enter the URL (http://121.244.192.84:9999/CustomUI) in the address bar of browser (Chrome), and press Enter.
- Below login page will be loaded.
Image Added - Enter a valid username and password(sampleuser:- username: elxsi password: elxsi123)
- Click on Login.
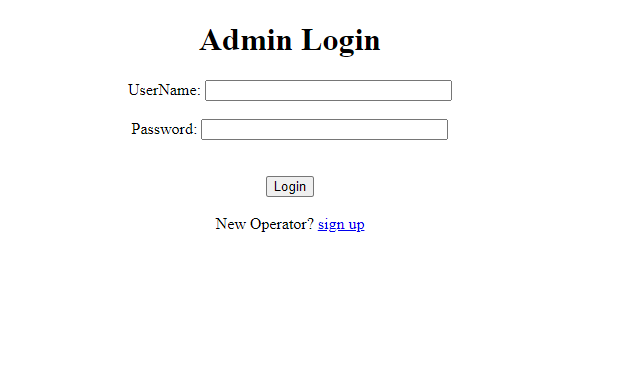
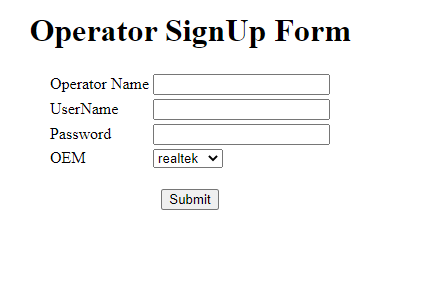
Follow the steps below to login as a new operator
- Click on the sign-up link to create a new operator.
- Once clicked below page will be loaded.
Image Added - Enter the operator name, Username, Password and select the OEM.
- Note down the Username since the same value should be given in the OPERATOR_ID in box configuration discussed later.
- Once all values are entered click on the submit button.
- Dashboard screen will be displayed on successful login.
Image AddedOpen XAMPP Control Panel and Click the Start button for Apache and MySQL modules
Image Removed
Click on the Admin button on the MySQL module to launch the phpMyAdmin dashboard on browser
Image Removed
Follow the steps given below for Importing Database through phpMyAdmin page - Click on the Import tab in the top menu of phpMyAdmin dashboard
Image Removed
- Click on Choose File then select the shared database zip file (accelerator.sql.zip) and click on Go button to import the database
Image Removed Click on the accelerator Database from the side bar to verify the Database tables
Configure the XAMPP Tomcat server by following the steps below
- Copy the war file attached (CustomUI.war) and paste the same inside “xampp\tomcat\webapps”
Start Tomcat in XAMPP Control Panel and click on the Admin button next to the start button to view the tomcat server home page in the browser
Image Removed
Client setup
The steps to connect to the server is given below:
...
- Open /opt/www/build/static/server/Serverconfig.json in box.
- Serverconfig.json contains 3 fields:
"ServerSERVER_ipURL":ip address of the server machine in which the xampp server is setup
"Server_port": port of Tomcat server
"serial_number": unique id of the box.
- Save and reboot the box.
The following command can be used to identify the ‘serial number’ in the box which is to be used in the database for its unique ID.
...
URL of the CustomUI ( http://
...
121.
...
244.
...
192.
...
84:
...
9999/CustomUI/
...
)
...
Customize the Application
The steps to add a new box in database table are listed in this section. A default configuration is already given in the provided database.
General procedure is:
...
- E.g., Enable/disable Premium Apps category home page
...
- E.g., Enable/disable Netflix within the Premium Apps category
...
- E.g., Enable/disable weather icon in the InfoBar
"OPERATOR_ID": Username given while creating a newoperator (for default user :operator_id : teuser)
"ASSET_URL ": URL of the server from which assets are to be loaded (http://121.224.192.84:9999/)
- Save and reboot the box.
...
Customize the Application
Note: The configuration is to be done against each box operator and each box operator is identified by a unique customeroperator_id (representing boxid), which is the box serial number. This serial number operator_id should be same as serial number operator_id in /opt/www/build/static/server/Serverconfig.json in box.
1.
...
Follow the steps below to add a new box information to the server:
...
Home
...
Image Removed
...
- The order of the sections in the home screen can be customized by the operator.
- Click the Home button on the top bar of dashboard, below page will be displayed
- Click on the customer_menu_app_list table through phpMyAdmin page.
Image Added
Image Removed
- Click on the Insert button to add Customer data.
- Premium apps feature in main menu of Accelerator UI app can be enabled by setting 6 in the menu_id field.
[6 here refers to the Premium app content against that customer id] - Individual Premium apps in the Accelerator UI app can be enabled by setting the app_id field.
[values for app_id can be referred from app_list table, see picture below with YouTube is 1, Netflix is 2 etc]
Image Removed
Image Added
e.g. For enabling YouTube in first position
click on customer_menu_app_list -> click on insert
->Add → menu_id : 6
→ app_id : 1
→ app_position :1
→customer_id : boxid (serial_number)
...
- Click on the customer_menu_app_list table.
Image Removed
Image Added
- Click on the Insert button to add Customer data .
- Metro apps feature can be enabled by setting 7 in the menu_id field.
[7 here refers to the Metro app content in menu_list table] - Individual Metro apps can be enabled by setting the value in app_id field.
[values for app_id can be referred from app_list table]
...
- Click on the customer_recommended_list table through phpMyAdmin page.
Image Added
- Click on the Insert button to add Customer data.
- Recommended For You content in main menu of demo app can be added for a particular customer by setting the required recommended_content_id against that customer_id.
[values of recommended_content_id can be referred from recommended_list table, see the picture below]
...
Image Added
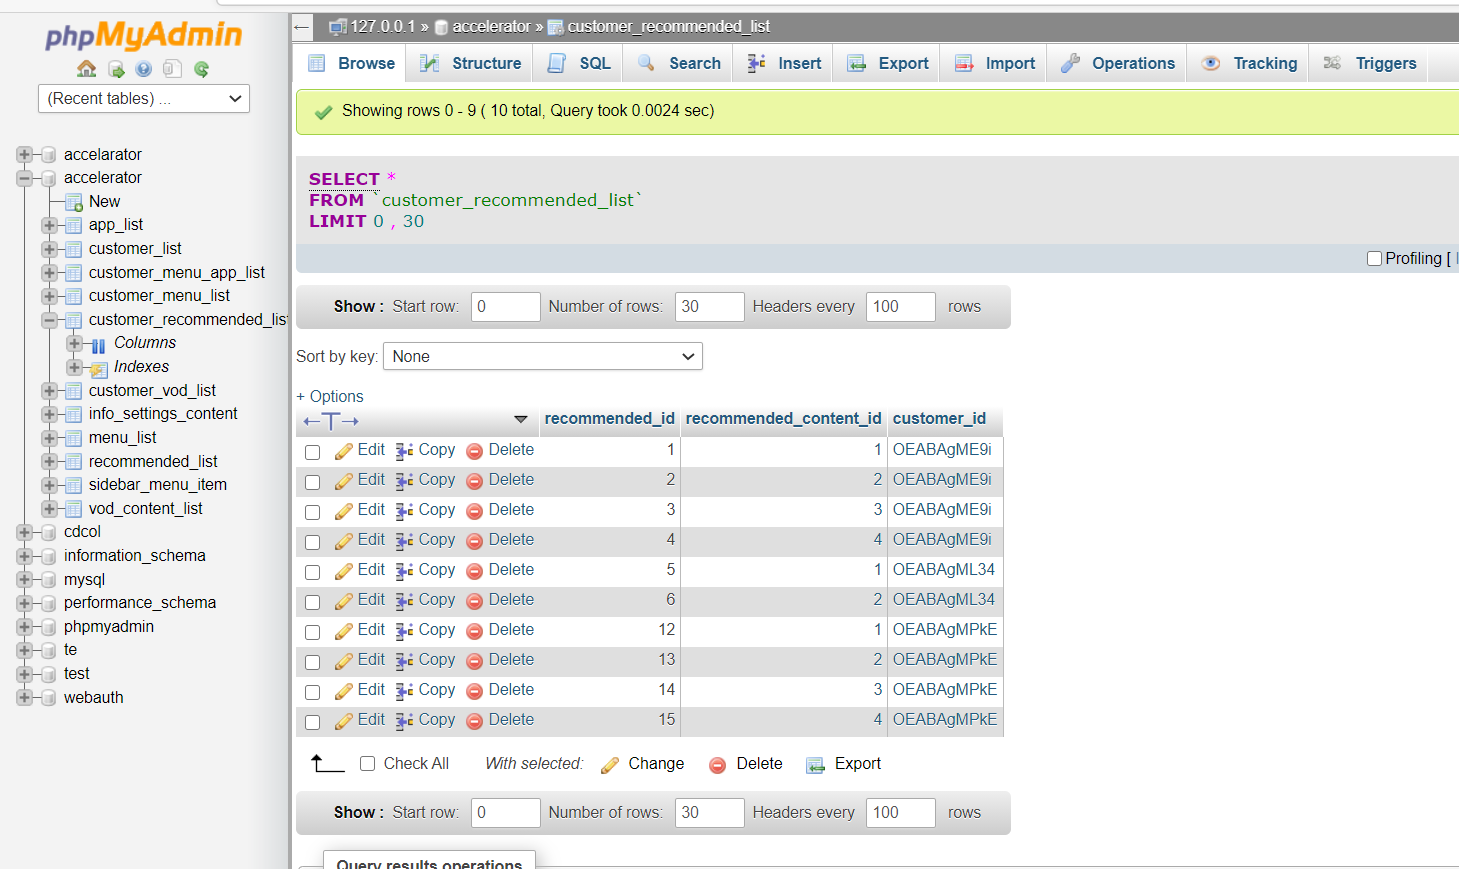
eg. For enabling Tears of steel.
click on customer_recommended_list→ click on insert
→ Add → recommended_content_id : 1
→ customer_id : boxid (serial_number)
Note: To add a new content to recommended_list table
- Add a new recommended_content_id for the new content.
- Add the corresponding poster url in "url" field and video content url to "videourl" field.
- Add the corresponding category if it needs to displayed on the poster.
8. Steps to Remove a Recommended for you content for a customer
...
- Click on the info_settings_content table through phpMyAdmin page .
- Click on Insert button to add Infobar icon path.
- Infobar icon path can be added to the column of image in the table against corresponding menu name (i.e. icon name).
[menu_id can be referred from menu_list table]
Image Added
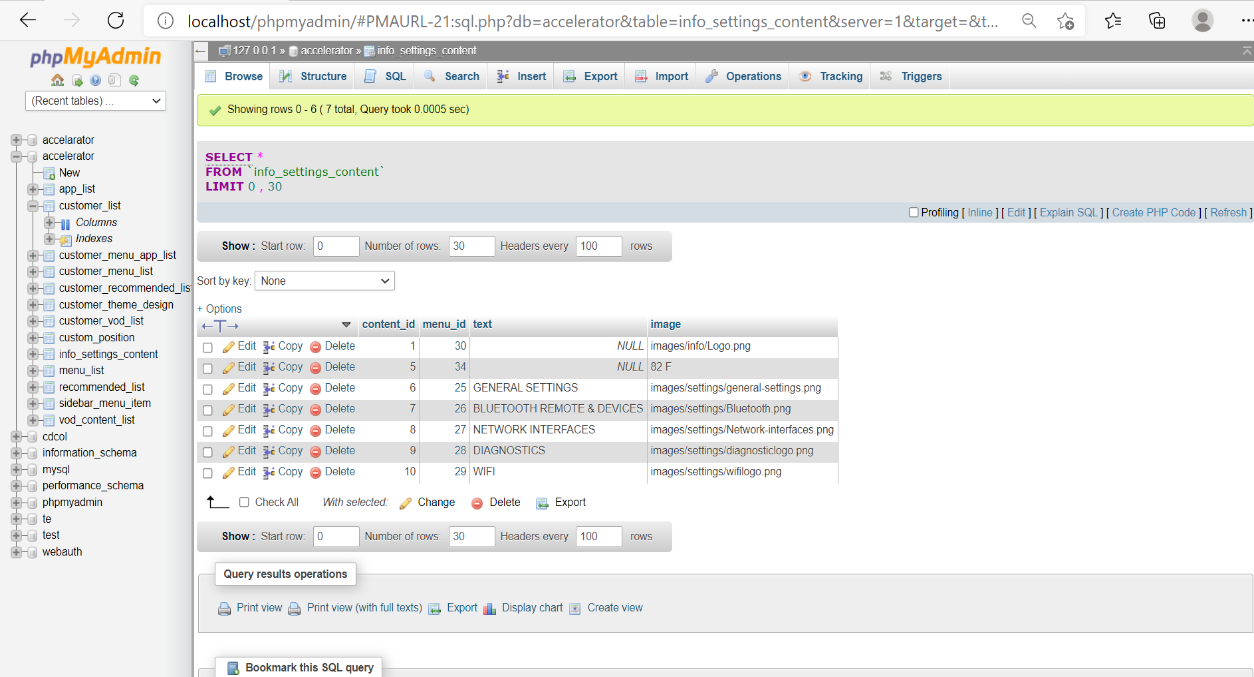
e.g. For adding bluetooth icon to the infobar.
click on info_settings_content table-> click on insert
→ Add → menu_id : 32 (corresponding to Bluetooth InfoBar icon from menu_list table)
→ Image: 'images/info/bluetooth.png' (Add the local path of the icon in static folder )
Image Removed
10. Steps to delete an icon from the Infobar for a customer
...
Note: If both bg_image and bg_color are configured in the table , preference is given to bg_image.
Image Removed
Image Added
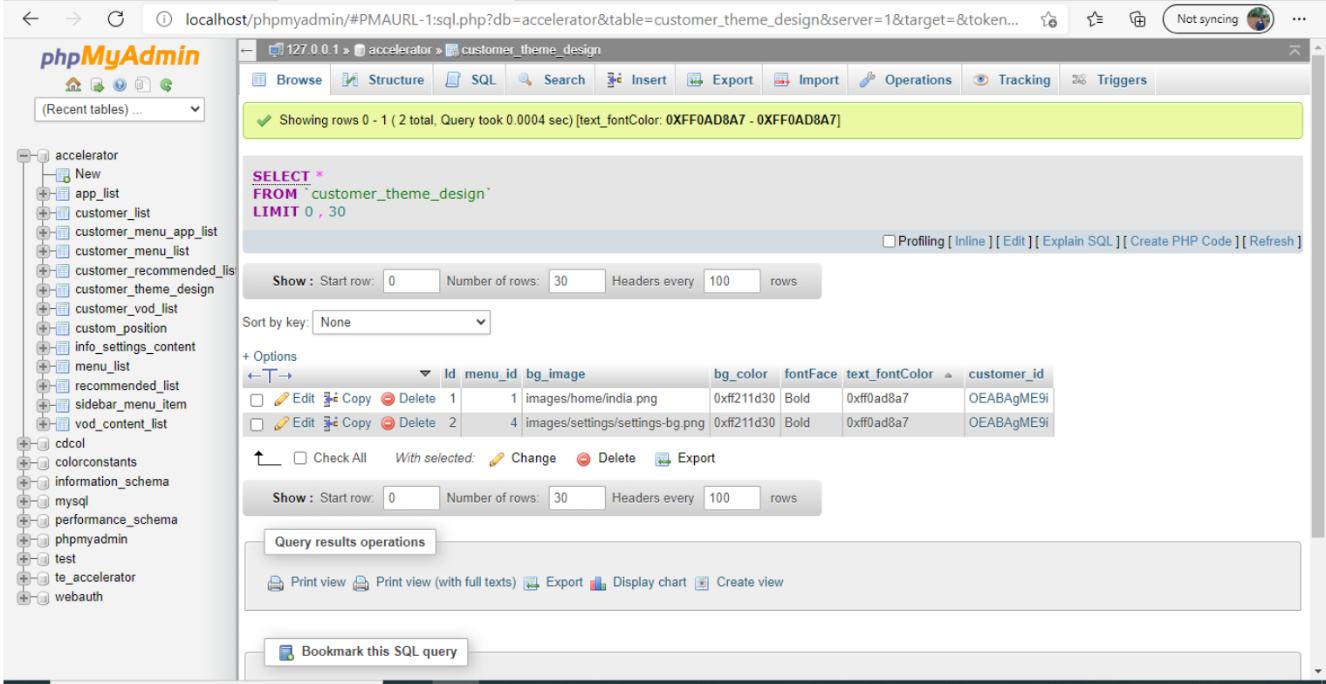
e.g. For Adding bg_color/bg_image , font face and font color for home screen .
click on customer_theme_design → click on insert
->Add → menu_id : 1
→ bg_image : images/settings/settings-bg.png
→ bg_color : 0xff211d30
→ FontFace : bold
→ text_fontColor: 0xff211d30
→ customer_id: boxid(serial_number)
...
e.g. For Adding bg_color/bg_image , font face and font color for home screen
click on customer_theme_design -> click on insert
-> Add → menu_id : 1
→ bg_image : images/settings/settings-bg.png
→ bg_color : 0xff211d30
→ FontFace : bold
→ text_fontColor : 0xff211d30
→ customer_id : boxid(serial_number)
Appendix
Whom to contact for Support
...
TroubleShooting
To confirm the client-server setup is working as expected:
- Ensure firewall is disabled
- Try the following URL in the browser first and then try the same using curl command in the box.
Browser:
http://localhost:8080/CustomUI/getThemeConfig?customer_id=OEABAgME9i
Box:
curl http://<Server_ip>:<Server_port>/CustomUI/getThemeConfig?customer_id=OEABAgME9i
If you are not getting data in the box try: ping <Server_ip>
eg: root@mediabox:~# ping 192.168.18.3
PING 192.168.18.3 (192.168.18.3): 56 data bytes
64 bytes from 192.168.18.3: seq=0 ttl=128 time=35.467 ms
64 bytes from 192.168.18.3: seq=1 ttl=128 time=2.238 ms
64 bytes from 192.168.18.3: seq=2 ttl=128 time=2.214 ms
If Ping is success, try http://192.168.18.3:8080/CustomUI/getPosition?customer_id=O in the browser to get the corresopnding data.
["premium Apps","Recommended for you","metro Apps"]
Then try the curl for the same in the box:
~# curl http://192.168.18.3:8080/CustomUI/getPosition?customer_id=OEABAgME9i
response: ["premium Apps","Recommended for you","metro Apps"]
If you are getting the appropriate response for the curl, Then the client server connection is successful.
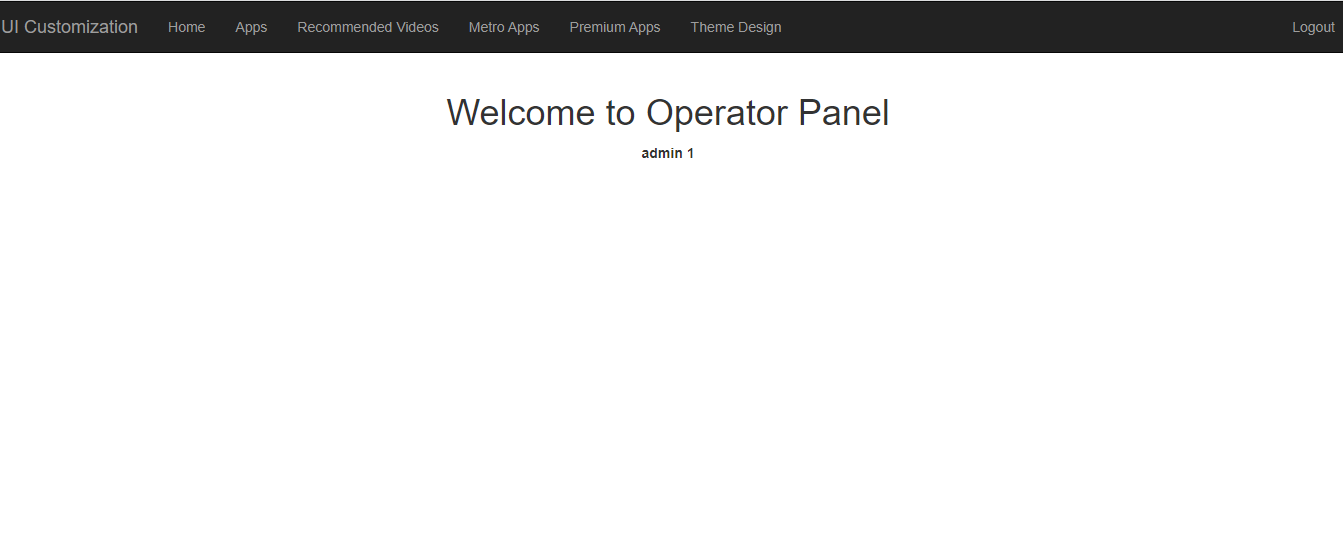
To get the corresponding customization changes in UI:
- Add the following in /opt/www/build/static/server/Serverconfig.json
"Server_ip": ip address of the server machine in which the xampp server is setup
Note: Ping to this ip should be successful as we tried in the previous step
"Server_port": port of Tomcat server - Add the following boxid in /opt/www/build/static/server/Serverconfig.json
"serial_number": OEABAgME9i - Reboot
The corresponding changes will be reflected in the Accelerator UI.
...