RDK Resources
[*RDK Preferred*]
Code Management Facility
RDK Forums
[RDK Conferences]
RDK Support
Archives
Papers & Presentations Archive![]()
Papers & Presentations Archive![]()
| Children Display |
|---|
| Table of Contents |
|---|
This page dedicated to bringing up and validation of Continuous video recording functionality in RPI-3 B+.
CVR using pipewire callback to receive frames from v4l2 and also it using AWS Kinesis Video Stream( KVS ) to perform 24/7 video recording with AWS IOT credential.
Refer below link to build camera image
Morty:
RDK-C Build Instruction for RPI-0
RDK-C Build Instruction for RPI-3
Dunfell:
RDK-C rdk-next Yocto 3.1 dunfell build for Raspberrypi
STEP 1:
AWS account is needed for to validate CVR use case. so, Refer below link to create AWS account.
Procedure To Create AWS Account
After the AWS account creation, Refer same link to create Access key ID ,Secret Access Key and Region Name of your AWS account.
STEP 2:
After the AWS account creation, Need to create IOT credential with AWS CLI interface to validate CVR use case.
Use the below link to install AWS CLI interface package for to create AWS IOT credential.
Please install this AWS CLI package in your local linux pc. we can interact AWS account through our local linux pc with this AWS CLI interface.
https://docs.aws.amazon.com/cli/latest/userguide/install-cliv2-linux.html#cliv2-linux-install
Follow the below command to create config and credentials file in your local PC to interact AWS account
| Code Block | ||||
|---|---|---|---|---|
| ||||
$ aws configure

AWS Access Key ID [None]: XXXXXXXXX	( Give your AWS account Access Key ID )
AWS Secret Access Key [None]: YYYYYYYYYYYYY ( Give your AWS Secret Key )
Default region name [None]: ZZZZZZZZZZ ( Give your Region Name )
Default output format [None]: json |
Oncw you done this aws configure in your local PC automatically below files will be create with below content. so, please cross check whether that is created or not
| Code Block | ||||
|---|---|---|---|---|
| ||||
vi ~/.aws/config

[default]
region = ZZZZZZZZZZ
output = json |
| Code Block | ||||
|---|---|---|---|---|
| ||||
vi ~/.aws/credentials

[default]
aws_access_key_id = XXXXXXXXX
aws_secret_access_key = YYYYYYYYYYYYY |
use the below link to create AWS IOT credential
https://docs.aws.amazon.com/kinesisvideostreams/latest/dg/how-iot.html
After created the IOT credential you will get below list of details
Stream Name, Default Region, IOT Credential Endpoint, Certificate key, Private Kay, Role Alias and cacertificate key
Move the certificate.pem,private.pem.key and cacert.pem keys into your RPI /etc/ssl/certs/ directory
STEP 1:
Add require SSID and PSK in /etc/wpa_supplicant.conf file in below format
network={
ssid="username"
psk="password"
}
| Code Block | ||||
|---|---|---|---|---|
| ||||
ctrl_interface=/var/run/wpa_supplicant
ctrl_interface_group=0
update_config=1

network={
ssid="RDK"
psk="Comcast1"
}
|
STEP 2:
Reboot the Target
After Reboot don't do step 1 and 2.
Note : Step 1 & 2 is only applicable for fresh target boot-up with new image.
STEP 3:
WiFi connection is must needed for CVR-AWS validation.
Check WiFi connection by using below command.
ifconfig
| Code Block | ||||
|---|---|---|---|---|
| ||||
root@raspberrypi3-rdk-camera:~# ifconfig
lo        Link encap:Local Loopback
          inet addr:127.0.0.1  Mask:255.0.0.0
          inet6 addr: ::1/128 Scope:Host
          UP LOOPBACK RUNNING  MTU:65536  Metric:1
          RX packets:87 errors:0 dropped:0 overruns:0 frame:0
          TX packets:87 errors:0 dropped:0 overruns:0 carrier:0
          collisions:0 txqueuelen:1000
          RX bytes:4552 (4.4 KiB)  TX bytes:4552 (4.4 KiB)

wlan0     Link encap:Ethernet  HWaddr B8:27:EB:2E:72:2B
          inet addr:192.168.43.246  Bcast:192.168.43.255  Mask:255.255.255.0
          UP BROADCAST RUNNING MULTICAST  MTU:1500  Metric:1
          RX packets:23 errors:0 dropped:0 overruns:0 frame:0
          TX packets:44 errors:0 dropped:0 overruns:0 carrier:0
          collisions:0 txqueuelen:1000
          RX bytes:2893 (2.8 KiB)  TX bytes:5887 (5.7 KiB)
|
STEP 4:
Give the below environment variable in your RPI target. Based on this details the frame will upload into AWS KVS.
export STREAM_NAME="XXXXXXX"
export AWS_DEFAULT_REGION="YYYYYYYY"
export IOT_GET_CREDENTIAL_ENDPOINT="ZZZZZZZ"
export CERT_PATH="/etc/ssl/certs/certificate.pem"
export PRIVATE_KEY_PATH="/etc/ssl/certs/private.pem.key"
export ROLE_ALIAS="WWWWWWW"
export CA_CERT_PATH="/etc/ssl/certs/cacert.pem"
| Code Block | ||||
|---|---|---|---|---|
| ||||
root@raspberrypi3-rdk-camera:~# export STREAM_NAME="XXXXXXX"
root@raspberrypi3-rdk-camera:~# export AWS_DEFAULT_REGION="YYYYYYYY"
root@raspberrypi3-rdk-camera:~# export IOT_GET_CREDENTIAL_ENDPOINT="ZZZZZZZ"
root@raspberrypi3-rdk-camera:~# export CERT_PATH="/etc/ssl/certs/certificate.pem"
root@raspberrypi3-rdk-camera:~# export PRIVATE_KEY_PATH="/etc/ssl/certs/private.pem.key"
root@raspberrypi3-rdk-camera:~# export ROLE_ALIAS="WWWWWWW"
root@raspberrypi3-rdk-camera:~# export CA_CERT_PATH="/etc/ssl/certs/cacert.pem" |
STEP 5:
Check exported AWS IOT credential by using below command.
printenv
| Code Block | ||||
|---|---|---|---|---|
| ||||
root@raspberrypi3-rdk-camera:~# printenv
CERT_PATH=/etc/ssl/certs/certificate.pem
CA_CERT_PATH=/etc/ssl/certs/cacert.pem
ROLE_ALIAS=WWWWWWW
TERM=xterm
SHELL=/bin/sh
SSH_CLIENT=::ffff:192.168.1.4 50911 22
SSH_TTY=/dev/pts/0
USER=root
PRIVATE_KEY_PATH=/etc/ssl/certs/private.pem.key
SYSTEMD_PAGER=/bin/cat
STREAM_NAME=XXXXXXX
PATH=/usr/local/bin:/usr/bin:/bin:/usr/local/sbin:/usr/sbin:/sbin
AWS_DEFAULT_REGION=YYYYYYYY
PWD=/home/root
EDITOR=vi
PS1=\u@\h:\w\$
SHLVL=1
HOME=/home/root
LOGNAME=root
SSH_CONNECTION=::ffff:192.168.1.4 50911 ::ffff:192.168.1.2 22
RMF_USE_SOUPHTTPSRC=TRUE
DISPLAY=localhost:10.0
IOT_GET_CREDENTIAL_ENDPOINT=ZZZZZZZ
_=/bin/printenv |
STEP 6:
Before triggering CVR binary we should stop rms binary and mediastreamer binary with below command.
systemctl stop rms-launcher
systemctl stop mst-launcher
STEP 7:
Before start the CVR binary please check the current date and time in RPI with "date" command, If you get wrong date and time please manually set current date and time with the below command.
date -s "Mon Nov 30 03:42:44 UTC 2020"
| Code Block | ||||
|---|---|---|---|---|
| ||||
root@raspberrypi3-rdk-camera:~# date -s "Mon Nov 30 03:42:44 UTC 2020"
Mon Nov 30 03:42:44 UTC 2020
root@raspberrypi3-rdk-camera:~# date
Mon Nov 30 03:43:55 UTC 2020 |
STEP 8:
Run the pipewire binary with below command
pipewire &
| Code Block | ||||
|---|---|---|---|---|
| ||||
root@raspberrypi3-rdk-camera:~# pipewire & |
STEP 9:
Run the pipewire media session binary with below command
pipewire-media-session &
| Code Block | ||||
|---|---|---|---|---|
| ||||
root@raspberrypi3-rdk-camera:~# pipewire-media-session & |
STEP 10
Run the cvr binary
cvr_daemon_kvs2 &
| Code Block | ||||
|---|---|---|---|---|
| ||||
root@raspberrypi3-rdk-camera:~# cvr_daemon_kvs2 & |
STEP 11:
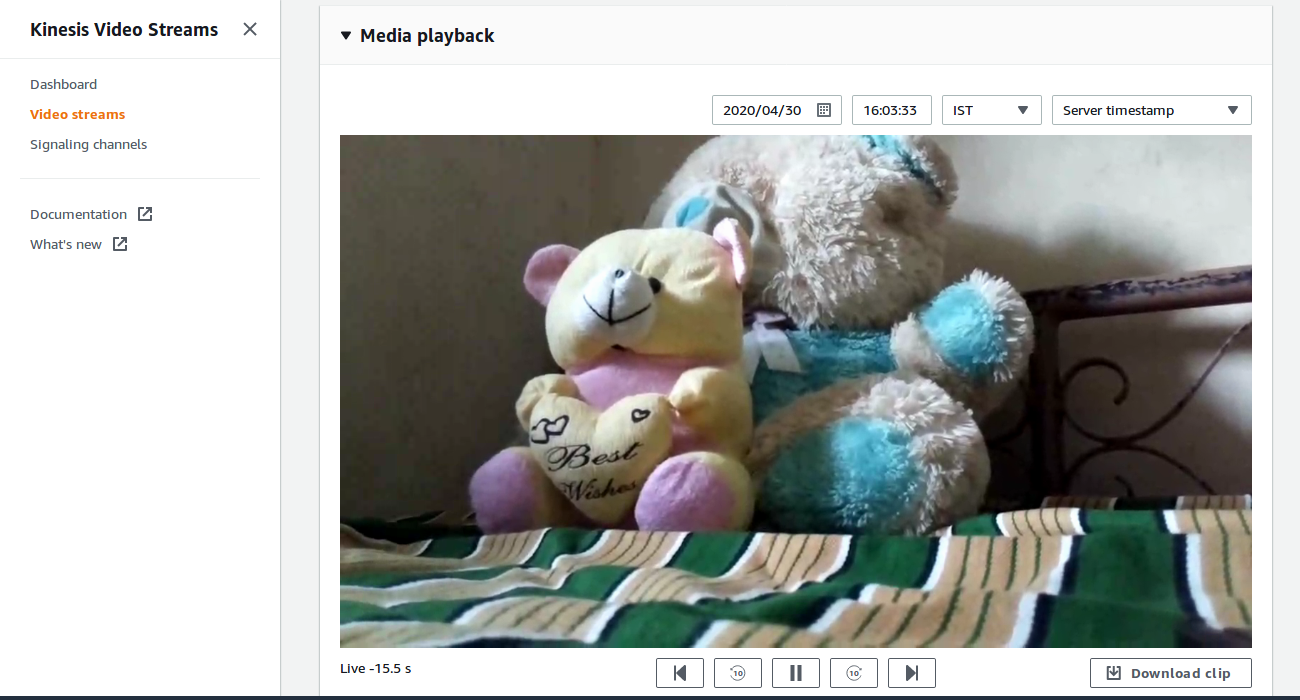
Enter into AWS account and select the corresponding video stream service which was we created for streaming.
Press "Media Playback" option on the video stream player.
Streaming video content should decode properly on AWS.