RDK Resources
[*RDK Preferred*]
Code Management Facility
RDK Forums
[RDK Conferences]
RDK Support
Archives
Papers & Presentations Archive![]()
Papers & Presentations Archive![]()
| Children Display |
|---|
| Table of Contents |
|---|
...
|
Briefly describe in general terms the system/application and the purpose for which it is intended, written in non-technical terminology. Consider including a high-level architecture diagram for the system. The description should include, but is not limited to, the following:
<Briefly describe and graphically depict as appropriate the equipment, communications, and network configuration of the system in a way that a non-technical user can understand>
<Briefly describe and graphically depict as appropriate the equipment, communications, and network configuration of the system in a way that a non-technical user can understand>
<Provide detailed information and describe the procedures necessary to access the system. If applicable, include how to get a user ID and log on to the system, as well as the actions a user must take to change and/or reset a password.>
<Describe how system flow is happening mentioning checkpoints which can be verified during flow to ensure system is working as expected>
<Mention the validation artifacts that are essential to ensure the functionality is working as expected. Also any limitation while closing the validation process>
Describe the specific system function or feature in detail and depict graphically by including screen prints and descriptive narrative as appropriate. Ensure each screen print is captioned and has an associated tag providing appropriate alternative text
Follow the above for sub feature / use cases
<Identify the error messages that a user may receive and the likely cause(s) and/or possible corrective actions for the error>
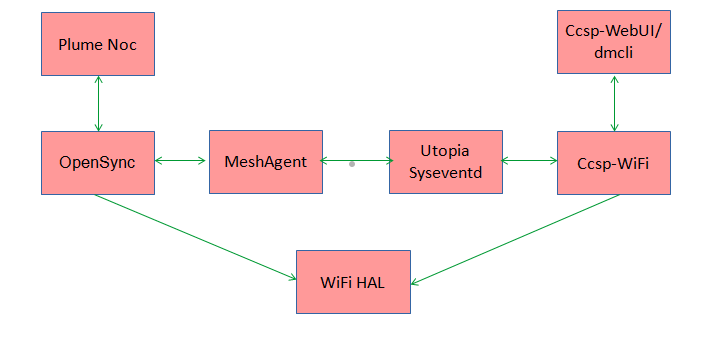
Integration of Mesh-agent component in Turris Omnia Gateway for Sync between RDKB WEBUI and Plume NOC. Mesh-agent notifies the Plume NOC , when there is a change of SSID in RDKB WebUI and vice versa.
Mesh-agent uses sysevent to notify between NOC and WebUI.
NOC - Graphical UI for Opensync Extender Devices
The following Components are involved in the Synchronization process
Opensync has to be manually triggered , and respective certificate has to be copied into the image
Execute the below script , for linking the back-haul interfaces
| Code Block | ||||||
|---|---|---|---|---|---|---|
| ||||||
root@TurrisOmnia-GW:# sh start_hostapd.sh

#!/bin/bash

killall dnsmasq
dnsmasq -u root -a 10.0.0.1 -i brlan0 -F 10.0.0.2,10.0.0.20 --dhcp-option=3,10.0.0.1 --dhcp-option=6,10.0.0.1 \
-a 169.254.2.1 -i wifi2 -F 169.254.2.2,169.254.2.10 \
-a 169.254.3.1 -i wifi3 -F 169.254.3.2,169.254.3.10 \
-C /dev/null -z --except-interface=lo -l /nvram/dnsmasq.leases --dhcp-script=/nvram/scripts/restart_mesh.sh \
--log-facility=/tmp/dnsmasq.log --log-dhcp

#touch /tmp/hostapd-acl0
#touch /tmp/hostapd-acl1
touch /tmp/hostapd-acl2
touch /tmp/hostapd-acl3

#hostapd_cli -i global raw ADD bss_config=wlan0:/nvram/hostapd0.conf
#hostapd_cli -i global raw ADD bss_config=wlan1:/nvram/hostapd1.conf
hostapd_cli -i global raw ADD bss_config=wlan2:/nvram/hostapd2.conf
hostapd_cli -i global raw ADD bss_config=wlan3:/nvram/hostapd3.conf |
Execute the below script for running the opensync Managers
| Code Block | ||||||
|---|---|---|---|---|---|---|
| ||||||
root@TurrisOmnia-GW:/# sh start_plume.sh
#temporary fix
iptables -P INPUT ACCEPT

brctl addbr br-home

#ln -s /nvram/dnsmasq.leases /tmp/dnsmasq.leases

if [ ! -f /usr/plume/etc/certs/ca.pem ];
then
cp /nvram/certs/c* /usr/plume/etc/certs/
fi

killall meshAgent
cd /usr/ccsp/mesh
meshAgent &
cd /usr/plume/etc/
/usr/plume/scripts/managers.init stop
/usr/plume/scripts/managers.init start |
Copy the Certificates in /usr/plume/etc/certs/*
Note: Cert files are provided by Opensync for Licencees
Opensync mangers and NOC status can verified by querying OVSDB table
1) root@TurrisOmnia-GW:# /usr/plume/tools/ovsh s Manager
--------------------------------------------------------------------------
_uuid | cdff~a085 |
_version | b6e7~58ac |
connection_mode | ["set",[]] |
external_ids | ["map",[]] |
inactivity_probe | 30000 |
is_connected | true |
max_backoff | ["set",[]] |
other_config | ["map",[]] |
status | ["map",[["sec_since_connect","31"],["state","ACTIVE"]]] |
target | ssl:54.200.0.59:443 |
----------------------------------------------------------------------------
1) Log on to plume NOC, with the following URL https://piranha-osacademy.dev.us-west-2.aws.plume.tech/noc/login
UserName and Password are provided for Opensync Licencees
2) Access RDKB-WebUI , in the browser <erouter0-ip>:8080
UserName: admin
Password: password - (default password)
Use Case 1:
Changing the SSID in Plume NOC
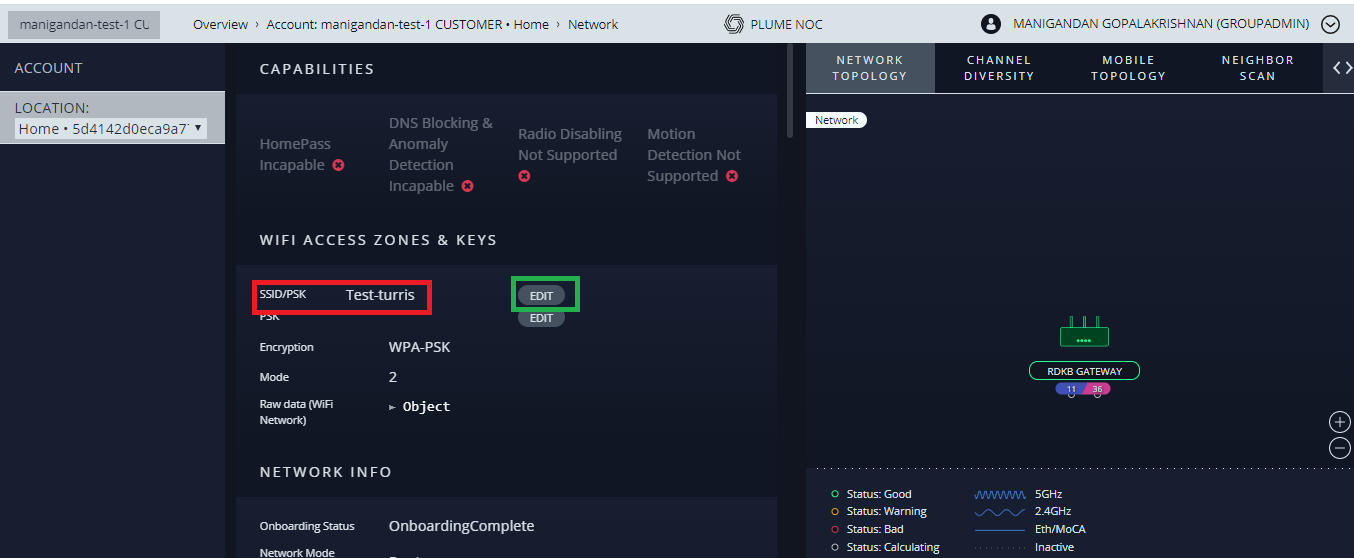
Click on EDIT button and change the SSID
Changed SSID is updated in RDKB WebUI
Can be verified with following dmcli Command
root@TurrisOmnia-GW:# dmcli eRT getv Device.WiFi.SSID.1.SSID
CR component name is: eRT.com.cisco.spvtg.ccsp.CR
subsystem_prefix eRT.
getv from/to component(eRT.com.cisco.spvtg.ccsp.wifi): Device.WiFi.SSID.1.SSID
Execution succeed.
Parameter 1 name: Device.WiFi.SSID.1.SSID
type: string, value: Test-turris
Use Case 2:
Changing the SSID in WebUI or via dmcli
Execute the below command, to change the SSID via dmcli
root@TurrisOmnia-GW:# dmcli eRT setv Device.WiFi.SSID.1.SSID string Test-turris1
CR component name is: eRT.com.cisco.spvtg.ccsp.CR
subsystem_prefix eRT.
setv from/to component(eRT.com.cisco.spvtg.ccsp.wifi): Device.WiFi.SSID.1.SSID
Execution succeed.
Log on to plume NOC and verify the Changed SSID is updated from dmcli
If unable to change SSID via dmcli command, restart ccspwifiagent.service
$ systemctl restart ccspwifiagent
To see the updated SSID in NOC refresh the page in browser<If applicable, describe any special circumstances, actions, exceptions, etc., that should be considered for troubleshooting.>