RDK Resources
[*RDK Preferred*]
Code Management Facility
RDK Forums
[RDK Conferences]
RDK Support
Archives
Papers & Presentations Archive![]()
Papers & Presentations Archive![]()
...
| Table of Contents |
|---|
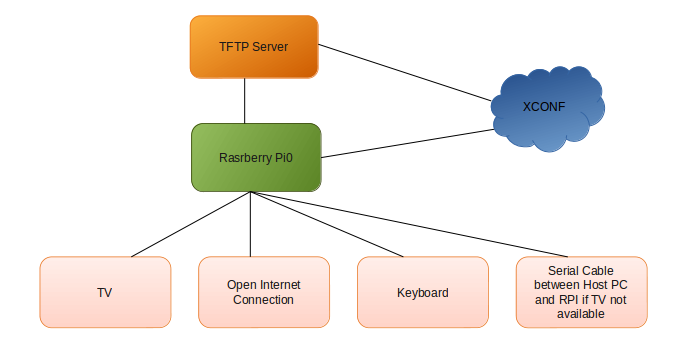
The Firmware upgrade will upgrade higher or lower version of the current image in RPI target with the help of Xconf server and Local TFTP server.
RDK Media Streamer is much more than a multi-format, multi-protocol server that delivers your media rich content across multiple screens and platforms. The RDK camera software runs on RPi-0 device. This page dedicated to bringing up and validation of RMS functionality Firmware upgrade in R-Pi Zero.

Please refer Refer below link for RPI-0 Environment setup
...
...
...
| language | bash |
|---|---|
| title | Build steps |
...
Refer below link to build camera image
RDK-C Build Instructions for R-Pi
| Code Block | ||||
|---|---|---|---|---|
| ||||
$ sudo dd if="Image Name" of="Device Name" bs=4M

Example:
sudo dd if=rdk-generic-camera-image_default_20200130060729.rootfs.rpi-sdimg of=/dev/sdb bs=4M
|
...
STEP 1:
Add require SSID and PSK in /etc/wpa_supplicant.conf file in below format
network={
ssid="username"
psk="password"
Install xinetd and tftpd-hpa application in your local PC to setup tftp server by using below command
| Code Block | ||||
|---|---|---|---|---|
| ||||
sudo apt-get install xinetd
sudo apt-get install tftpd-hpa
|
STEP 2:
Create checksum file for your upgrading image.}
| Code Block | ||||
|---|---|---|---|---|
| ||||
ctrl_interface=/var/run/wpa_supplicant
ctrl_interface_group=0
update_config=1

network={
ssid="RDK"
psk="Comcast1"
}
|
STEP 2:
Reboot the Target
After Reboot don't do step 1 and 2.
Note : Step 1 & 2 is only applicable for fresh target boot-up with new image.
STEP 3:
Modify needed resolution in rms configuration file
Supported Resolution:
SD:
Width - 640 , Height - 480
Width - 720 , Height - 576
HD:
Width - 1280 , Height - 720
FULL HD :
...
Modify resolution in below configuration file
cd /usr/local/rms/bin
vi rms.conf
| Code Block | ||||
|---|---|---|---|---|
| ||||
RRSIP=18.224.54.11
RRSPORT=81
ROOMID=rpi0
RRSSSL=0
WIDTH=1280
HEIGHT=72 |
After resolution modification need to reboot the target.
Note: This step is not necessary,it is depends on your resolution validation.
STEP 4:
WiFi connection is must needed for RMS validation.
Check WiFi connection by using below command.
| |
md5sum "<imagefile_name>.rootfs.rpi-sdimg" > imagefile_name.txt

for Ex:
upgrading image file is rdk-generic-camera-image_default_20200329074421.rootfs.rpi-sdimg
md5sum "rdk-generic-camera-image_default_20200329074421.rootfs.rpi-sdimg" > rdk-generic-camera-image_default_20200329074421.txt |
STEP 3:
Create new folder for example "tfphome" in your PC home direcotry to maintain checksum file and upgrading image file.
Keep upgrading image file and checksum file in your created folder.
For Ex:
Keep rdk-generic-camera-image_default_20200329074421.rootfs.rpi-sdimg and rdk-generic-camera-image_default_20200329074421.txt files in your tftphome folder.
STEP 4:
Check tftp file is there or not in /etc/xinetd.d/ directory. if it is not there then create tftp file under this /etc/xinetd.d/ direcotry and add below content.
vi /etc/xinetd.d/tftpifconfig
| Code Block | |||||
|---|---|---|---|---|---|
| |||||
service tftp { protocolroot@raspberrypi0-rdk-camera:~# ifconfig lo Link encap:Local Loopback inet addr:127.0.0.1 Mask:255.0.0.0 = udp port inet6 addr: ::1/128 Scope:Host = 69 socket_type UP LOOPBACK RUNNING MTU:65536 Metric:1 = dgram wait RX packets:87 errors:0 dropped:0 overruns:0 frame:0 = yes user TX packets:87 errors:0 dropped:0 overruns:0 carrier:0 = nobody server collisions:0 txqueuelen:1000 = /usr/sbin/in.tftpd server_args = -c -v RX bytes:4552 (4.4 KiB) TX bytes:4552 (4.4 KiB) wlan0 Link encap:Ethernet HWaddr B8:27:EB:2E:72:2B -s /home/xyz/tftphome ( Give upgrading file and checksum file maintained directory ) disable inet addr:192.168.43.246 Bcast:192.168.43.255 Mask:255.255.255.0 UP BROADCAST RUNNING MULTICAST MTU:1500 Metric:1 RX packets:23 errors:0 dropped:0 overruns:0 frame:0 TX packets:44 errors:0 dropped:0 overruns:0 carrier:0 collisions:0 txqueuelen:1000 RX bytes:2893 (2.8 KiB) TX bytes:5887 (5.7 KiB) |
STEP 5:
check loaded module by using below command
= no
} |
STEP 5:
Verify /etc/default/tftpd-hpa file content
vi /etc/default/tftpd-hpalsmod
| Code Block | ||||
|---|---|---|---|---|
| ||||
root@raspberrypi0-rdk-camera:~# lsmod
Module                  Size  Used by
bcm2835_v4l2           40563  0
v4l2_common             4809  1 bcm2835_v4l2
videobuf2_vmalloc       6264  1 bcm2835_v4l2
videobuf2_memops        1528  1 videobuf2_vmalloc
videobuf2_v4l2         12640  1 bcm2835_v4l2
videobuf2_core         27389  2 bcm2835_v4l2,videobuf2_v4l2
videodev              154457  4 v4l2_common,videobuf2_core,bcm2835_v4l2,videobuf2_v4l2
media                  23307  1 videodev
brcmfmac              258239  0
brcmutil                7590  1 brcmfmac
snd_bcm2835            21405  0
cfg80211              492836  1 brcmfmac
snd_pcm                79872  1 snd_bcm2835
rfkill                 19936  3 cfg80211
snd_timer              20294  1 snd_pcm
snd                    52949  3 snd_timer,snd_bcm2835,snd_pcm
lirc_rpi                6840  0
lirc_dev                7533  1 lirc_rpi
uio_pdrv_genirq         3469  0
uio                     8703  1 uio_pdrv_genirq
fixed                   2876  0
sch_fq_codel            9662  2
ipv6                  384101  18
|
STEP 6:
check camera device there or not by using below command
ls /dev/video0
| Code Block | ||||
|---|---|---|---|---|
| ||||
root@raspberrypi0-rdk-camera:~# ls /dev/video0
/dev/video0 |
STEP 7:
On Bowser of PC:
http://dh-livevid-dev.comcast.com/bryan/demov3/evoplayersTest.html
Need to modify roomid as rpi0
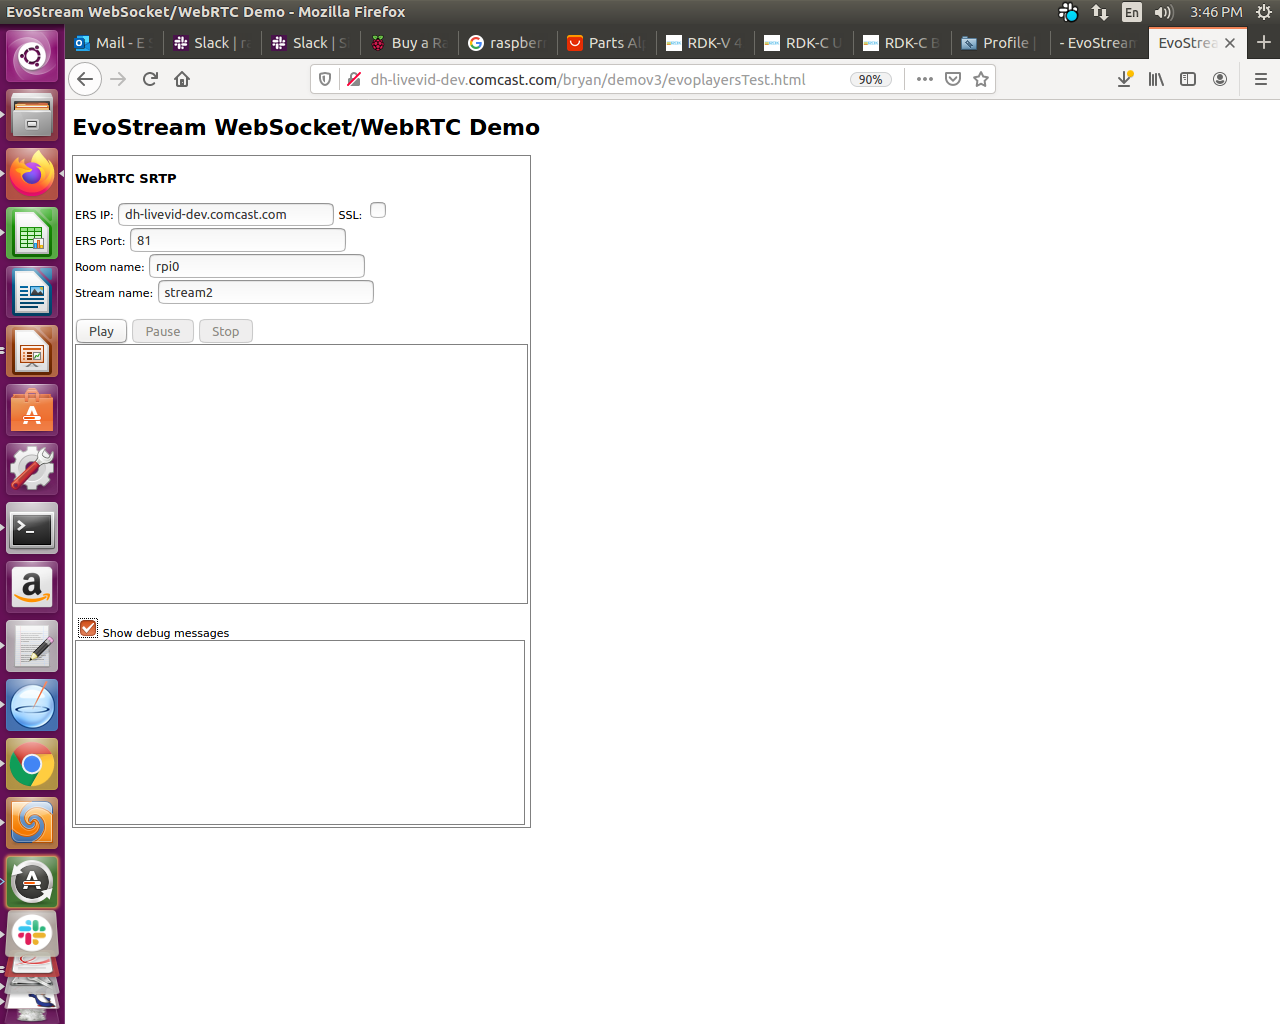
Press "PLAY" button in WebBrowser page.
| |
# /etc/default/tftpd-hpa

TFTP_USERNAME="tftp"
TFTP_DIRECTORY="/home/xyz/tftphome" ( Give upgrading file and checksum file maintained directory )
TFTP_ADDRESS="0.0.0.0:69"
TFTP_OPTIONS="--secure"
|
STEP 6:
Start tftp server and xinetd server
| Code Block | ||
|---|---|---|
| ||
sudo service tftpd-hpa restart

sudo /etc/init.d/xinetd restar |
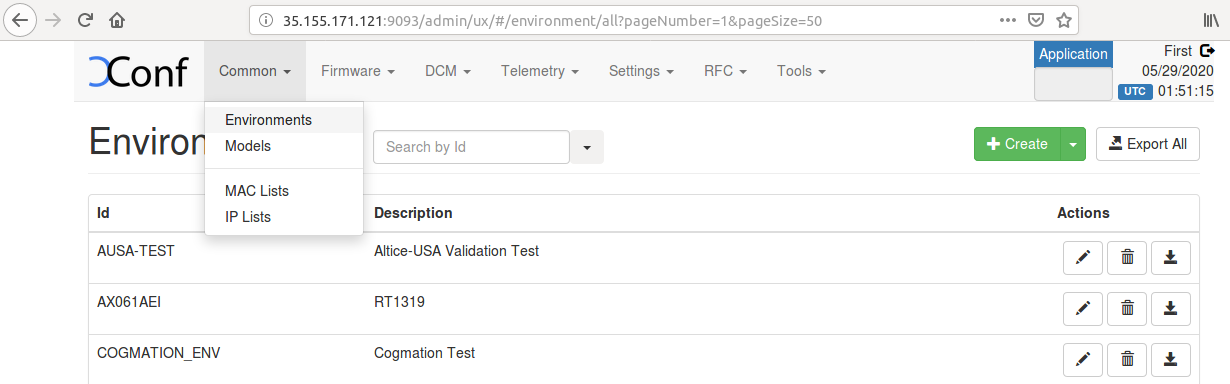
Enter XConf server wiki page with below URL to create Environment,Model,Mac list,Firmware config,Firmware rule and Download Location Round Robin Filter.
| Code Block | ||||
|---|---|---|---|---|
| ||||
http://35.155.171.121:9093/admin/ux
|
STEP 1:
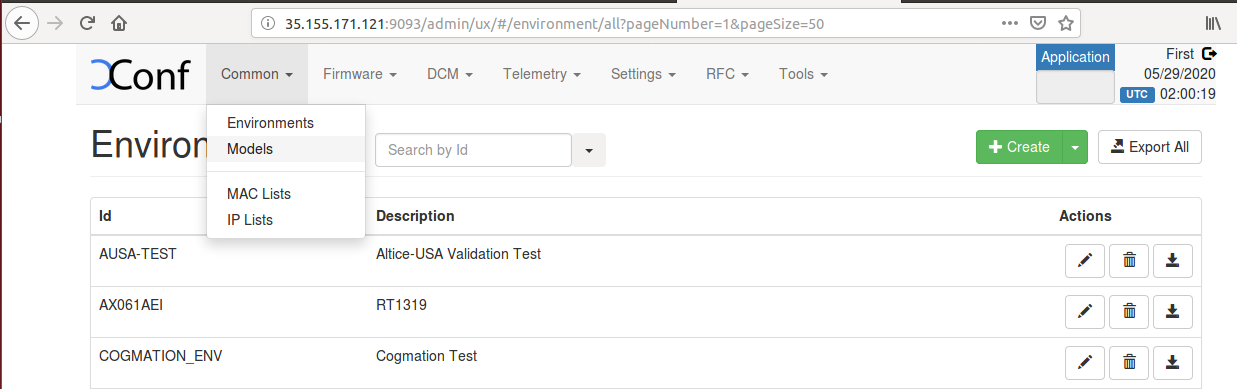
Select Environments option within common list to enter Environments page.
After entered Environments page press create button to add your device environment detail.
STEP 2:
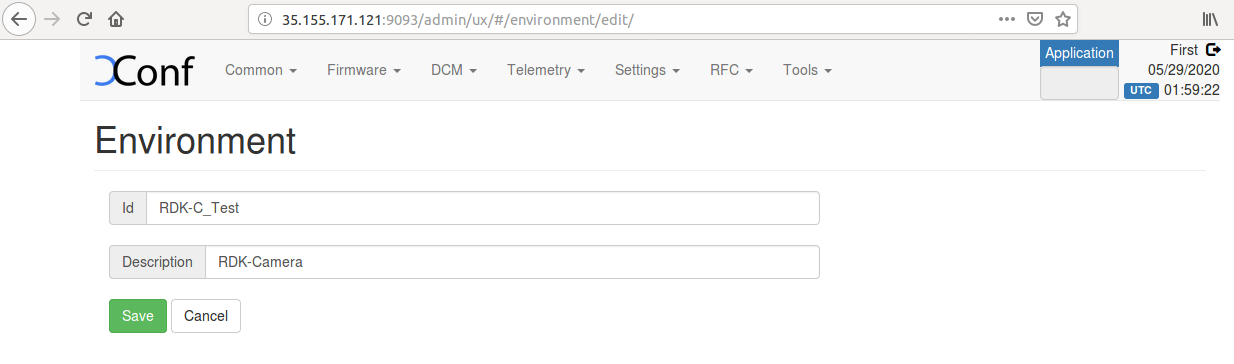
Give ID and Description to setup Environment for your device and save that details in xconf server..
STEP 1:
Select Models option within common list to enter Models page.
After entered Models page press create button to add your device model detail.
STEP 2:
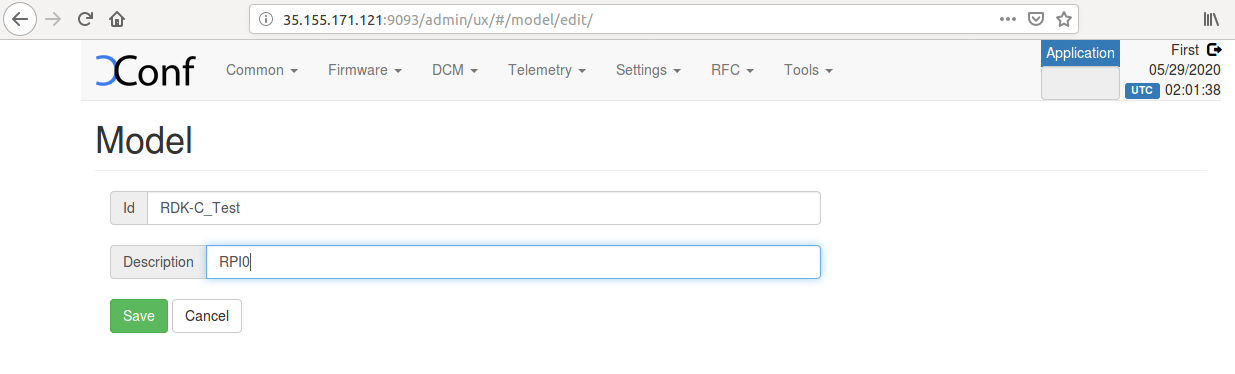
Give ID and Description to setup Model for your device and save that details in xconf server..
STEP 1:
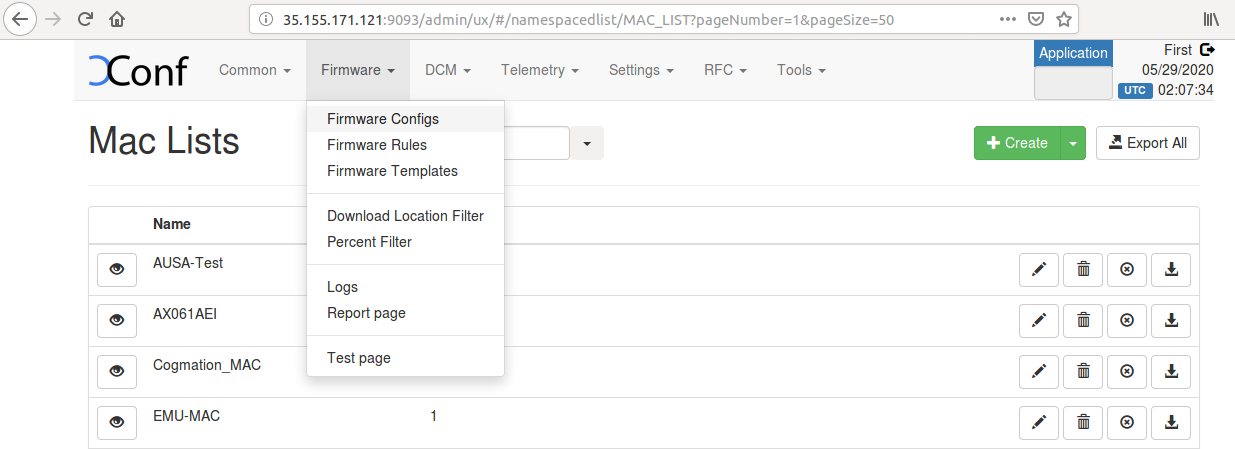
Select MAC Lists option within common list to enter MAC Lists page.
After entered MAC Lists page press create button to add your device MAC detail.

STEP 2:
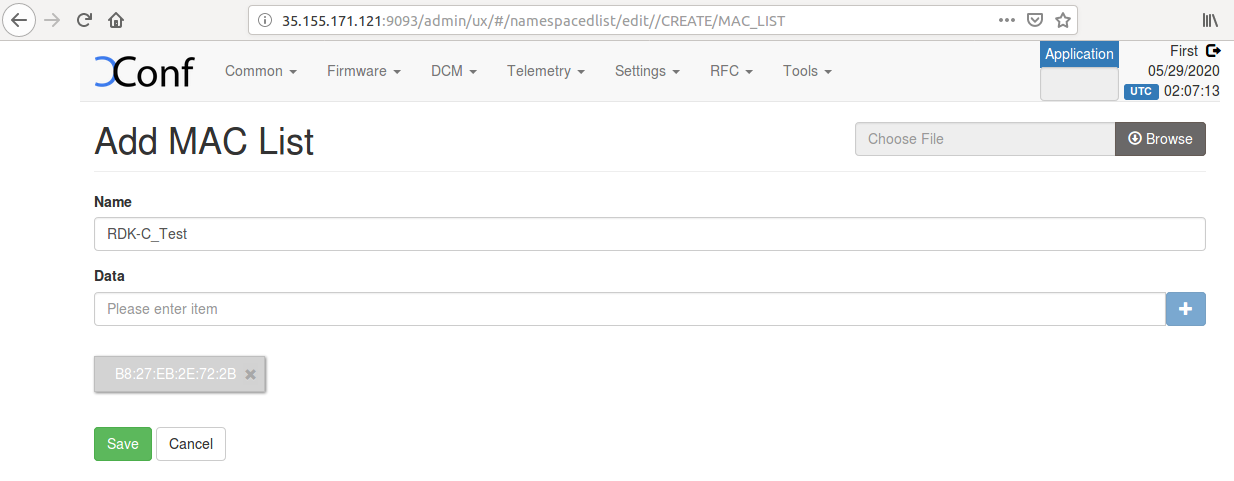
Give Name and Data to set MAC detail for your device and save that details in xconf server..
Ensure application type is stb. If the application type is xhome then change application into stb.
STEP 1:
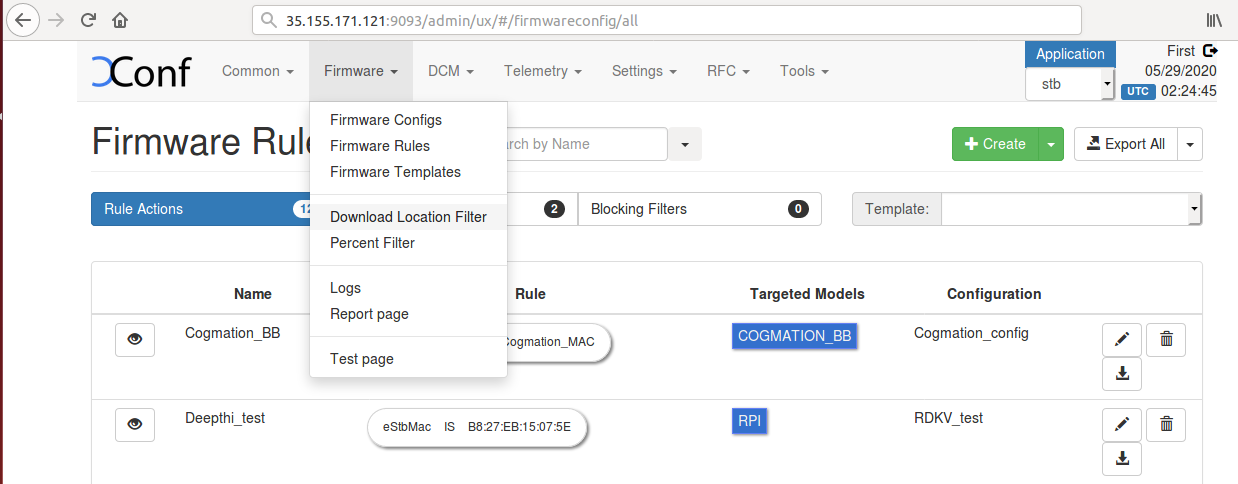
Select Firmware Configs option within common list to enter Firmware Configs page.
After entered Firmware Configs page press create button to add your device firmware configuration detail.
STEP 2:
Give Description,File name ( Upgrading image name ),Version( Upgrading image name without .rootfs.rpi.sdimg) and select your model name and save the details in xconf server.

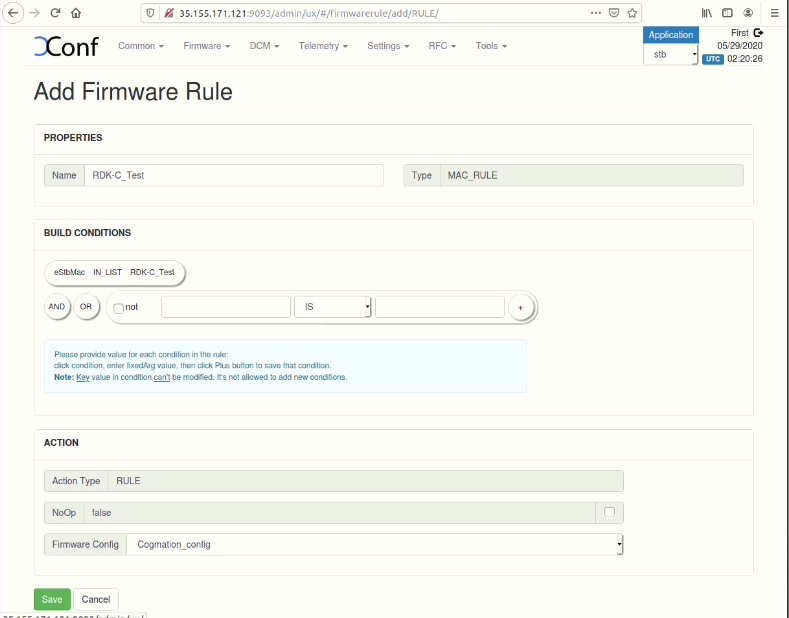
STEP 1:
Select Firmware Rule option within common list to enter Firmware Rule page.
After entered Firmware Rule page press create button to add your device firmware Rule detail.

STEP 2:
After entered firmware Rule page you can see list of template.
Choose MAC_RULE in this list of Template to add your device MAC list in Firmware Configuration.

STEP 3:
After entered Firmware Rule page.If any estbmac if there under build condition then remove that estmac before add your device specific Firmware rules.
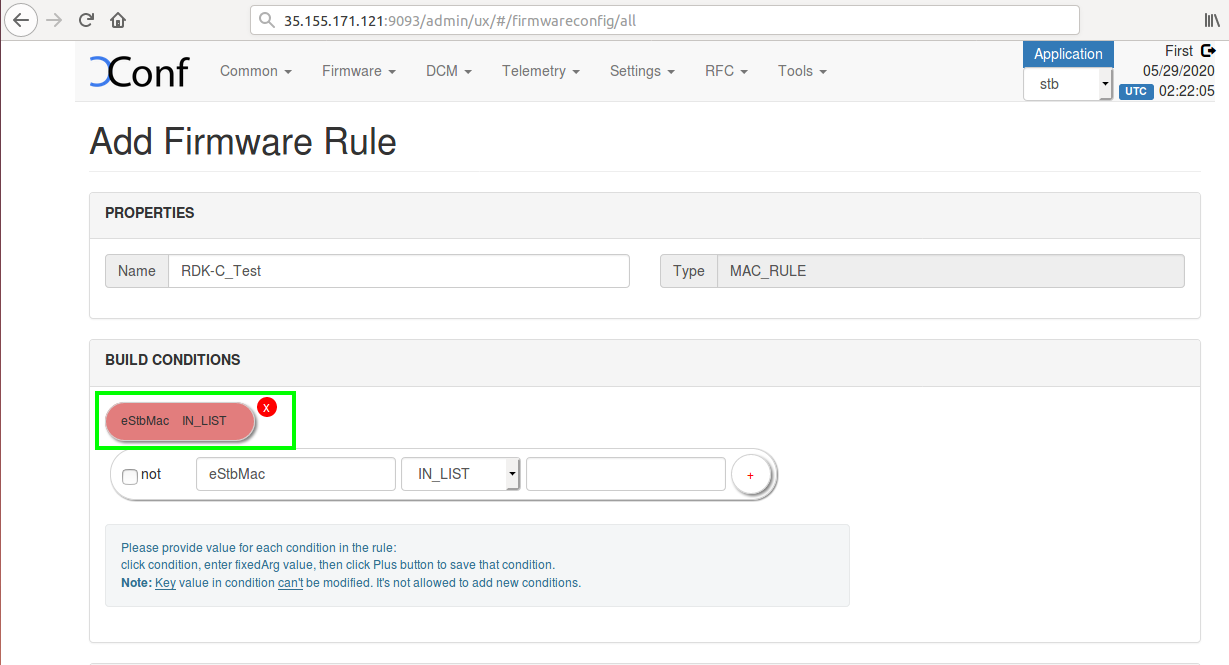
STEP 4:
Add your device specific eStbMac under build condition option.
Select your firmware config under Action option and save your Firmware rule in XConf server.
STEP 1:
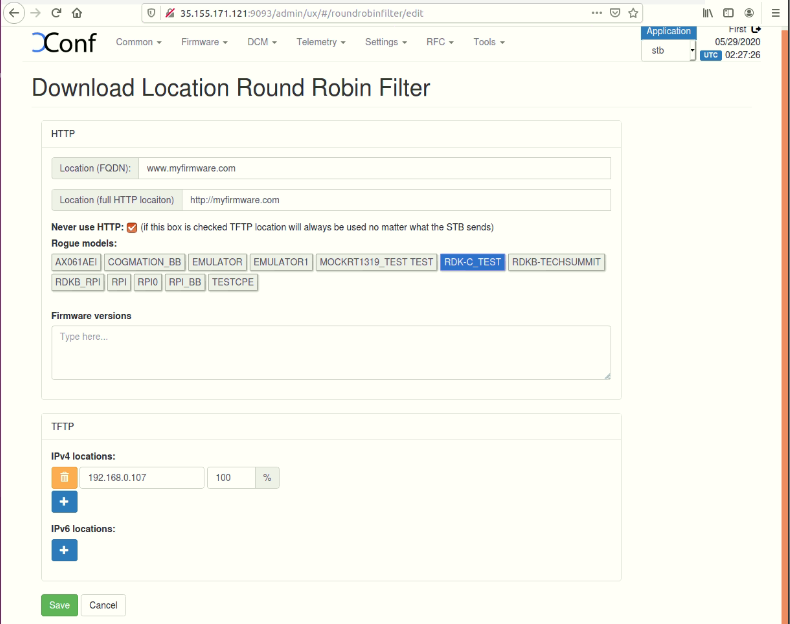
Select Download Location Filter option within common list to enter Download Location Filter page.
After entered Download Location Filter page press create button to add your Download Location detail.
STEP 2:
After entered Download Location Round Robin filter press edit button to edit your image downloading details.
Enable Never use HTTP and select your Rongue model.
Give TFTP server running IP address to download image.
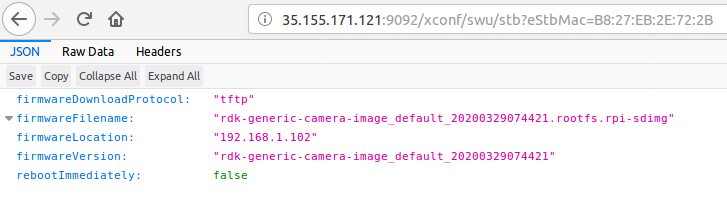
Verify that XConf Server configuration displays the Json response from the mentioned URL:
http://<Xconf Server IP:port no.>/xconf/swu/stb?eStbMac=<MAC address of Rpi board>
For Ex: http://35.155.171.121:9092/xconf/swu/stb?eStbMac=B8:27:EB:2E:72:2B
Please find the summary on firmware upgrade explained above
Note :
1. RPI will go for reboot while booting for the first time, since two more partition needs to be created which requires reboot. Depends on the image present in xconf and RPI, further reboot will happen for upgrade. Please refer to design (Firmware Upgrade Support in R-Pi - RDK Camera - Design - M5 - 2020) for how firmware upgrade works with bank switching
2. SD card should be zero filled formatted before starting the firmware upgrade procedure. DriveWipe software is used for this. Please refer the you-tube video link for the SD card full format process.
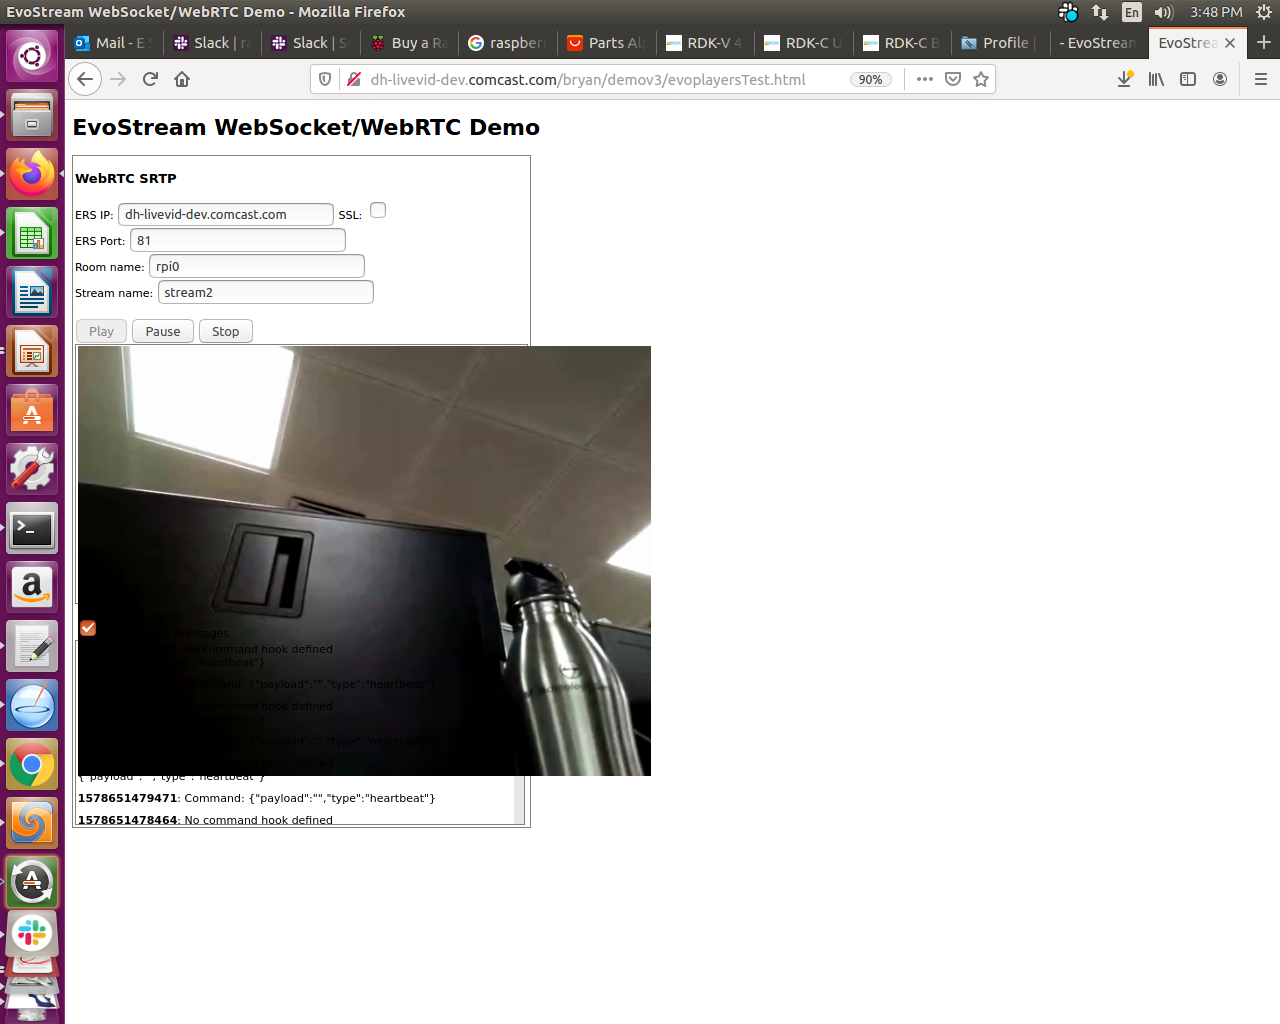
RPI will support only tftp protocol . No http protocol support is provided yetWe can able to see the capturing content on WebBrowser.