RDK Resources
[*RDK Preferred*]
Code Management Facility
RDK Forums
[RDK Conferences]
RDK Support
Archives
Papers & Presentations Archive![]()
Papers & Presentations Archive![]()
| Children Display |
|---|
| Table of Contents |
|---|
This page dedicated to bringing up and validation of Continuous video recording functionality in R-Pi Zero.
CVR uses Kinesis Video Streams and supporting 24/7 video recording support.Allows the feature of storing the recorded content locally or in any AWS server.

Please refer below link for RPI-0 Environment setup
| Code Block | ||||
|---|---|---|---|---|
| ||||
$ repo init -u "https://code.rdkcentral.com/r/manifests" -m rdkc-nosrc.xml -b rdk-next
$ repo sync
$ source meta-cmf-raspberrypi/setup-environment
	select meta-cmf-raspberrypi/conf/machine/raspberrypi0-rdk-camera.conf
$ bitbake rdk-generic-camera-image
|
| Code Block | ||||
|---|---|---|---|---|
| ||||
$ sudo dd if="Image Name" of="Device Name" bs=4M

Example:
sudo dd if=rdk-generic-camera-image_default_20200130060729.rootfs.rpi-sdimg of=/dev/sdb bs=4M
|
STEP 1:
Can't able to validate without AWS account. so,Refer below link to create AWS account.
https://docs.aws.amazon.com/kinesisvideostreams/latest/dg/gs-account.html
After AWS account creation ,Refer same link to create Access key ID ,Secret Access Key and Region Name.
STEP 2:
Follow below steps to create kinese video stream or refer below link.
https://docs.aws.amazon.com/kinesisvideostreams/latest/dg/gs-createstream.html
| Code Block | ||||
|---|---|---|---|---|
| ||||
1.Sign in to the AWS Management Console and open the Kinesis console at https://eu-west-1.console.aws.amazon.com/kinesisvideo/home?region=eu-west-1#/.
2.On the Video streams page, choose Create video stream.
3.On the Create a new video stream page, type ExampleStream for the stream name. Leave the Default configuration radio button selected.
4.Choose Create video stream.
5.After Kinesis Video Streams creates the stream, review the details on the ExampleStream page.
|
STEP 1:
Add require SSID and PSK in /etc/wpa_supplicant.conf file in below format
network={
ssid="username"
psk="password"
}
| Code Block | ||||
|---|---|---|---|---|
| ||||
ctrl_interface=/var/run/wpa_supplicant
ctrl_interface_group=0
update_config=1

network={
ssid="RDK"
psk="Comcast1"
}
|
STEP 2:
Reboot the Target
After Reboot don't do step 1 and 2.
Note : Step 1 & 2 is only applicable for fresh target boot-up with new image.
STEP 3:
WiFi connection is must needed for CVR-AWS validation.
Check WiFi connection by using below command.
ifconfig
| Code Block | ||||
|---|---|---|---|---|
| ||||
root@raspberrypi0-rdk-camera:~# ifconfig
lo        Link encap:Local Loopback
          inet addr:127.0.0.1  Mask:255.0.0.0
          inet6 addr: ::1/128 Scope:Host
          UP LOOPBACK RUNNING  MTU:65536  Metric:1
          RX packets:87 errors:0 dropped:0 overruns:0 frame:0
          TX packets:87 errors:0 dropped:0 overruns:0 carrier:0
          collisions:0 txqueuelen:1000
          RX bytes:4552 (4.4 KiB)  TX bytes:4552 (4.4 KiB)

wlan0     Link encap:Ethernet  HWaddr B8:27:EB:2E:72:2B
          inet addr:192.168.43.246  Bcast:192.168.43.255  Mask:255.255.255.0
          UP BROADCAST RUNNING MULTICAST  MTU:1500  Metric:1
          RX packets:23 errors:0 dropped:0 overruns:0 frame:0
          TX packets:44 errors:0 dropped:0 overruns:0 carrier:0
          collisions:0 txqueuelen:1000
          RX bytes:2893 (2.8 KiB)  TX bytes:5887 (5.7 KiB)
|
STEP 4:
Export Created Stream Name,Access key id, Secret access key and Region name in RPI target.
export STREAM_NAME="samplestream"
export ACCESS_KEY="XXXXXXXXXXXXXX"
export SECRET_KEY="yyyyyyyyyyyyyyyyyyyyyyyy"
export AWS_DEFAULT_REGION="eu-west-1"
| Code Block | ||||
|---|---|---|---|---|
| ||||
root@raspberrypi0-rdk-camera:~# export STREAM_NAME="Samplestream"
root@raspberrypi0-rdk-camera:~# export ACCESS_KEY="XXXXXXXXXXXXX"
root@raspberrypi0-rdk-camera:~# export SECRET_KEY="yyyyyyyyyyyyyyyyyyyyyyyyy"
root@raspberrypi0-rdk-camera:~# export AWS_DEFAULT_REGION="eu-west-1" |
STEP 5:
Check exported Access key id,Secret access key,Stream name and Region name by using below command.
printenv
| Code Block | ||||
|---|---|---|---|---|
| ||||
root@raspberrypi0-rdk-camera:~# printenv
PLAYERSINKBIN_USE_WESTEROSSINK=1
WAYLAND_DISPLAY=wayland-0
SHELL=/bin/sh
TERM=xterm
LD_PRELOAD=/usr/lib/libopenmaxil.so:/usr/lib/libwayland-client.so.0
HUSHLOGIN=FALSE
USER=root
SYSTEMD_PAGER=/bin/cat
ACCESS_KEY=XXXXXXXXXXXXXX
STREAM_NAME=samplestream
MAIL=/var/spool/mail/root
PATH=/usr/local/bin:/usr/bin:/bin:/usr/local/sbin:/usr/sbin:/sbin
AWS_DEFAULT_REGION=eu-west-1
SECRET_KEY=yyyyyyyyyyyyyyyyyyyyyyyy
PWD=/home/root
EDITOR=vi
PS1=\u@\h:\w\$
SHLVL=1
HOME=/home/root
LOGNAME=root
XDG_RUNTIME_DIR=/run
_=/usr/bin/printenv
|
STEP 6:
Run cvr-gst-rpi binary to transmit data into AWS server.
cvr-gst-rpi
| Code Block | ||||
|---|---|---|---|---|
| ||||
root@raspberrypi0-rdk-camera:~# cvr-gst-rpi
Conf file /etc/debug.ini open success
rdk_logger_init /etc/debug.ini Already Stack Level Logging processed... not processing again.
200430-10:37:21.578891 [mod=GSTREAMER, lvl=DEBUG] [tid=7305] /usr/src/debug/cvr/git-r0/git/cvr-gst-rpi/cvr_gst_rpi.c(176):Element linking succes
s for pipelin |
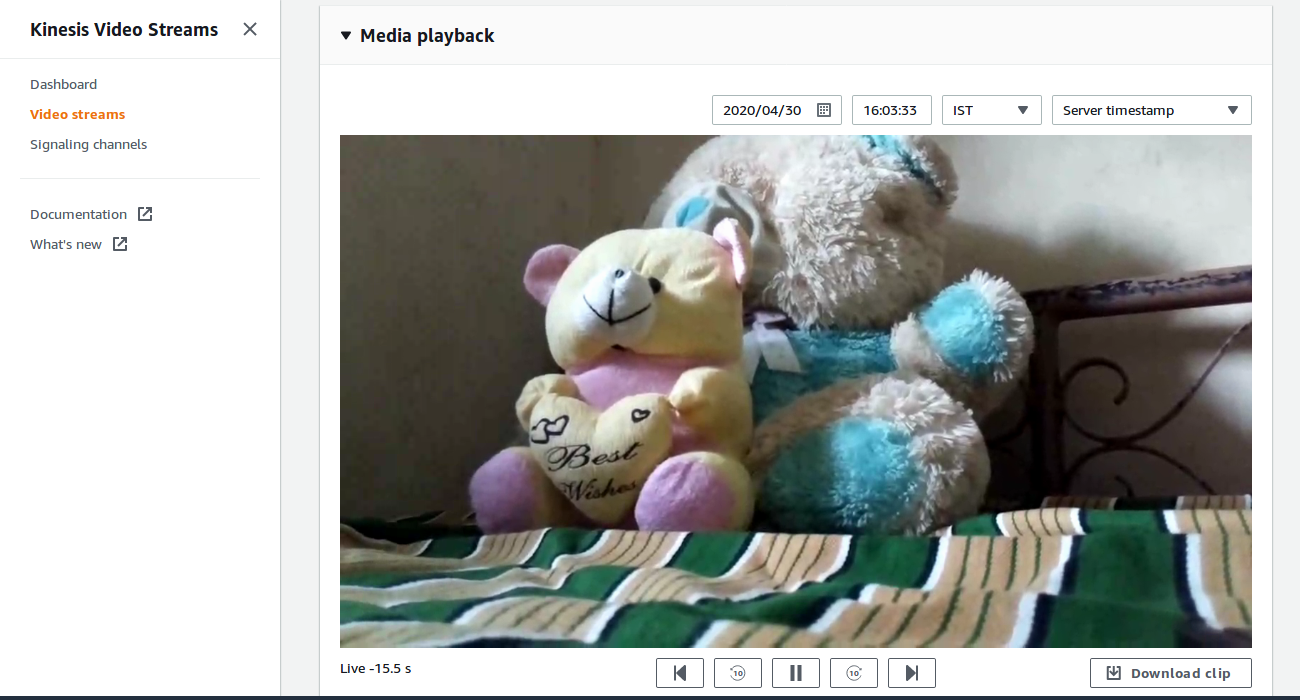
STEP 7:
Enter into AWS account and select the corresponding video stream service which was we created for streaming.
Press "Media Playback" option on the video stream player.
Streaming video content should decode properly on AWS.
CVR Support in AWS cloud through gstreamer kvs sink.