RDK Resources
[*RDK Preferred*]
Code Management Facility
RDK Forums
[RDK Conferences]
RDK Support
Archives
Papers & Presentations Archive![]()
Papers & Presentations Archive![]()
...
Create a folder
$ mkdir xconf
Step into the folder & clone the repo
$ cd xconf/
$ git clone https://github.com/rdkcentral/xconfserver.git -b main
To install Cassandra , follow the below steps
Unpack the tarball :
$ tar -xvf  apache-cassandra-3.11.9-bin.tar.gz
...
$ sudo bin/cassandra...
$ bin/nodetool statusTo install Cassandra , follow the below steps
$ wget -c https://archive.apache.org/dist/cassandra/3.11.9/apache-cassandra-3.11.9-bin.tar.gz
Unpack the tarball :
$ tar -xvf  apache-cassandra-3.11.9-bin.tar.gz
$ cd apache-cassandra-3.11.9$ sudo bin/cassandra$ bin/nodetool statusNote : For the next step, make sure that python is installed. Because cqlsh is python based command line tool. If python is not installed , use this command : sudo apt install python2.7
...
cqlsh> quit
...
Production Installation
The production installation should be similar to the local installation, except that Cassandra will be installed to multiple hosts. Please see the Apache Cassandra documentation for more information.
...
$ bin/nodetool status
You will get an output like this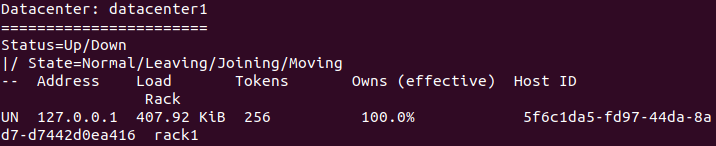
...
...
...
...
...
...
The sample service.properties file will be available in xconf-angular-admin/src/test/resources/service.properties, the below content is copied from the sample with a modification in cassandra port you can use this.
| Code Block | ||||
|---|---|---|---|---|
| ||||
cassandra.keyspaceName=demo cassandra.contactPoints=127.0.0.1 cassandra.username= cassandra.password= cassandra.port=9042 cassandra.authKey= dataaccess.cache.tickDuration=60000 dataaccess.cache.retryCountUntilFullRefresh=10 dataaccess.cache.changedKeysTimeWindowSize=900000 dataaccess.cache.reloadCacheEntries=false dataaccess.cache.reloadCacheEntriesTimeout=1 dataaccess.cache.reloadCacheEntriesTimeUnit=DAYS dataaccess.cache.numberOfEntriesToProcessSequentially=10000 dataaccess.cache.keysetChunkSizeForMassCacheLoad=500 dataaccess.cache.changedKeysCfName=XconfChangedKeys4 |
...
To run the admin UI launch it as http://<XCONF-SERVER-IP>:19093/admin/ in any browser(Default port is set as 19093, it can be changed by using the option -Djetty.port=[port number]). This will redirect to the login page.
To launch in localhost : http://127.0.0.1:19093/admin
If the user wants both read If the user wants both read and write permissions ,then enter username and password for the login as admin and admin respectively
If the user wants only read permissions ,then enter username and password for the login as user and user respectively.
...
If xconf-angular-admin is run with -Dspring.profiles.active=dev UI will use not compiled .js and .css files but the source files. See xconf-angular-admin
...
/src/main/webapp/WEB-INF/jsp/xconfindex.jsp for details. That can be useful for local development purpose, to update UI it is just needed to reload page with cache refresh option.
For first time application deployment, create a "service.properties" file under the path xconfserver/xconf-dataservice/src/main/resources/service.resources/service.properties with the following contents. The sample service.properties file will be available in xconf-dataservice/src/test/resources/sample-service.properties, the below content is taken from there and modified with change in cassandra port .(There are some mistakes in that sample file - 1. cassandra.keyspaceName=demo 2. dataaccess.cache.changedKeysCfName=XconfChangedKeys4 that is rectified below. You can also edit that file with the changes 1 and 2. Then rename it to be used here), the below content is taken from there and modified with change in cassandra port .
| Code Block | ||||
|---|---|---|---|---|
| ||||
cassandra.keyspaceName=demo cassandra.contactPoints=127.0.0.1 cassandra.username= cassandra.password= cassandra.port=9042 cassandra.authKey= dataaccess.cache.tickDuration=60000 dataaccess.cache.retryCountUntilFullRefresh=10 dataaccess.cache.changedKeysTimeWindowSize=900000 dataaccess.cache.reloadCacheEntries=false dataaccess.cache.reloadCacheEntriesTimeout=1 dataaccess.cache.reloadCacheEntriesTimeUnit=DAYS dataaccess.cache.numberOfEntriesToProcessSequentially=10000 dataaccess.cache.keysetChunkSizeForMassCacheLoad=500 dataaccess.cache.changedKeysCfName=XconfChangedKeys4 |
...
$ cd ~xconf/xconfserver/xconf-dataservice
$ mvn jetty:run -DappConfig=${path-to-service-properties} -f pom.xmlFor first time run only, we need to specify the path to service.properties . For the subsequent runs execute the below command in the folder xconfserver/xconf-dataservice:
...
To launch the application go to http://<XCONF-SERVER-IP>:19092/queries/environments (Default port is set as 19092, it can be changed by using the option -Djetty.port=[port number]) . To verify, add an entry in the environments tab of the Xconf admin application and check whether the same is updated here in data service.
To launch in localhost : http://127.0.0.1:19092/queries/environments
...
Solution : This exception can be resolved by copying the .so file to the path /usr/lib.
| Show If | ||
|---|---|---|
| ||
Reference SetupFor helping the community to familiarize with the application, rdkm support team has created a reference setup . We have enabled SSL for both the applications and the URLs are given below Xconf angular admin - https://xconf.rdkcentral.com:9093/admin/ Xconf dataservice - https://xconf.rdkcentral.com:9092/info/version |
...
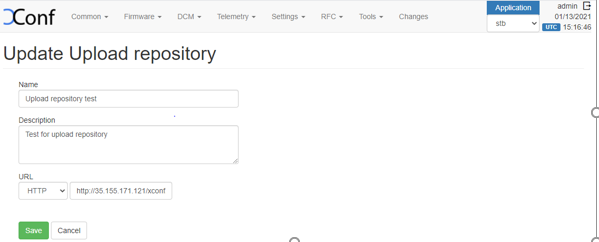
1. Create upload repository via DCM->Upload repository -> Create. Here we can add where to configure the log upload, i.e. the upload URL and protocol(This will be the URL of logopload server that is setup to upload the log files, it can be http, https or tftp servers).
| Panel | ||
|---|---|---|
| ||
|
...
5. Edit the Log upload Setting (Create schedule & Add the upload repository created beforehand).
6. Note : The formula will be effective only if we select 'Are Settings Active' option to 'true' in 'Create Device Settings' and 'Log Upload settings'
a.Verification of log upload settings test page.
...
...
| Code Block |
|---|
{
    "urn:settings:GroupName": "RDKM_TEST",
    "urn:settings:CheckOnReboot": true,
    "urn:settings:CheckSchedule:cron": "2 1 2 1 1",
    "urn:settings:CheckSchedule:DurationMinutes": 0,
    "urn:settings:LogUploadSettings:Message": null,
    "urn:settings:LogUploadSettings:Name": "RDKM_TEST",
    "urn:settings:LogUploadSettings:NumberOfDays": 1,
    "urn:settings:LogUploadSettings:UploadRepositoryName": "RDKM_TEST",
    "urn:settings:LogUploadSettings:RepositoryURL": "http://xconf.rdkcentral.com{loguoloadserver}/xconf/logupload.php",
    "urn:settings:LogUploadSettings:UploadOnReboot": true,
    "urn:settings:LogUploadSettings:UploadImmediately": false,
    "urn:settings:LogUploadSettings:upload": true,
    "urn:settings:LogUploadSettings:UploadSchedule:cron": "2 1 1 1 1",
    "urn:settings:LogUploadSettings:UploadSchedule:levelone:cron": null,
    "urn:settings:LogUploadSettings:UploadSchedule:leveltwo:cron": null,
    "urn:settings:LogUploadSettings:UploadSchedule:levelthree:cron": null,
    "urn:settings:LogUploadSettings:UploadSchedule:DurationMinutes": 0,
    "urn:settings:VODSettings:Name": null,
    "urn:settings:VODSettings:LocationsURL": null,
    "urn:settings:VODSettings:SRMIPList": null,
    "urn:settings:TelemetryProfile": {
        "id": "69e37757-b463-47aa-94a8-2ce438e26a50",
        "telemetryProfile": [
            {
                "header": "Firewall",
                "content": "starting firewall service",
                "type": "FirewallDebug.txt",
                "pollingFrequency": "1"
            },
            {
                "header": "MEDIA_ERROR_NETWORK_ERROR",
                "content": "onMediaError NETWORK ERROR(10)",
                "type": "receiver.log",
                "pollingFrequency": "1"
            }
        ],
        "schedule": "3",
        "expires": 0,
        "telemetryProfile:name": "RDKM_TEST",
        "uploadRepository:URL": "http://xconf.rdkcentral.com{logupload-server}/xconf/logupload.php",
        "uploadRepository:uploadProtocol": "HTTP"
    }
} |
...
| Code Block |
|---|
{
    "urn:settings:GroupName": "RDKM_TEST",
    "urn:settings:CheckOnReboot": true,
    "urn:settings:CheckSchedule:cron": "2 1 2 1 1",
    "urn:settings:CheckSchedule:DurationMinutes": 0,
    "urn:settings:LogUploadSettings:Message": null,
    "urn:settings:LogUploadSettings:Name": "RDKM_TEST",
    "urn:settings:LogUploadSettings:NumberOfDays": 1,
    "urn:settings:LogUploadSettings:UploadRepositoryName": "RDKM_TEST",
    "urn:settings:LogUploadSettings:RepositoryURL": "http://xconf.rdkcentral.com{log-upload-server}/xconf/logupload.php",
    "urn:settings:LogUploadSettings:UploadOnReboot": true,
    "urn:settings:LogUploadSettings:UploadImmediately": false,
    "urn:settings:LogUploadSettings:upload": true,
    "urn:settings:LogUploadSettings:UploadSchedule:cron": "2 1 1 1 1",
    "urn:settings:LogUploadSettings:UploadSchedule:levelone:cron": null,
    "urn:settings:LogUploadSettings:UploadSchedule:leveltwo:cron": null,
    "urn:settings:LogUploadSettings:UploadSchedule:levelthree:cron": null,
    "urn:settings:LogUploadSettings:UploadSchedule:DurationMinutes": 0,
    "urn:settings:VODSettings:Name": null,
    "urn:settings:VODSettings:LocationsURL": null,
    "urn:settings:VODSettings:SRMIPList": null,
    "urn:settings:TelemetryProfile": {
        "id": "69e37757-b463-47aa-94a8-2ce438e26a50",
        "telemetryProfile": [
            {
                "header": "Firewall",
                "content": "starting firewall service",
                "type": "FirewallDebug.txt",
                "pollingFrequency": "1"
            },
            {
                "header": "MEDIA_ERROR_NETWORK_ERROR",
                "content": "com.cisco.spvtg.ccsp.meshagent",
                "type": "<event>",
                "pollingFrequency": "1"
            }
        ],
        "schedule": "3",
        "expires": 0,
        "telemetryProfile:name": "RDKM_TEST",
        "uploadRepository:URL": "http://xconf.rdkcentral.comlog-upload-server}/xconf/logupload.php",
        "uploadRepository:uploadProtocol": "HTTP"
    }
} |
...
An HTTP location will be returned by default to all devices. To enable tftp(If you have the download location of the firmware as tftp, then only you need to setup this)as download location for a particular set of devices, we need to override it from firmware rules.
...
4. To add IPV6 address of tftp servers, you can either specify it here in the define properties rule or else from ‘Download Round Robin Filter’ page. To add IPV6, add it as ‘ipv6FirmwareLocation’ Property in ‘define properties rule’ page (ipv6FirmwareLocation key will be there by default, you need to add the value as tftp ipv6 address).
5. To add IPV6 address of tftp servers in ‘Download Round Robin Filter’, Go to Firmware - > Download Location Filter. Enter the tftp IPV6 locations and also the percentages. The devices will get back one of the locations based on the percentage listed for the location.
...
6. Response example for https://xconf.rdkcentral.com:9092{xconf-ip}:{port}/xconf/swu/stb?eStbMac={mac}. Here the 'firmwareLocation' and 'firmwareDownloadProtocol' are overrided at 'Define Properties' firmware rule.
The 'ipv6' addresses will be one of the addresses mentioned in the 'Download Filter' page
{
"firmwareDownloadProtocol": "tftp",
. If you don't want "ipv6FirmwareLocation", then don't setup it in 'Define Properties' or in the 'Download location filter' pages and you will get only "firmwareLocation" in the response
{
"firmwareDownloadProtocol": "tftp",
"firmwareFilename": " "firmwareFilename": "rdkb-generic-broadband-image_default_20200406103506.rootfs.rpi-sdimg",
...
7. Setting up IPV4 locations via ‘Download Location Round Robin Filter’ is not supported. This can be set only by the property 'firmwareLocation' from the 'Define Properties' firmware rule page.
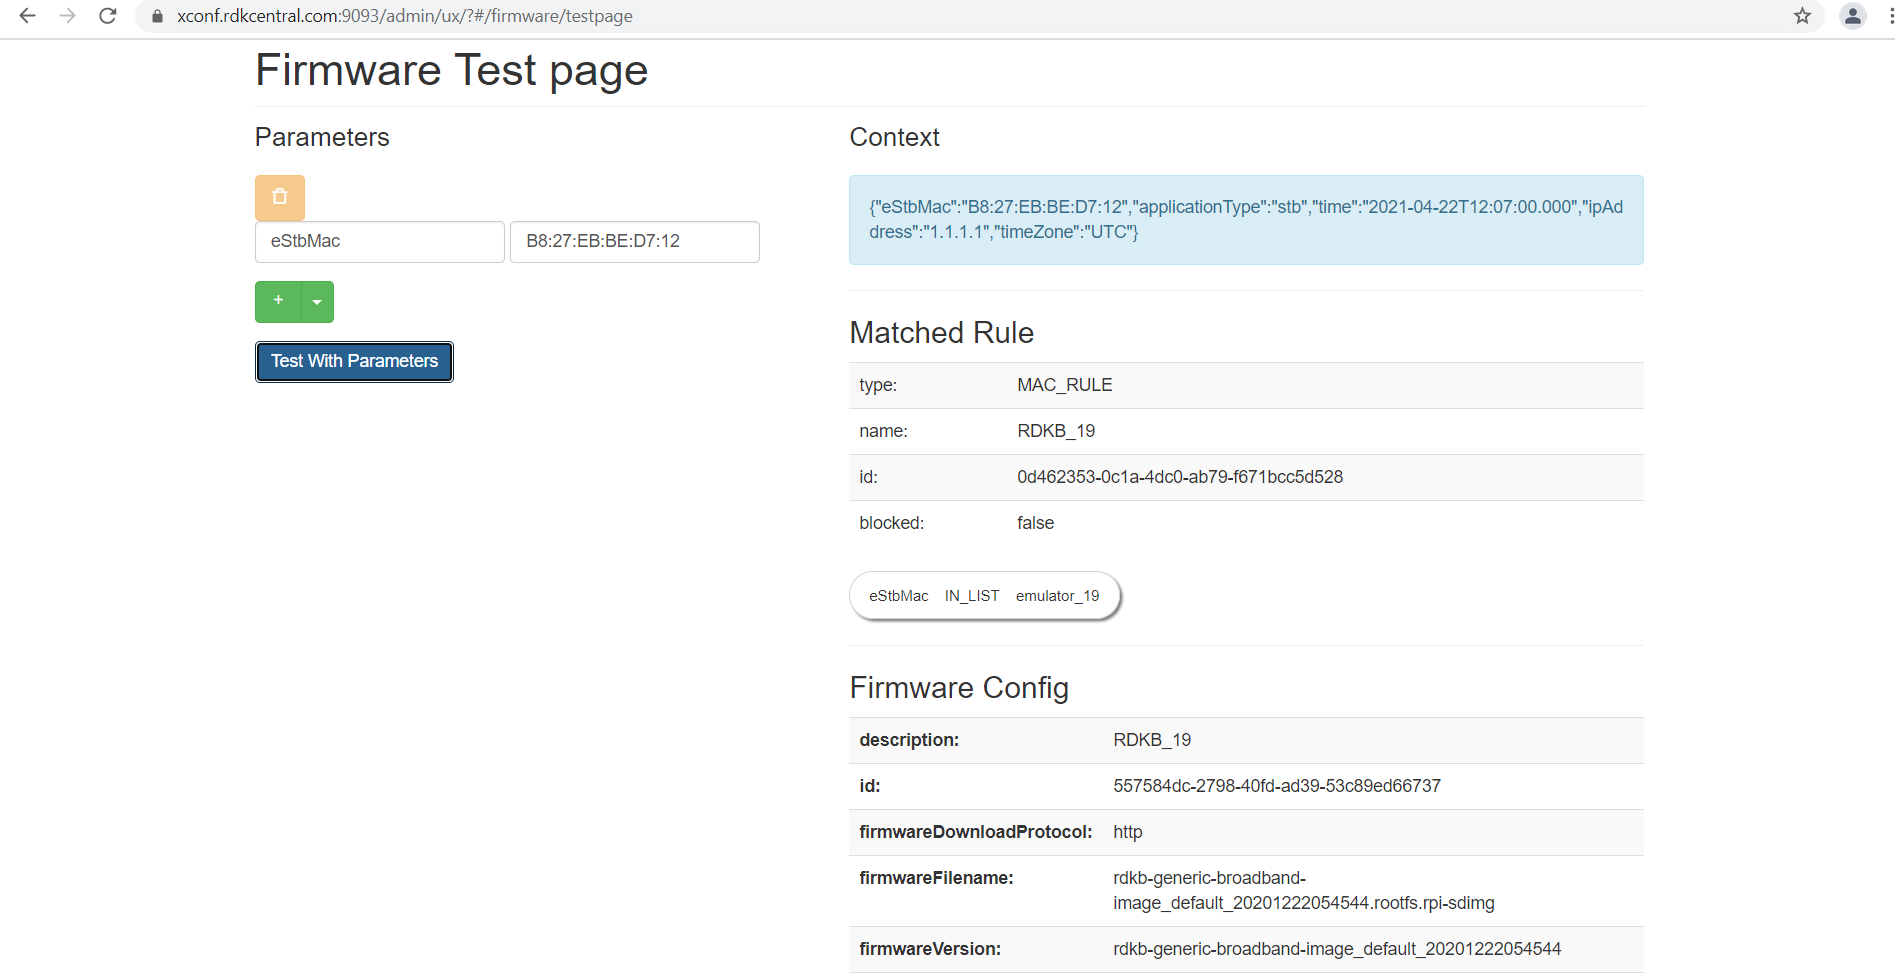
a. Verification of Firmware test page.
After creating the Firmware configs and Firmware rules , go to Firmware->Test page and give a parameter that will match the one of the rule that you have created. Then matched rule will be displayed like below.
| Panel | ||
|---|---|---|
| ||
 |
b. Verification via curl command
The curl command mocks the request being sent from an STB like below and sample response is also given. It can be given as a curl command or as a get request via postman or browser.
eg :
$ curl 'https://<XCONF_IP>:19092/xconf/swu/stb?eStbMac=B8:27:EB:BE:D7:12
’
Sample Response :
| Code Block |
|---|
{
    "firmwareDownloadProtocol": "http",
    "firmwareFilename": "rdkb-generic-broadband-image_default_20201222054544.rootfs.rpi-sdimg",
    "firmwareLocation": "xconf.rdkcentral.com",
    "firmwareVersion": "rdkb-generic-broadband-image_default_20201222054544",
    "rebootImmediately": false
} |
...
8. Note : Just like we added tftp location and protocol here, we can also override the default value with http as well. For firmwareDownloadProtocol, add 'http' and for the 'firmwareLocation', add http location
There is a new option added in the Firmware Config, where we can add parameters. For example if we add parameters 'firmwareLocation' and 'firmwareDownloadProtocol'. then we will be able to override the default download location set from the 'DownLoad Location Filter' page.
To create a new firmware configuration for a particular set of devices with http download location :
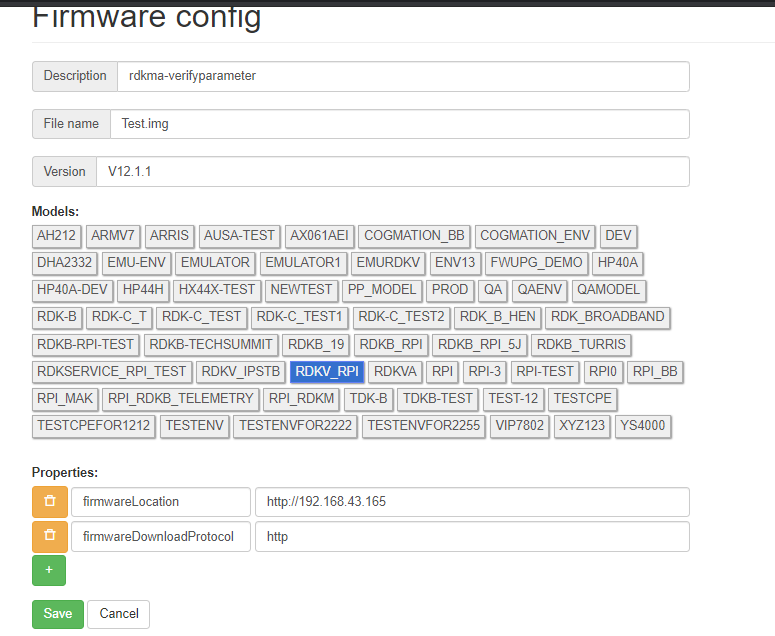
a. Verification of Firmware test page.
After creating the Firmware configs and Firmware rules , go to Firmware->Test page and give a parameter that will match the one of the rule that you have created. Then matched rule will be displayed like below.
| Panel | ||
|---|---|---|
| ||
|
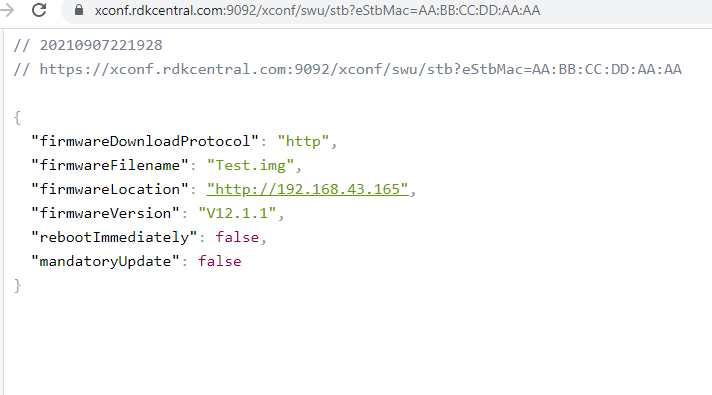
b. Verification via curl command
The curl command mocks the request being sent from an STB like below and sample response is also given. It can be given as a curl command or as a get request via postman or browser.
eg :
$ curl 'https://<XCONF_IP>:19092/xconf/swu/stb?eStbMac=B8:27:EB:BE:D7:12
...
’
Sample Response :
| Code Block |
|---|
 {
  "firmwareDownloadProtocol": "http",
  "firmwareFilename": "vip7802_FBT_rdk-next_20210610095056.pkg.tar.gz",
  "firmwareLocation": "xconf.rdkcentral.com",
  "firmwareVersion": "vip7802_FBT_rdk-next_20210610095056",
  "rebootImmediately": false,
  "mandatoryUpdate": false
} |
| CURL Command | curl 'http://<XCONF_IP>:19092/xconf/swu/stb?eStbMac=B8:27:EB:BE:D7:12&model=ARMv7&capabilities=RCDL&capabilities=supportsFullHttpUrl' |
|---|---|
| CPE Script (RDK-V) | /lib/rdk/swupdate_utility.sh |
| CPE Service (RDK-V) | /lib/systemd/system/swupdate.service |
Percentage based filters allow us to block a certain percentage of Xconf responses that would otherwise have resulted in a change in firmware. The use case for this is when we have tons of STBs out there and we don't yet have scheduled downloads. We would like to be able to only service a certain percentage as a throttling mechanism so download servers aren't overwhelmed.
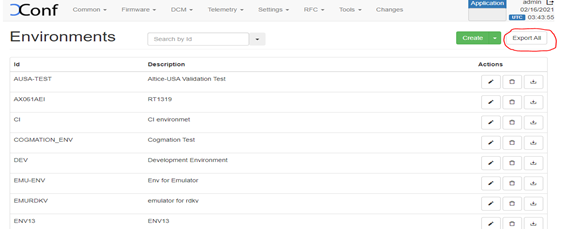
We can import and export all the configuration data from the UI itself. This feature can be primarily used for transferring the configuration data from one xconfserver setup to the other one.
The export and import data need to be done separately for the Application - stb, xhome and rdkcloud for all the pages except those in Common tab.
To export data from a page, Click on ‘Export All’ button in that page. The configuration data will be downloaded as a JSON file.
To import data :

This is an exception from unit test , but the tests will run successfully. Build process may stall for some time but the build will be successful and the application can be launched successfully. So it can be ignored as well. Or you can run the mvn build step - 'mvn clean install -DskipTests=true', instead of the 'mvn clean install'.
This can be added in the build conditions just like you add maclists or IPlists.
3. I am getting a 503 error on accessing the dataservice. What may be the reason?
Check whether Cassandra DB is up or not. If Cassandra DB is not up, then it may affect the admin UI as well. The admin UI may be up, but you may not be able to add data to the Application.
4. We are getting 'Failed to execute goal com.github.eirslett:frontend-maven-plugin:1.10.0:npm (Compile via NPM install) on project xconf-angular-admin: Failed to run task: 'npm install' failed.'. What will be the reason?
For running xconf-angular admin, frontend-maven-plugin is used and it will internally install node and npm. Some dependencies may not be getting installed due to network restrictions. Run the build command 'mvn clean install' using -e switch and you will get the full error trace. Rectify the network issue and continue
5. Is there a requirement for a GUI for deployment?
No, there is no requirement for GUI based deployment environment
6. Python 2.7 is mentioned here, Can we use any other Python versions?
At the time of reference setup, this python version worked with the Cassandra version we used. For the reference setup we used cassandra 3.11.9 and python 2.7 . For Cassandra 3X, python 2.7 is required, https://community.datastax.com/questions/11213/py3-support-for-cassandra-3116.html.
7. Can openjdk v11 be used?
No, Like mentioned in the userguide app requires java 8 and you can refer the prerequisites here in readme https://github.com/rdkcentral/xconfserver#readme
8. Local Firewall is required. Are there any known issues with this?
Firewall issue is not mentioned in the user guide. However there were issues in the past where partner would deploy the application in their VMs and due to the firewall , they may face issues to access it. This need to be resolved internally.
9. We are getting this issue on running Cassandra - "Java HotSpot (TM) 64-Bit Server VM warning: Cannot open file. /..logs/gc.log due to No such file or directory"
This may be an issue related to the memory. This issue has happened in the past when community members try to setup the applications in Virtual env like Oracle VM virtual box. Increase the allocated memory for the virtual machine and it will be resolved
...
/lib/rdk/swupdate_utility.sh
...
We can import and export all the configuration data from the UI itself. This feature can be primarily used for transferring the configuration data from one xconfserver setup to the other one.
The export and import data need to be done separately for the Application - stb, xhome and rdkcloud for all the pages except those in Common tab.
...
To import data :