RDK Resources
[*RDK Preferred*]
Code Management Facility
RDK Forums
[RDK Conferences]
RDK Support
Archives
Papers & Presentations Archive![]()
Papers & Presentations Archive![]()
| Table of Contents |
|---|
Xconf consist of two web applications - Xconf dataservice and Xconf admin. Xconf DataService is the app that the STBs talk to. Xconf Admin allows humans to enter all the information necessary for Xconf to provide the correct information to STBs. This repo contains the source code for both the applications - https://github.com/rdkcentral/xconfserver
| Component | Recommendation |
|---|---|
System/OS | Ubuntu 18.04.1 LTS 64 bit |
| Disk space | > 5GB |
| GIT | Version 2.17.1 |
| Python | 2.7x |
| Maven | 3.6.0 |
| Java/JDK | Java 8 (JDK version 1.8.0_282) |
Java JDK version should be 8. Get the supported version from Oracle or use the OpenJDK packages.
...
Check your installation using the command : java -version
Maven version should be 3 +.
...
sudo apt update
sudo apt install maven
Check the installation using : mvn -version
We can download the latest xconfserver code from https://github.com/rdkcentral/xconfserver. The latest version of the code is available in main branch.
Create a folder : mkdir xconf
Step into the folder cd xconf/
git clone https://github.com/rdkcentral/xconfserver.git -b main
To install Cassandra , follow the below steps
wget -c https://archive.apache.org/dist/cassandra/3.11.9/apache-cassandra-3.11.9-bin.tar.gz
Unpack the tarball :
tar -xvf  apache-cassandra-3.11.9-bin.tar.gz
cd apache-cassandra-3.11.9
sudo bin/cassandra
bin/nodetool status
Note : For the next step, make sure that python is installed. Because cqlsh is python based command line tool. If python is not installed , use this command : sudo apt install python2.7
...
...
bin/nodetool status
Build and run steps mentioned below is based on these steps - https://github.com/rdkcentral/xconfserver#run-application.
...
mvn clean install
...
If the user wants only read permissions ,then enter username and password for the login are user and user respectively.
For first time application deployment, create a "service.properties" file under the path xconfserver/xconf-dataservice/src/main/resources/service.properties with the following contents. The sample service.properties file will be available in xconf-dataservice/src/test/resources/service.properties, the below content is taken from there and modified with change in cassandra port.
cassandra.keyspaceName=demo cassandra.contactPoints=127.0.0.1 cassandra.username= cassandra.password= cassandra.port=9042 cassandra.authKey= dataaccess.cache.tickDuration=60000 dataaccess.cache.retryCountUntilFullRefresh=10 dataaccess.cache.changedKeysTimeWindowSize=900000 dataaccess.cache.reloadCacheEntries=false dataaccess.cache.reloadCacheEntriesTimeout=1 dataaccess.cache.reloadCacheEntriesTimeUnit=DAYS dataaccess.cache.numberOfEntriesToProcessSequentially=10000 dataaccess.cache.keysetChunkSizeForMassCacheLoad=500 dataaccess.cache.changedKeysCfName=XconfChangedKeys4 |
|---|
cd ~xconf/xconfserver/xconf-dataservice
...
To launch the application go to http://<XCONF-SERVER-IP>:19092/queries/environments . To verify, add an entry in the environments tab of the xconf admin application and check whether the same is updated here in data service.
...
NOTE: To run the Admin UI and data service applications in background start jetty server as follows: nohup mvn jetty:run &
...
Solution : This exception can be resolved by copying the .so file to the path /usr/lib.
Below steps will affect all the features in xconf system and should be configured after initial setup. Go to the steps given in site navigation step and press on create button to create new entries.
Define Environments
...
| Panel | ||
|---|---|---|
| ||
|
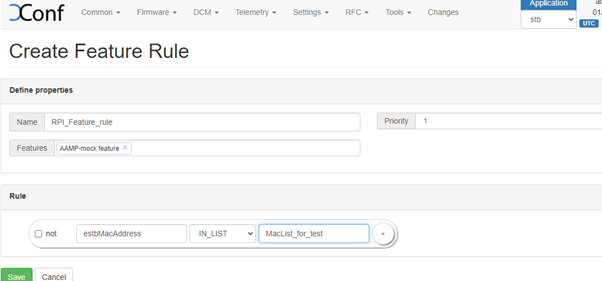
RDK Feature control configuration can be added by adding below 2 sections
...
| Panel | ||
|---|---|---|
| ||
|
...
}
]
}
}
Verification and setup from RPI
| CURL Command | curl 'http://<XCONF_IP>:19092/featureControl/getSettings?estbMacAddress=B8:27:EB:FF:54:95&firmwareVersion=rdk-generic-hybrid-wpe-image_default_20190702100618&env=pi&model=RPI&ecmMacAddress=B8:27:EB:FF:54:95&controllerId=2504&channelMapId=2345&vodId=15660&partnerId=&accountId=Unknown&version=2' |
| CPE Script (RDK-V) | /lib/rdk/RFCbase.sh |
| CPE Service (RDK-V) | /lib/systemd/system/rfc-config.service |
1. Create upload repository via DCM->Upload repository -> Create. Here we can add where to configure the log upload, ie the upload url and its protocol.
...
5. Edit the Log upload Setting (Create schedule & Add the upload repository created beforehand).
...
"urn:settings:VODSettings:SRMIPList": null
}
| CURL Command | curl 'http://<XCONF_IP>:19092/loguploader/getSettings?estbMacAddress=B8:27:EB:FF:54:95&firmwareVersion=rdk-generic-hybrid-wpe-image_default_20190702100618&env=dev&model=RPI&ecmMacAddress=B8:27:EB:FF:54:95&controllerId=2504&channelMapId=2345&vodId=15660&timezone=&partnerId=&accountId=Unknown&version=2' |
| CPE Script (RDK-V) | /lib/rdk/StartDCM.sh /lib/rdk/DCMscript.sh |
| CPE Service (RDK-V) | /lib/systemd/system/dcm-log.service |
...
| Panel | ||
|---|---|---|
| ||
|
...
"uploadRepository:uploadProtocol": "HTTP"
}
}
| CURL Command | curl 'http://<XCONF_IP>:19092/loguploader/getSettings?estbMacAddress=B8:27:EB:FF:54:95&firmwareVersion=rdk-generic-hybrid-wpe-image_default_20190702100618&env=dev&model=RPI&ecmMacAddress=B8:27:EB:FF:54:95&controllerId=2504&channelMapId=2345&vodId=15660&timezone=&partnerId=&accountId=Unknown&version=2' |
| CPE Script (RDK-V) | /lib/rdk/DCMscript.sh /lib/rdk/dca_utility.sh |
| CPE Service (RDK-V) | /lib/systemd/system/dcm-log.service |
1. Firmware config can be created via Firmware - > Firmware Configs -> Create. Here we can define the file name and version of the image/firmware that need to be downloaded to the CPE device. The models that we defined in Common → Models section will be available here, We can select the needed models by clicking on it.
...
| Panel | ||
|---|---|---|
| ||
|
We can import and export all the configuration data from the UI itself. This feature can be primarily used for transferring the configuration data from one xconfserver setup to the other one. The export and import
...