...
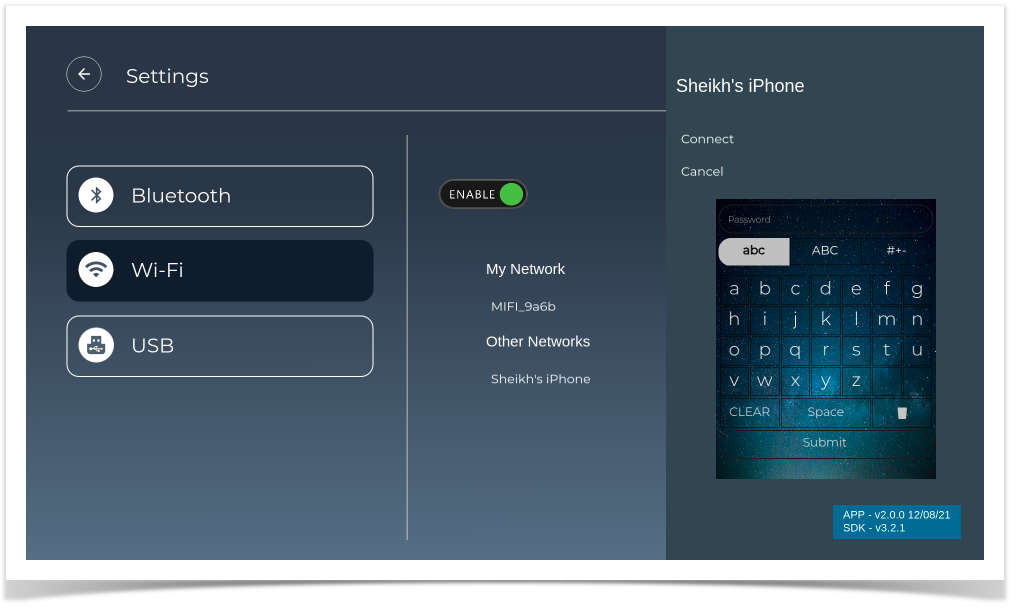
Virtual keyboard screen to connect to WiFi
USB Access Features
Steps to enable USB on box
- Connect USB/external HDD to box/device
- Launching controller UI
- $ <BOXIP>:9998
- Enable UsbAccess Plugin
- Login to box using below command:
- Mount usb on box with 'mount' command on box
- Create soft link using below command:
- $ ln -sf /usb /opt/www/usbdrive
Note:
- while creating Soft link use the path where the USB content are mounted for example in above case usb contents are mounted in /usb path
- USB access plugin should be enabled from controller UI
Key Navigation:
- On selection of USB tab , an enable/disable button will be shown
- Enable/disable button added to control retrieve of USB data once USB connected to Box
- Enable only if USB/HDD connected to box
- USB data are aggregated into three Types:
- Audio file(.mp3)
- Video file(.mp4)
- Images (.JPG and .PNG)
- For each type item custom folders are shown in setting screen when we enable USB
- Separate screen are shown for each type of data
- Data are listed horizontally along with there name
- Preview is shown for focused item
- Custom image are used to show Audio/Video item default preview
- Actual image on USB are shown in preview
- On selecting Video items , Video will be played in Full Screen
- Audio playback is not yet implemented
- For each screen Video/Audio/Images, there are headers showing back button and IP
- On Navigating Back button and enter, will land in setting screen and Focus is on USB folders
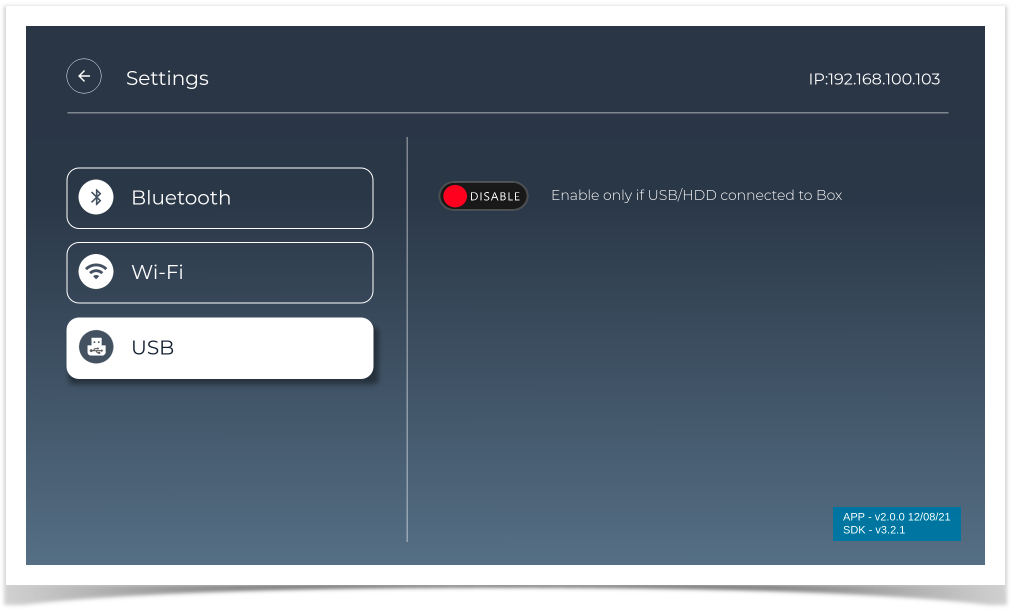 Image Removed
On enable USB
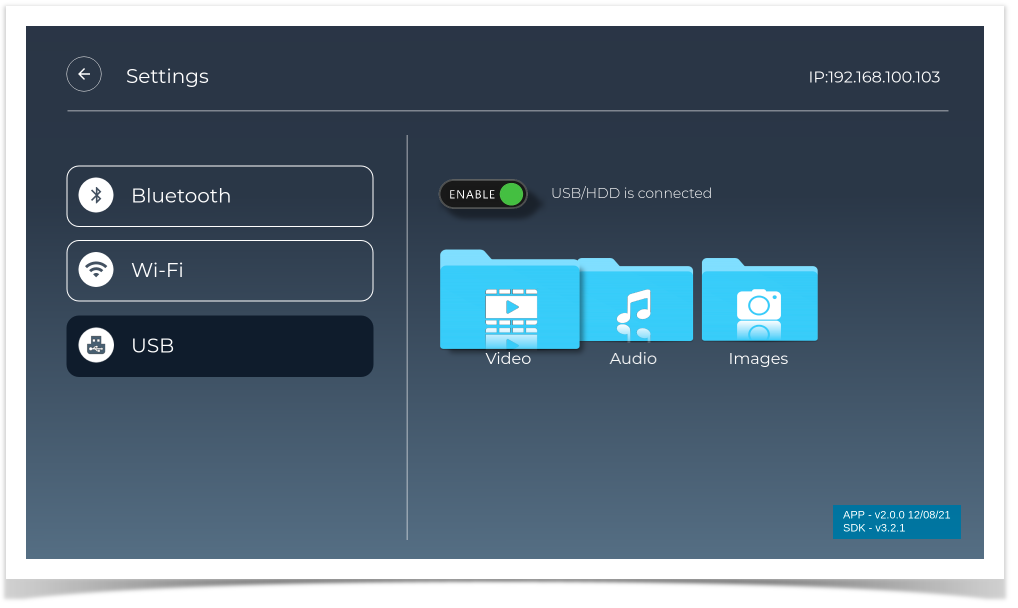 Image Removed
USB Video Screen
All mp4 files are listed in a row and focused Item preview shown
Key Navigation:
- Use left/right key to navigate to next and previous tiles/video to see the preview
- On pressing Enter video will play in Full screen
- On pressing key 'M' will exit from Full screen video to Video files screen
- On Navigating to header and pressing back icon , setting screen will launched
 Image Removed
USB Audio Screen
All mp3 files are listed in row and focused Item preview shown.
Key Navigation:
- Use left/right key to navigate to next and previous tiles/audio to see the preview
- On Navigating to header and pressing back icon , setting screen will launched
Note: audio playback functionality not implemented yet.
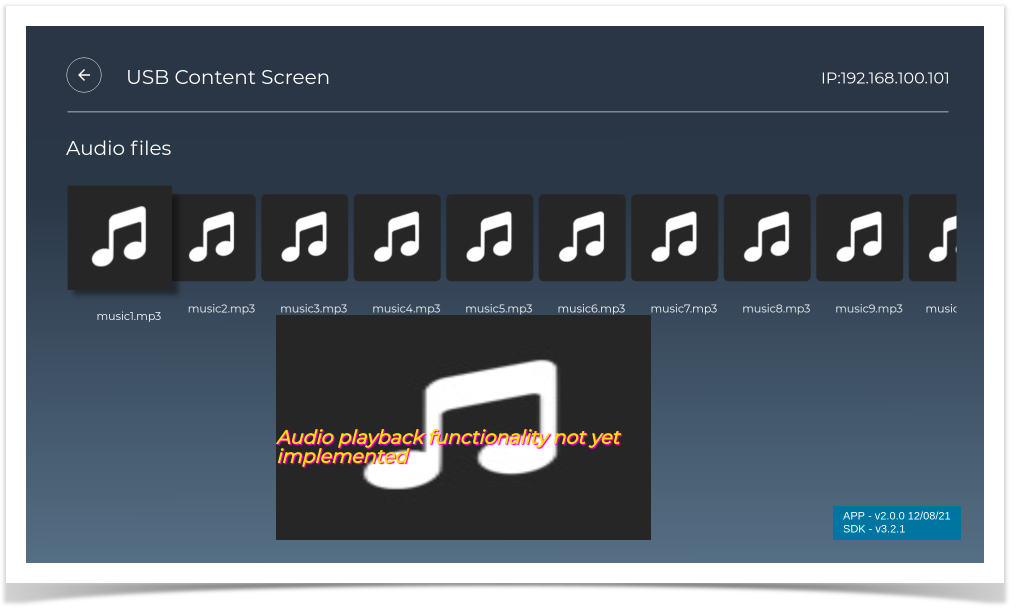 Image Removed
USB Image Screen
All JPG, PNG files are listed in row and focused Item preview shown
Key Navigation:
- Use left/right key to navigate to next and previous tiles/images to see the preview
- On Navigating to header and pressing back icon , setting screen will launched
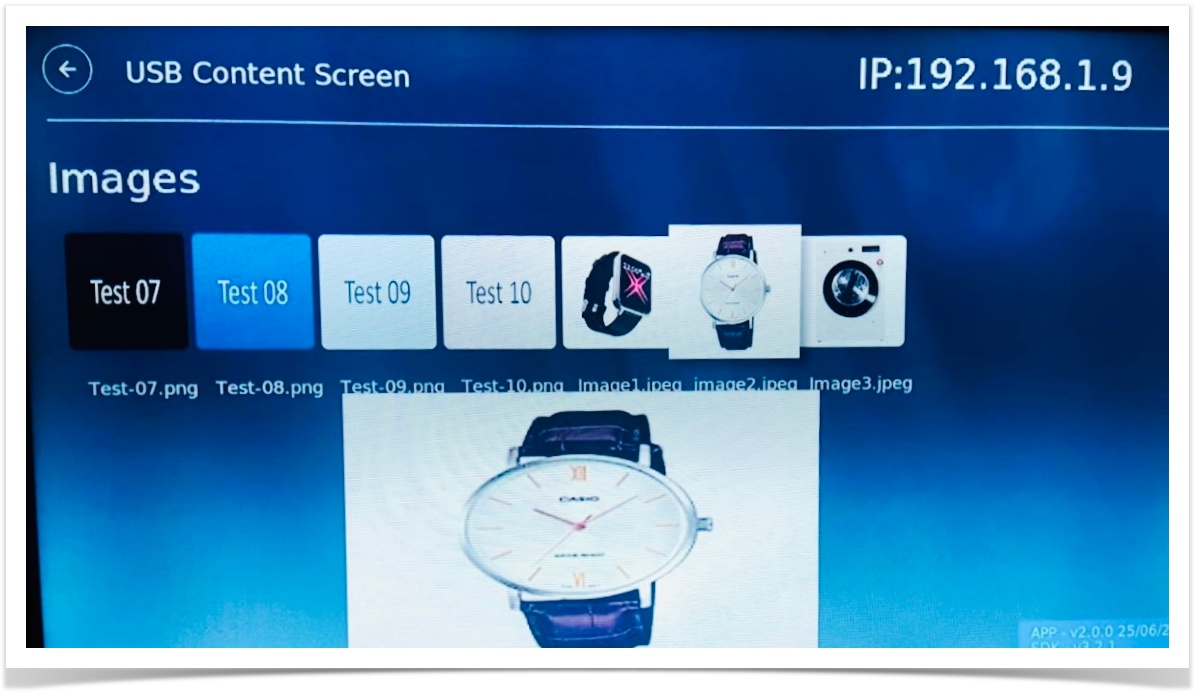 Image Removed
Controller UI
Users can interact with plugins using Controller UI. It helps the user to activate or deactivate the plugin and the user can go through each plugin and look for properties and methods to execute.
- Launching controller UI on browser (google chrome)
- http://<BOXIP>:9998
- Enable UsbAccess Plugin
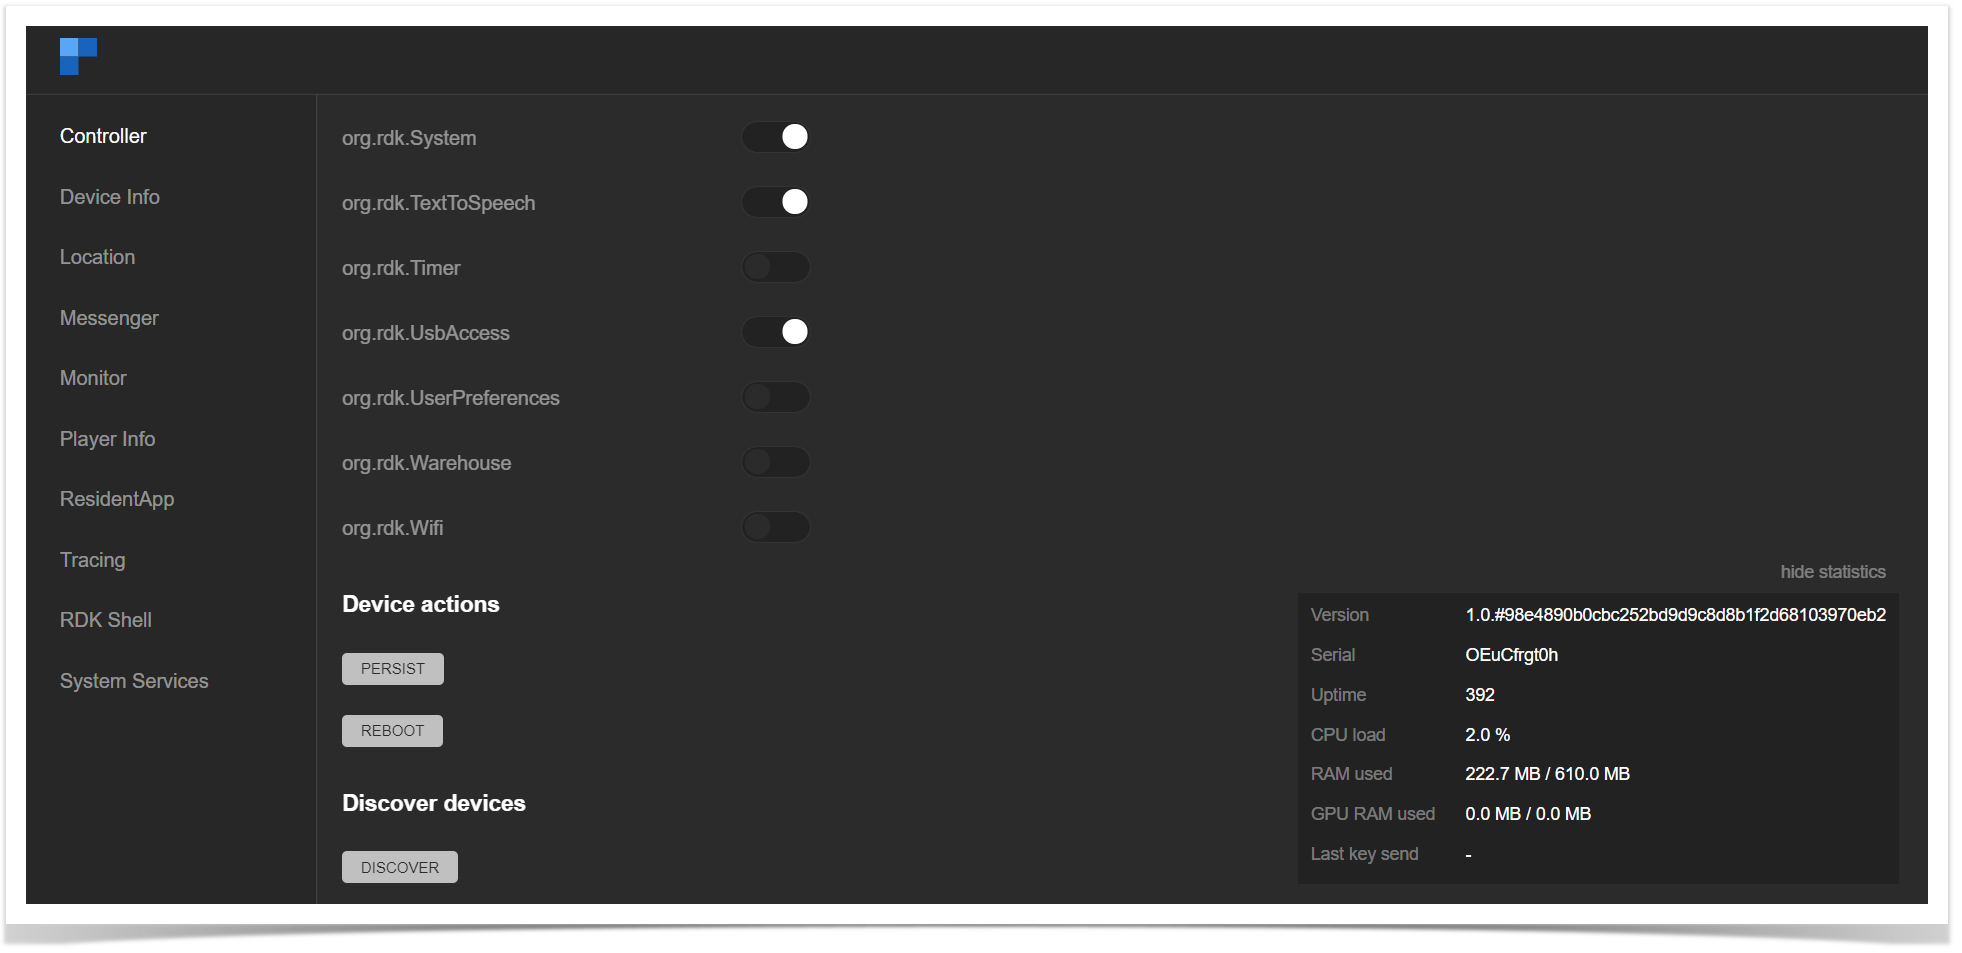 Image Removed
USB Access Plugin interaction using the console
User can also interact with 'UsbAccess' plugins using JSON-RPC
1) Create Link:
- USB tab list will be available on settings screen
- On selection of USB tab on settings screen, an enable/disable button will be shown
- Enable/Disable button will be available on settings screen
◦ Enable/disable button added to control retrieve of USB data once USB connected to Box, so enable only if USB/HDD connected to the box - Folders for video, audio, image along with title will be displayed on settings screen
- You will be able to navigate to USB tab, enable/disable button, video, audio, image folders
- You will be able to launch video, audio, image screen and navigate to the available tiles
- File formats supported to display on screens:
◦ Audio file (supports: .mp3, .MP3, .mpeg, .MPEG)
◦ Video file (supports: .mp4, .MP4, .mov, .MOV, .avi, .AVI, .m3u8, .M3U8, .mpeg2, .MPEG2)
◦ Images (supports: .png, .PNG, .jpg, .JPG, .jpeg, .JPEG) - You will be able to view usb contents on corresponding screens
- You will be able to play usb video content
- You will not be able to play audio content because audio playback is not working with aamp and uve-js. (Note: audio playback functionality not implemented)
- You will be able to see image preview in full screen, and right arrow key will be displayed
- On key right next image will be displayed, right arrow key will be hidden if no preview image available and left arrow key will be displayed
- On key left previous image will be displayed, left arrow key will be hidden if no preview image available
- For audio and video custom tiles will be shown on corresponding screens horizontally along with there name
- Actual images will be shown on image screen which are available in USB
- Preview will be shown for focused item below in all the screens
- On selecting Video items , Video will be played in Full Screen, once playback stops user has to come back to video screen and play next video
- Audio playback is not yet implemented, so playback will not work
- On Video/Audio/Images screen, in top panel back button and IP address will be displayed
- On Navigating Back button and enter, will land in setting screen and Focus will be on USB folders
Steps to enable USB on box
- Connect USB/external HDD to box/device
- Launching controller UI
- $ <BOXIP>:9998
- Enable UsbAccess Plugin
- Login to box using below command:
- Mount usb on box with 'mount' command on box
- Create soft link using below command:
- $ ln -sf /usb /opt/www/usbdrive
Note:
- while creating Soft link use the path where the USB content are mounted for example in above case usb contents are mounted in /usb path
- USB access plugin should be enabled from controller UI
Image Added
On enable USB
Image Added
USB Video Screen
All mp4 files are listed in a row and focused Item preview shown
Key Navigation:
- Use left/right key to navigate to next and previous tiles/video to see the preview
- On pressing Enter video will play in Full screen
- On pressing key 'M' will exit from Full screen video to Video files screen
- On Navigating to header and pressing back icon , setting screen will launched
Image Added
USB Audio Screen
All mp3 files are listed in row and focused Item preview shown.
Key Navigation:
- Use left/right key to navigate to next and previous tiles/audio to see the preview
- On Navigating to header and pressing back icon, setting screen will launched
Note: audio playback functionality not implemented yet.
Image Added
USB Image Screen
All JPG, PNG files are listed in row and focused Item preview shown
Key Navigation:
- Use left/right key to navigate to next and previous tiles/images to see the preview
- On Navigating to header and pressing back icon , setting screen will launched
Image Added
Controller UI
Users can interact with plugins using Controller UI. It helps the user to activate or deactivate the plugin and the user can go through each plugin and look for properties and methods to execute.
- Launching controller UI on browser (google chrome)
- http://<BOXIP>:9998
- Enable UsbAccess Plugin
Image Added
USB Access Plugin interaction using the console
User can also interact with 'UsbAccess' plugins using JSON-RPC
1) Create Link:
- Method: $ curl -d '{" Method: $ curl -d '{"jsonrpc":"2.0","id":"3","method":"org.rdk.UsbAccess.1.createLink","params":{}}' http://127.0.0.1:9998/jsonrpc
- Response: {"jsonrpc":"2.0","id":3,"result":{"baseURL":"http://localhost:50050/usbdrive","success":true}}
...
- Method: $ curl -d '{"jsonrpc":"2.0","id":"3","method":"org.rdk.UsbAccess.1.getFileList","params":{"path":"www"}}' http://127.0.0.1:9998/jsonrpc
- Response: {"jsonrpc":"2.0","id":3,"result":{"contents":[{"name":"var","t":"f"},{"name":"..","t":"d"},{"name":"pages","t":"d"},{"name":"logs","t":"f"},{"name":".","t":"d"}],"success":true}}
...
- Connect your device with lan and get the box/device ip, make sure your dev pc and device is connected with the same network
- login into box:
- $ ssh root@<your box ip>
- $ rm -rf lxresui
- Extract downloaded pre-build lxresui (dist) folder in your dev pc
- Copy lxresui folder from dev pc to box/device:
- configure residentapp.sh file
- login into box:
- goto dir:
- edit residentApp.sh:
- you will see
- Replace:
- reboot the box, on bootup new ui will be rendered on TV screen
Download pre-build (morty and dunfell) image's for RPI
Below per-build morty and dunfell image is available for RPI device created from sd card after flashing dist (compiled version of src code) just to avoid above steps: create distribution build, download pre-build and flash, it has latest version_2 ui changes and on bootup new ui will be rendered on TV screen.
pre-build dunfell image: https://drive.google.com/file/d/1WCuzFKwENFwq_bEERuHXxDUFyO6AuX7q/view?usp=sharing
- dir:
- edit residentApp.sh:
- you will see
- Replace:
- reboot the box, on bootup new ui will be rendered on TV screen
Download pre-build (morty and dunfell) image's for RPI with Version 2 UI changes
Below per-build morty and dunfell image is available for RPI device created from sd card after flashing dist (compiled version of src code) just to avoid above steps: create distribution build, download pre-build and flash, it has latest version_2 ui changes and on bootup new ui will be rendered on TV screen.
pre-build dunfell image: https://drive.google.com/file/d/1WCuzFKwENFwq_bEERuHXxDUFyO6AuX7q/view?usp=sharing
pre-build morty image: https://drive.google.com/file/d/1hxbTN-36rgLTposhTqANZs4fcv8jAQ2A/view?usp=sharing
Flash image on SD card
Option 1:
- Execute the below command to flash the image on the SD card
$ sudo dd if=<downloaded image path> of=/dev/sdb bs=1M
ex: sudo dd if=rdk-mc-rpi.img of=/dev/sdb bs=1M
Option 2:
- Download and install Balena Etcher to write the Raspberry Pi SD card: https://www.balena.io/etcher/
- Flash it to the Raspberry Pi's SD card using Etcher
Note: Balena etcher is available for MAC OS, Windows and Linux.
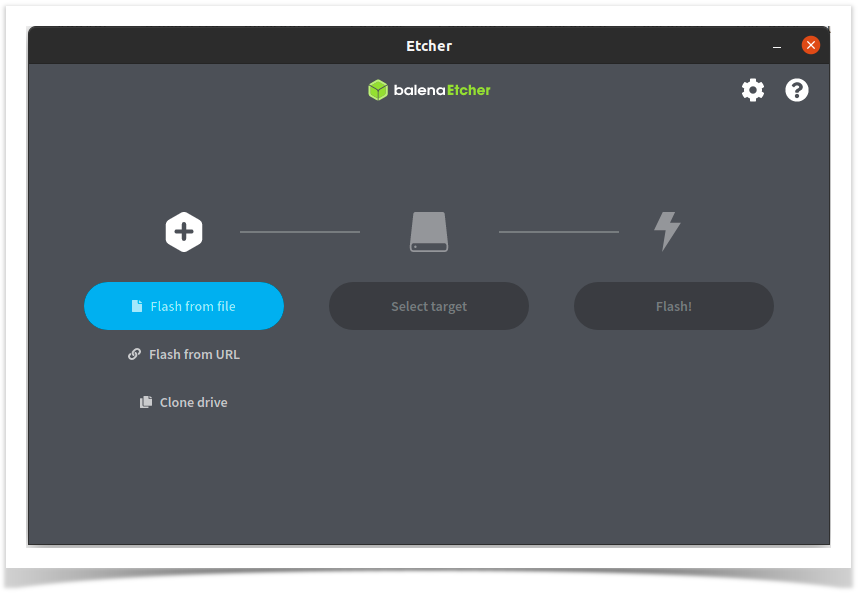 Image Addedpre-build morty image: https://drive.google.com/file/d/1hxbTN-36rgLTposhTqANZs4fcv8jAQ2A/view?usp=sharing