RDK Resources
[*RDK Preferred*]
Code Management Facility
RDK Forums
[RDK Conferences]
RDK Support
Archives
Papers & Presentations Archive![]()
Papers & Presentations Archive![]()
| Table of Contents | ||
|---|---|---|
|
The RDK Accelerator Home UI version 3 is the latest version (3.8) of the RDK reference UI which provides a full featured UI with a modern minimalistic design using a dark theme. .
This single UI currently supports IP-STB, Hybrid-STB and TV profile RDK stacks. UI uses DTV Plugin and HDMIInput plugins to distinguish the platform profile; UI will consider the platform as TV if stack has HDMIInput plugin support, Hybrid STB if DTV plugin is present else the default IP-STB.
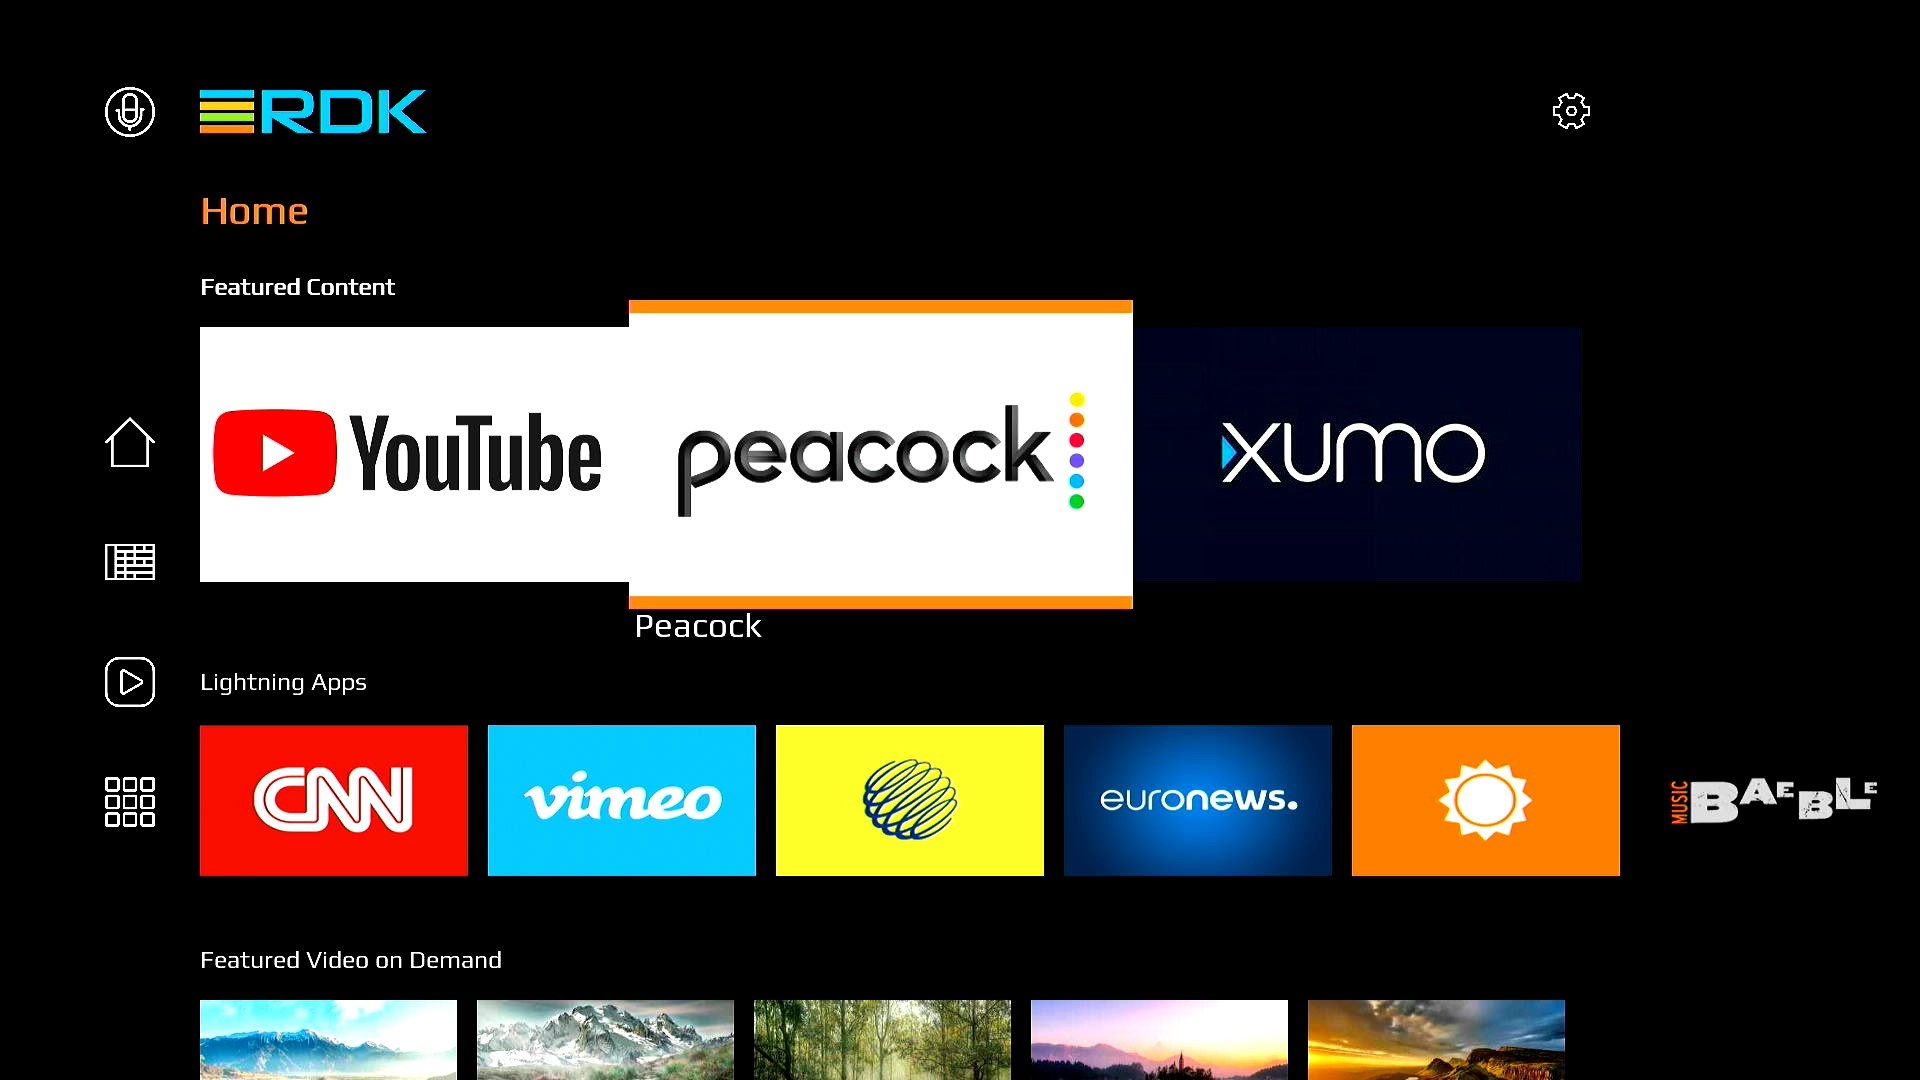
The UI uses Lightning SDK Plugins such as Language, Router, Storage and supports Premium apps such as Amazon, YouTube, Xumo along with a selection of Lightning apps from the Metrological App Store. It also includes a wide section of settings which allow a user to take full advantage of the device features such as Audio, Video, Network, Language and more.
...
The app loads a new splash logo when the device boots up which remains for a few seconds and then leads to user on-boarding screens if device is booting up afresh.
This screens shall appear only once the device is booting up. Criteria used to detect the fresh boot is by verifying whether any previous Remote Control Unit (hereafter RCU) pairing information is available or not. If yes, device shall skip these on-boarding screens and land at the Home screen.
Same features and functionalities are exposed under Settings menu as well for the user to interact later.
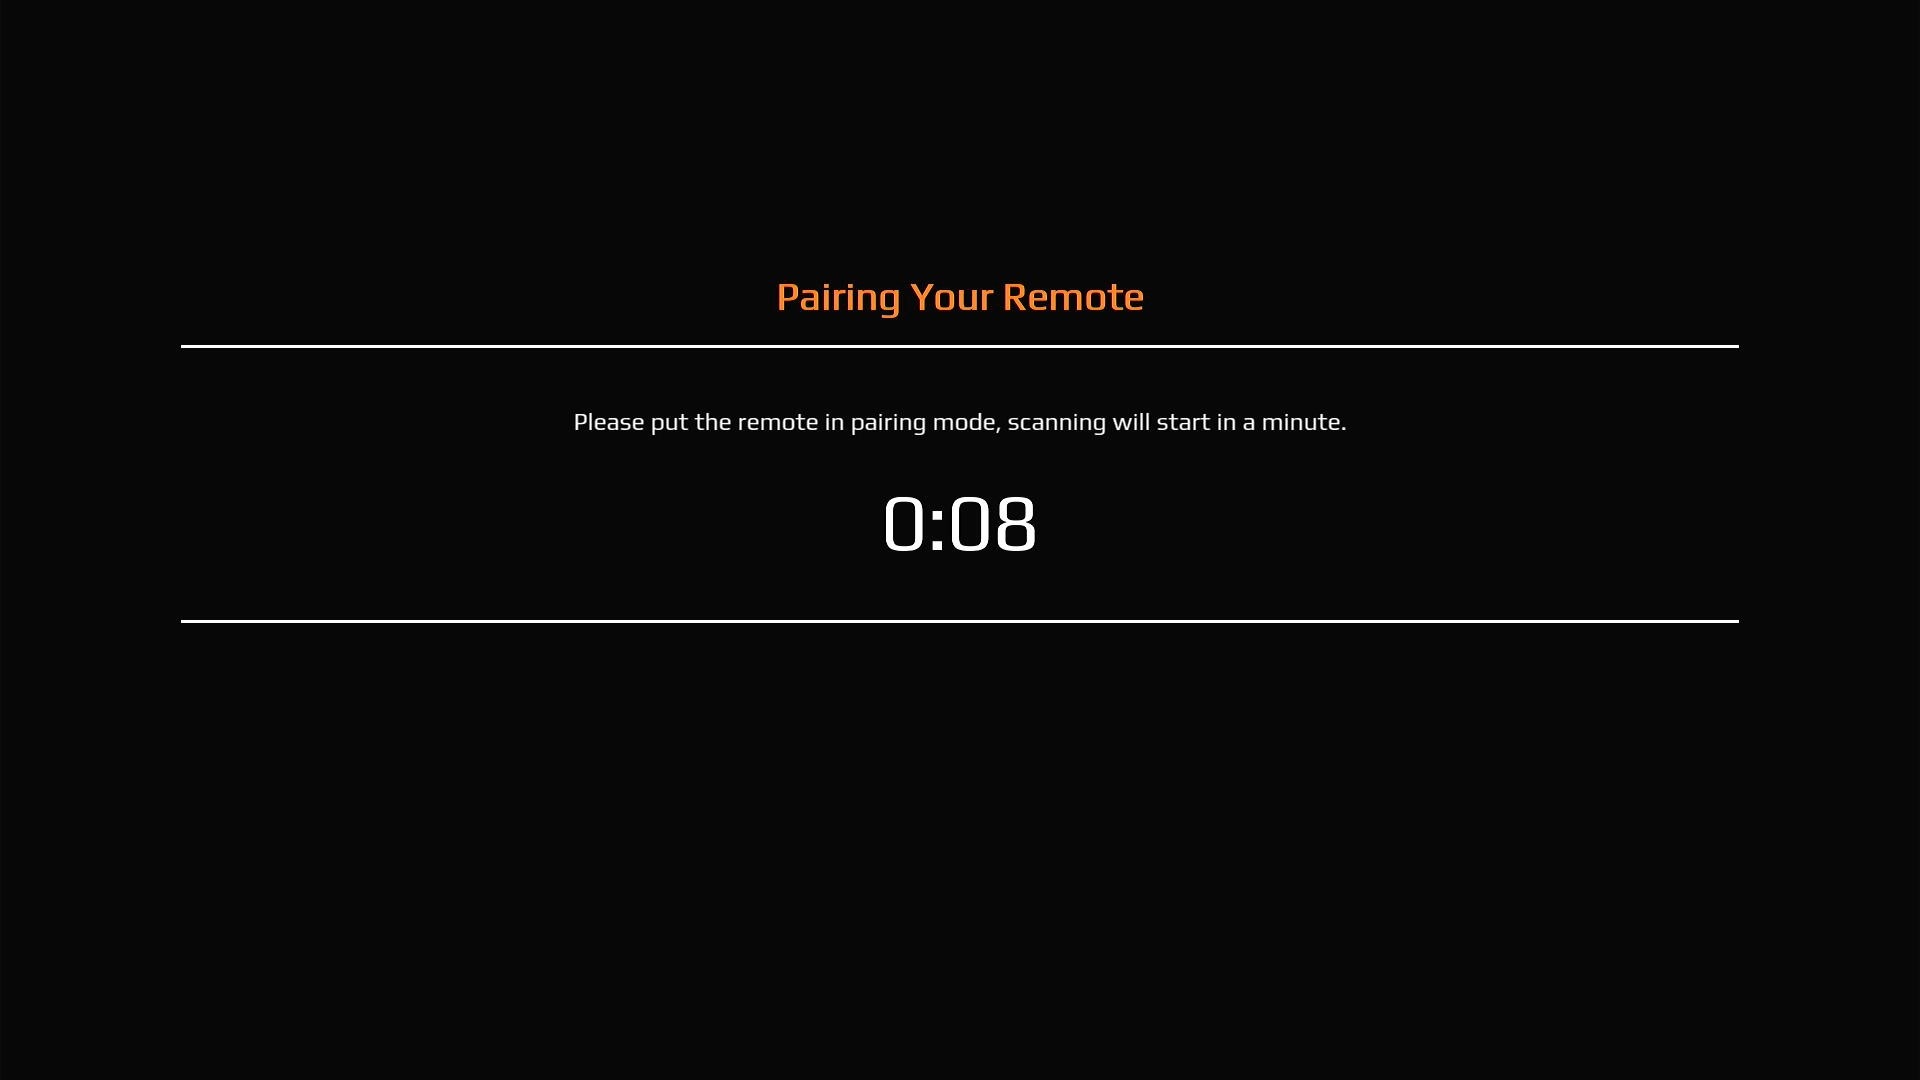
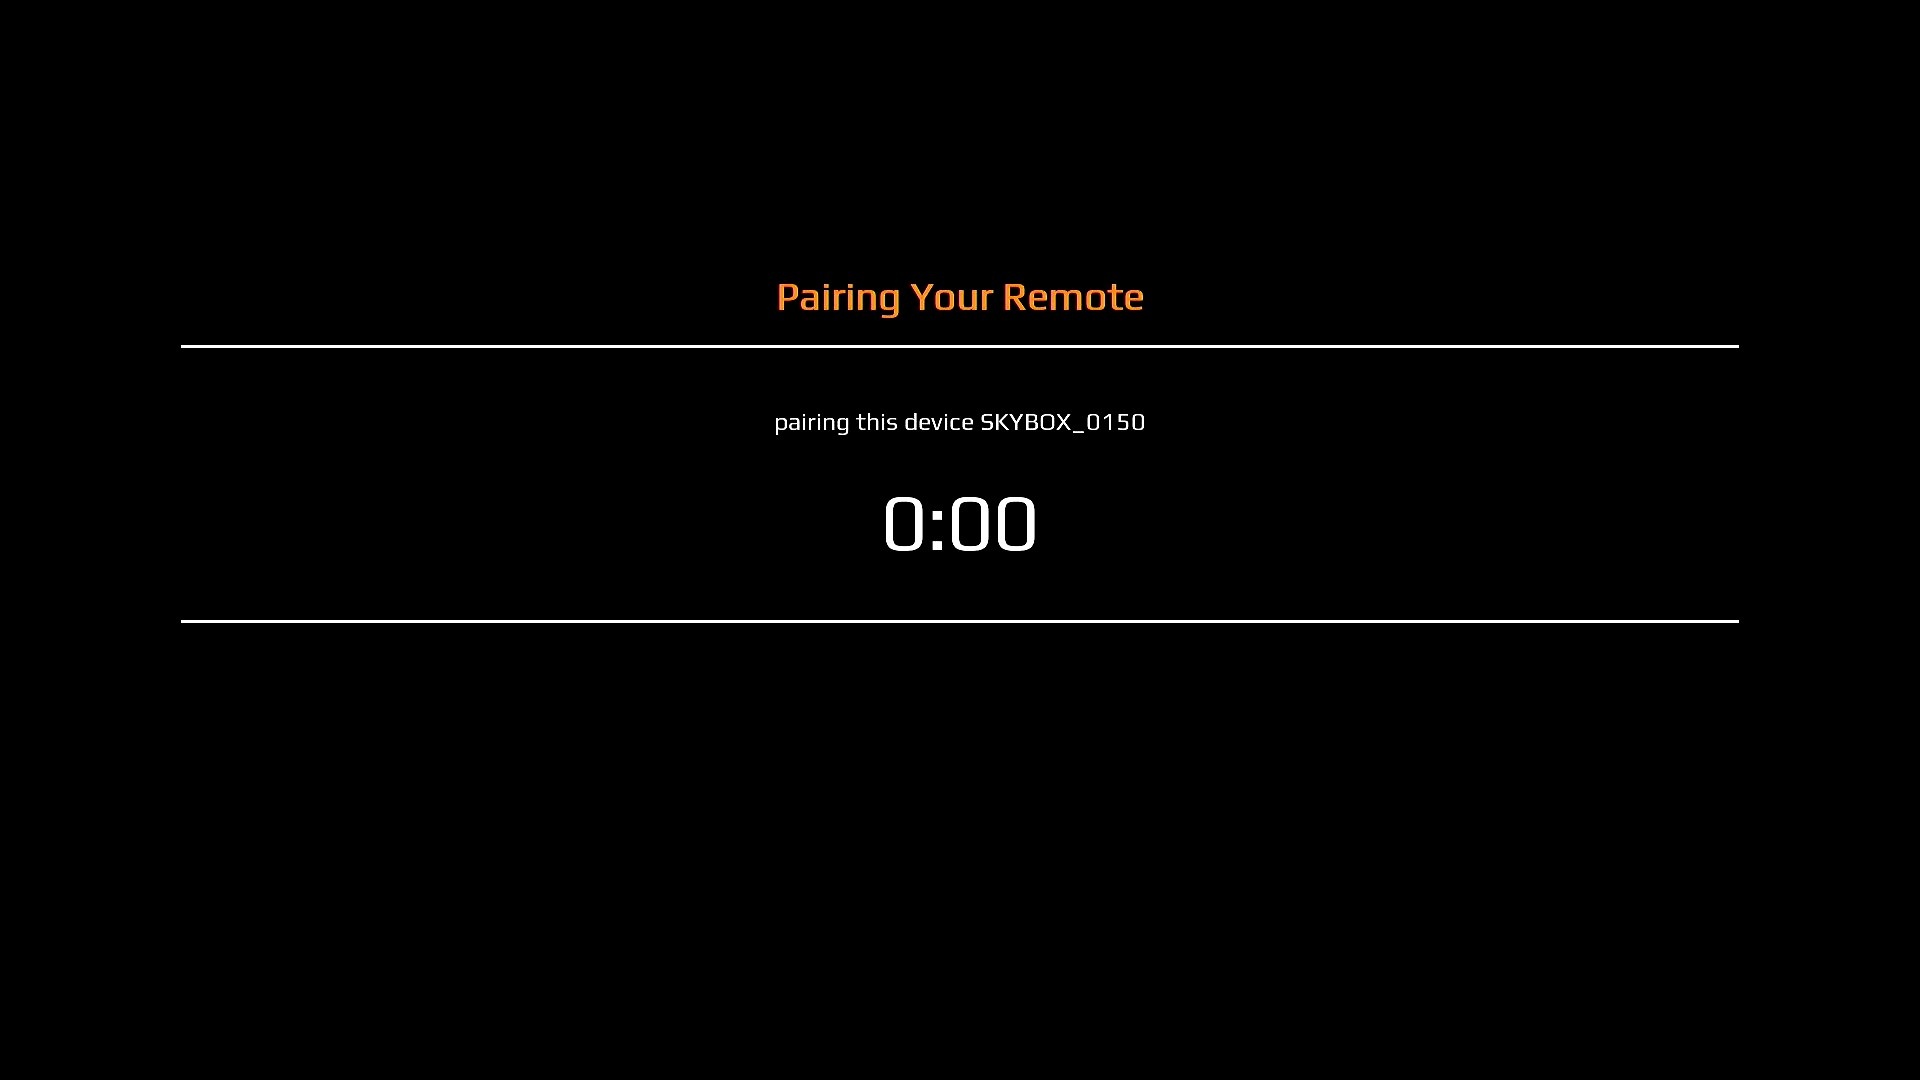
UI initiates Bluetooth scan for HID profile to connect and pair with at this point with a configured time-out. How to put the RCU in Bluetooth pairing mode is dependent on the RCU design which is not within UI scope.
Bluetooth Pairing is done through RCU on UI
Note: this feature of automatic RCU pairing requires RCU model support integrated with BLERCUDaemon at platform firmware build time. If your RCU does not support this feature yet, you can still pair your RCU through the "Settings" menu detailed in later section - "Pair Remote Control".
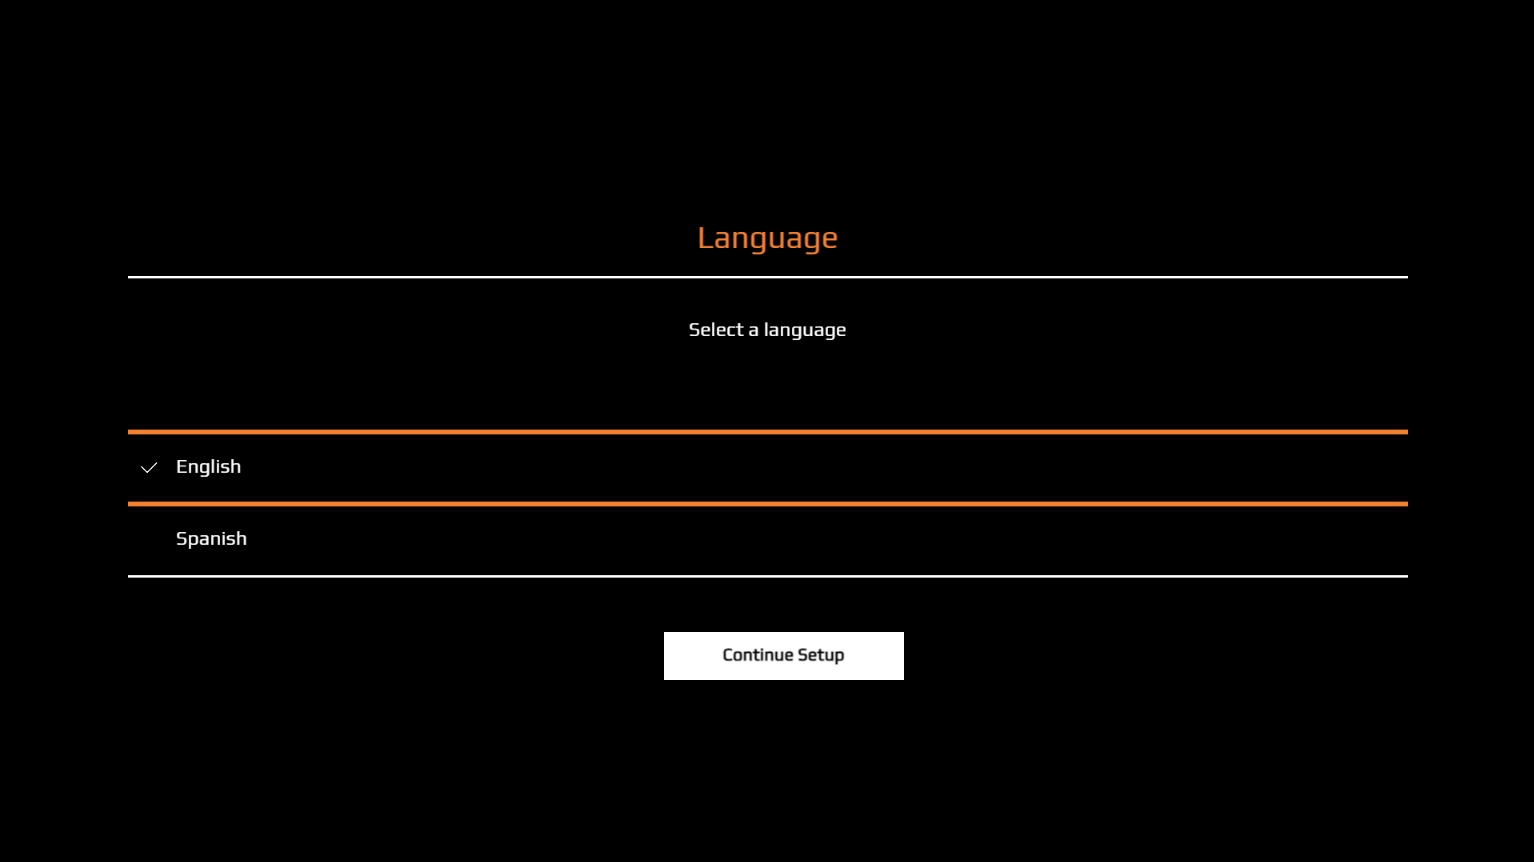
The UI currently supports two languages, English and Spanish. New language support can be integrated with proper resource files added along with the defaults as detailed in upcoming sections. UI will reload to refresh the entire settings and during that time user may see display going blank and a spinner appearing for the reload time.
Note: this spinner is being spawned as a separate app instance.

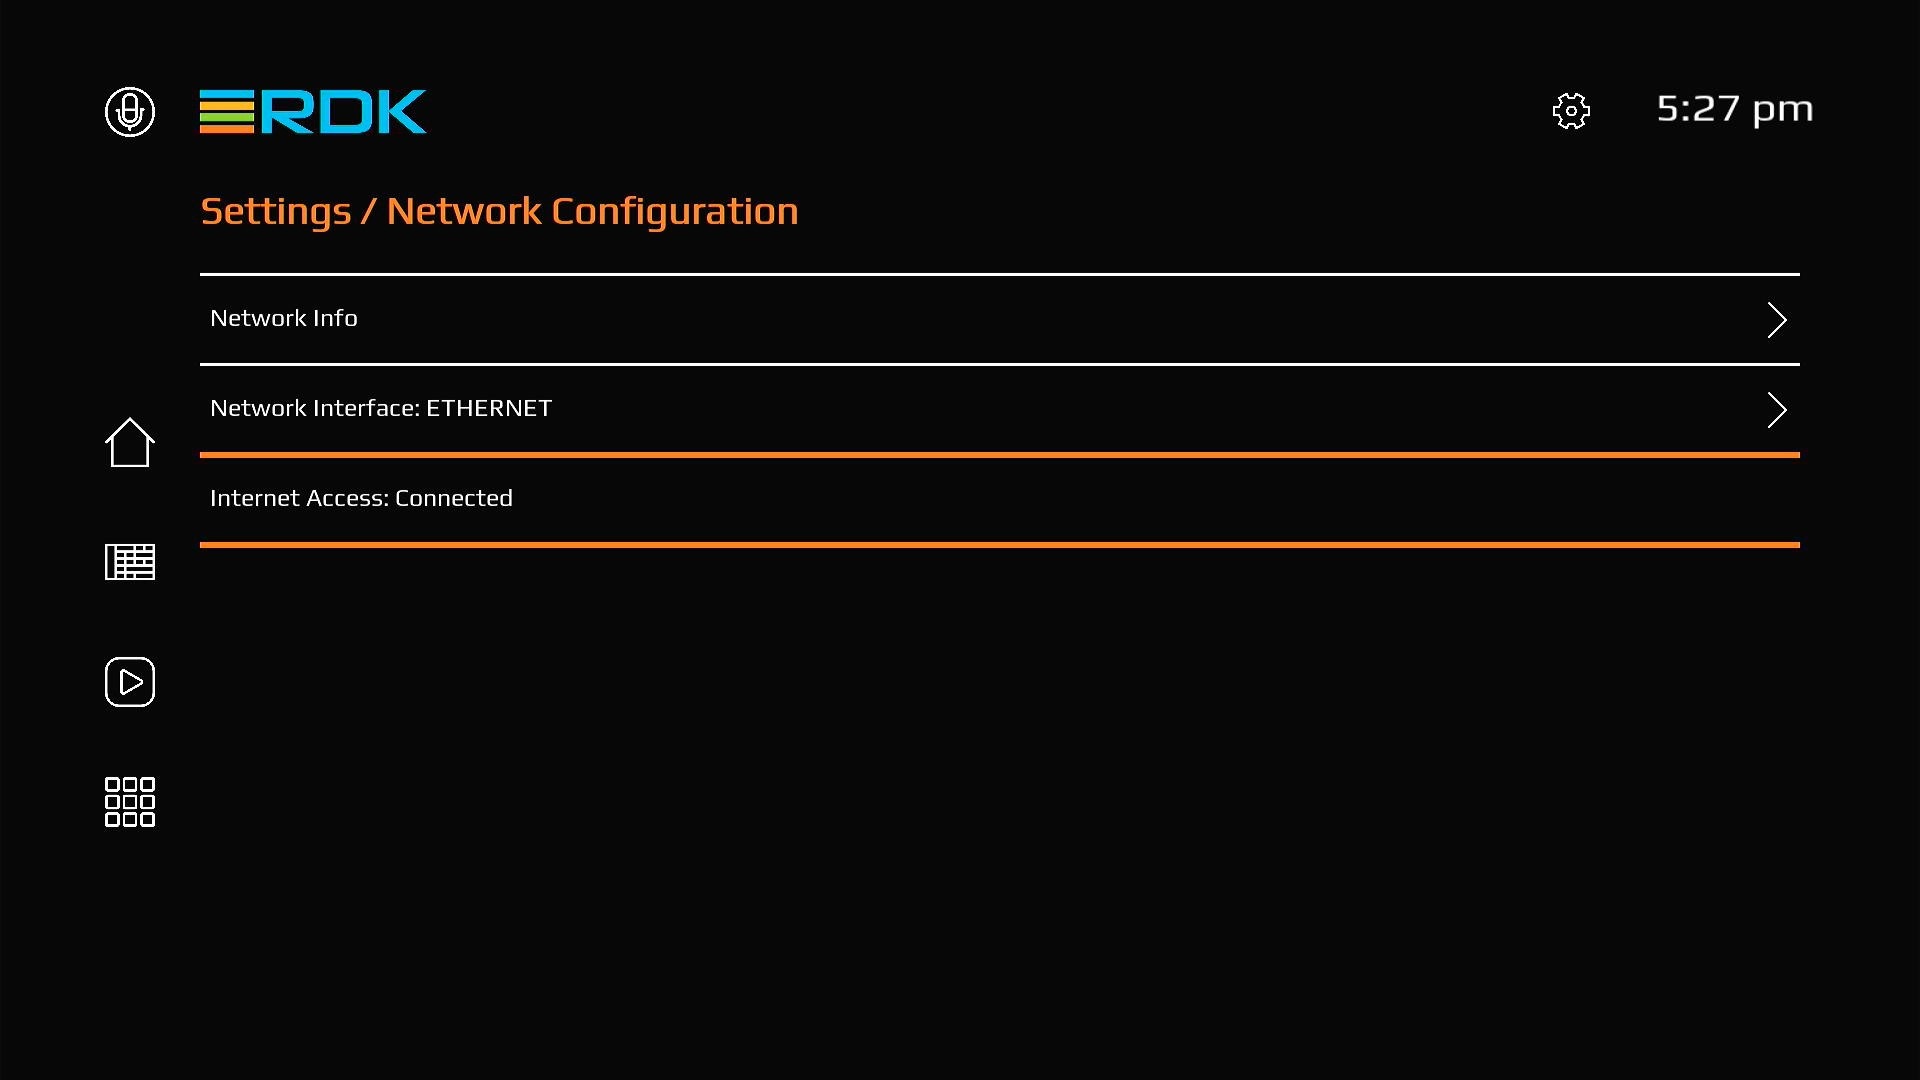
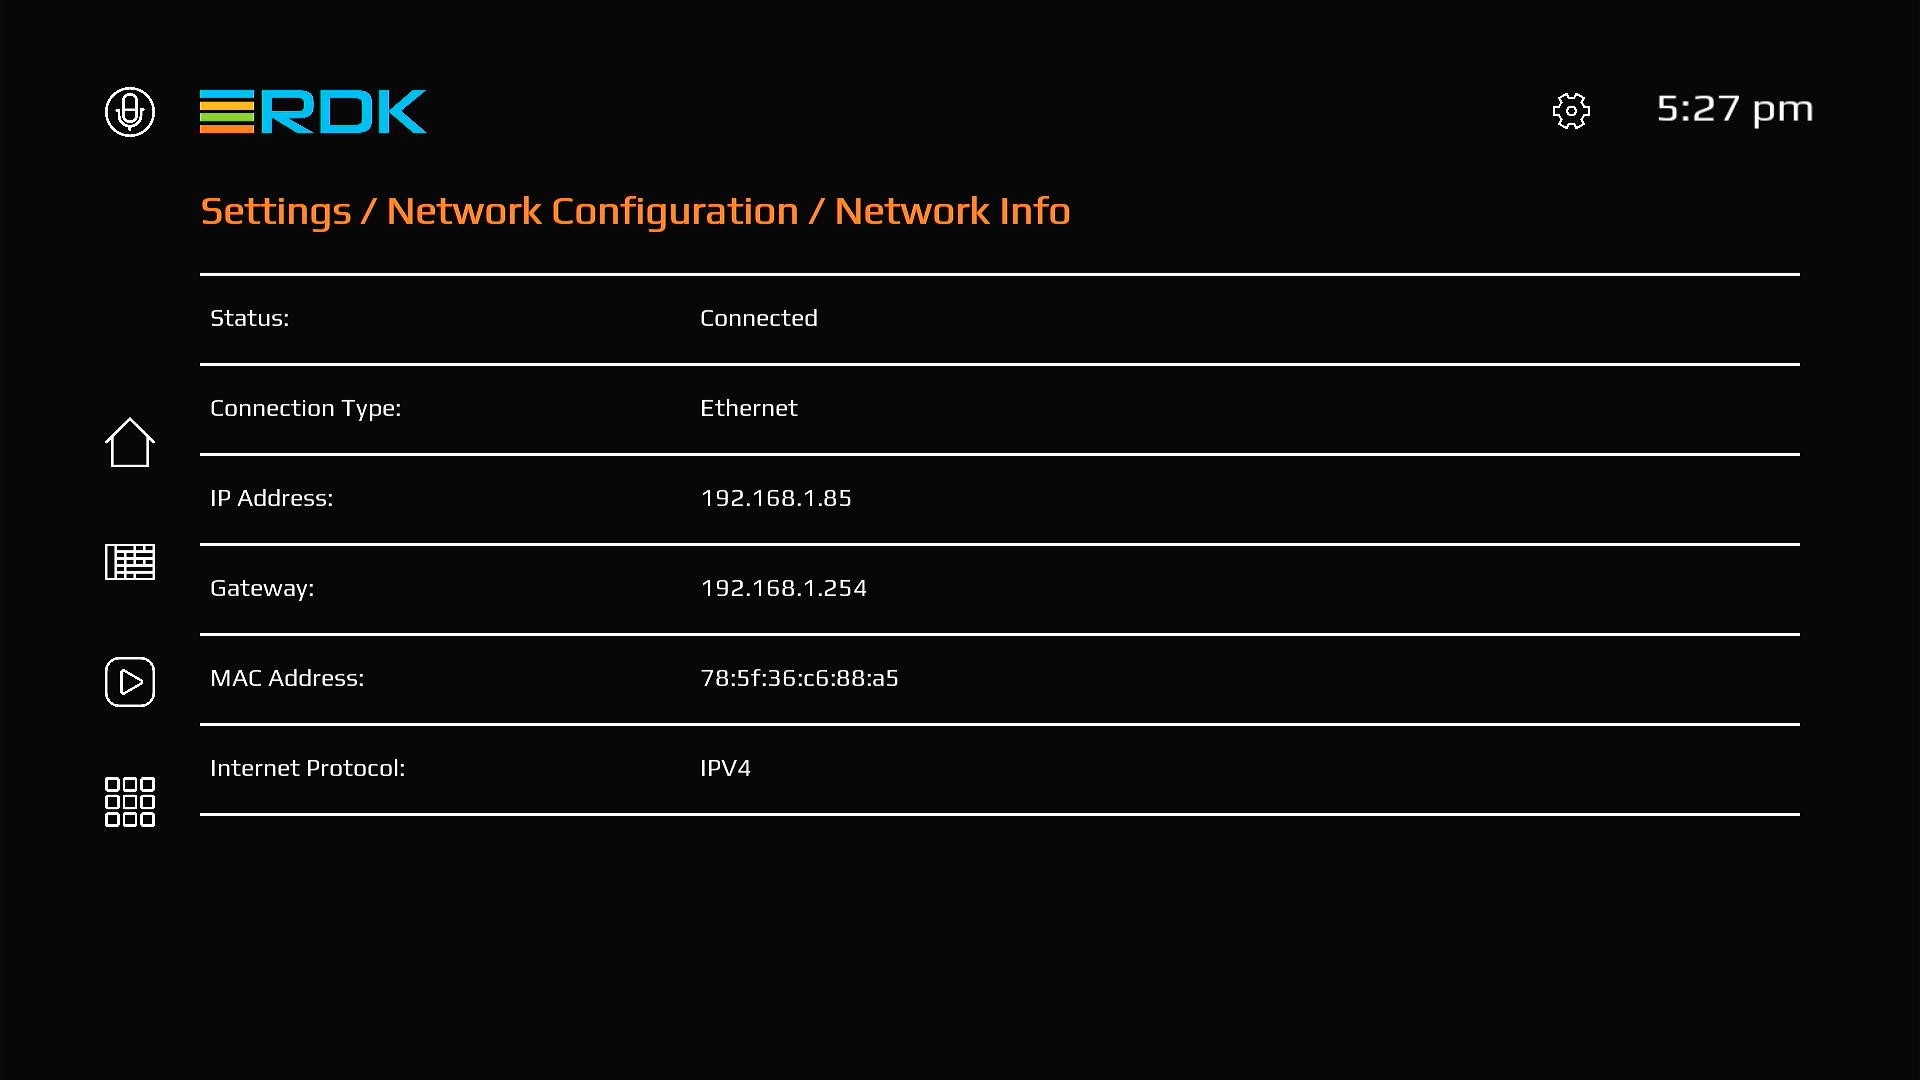
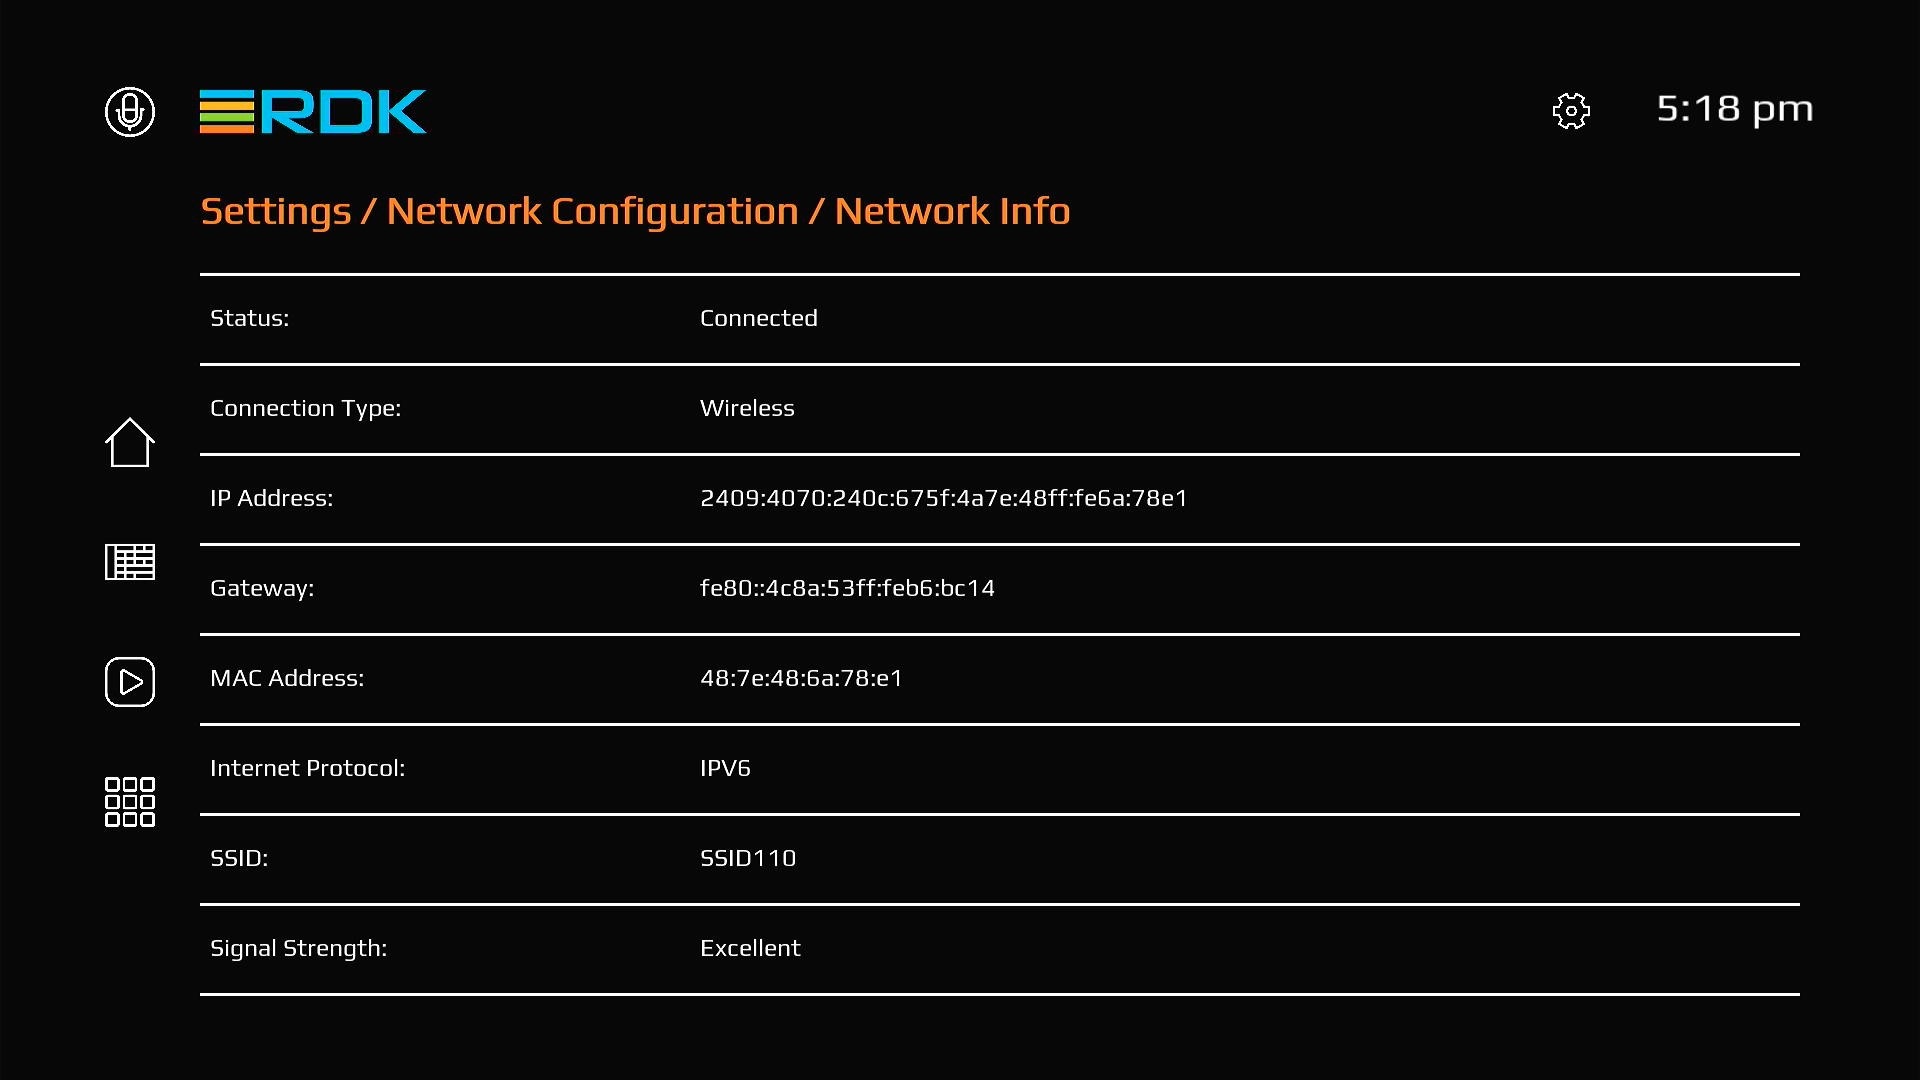
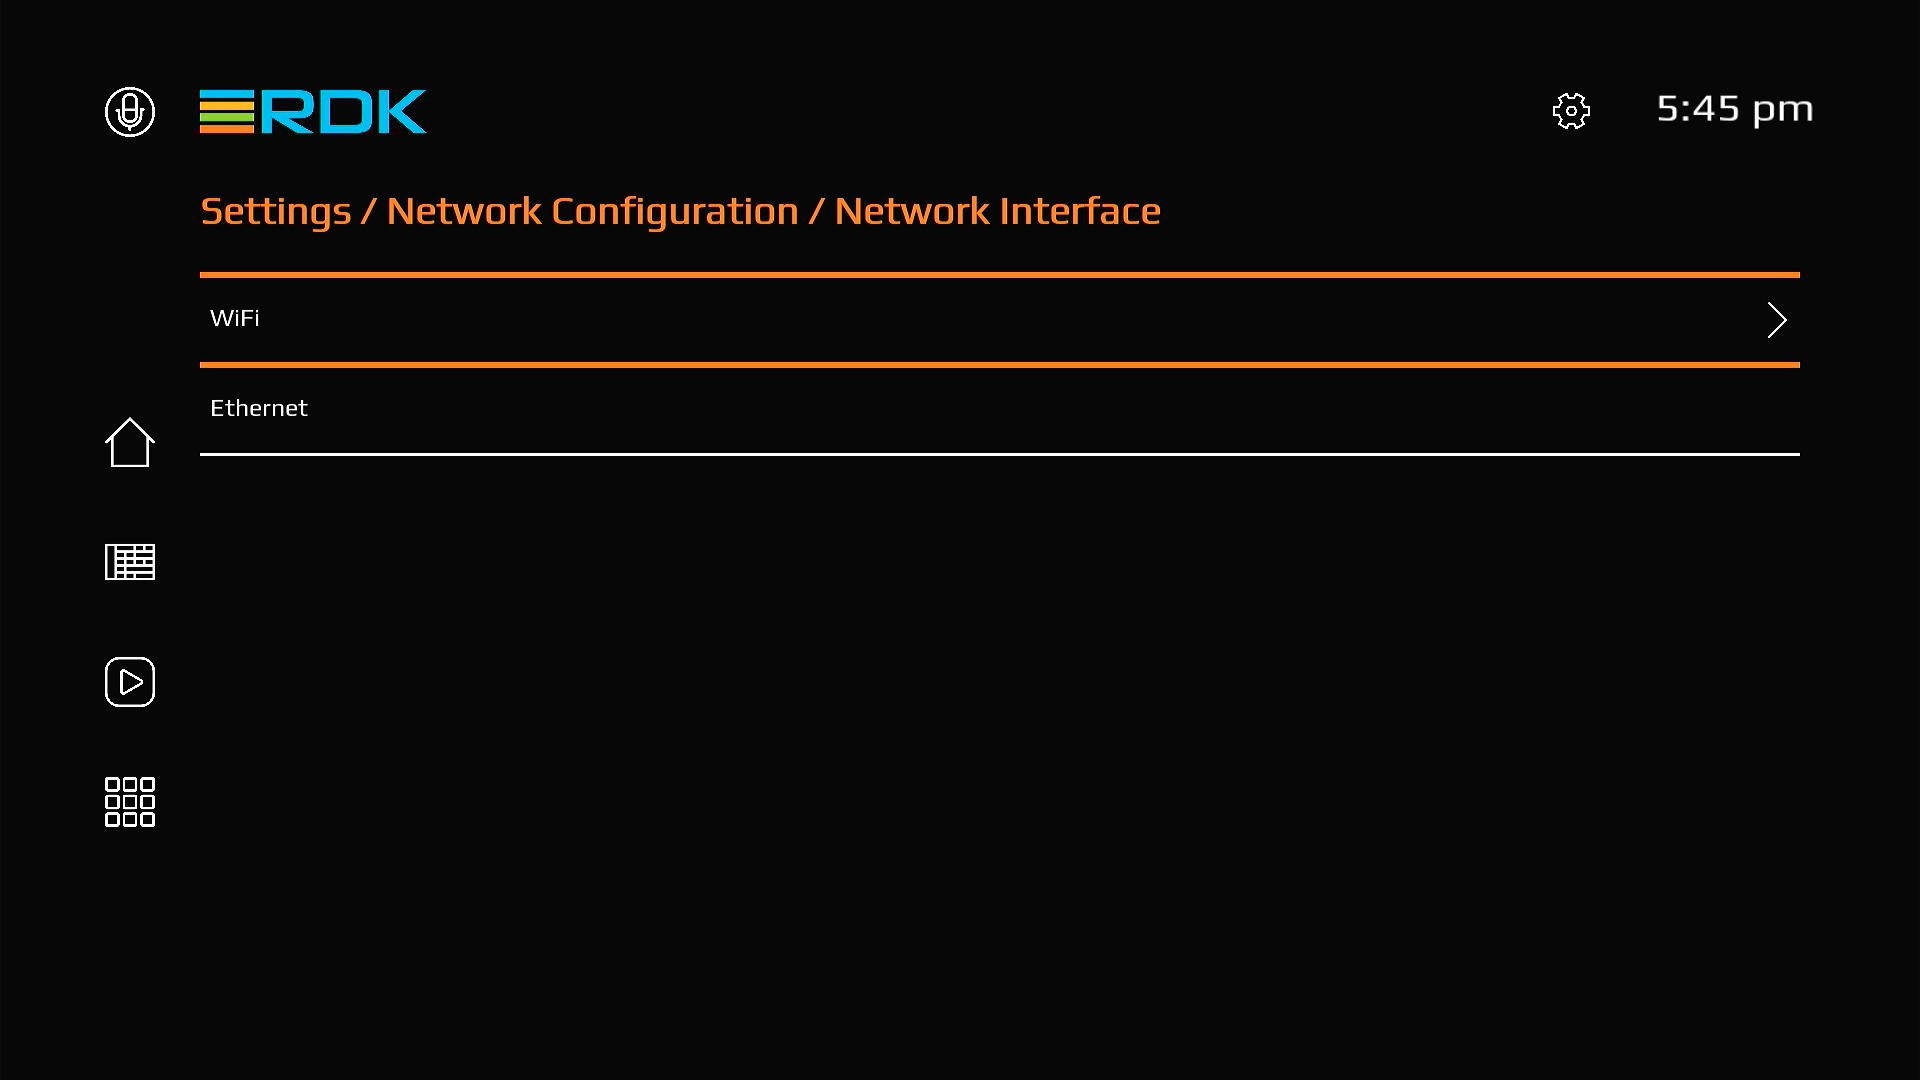
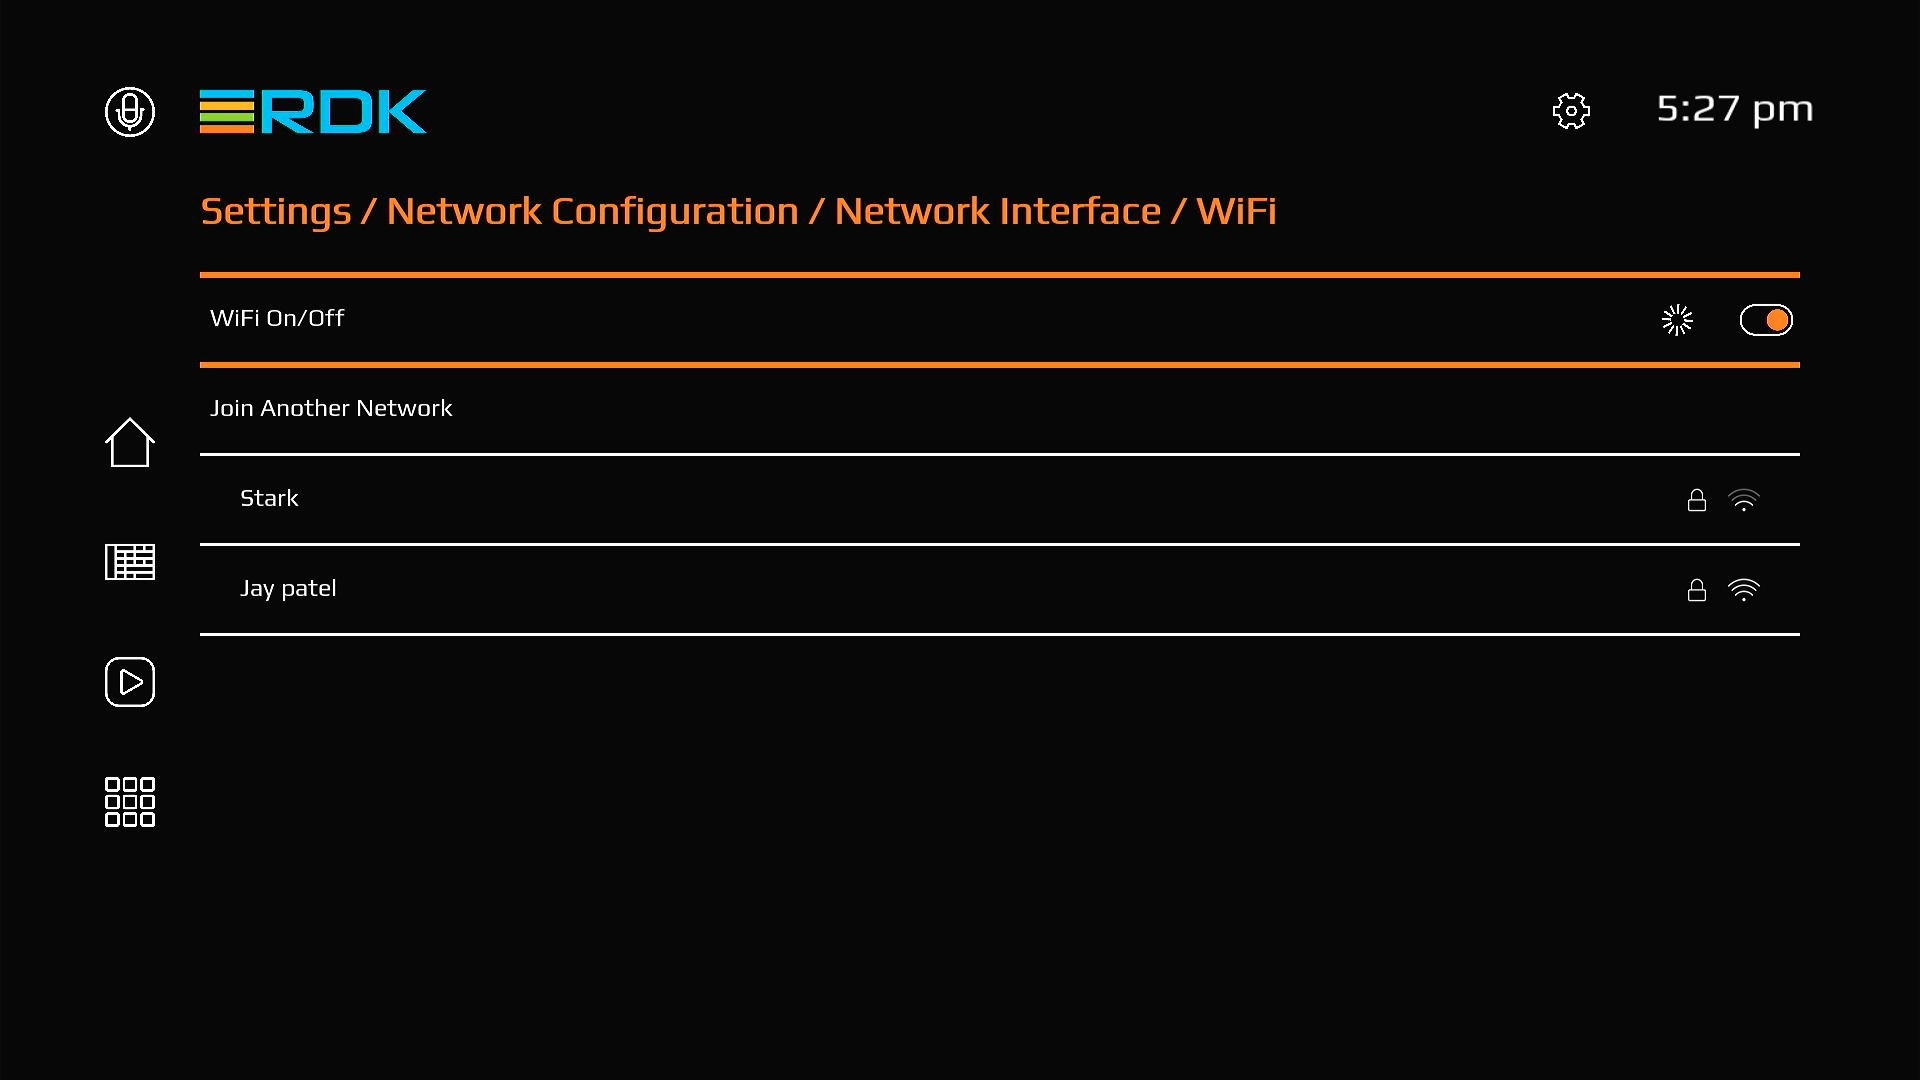
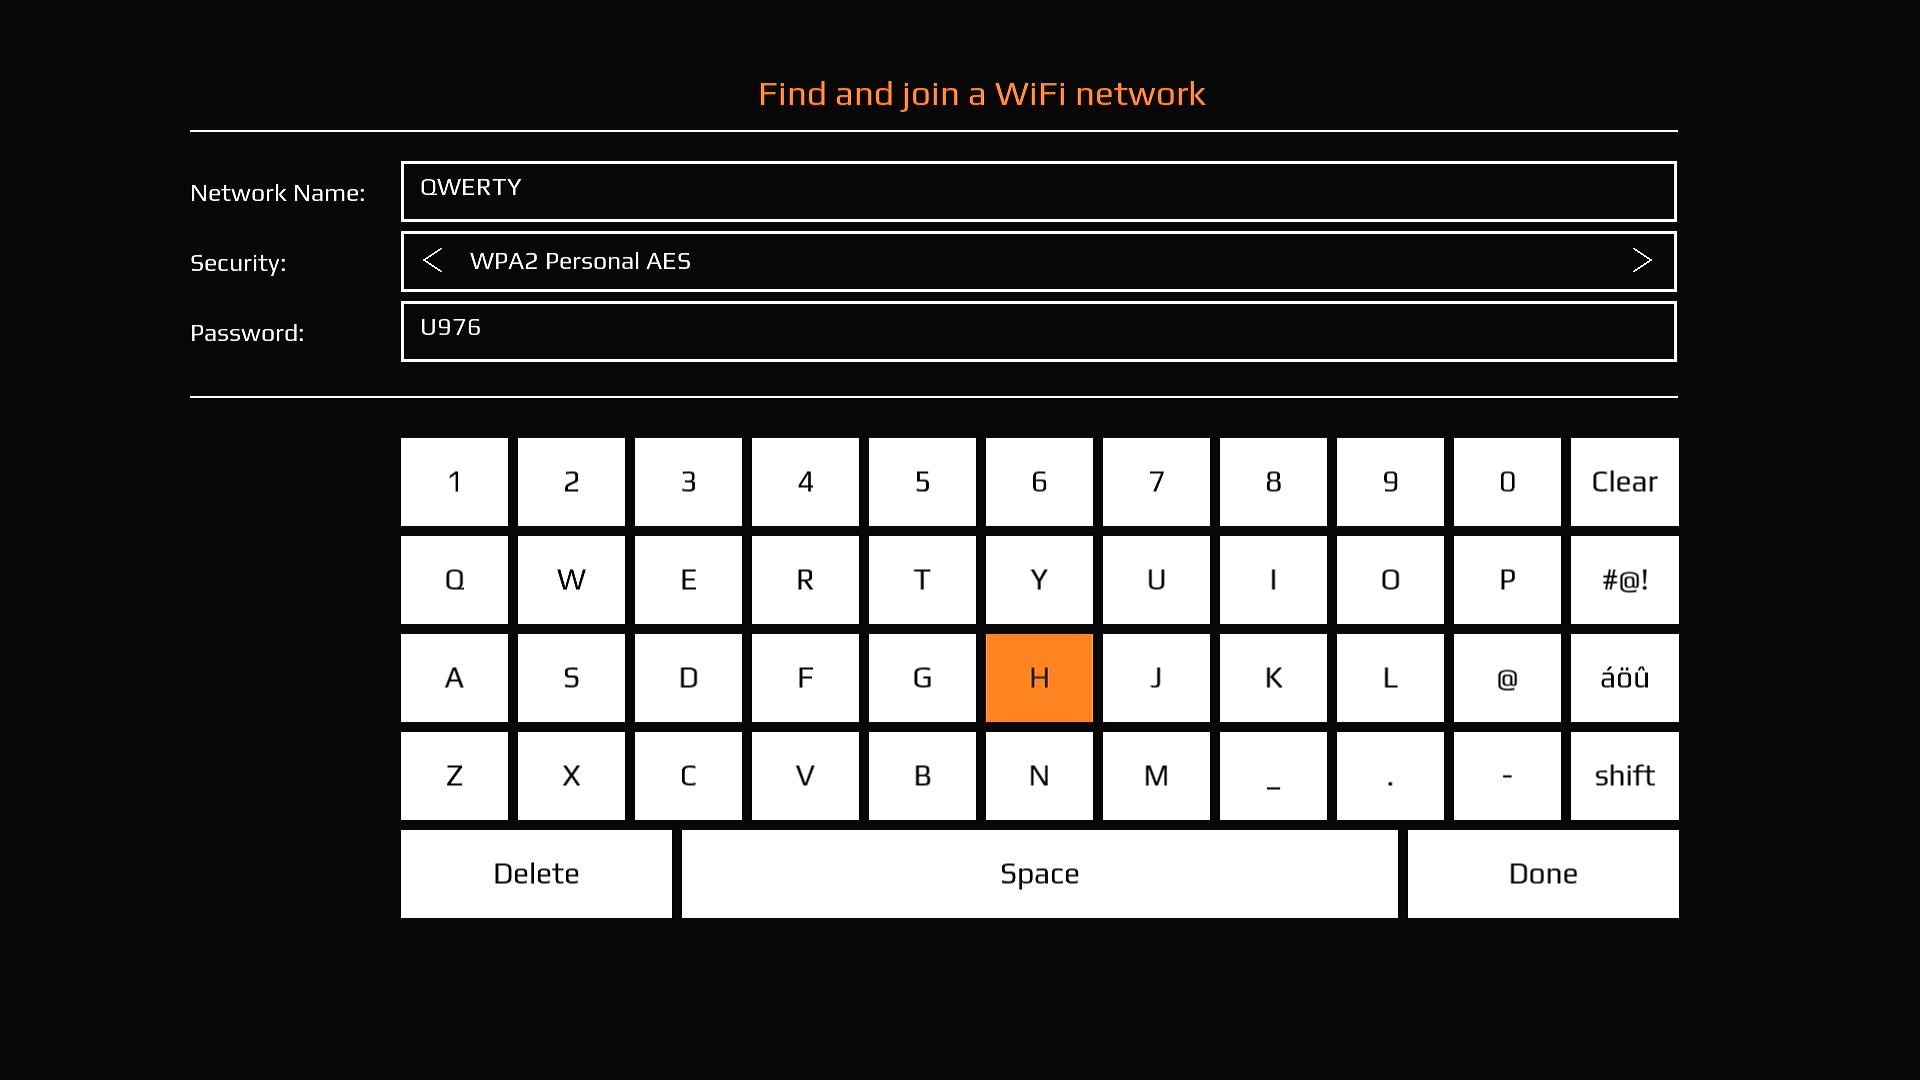
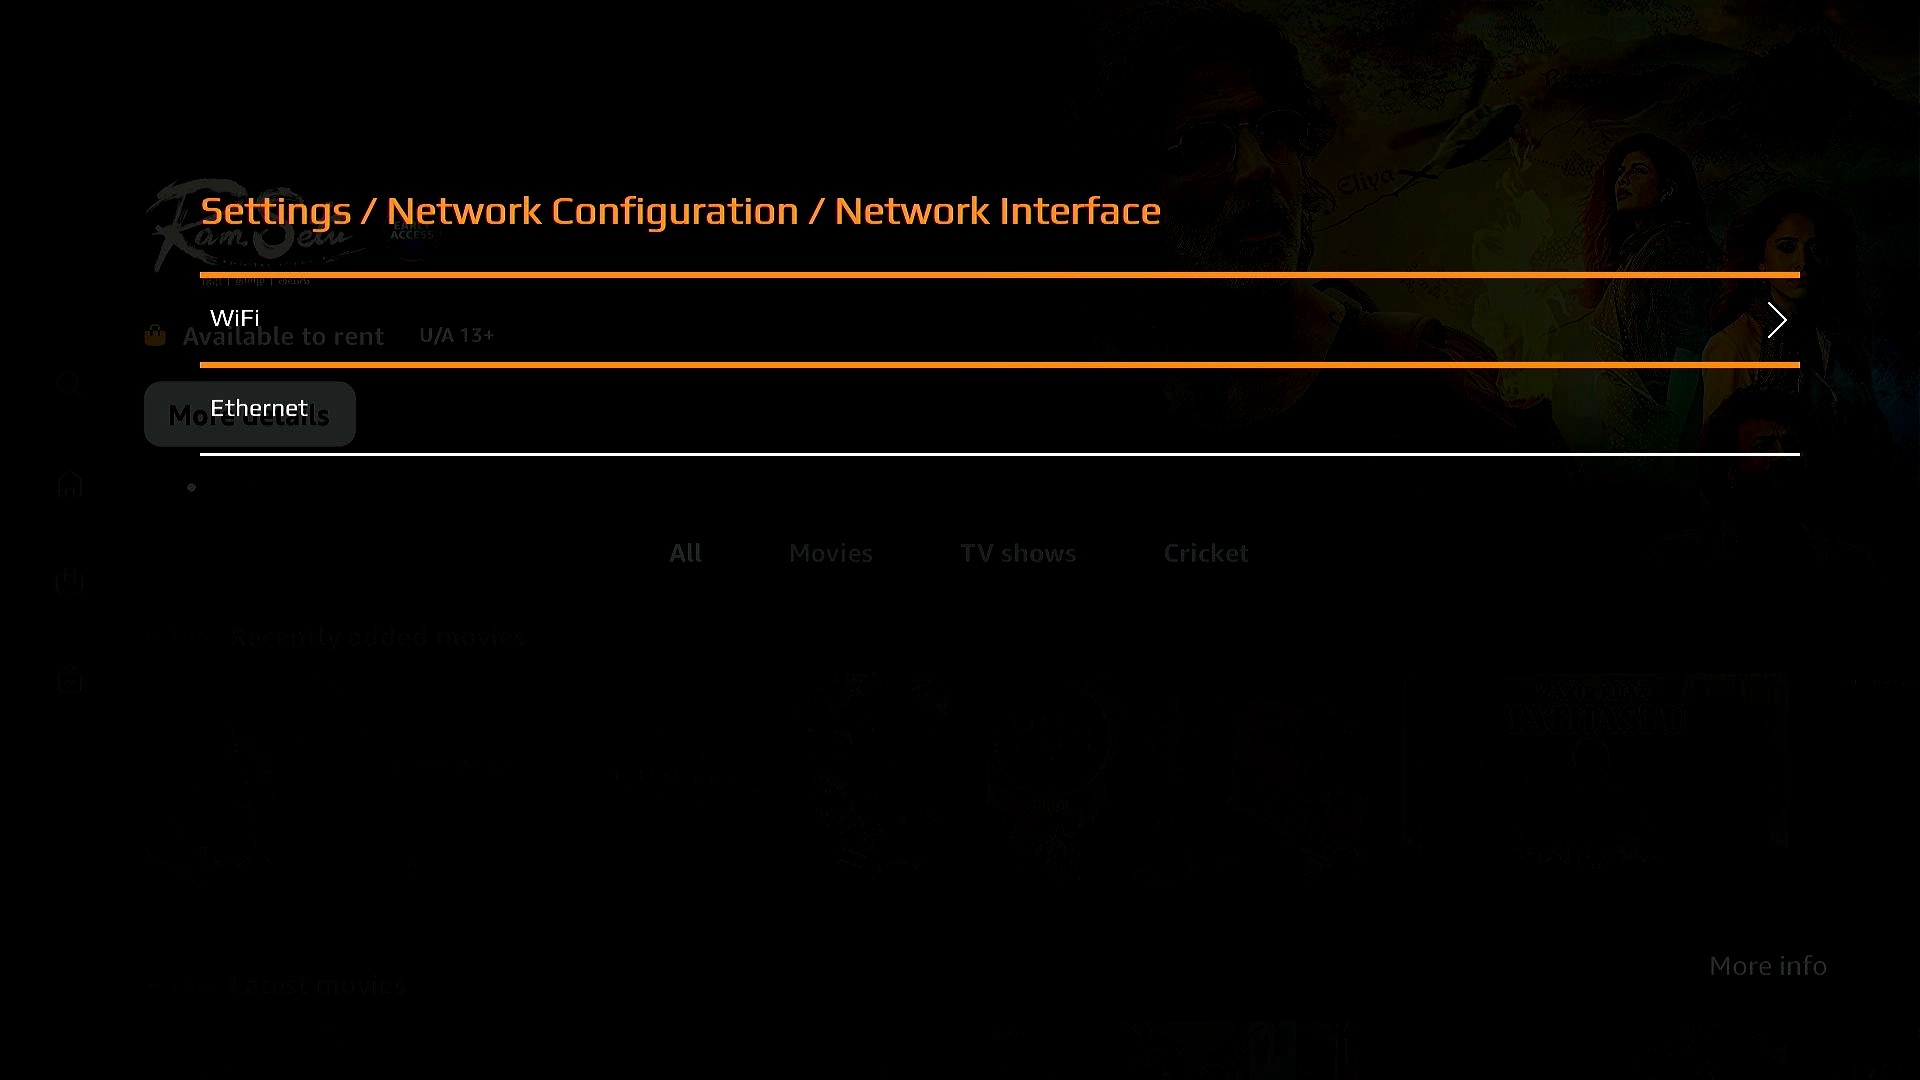
Network selection screen allows the user to configure connectivity method for internet access to the device.
...
Added skip section to test the offline mode where UI shall not initiate any network configuration. If the ethernet cable is connected or WiFi Wi-Fi is factory configured while selecting the skip button the device's backend may automatically try to connect to the network via respective interface which is not initiated by UI.
...
Keyboard seen in above snapshot is implemented using Lightning UI Components and has been customized to fit with present Keyboard layout.
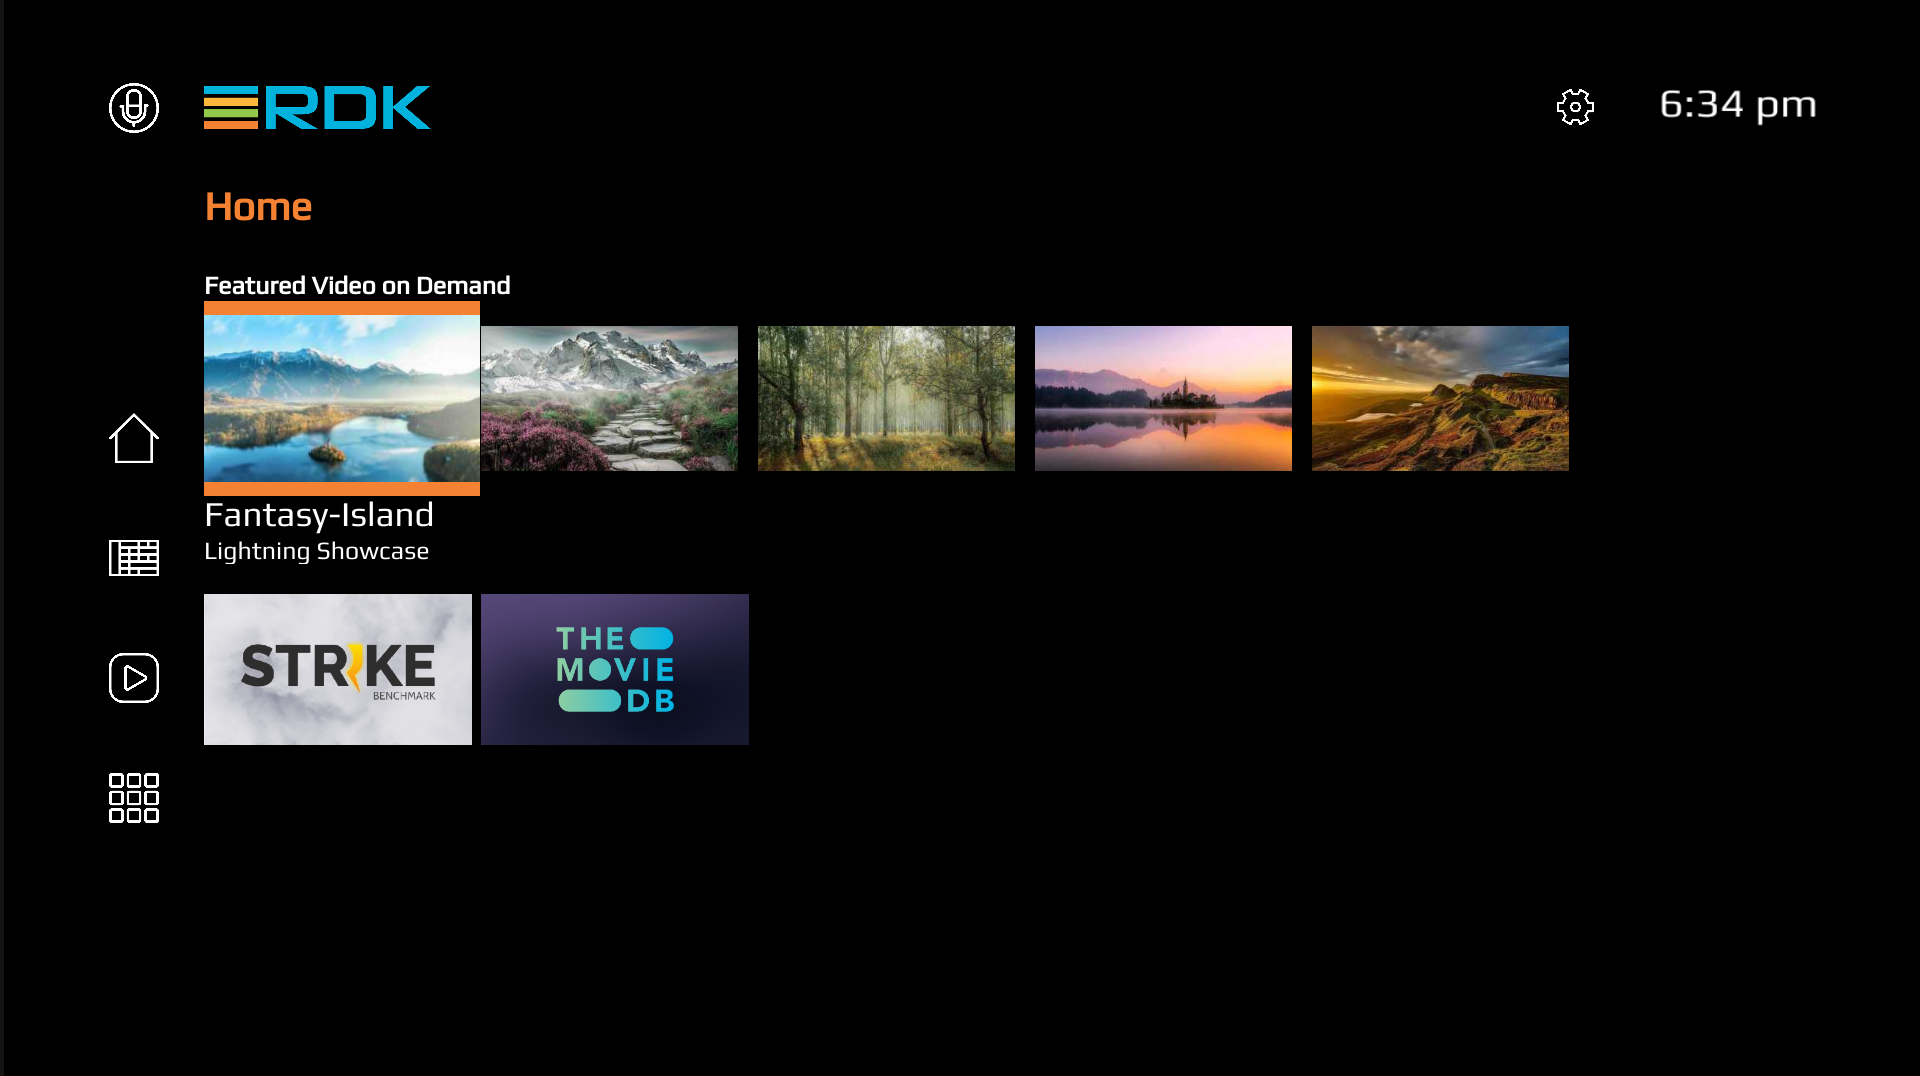
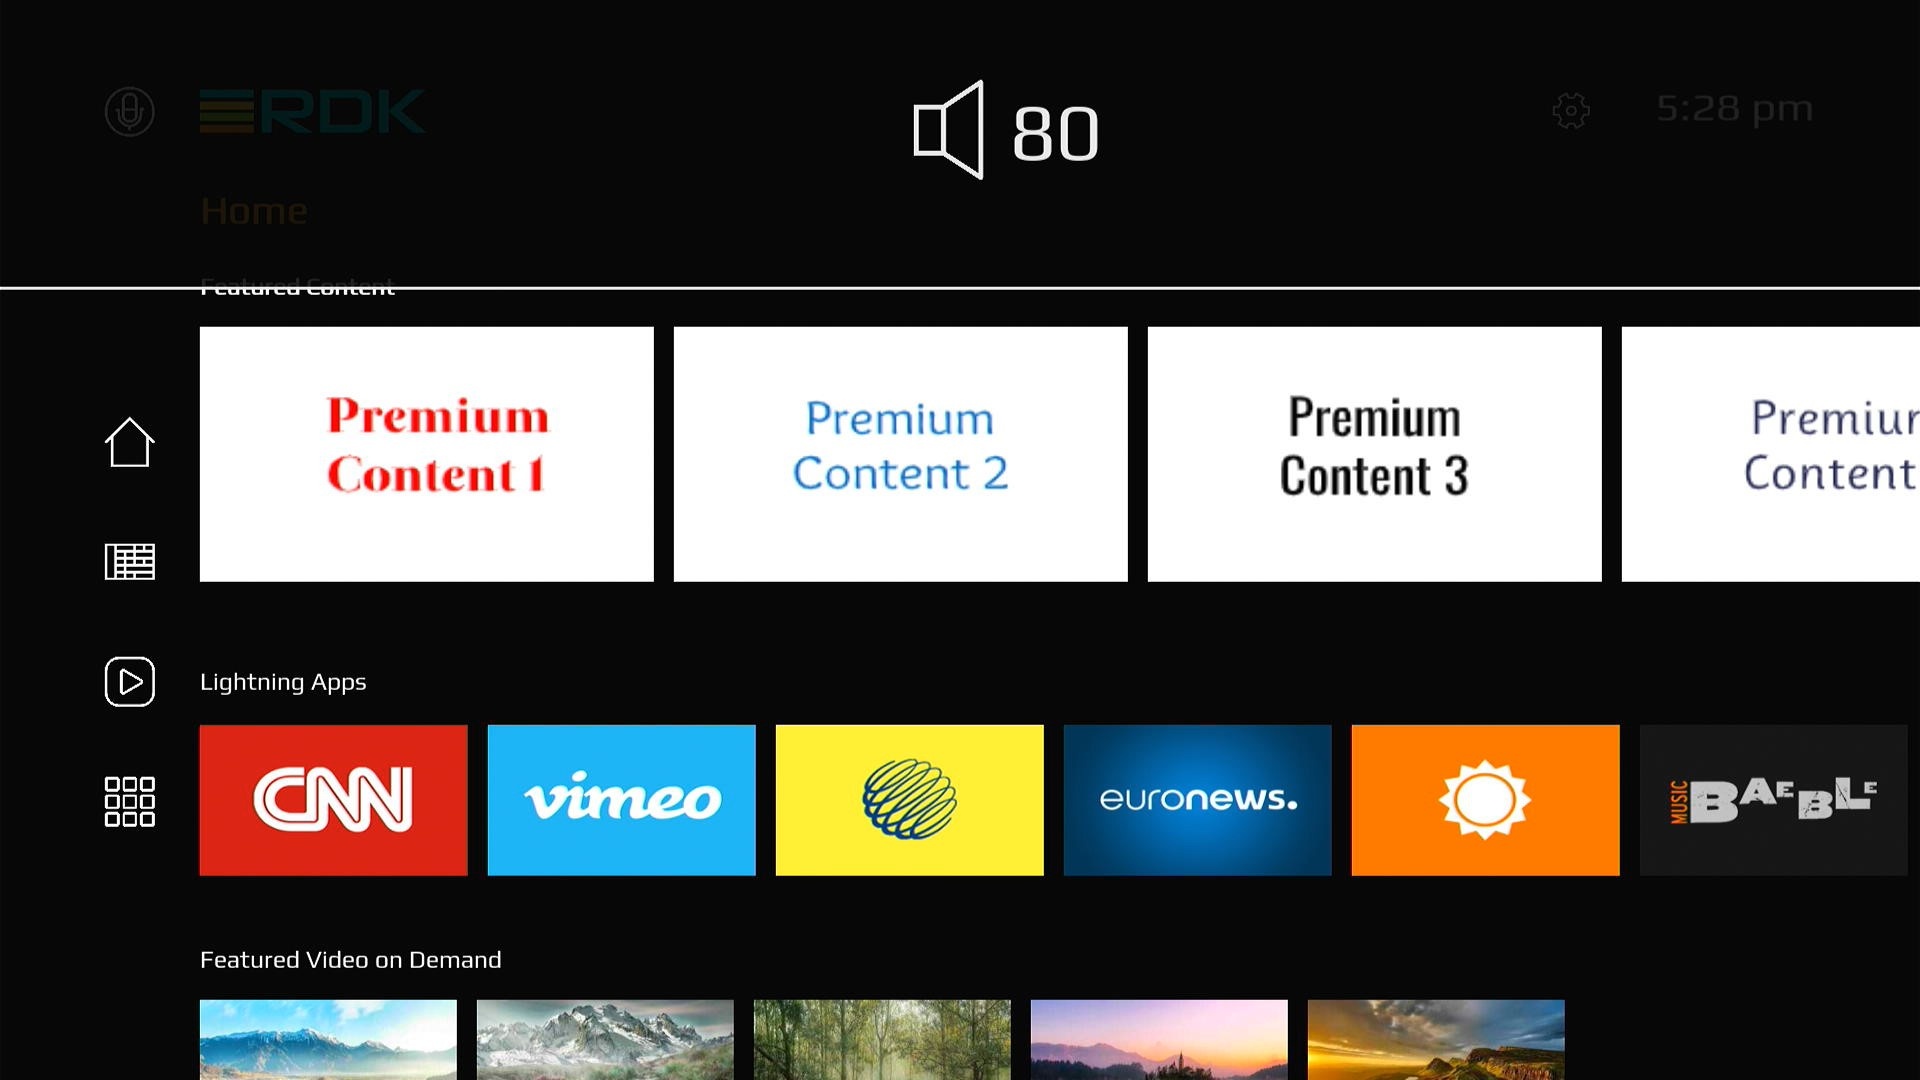
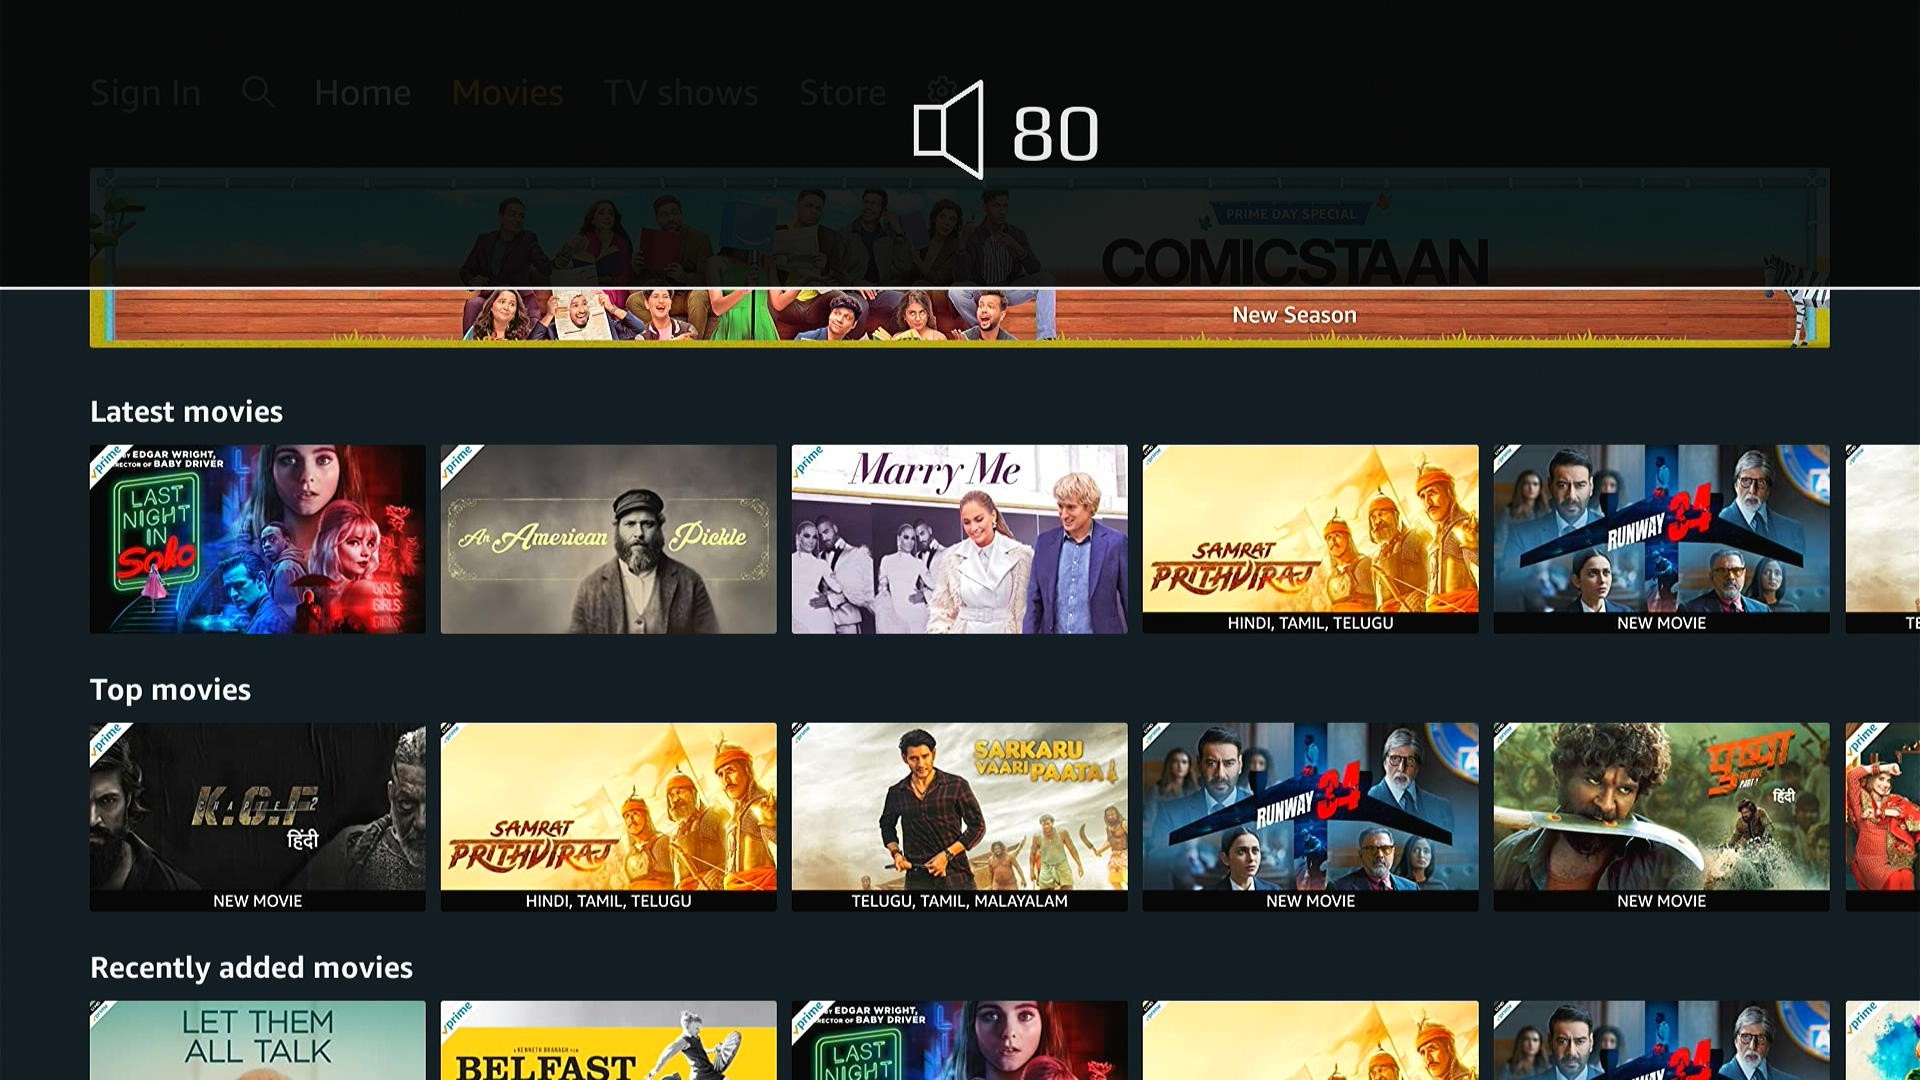
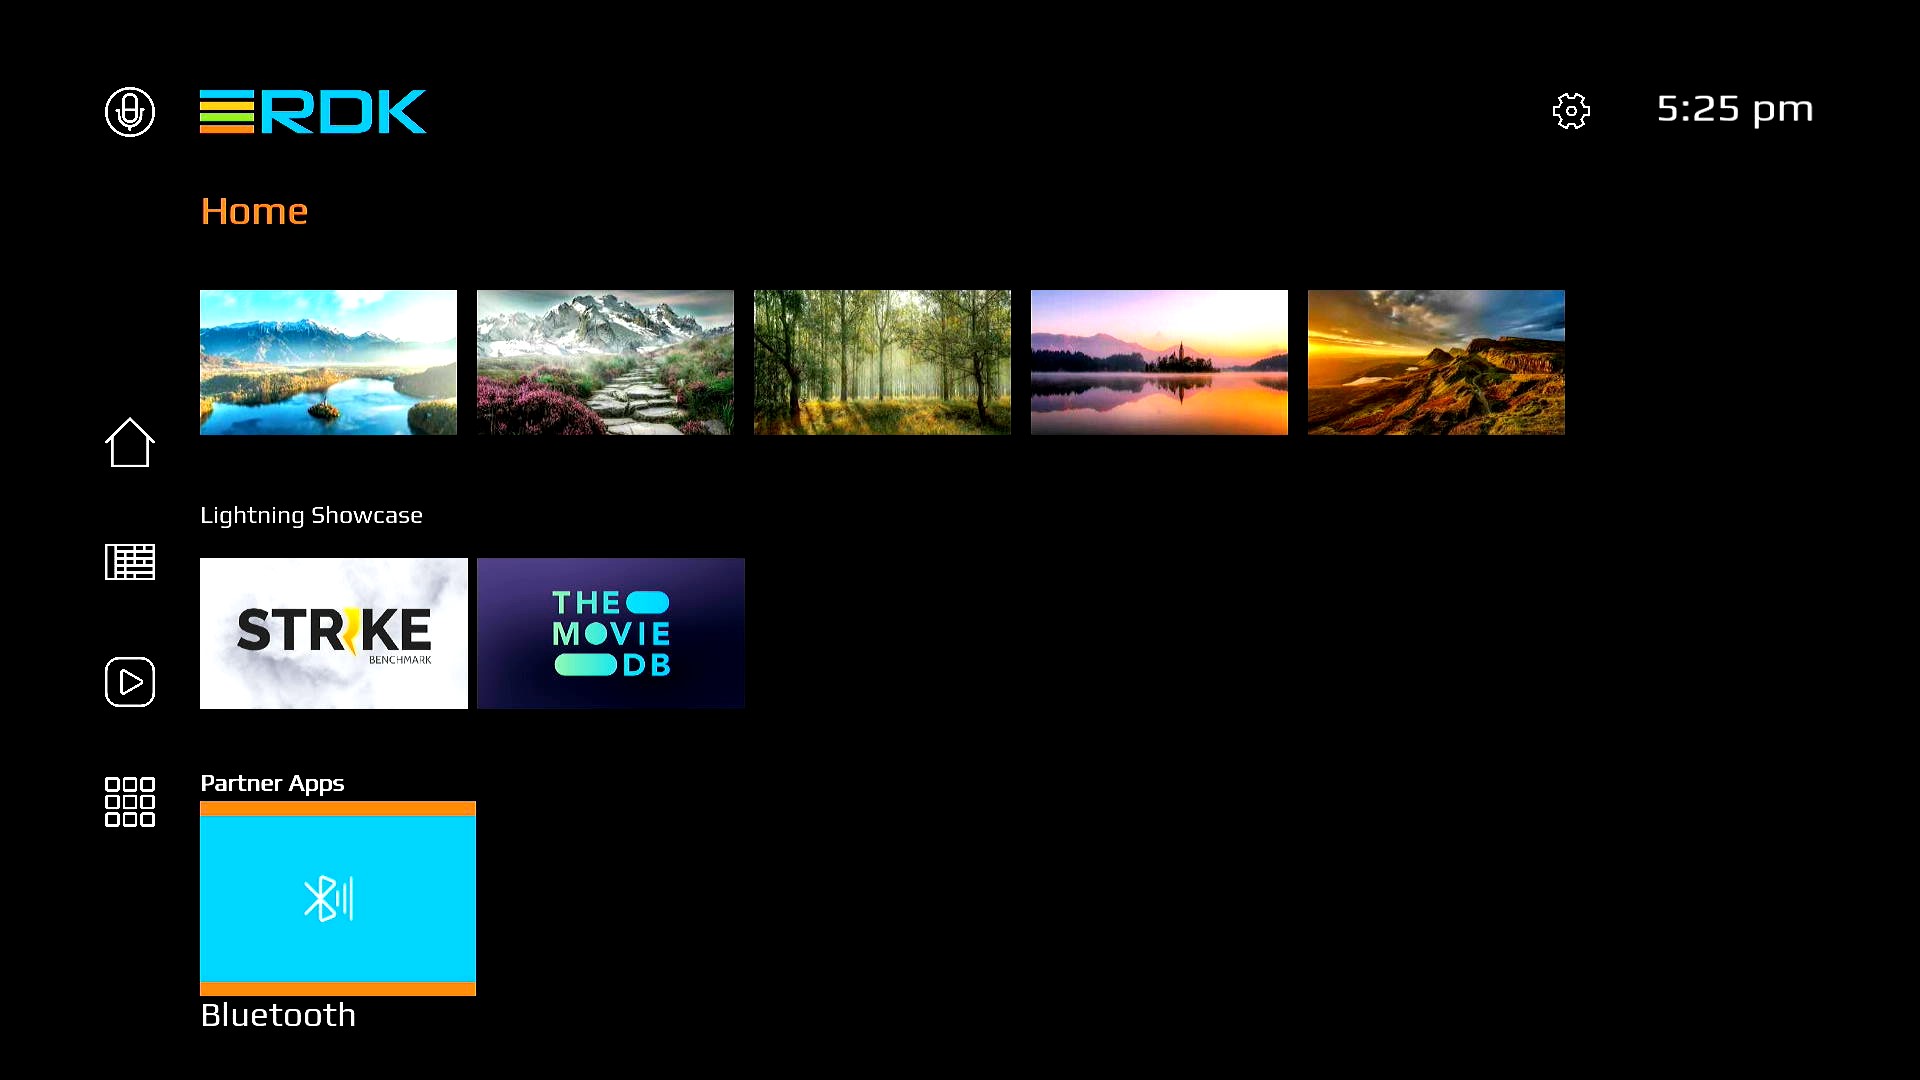
This new app has redesigned ‘Home UI’ screen with new background, shadow and animation effects. It contains sections for Featured content, Lightning Apps, Featured Video on Demand, and Voice and Settings icons displayed on top section.
...
Sample Video contents can be played from the Featured Video section.
User can access the device settings by interacting with the Settings icon which will redirect him on to dedicated settings screen. Time display is also available in the home UI.
Note: Voice Search Functionality implementation for the mic is not yet available, up-coming feature with BLERCUDaemon integration.
Note: The web apps will now auto-exit in case if the url gives 403 error.

Peacock App
The UI can display popular movies in Home screen with the help of Gracenote metadata if platform support is enabled. UI upon detecting required runtime configuration shall display "Popular Movies" row at the top as detailed below.
...
| Code Block | ||
|---|---|---|
| ||
curl -X POST http://127.0.0.1:9998/jsonrpc -d '{"jsonrpc":"2.0","id":"3","method":"org.rdk.PersistentStore.1.setValue","params":{"namespace":"gracenote","key":"apiKey","value":"SecretAPIKey"}}'
curl -X POST http://127.0.0.1:9998/jsonrpc -d '{"jsonrpc":"2.0","id":"3","method":"org.rdk.PersistentStore.1.getValue","params":{"namespace":"gracenote","key":"apiKey"}}' |

Here it is! This new feature allows users to select HDMI inputs connected your TV. It allows seamless switching between the UI and HDMI inputs.TBD: Need images
...
...
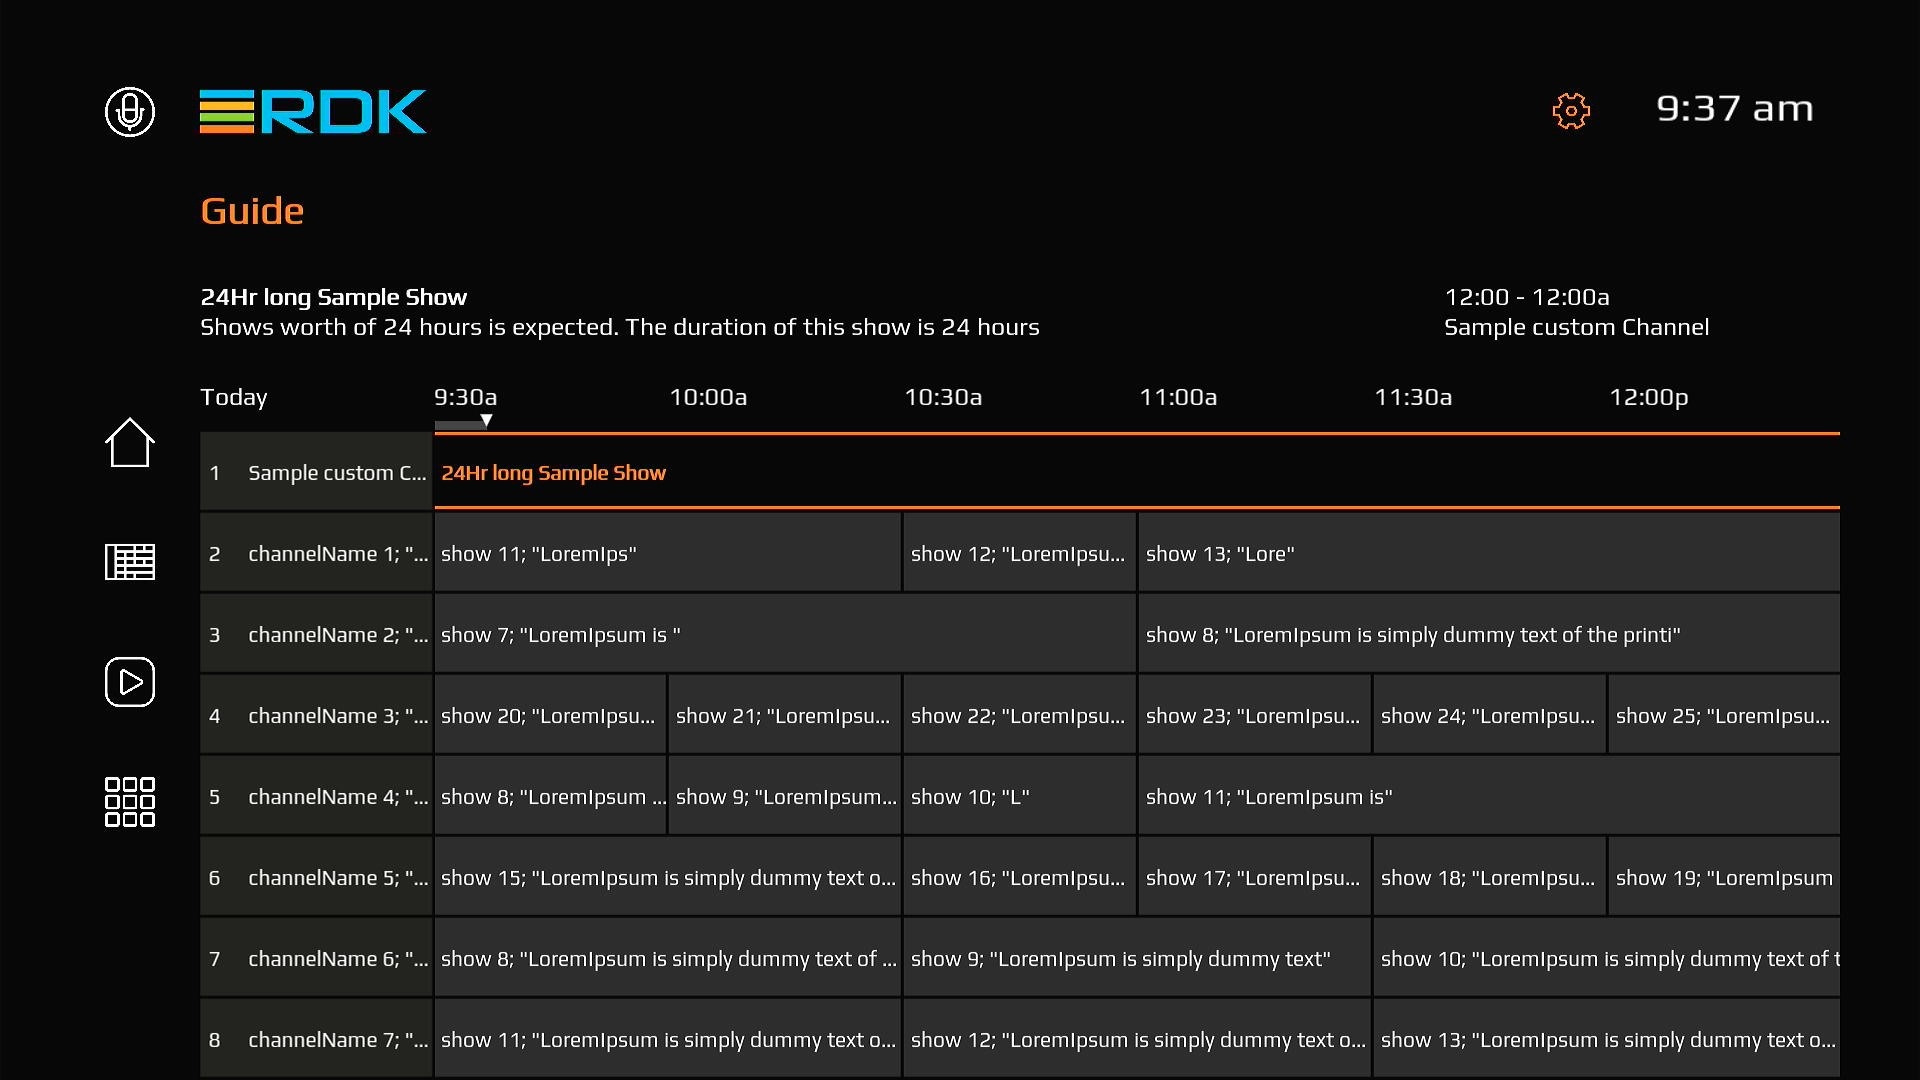
note - this file should be placed inside a folder named "moreChannels" and must be a valid json format.
Absolute path of file should be ~/lxresui/static/moreChannels/channelData.json.
sample Content for the file -
| Code Block | ||
|---|---|---|
| ||
{
    "data": [{
        "channelName": "Sample custom Channel",
        "channelUrl": "https://bitdash-a.akamaihd.net/content/MI201109210084_1/m3u8s/f08e80da-bf1d-4e3d-8899-f0f6155f6ef",
        "shows": [{
            "showName": "24Hr long Sample Show",
            "description": "Shows worth of 24 hours is expected. The duration of this show is 24 hours",
            "duration": 172800000,
            "startTime": "0:0",
            "endTime": "0:0"
        }]
    }]
} |
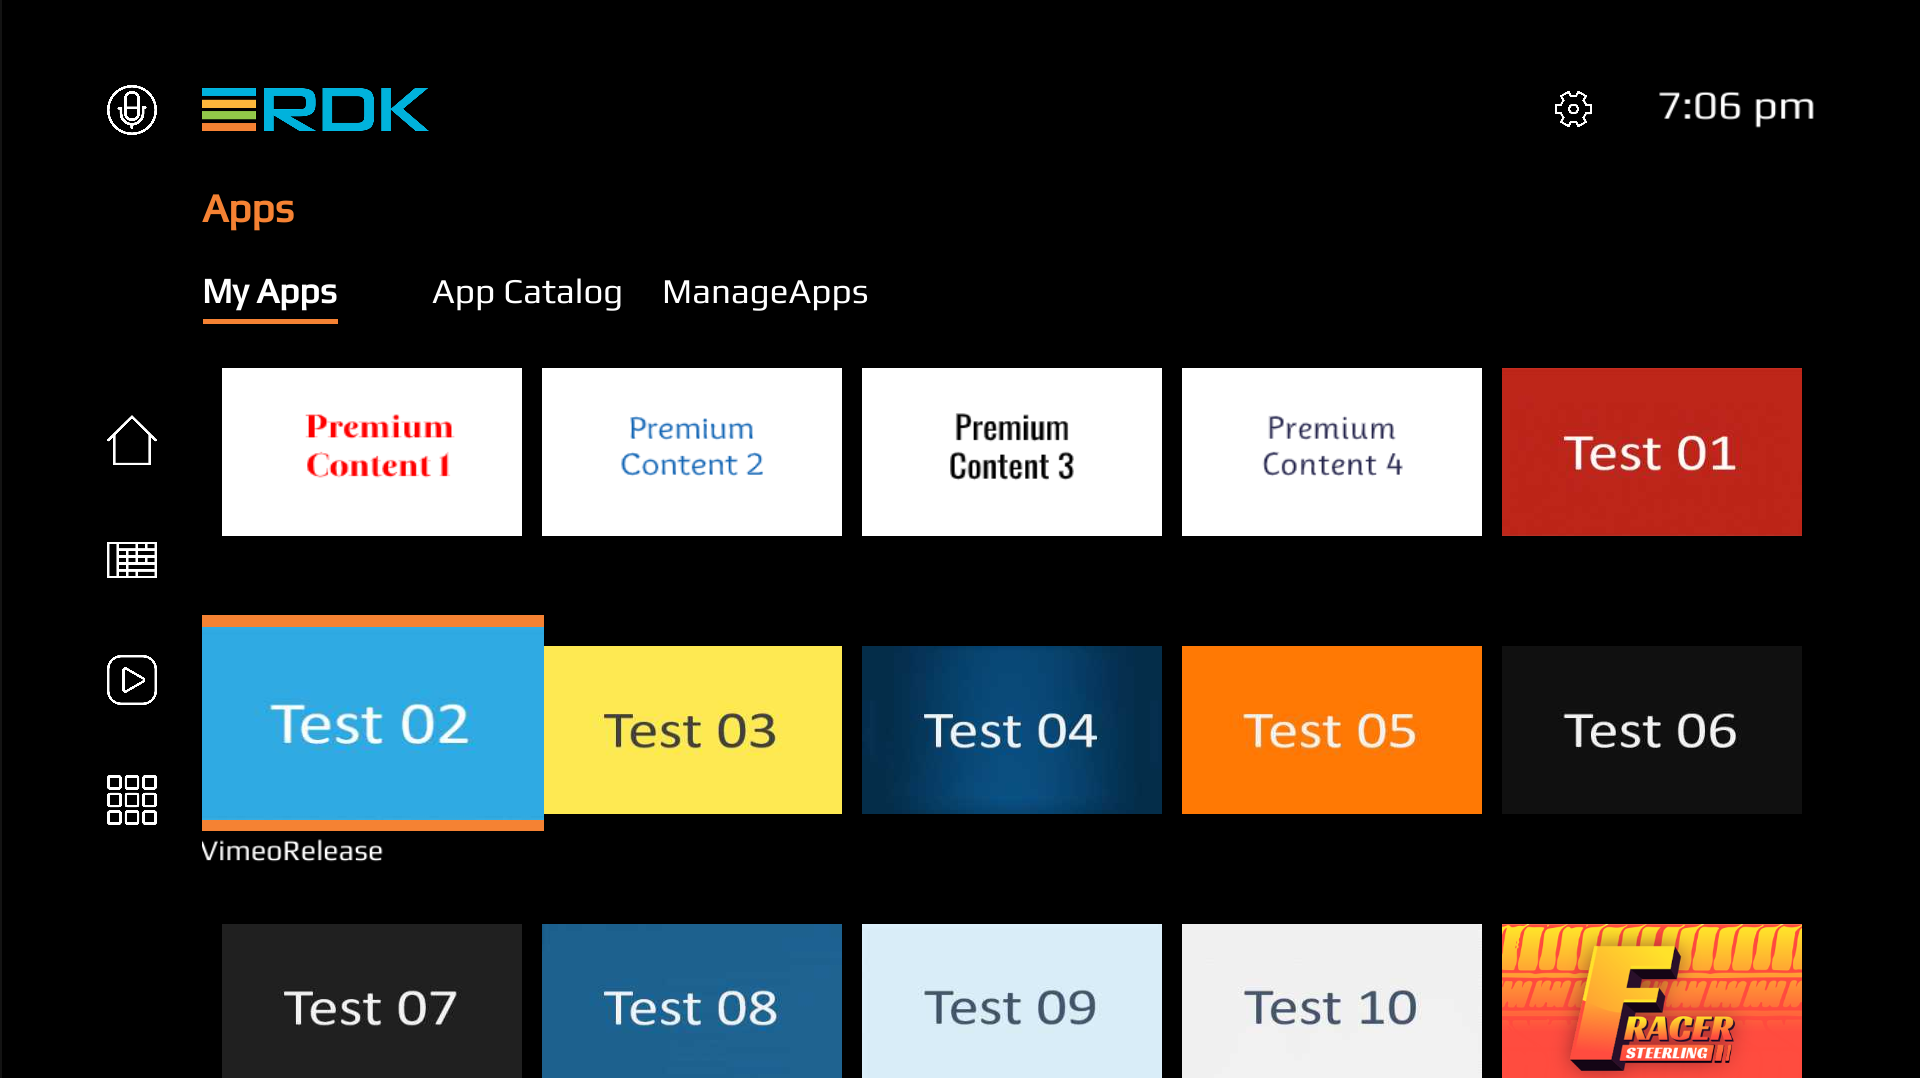
A new page under 4th Icon in the left banner !!!
On selecting the Apps Icon from left banner; User shall be presented a new page with 3 tabs highlighted with "MyApps" which shall list the list of all available Apps on that particular platform. User shall be able to launch selected App from this page as well.
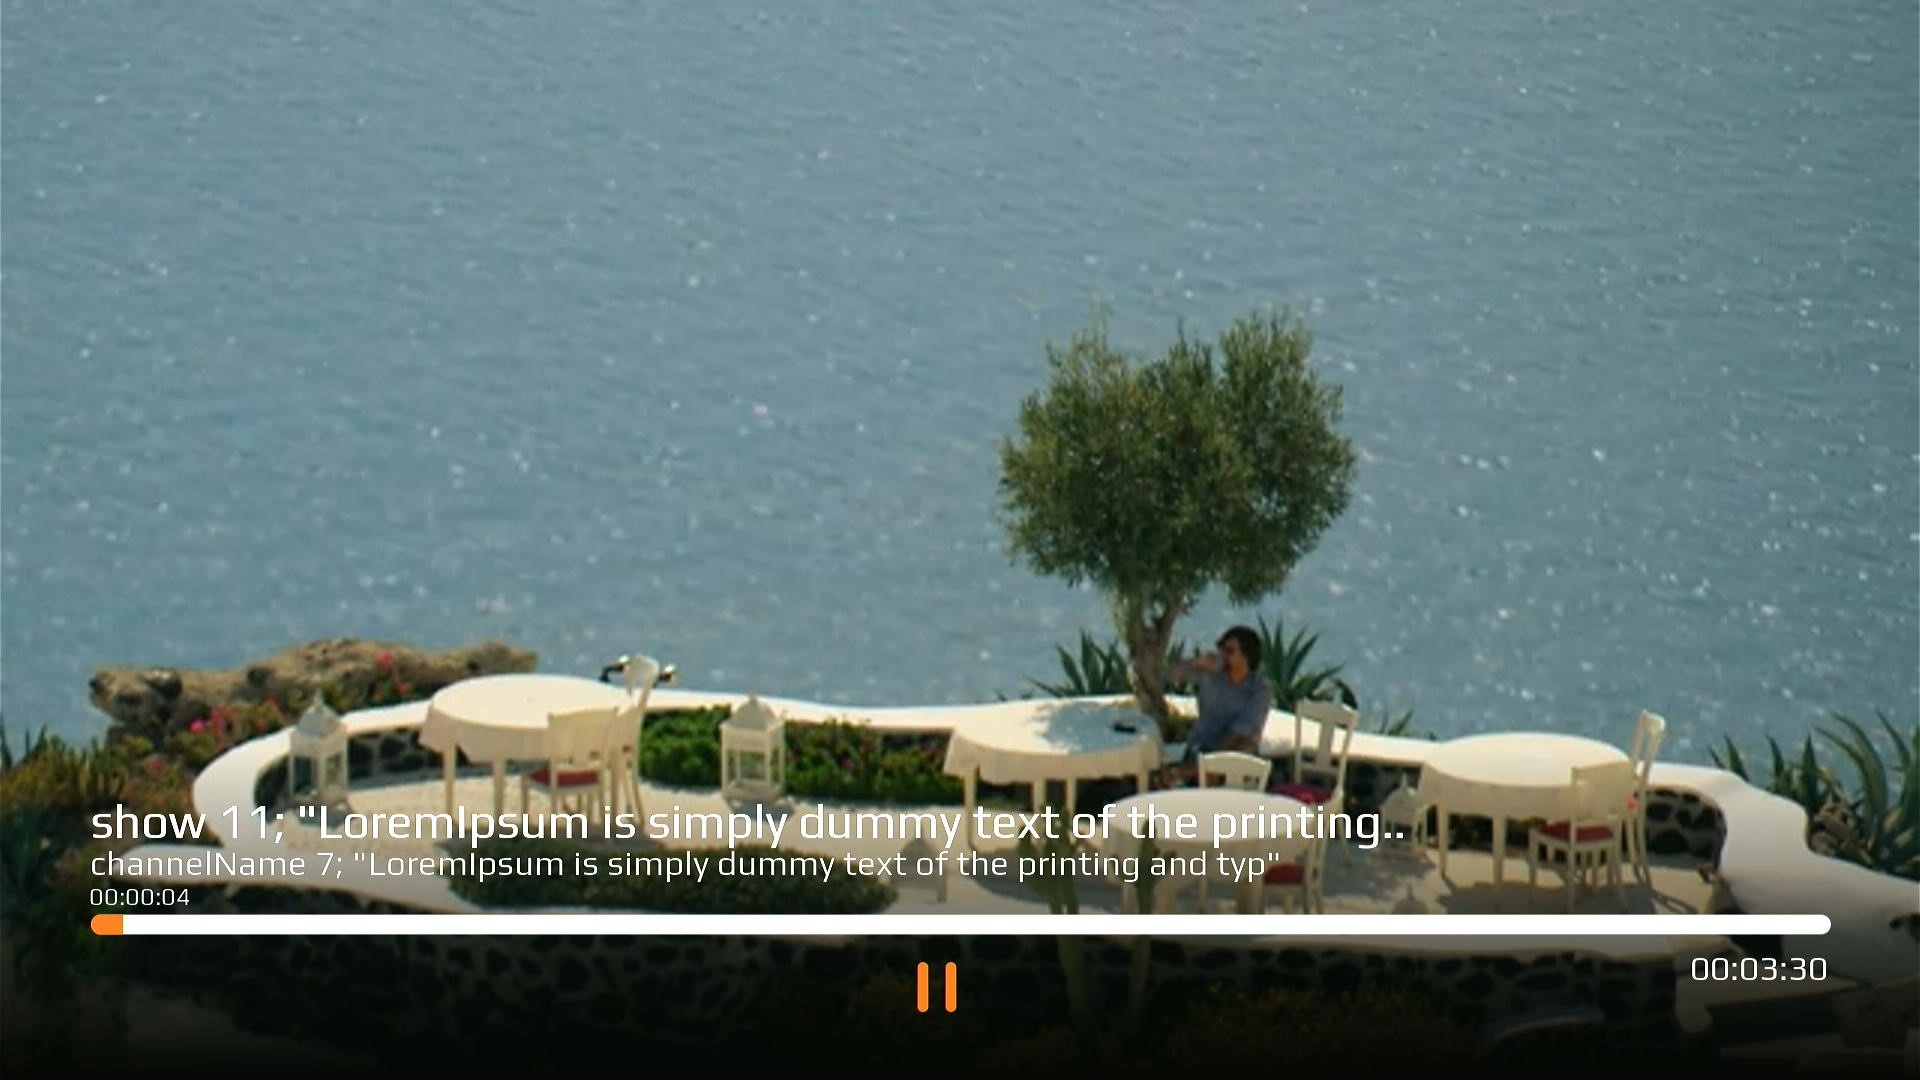
The redesigned video player utilizes UVE implementation and has kept the minimal controls such as a progress bar with pause, play, next and previous buttons. Various player controls are detailed below.

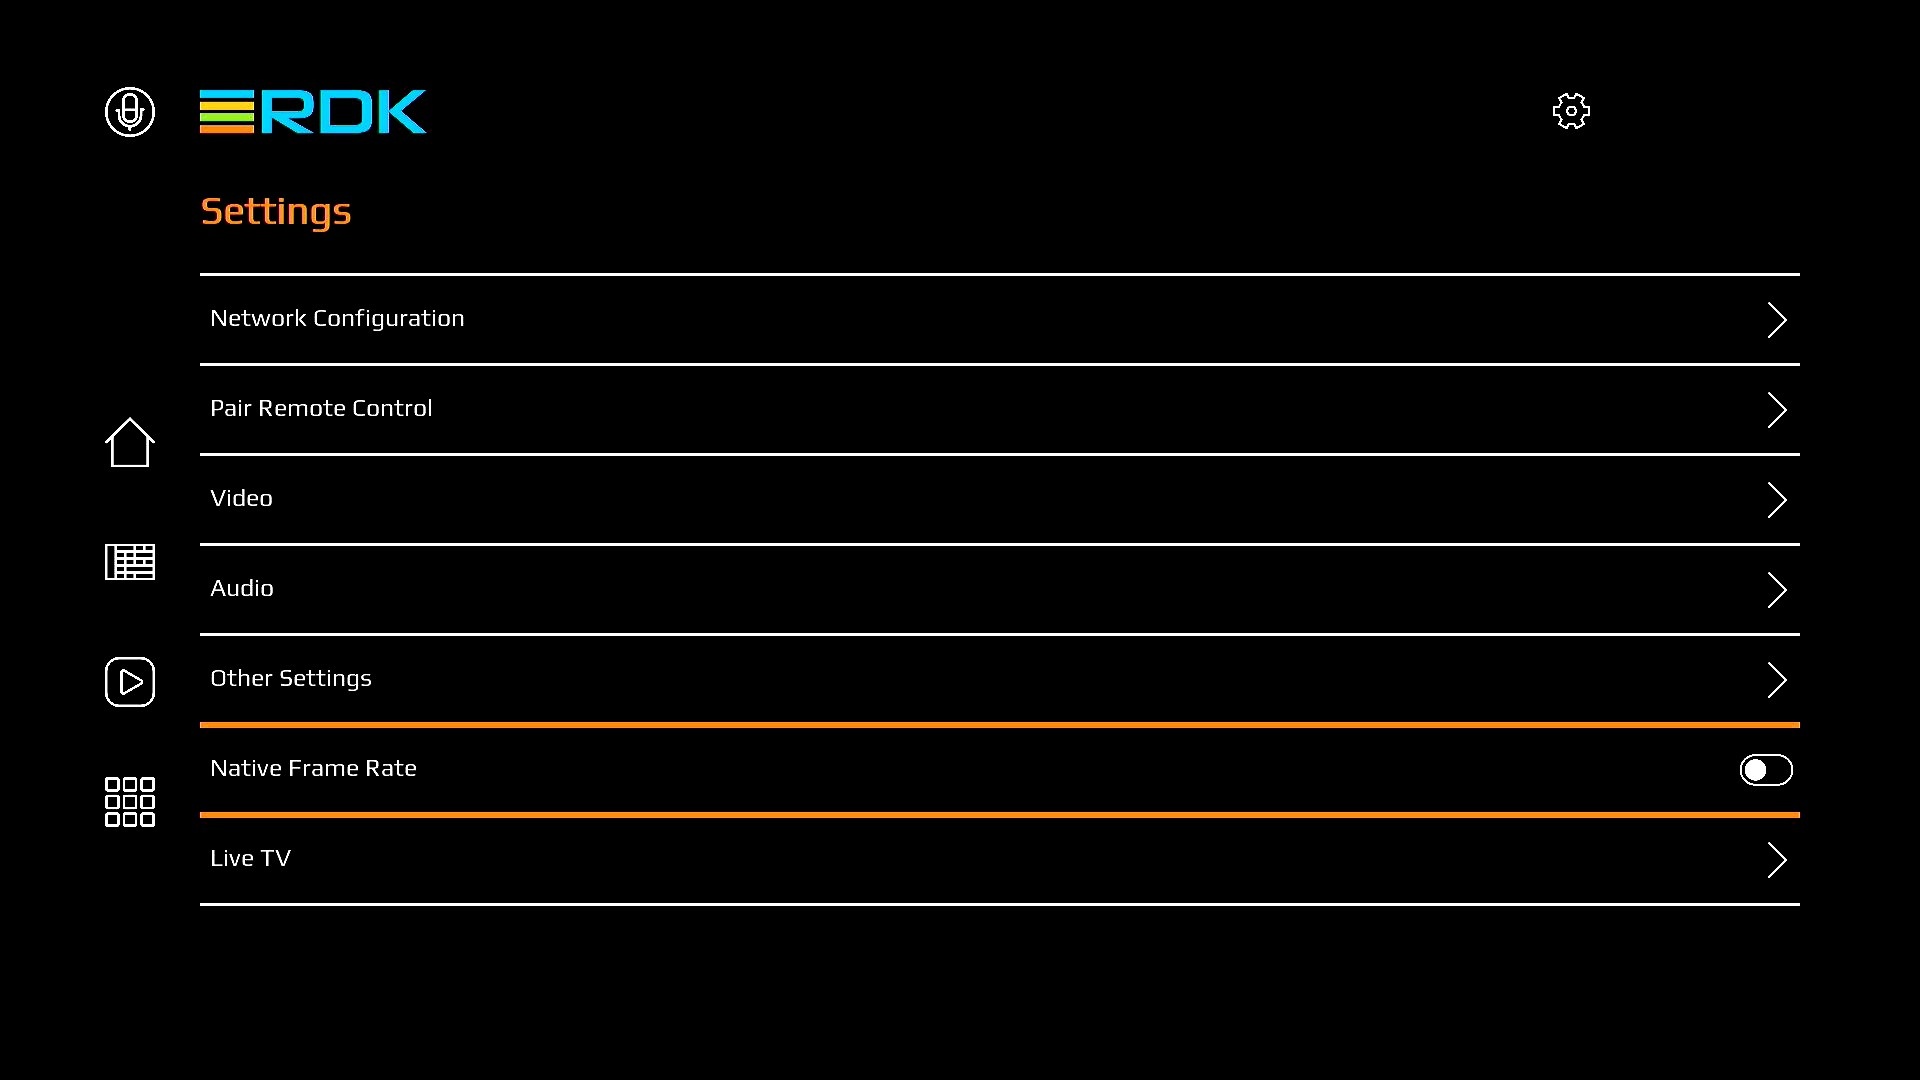
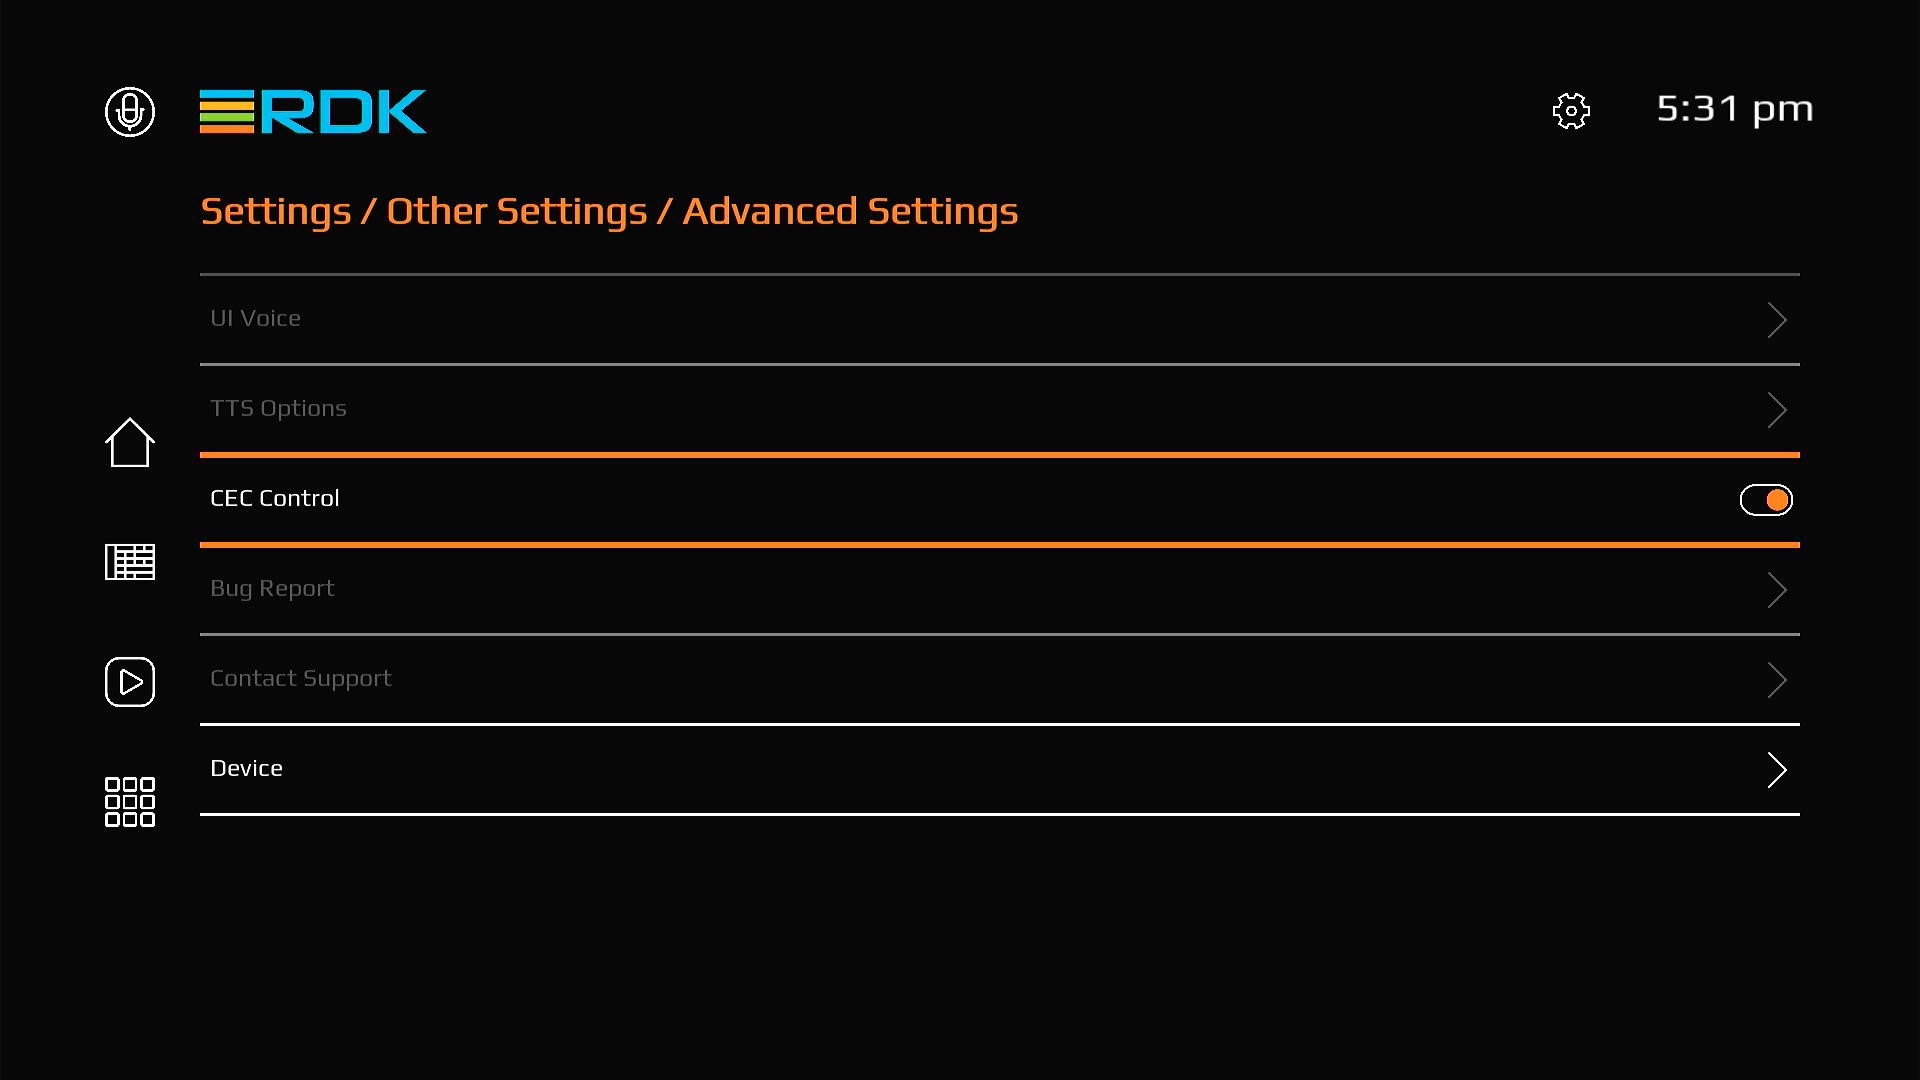
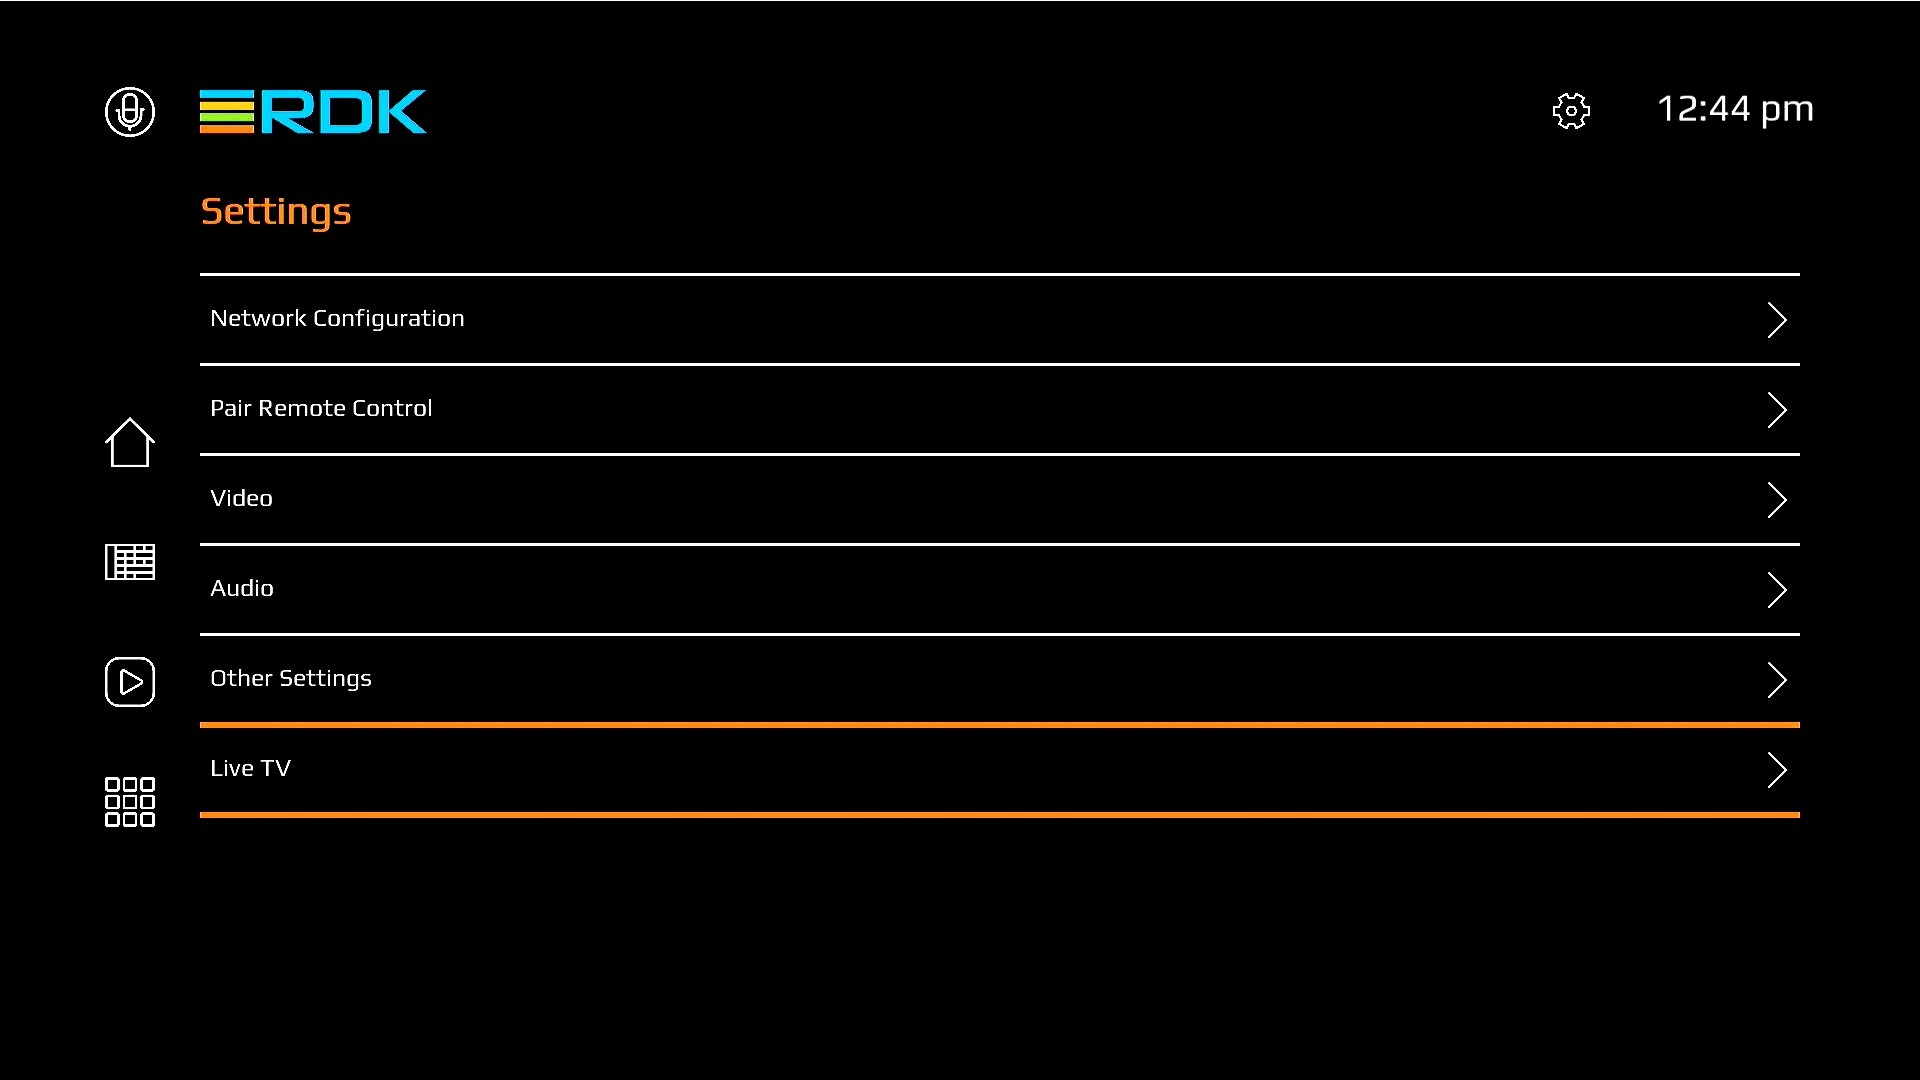
Settings screen has several new options which allows user to interact with device capabilities.
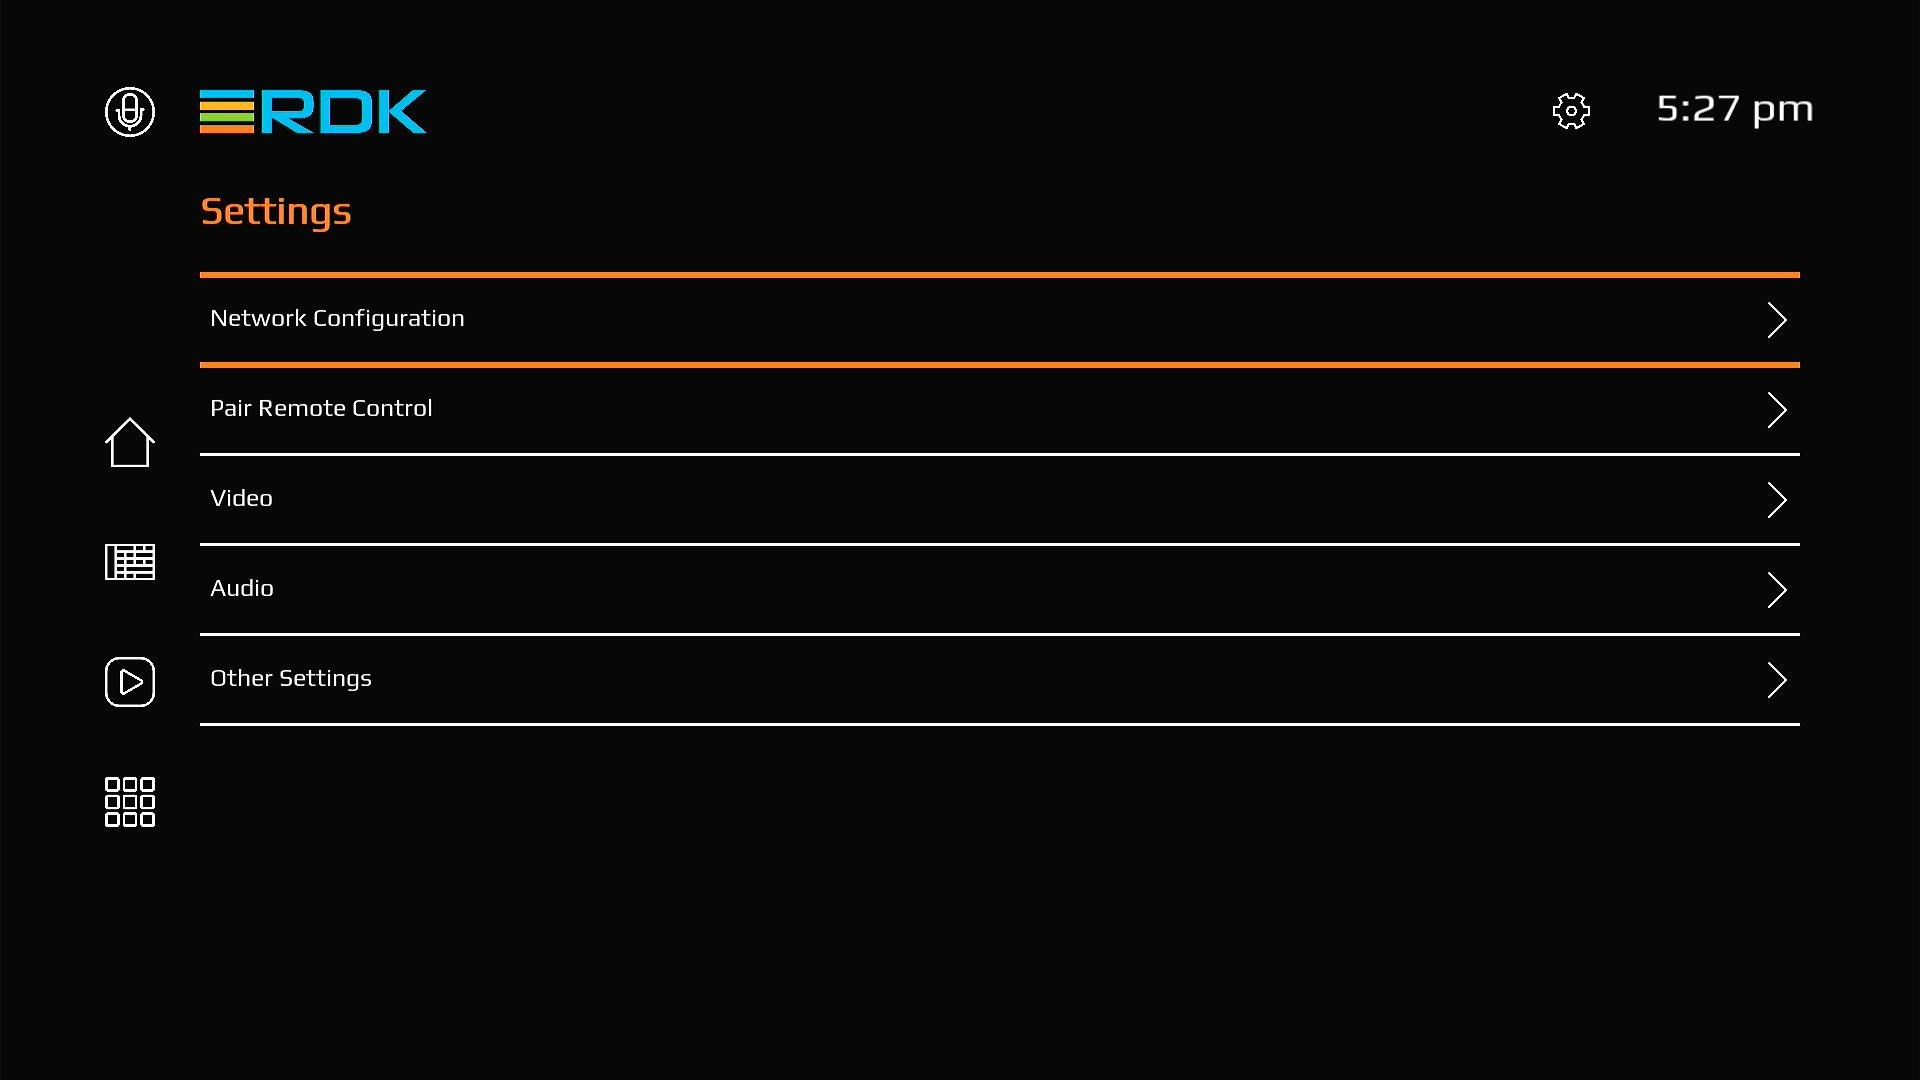
This page contains three subsections detailed below:
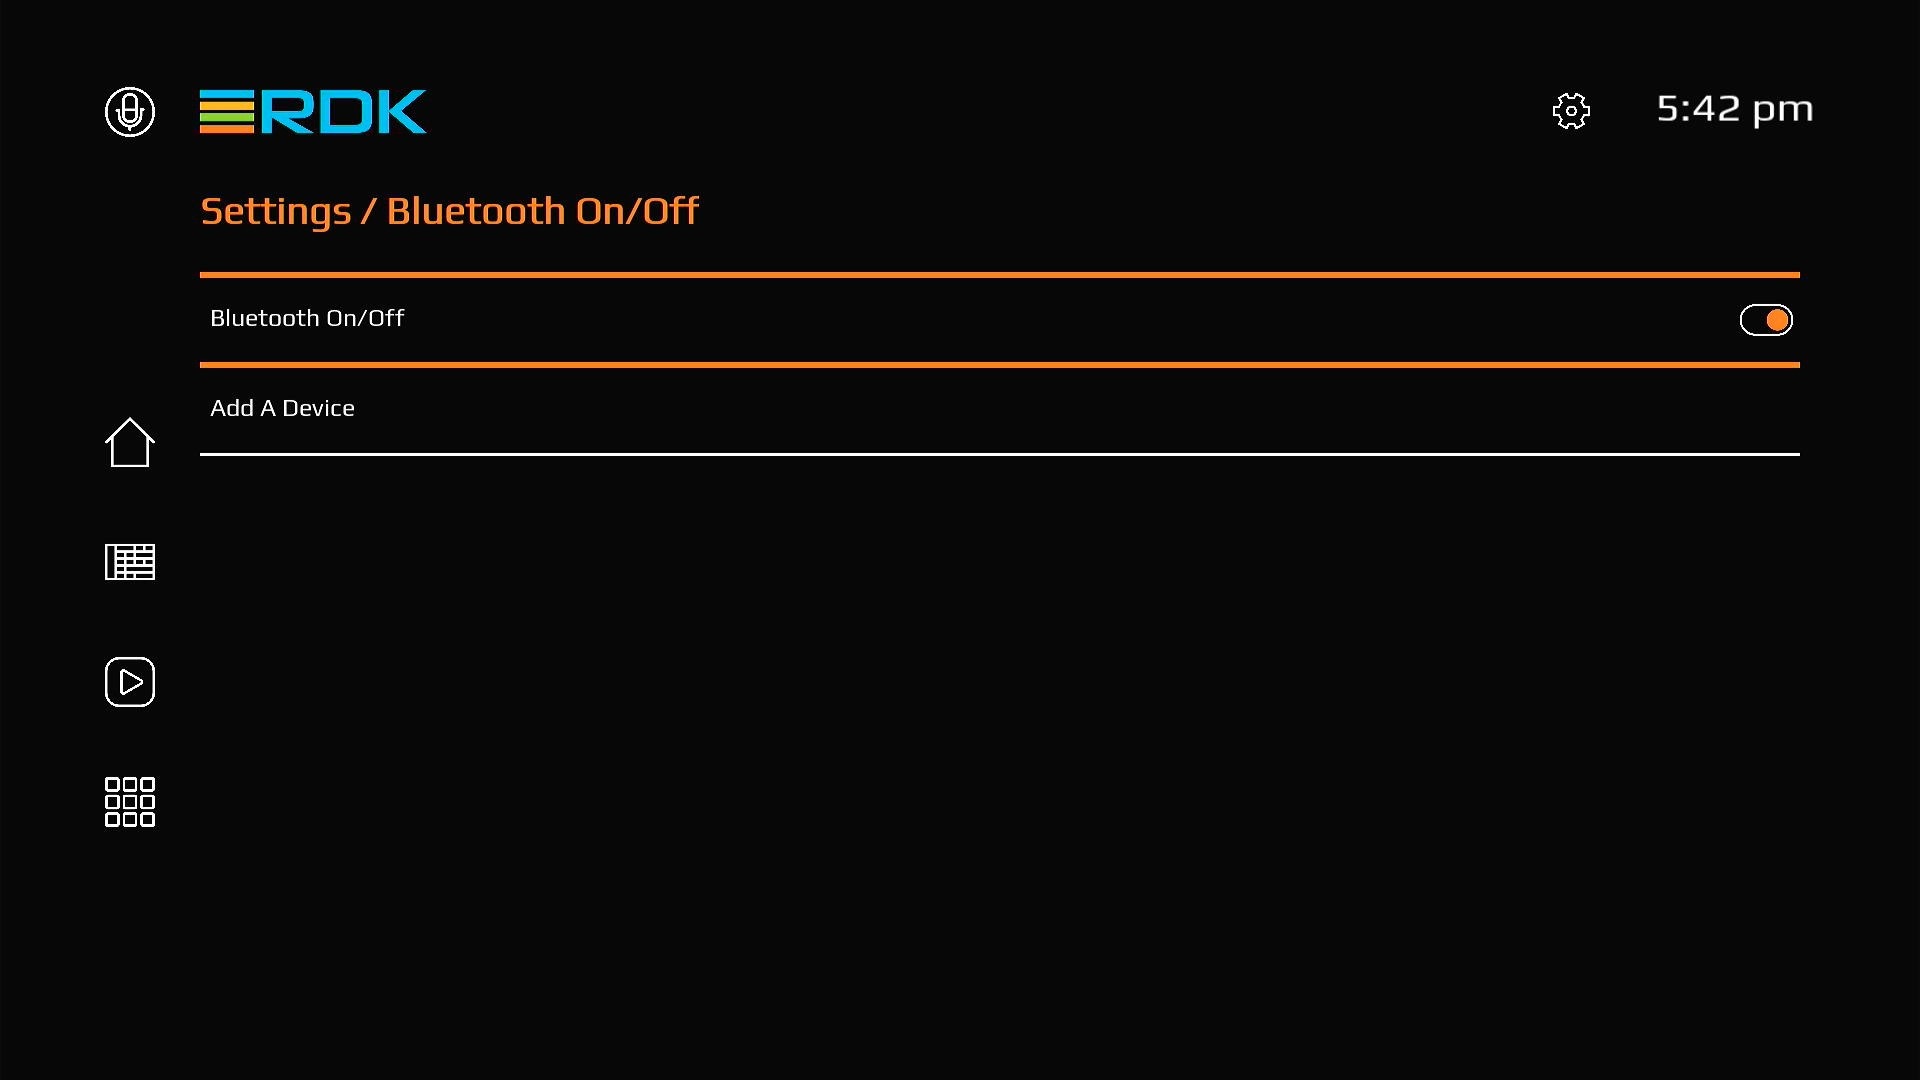
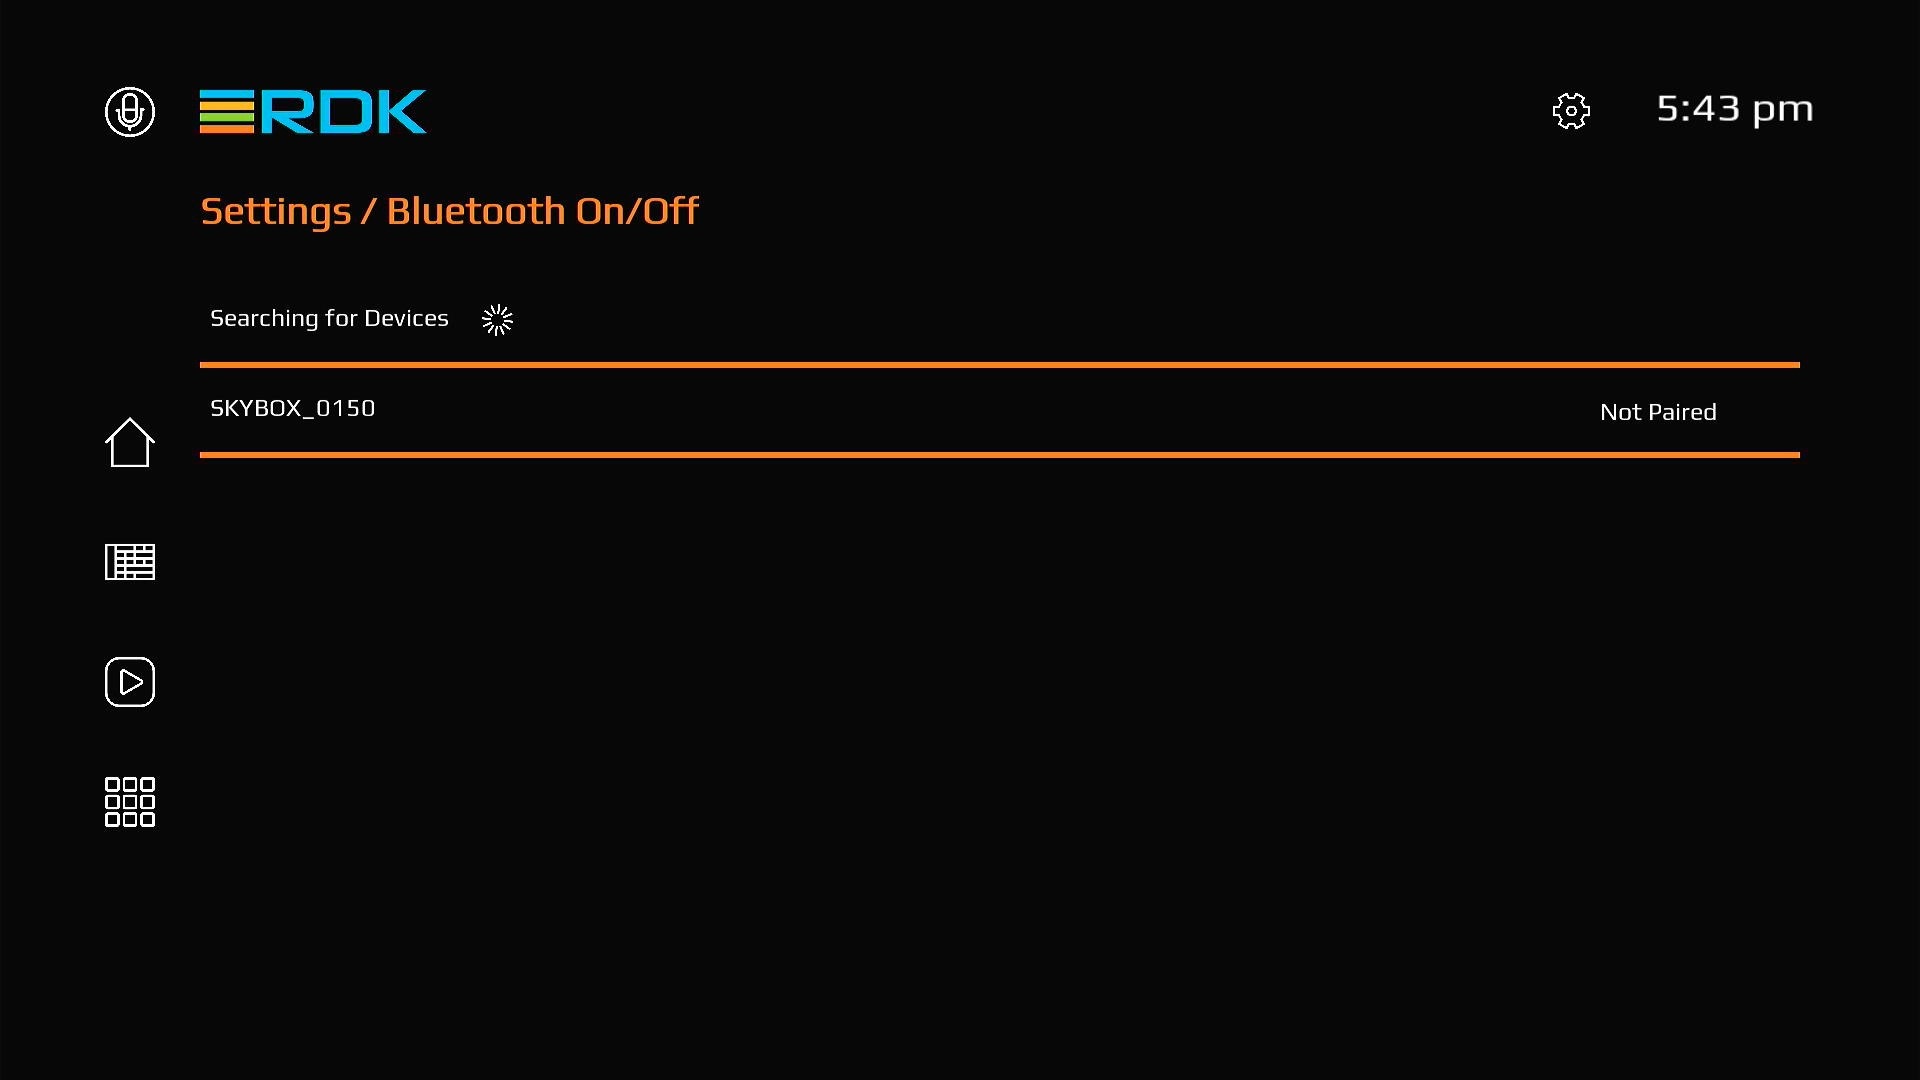
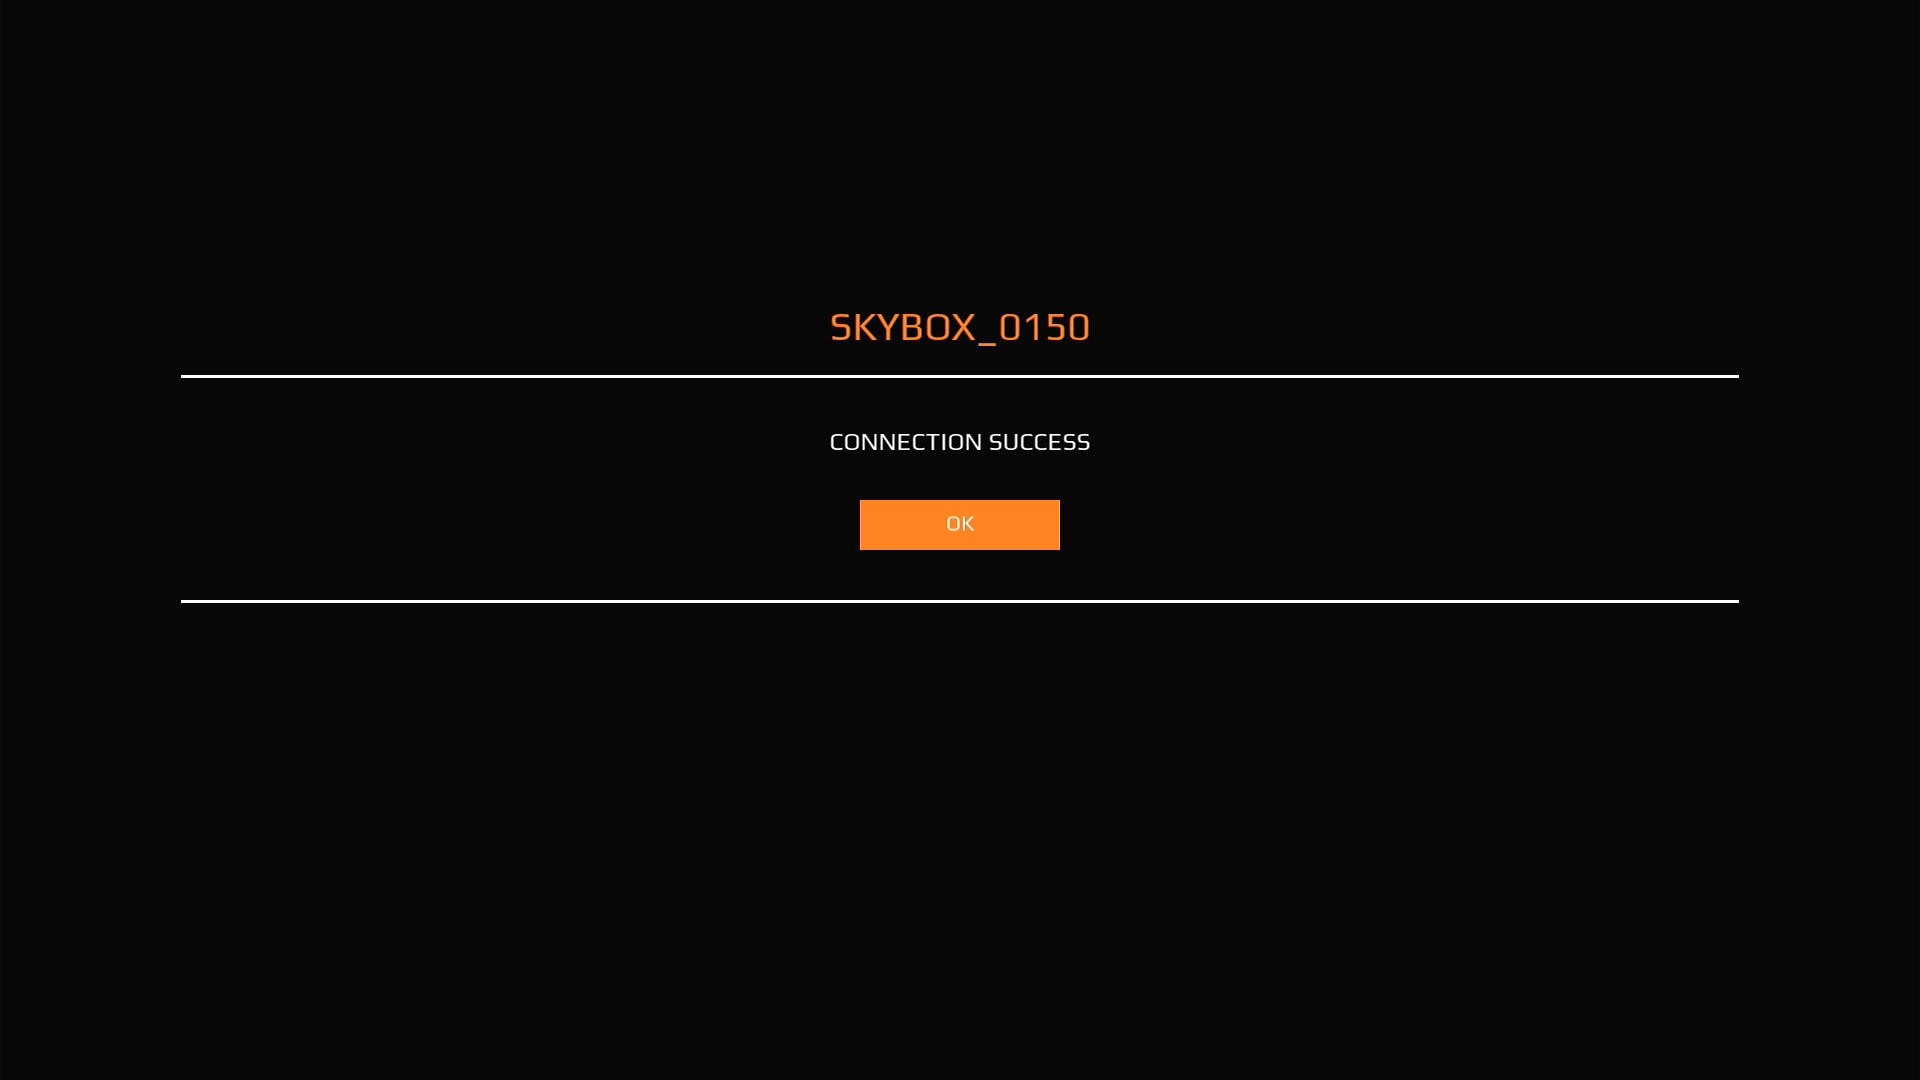
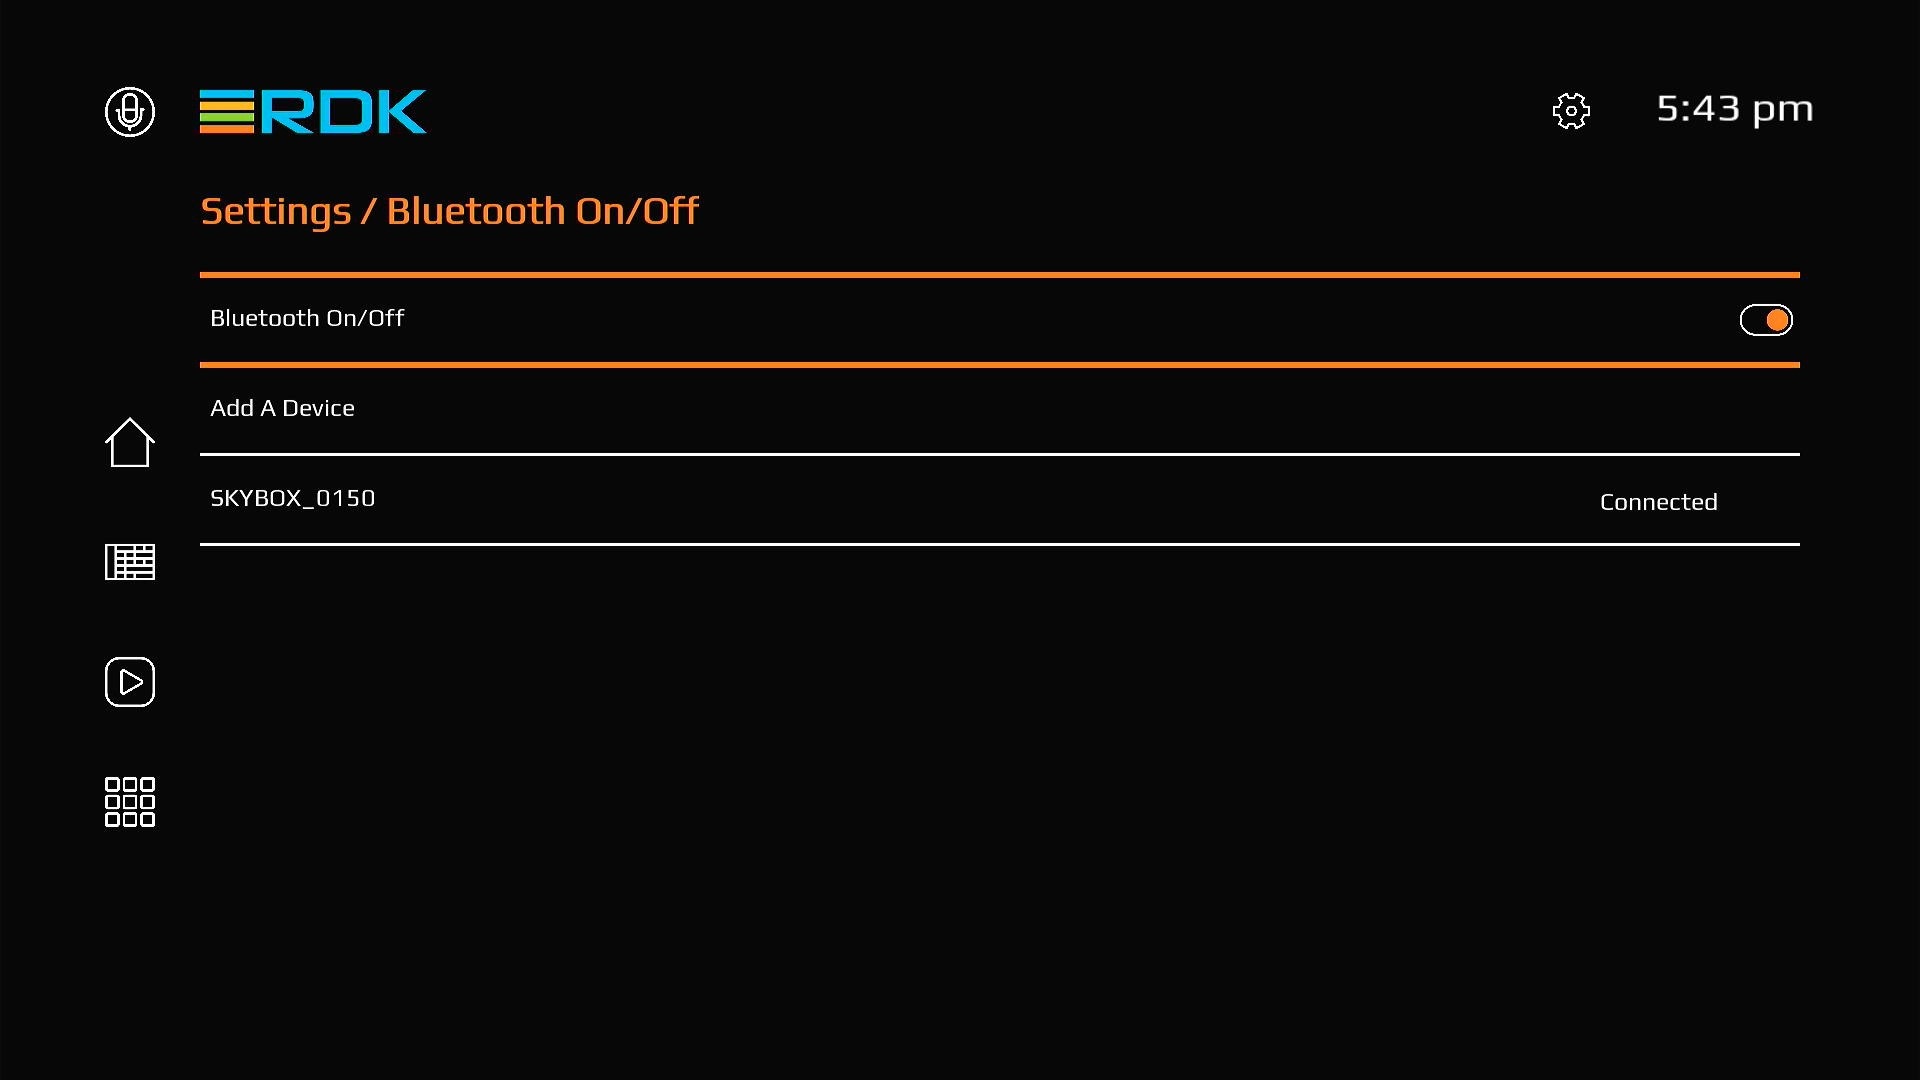
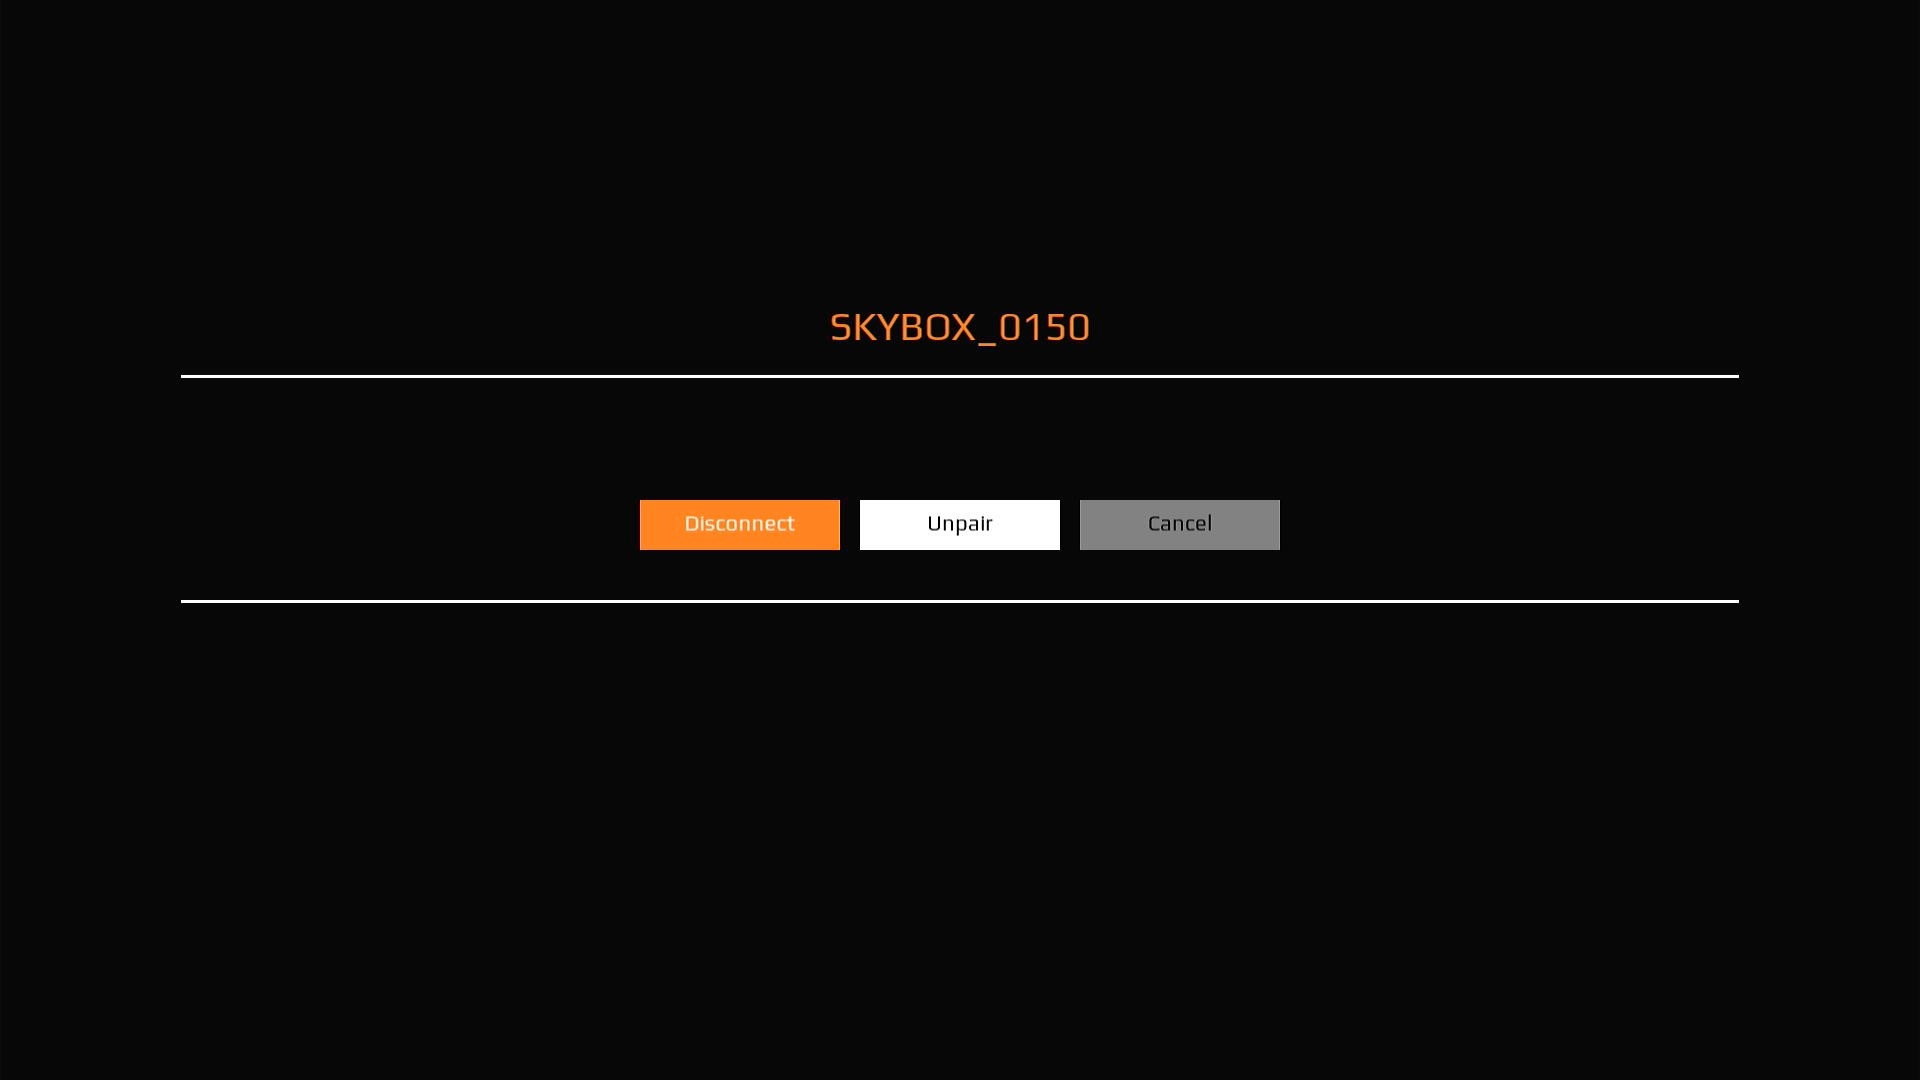
Allows user to connect to Human Interface devices like Remote, Bluetooth keyboard etc.
Below Images shows the flow.
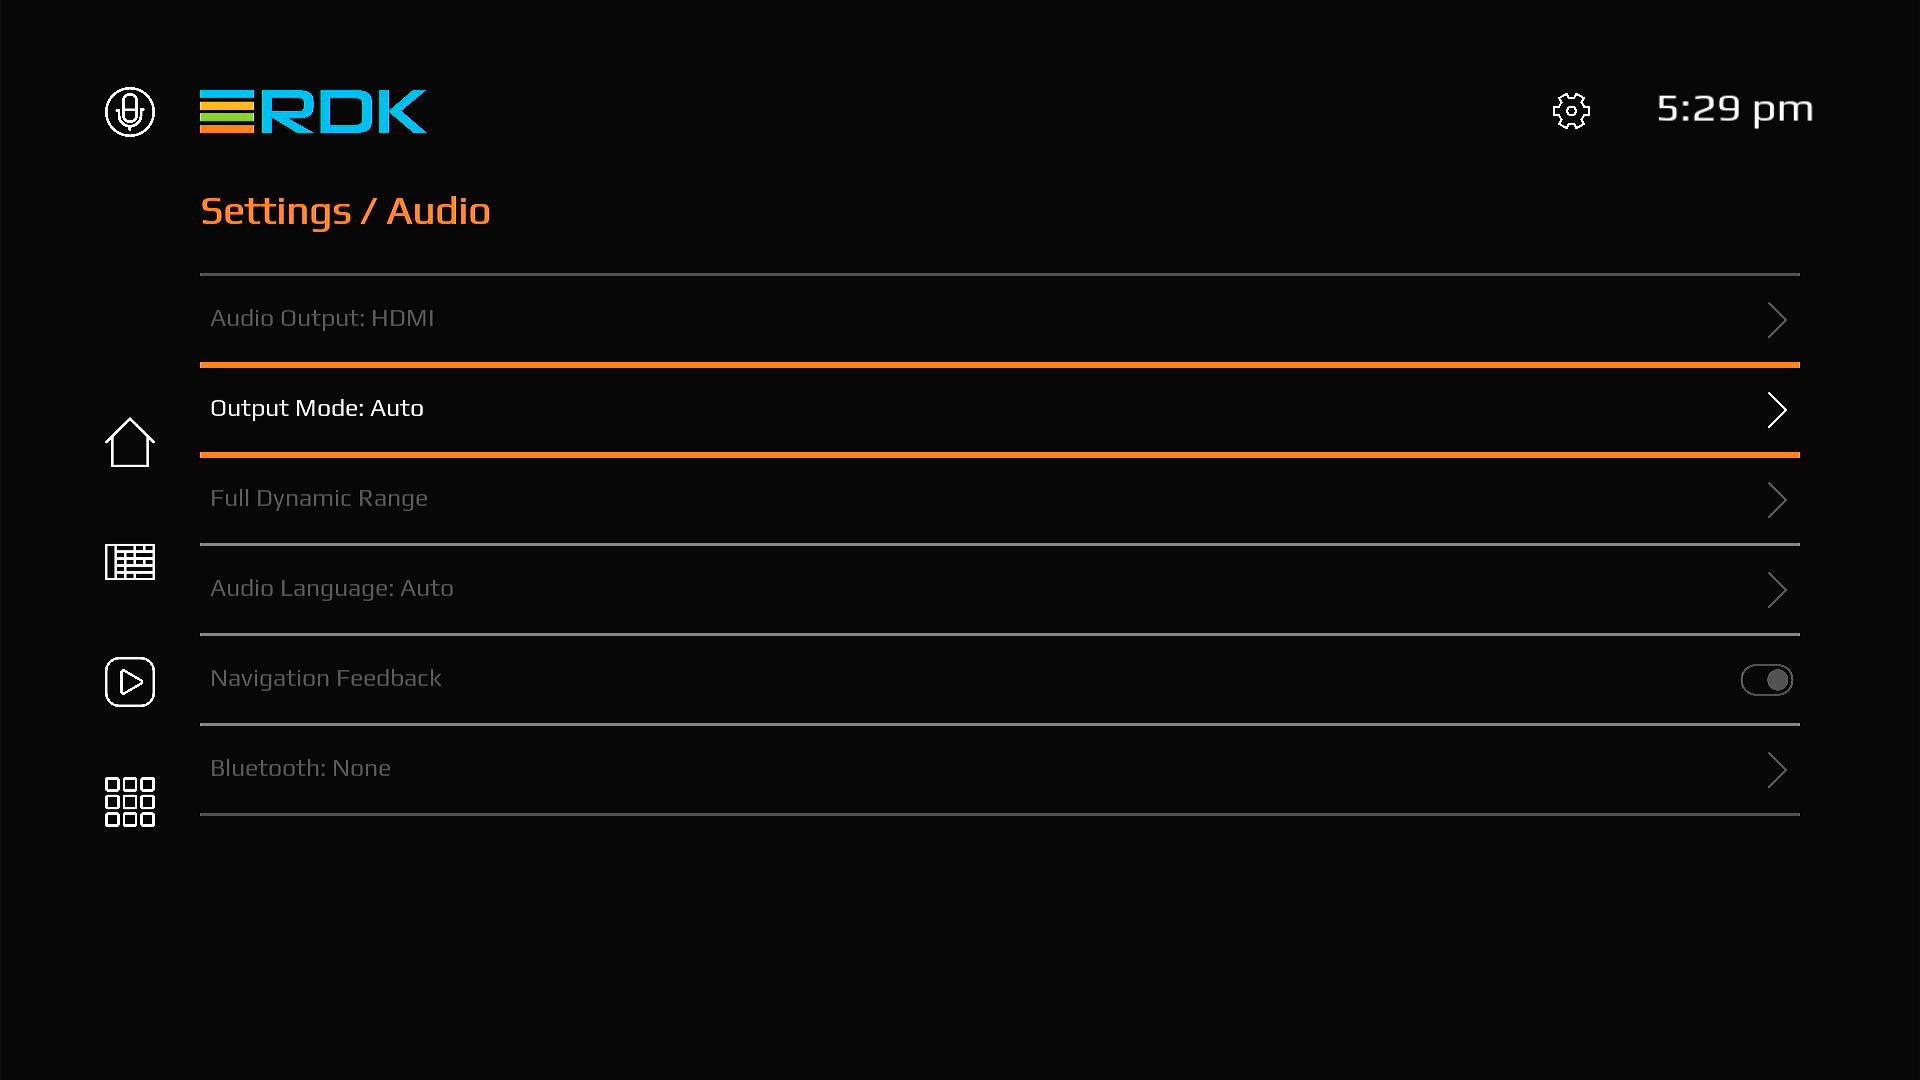
Video settings provide users to change resolution of the screen. HDR and HDCP options are read only fields which confirms certain requirements for premium apps.
Note: Transparent(advanced settings) contents are currently work in progress
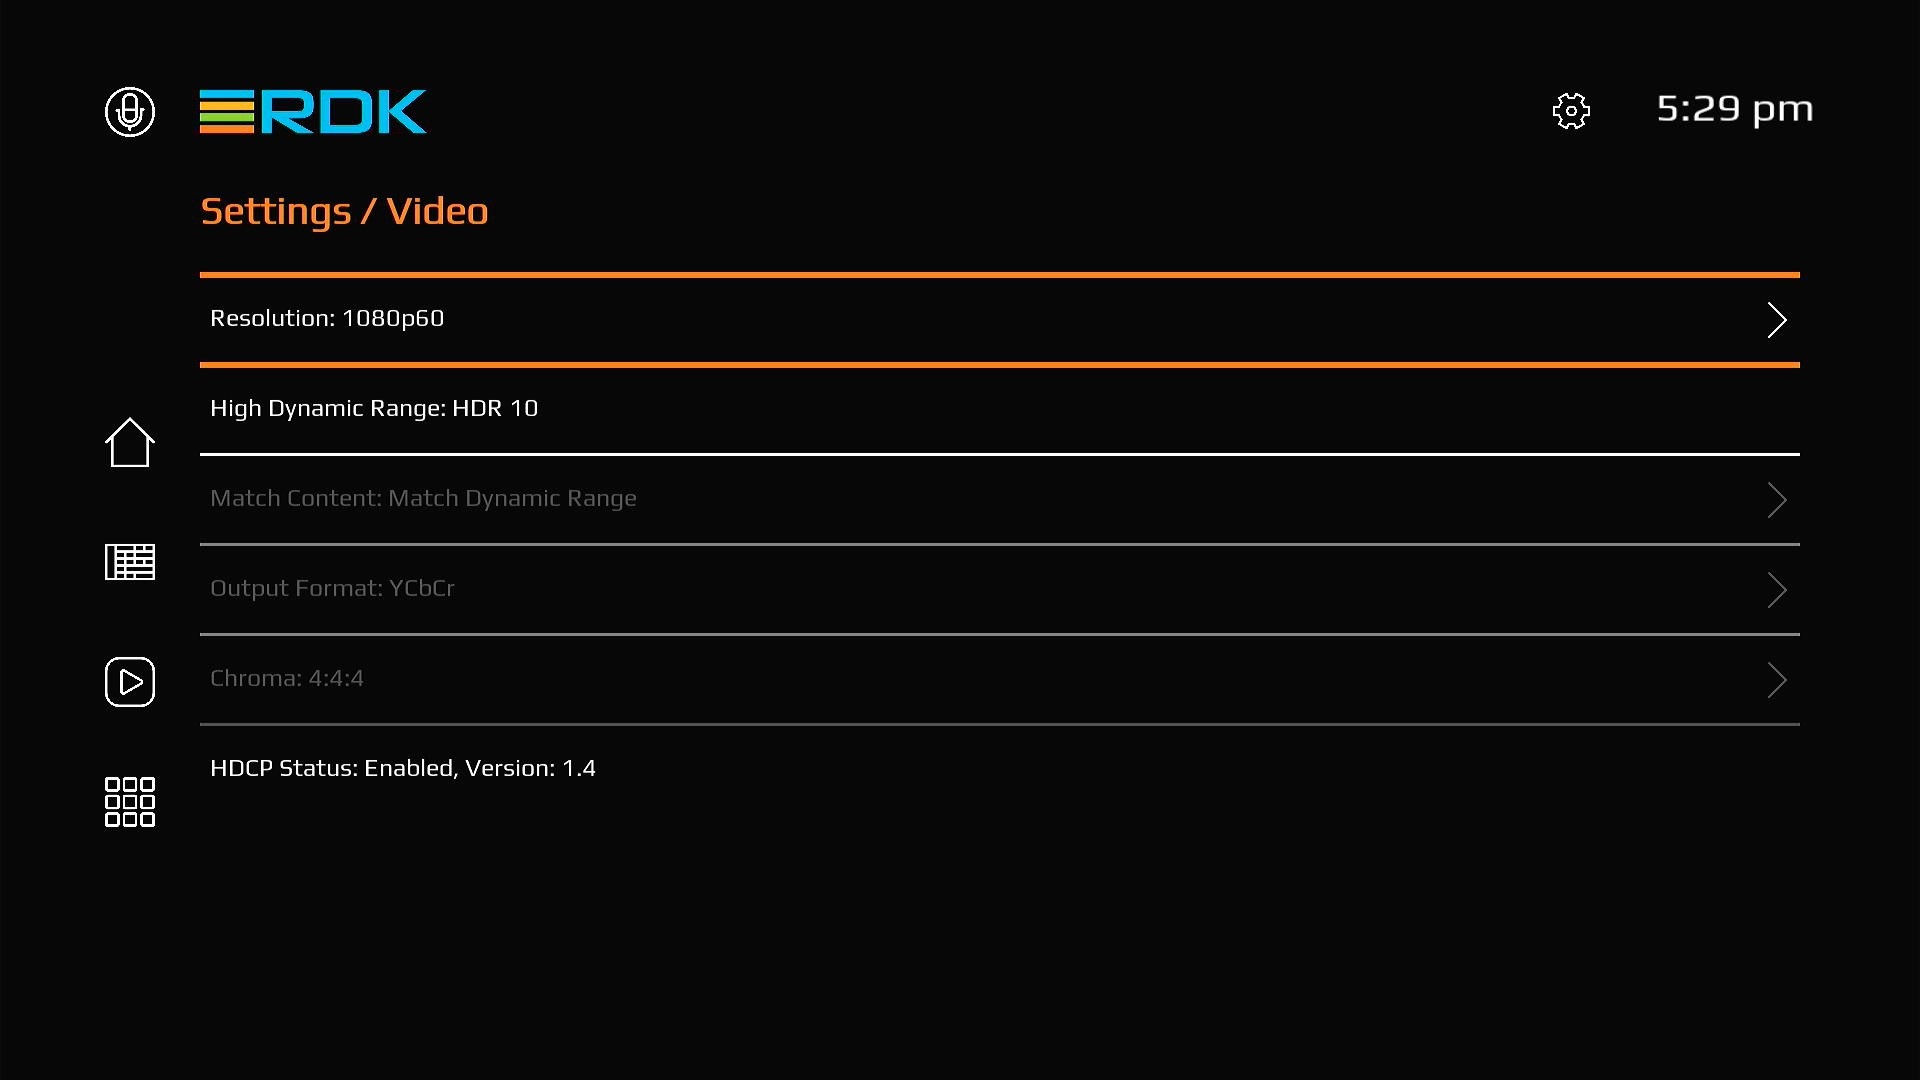
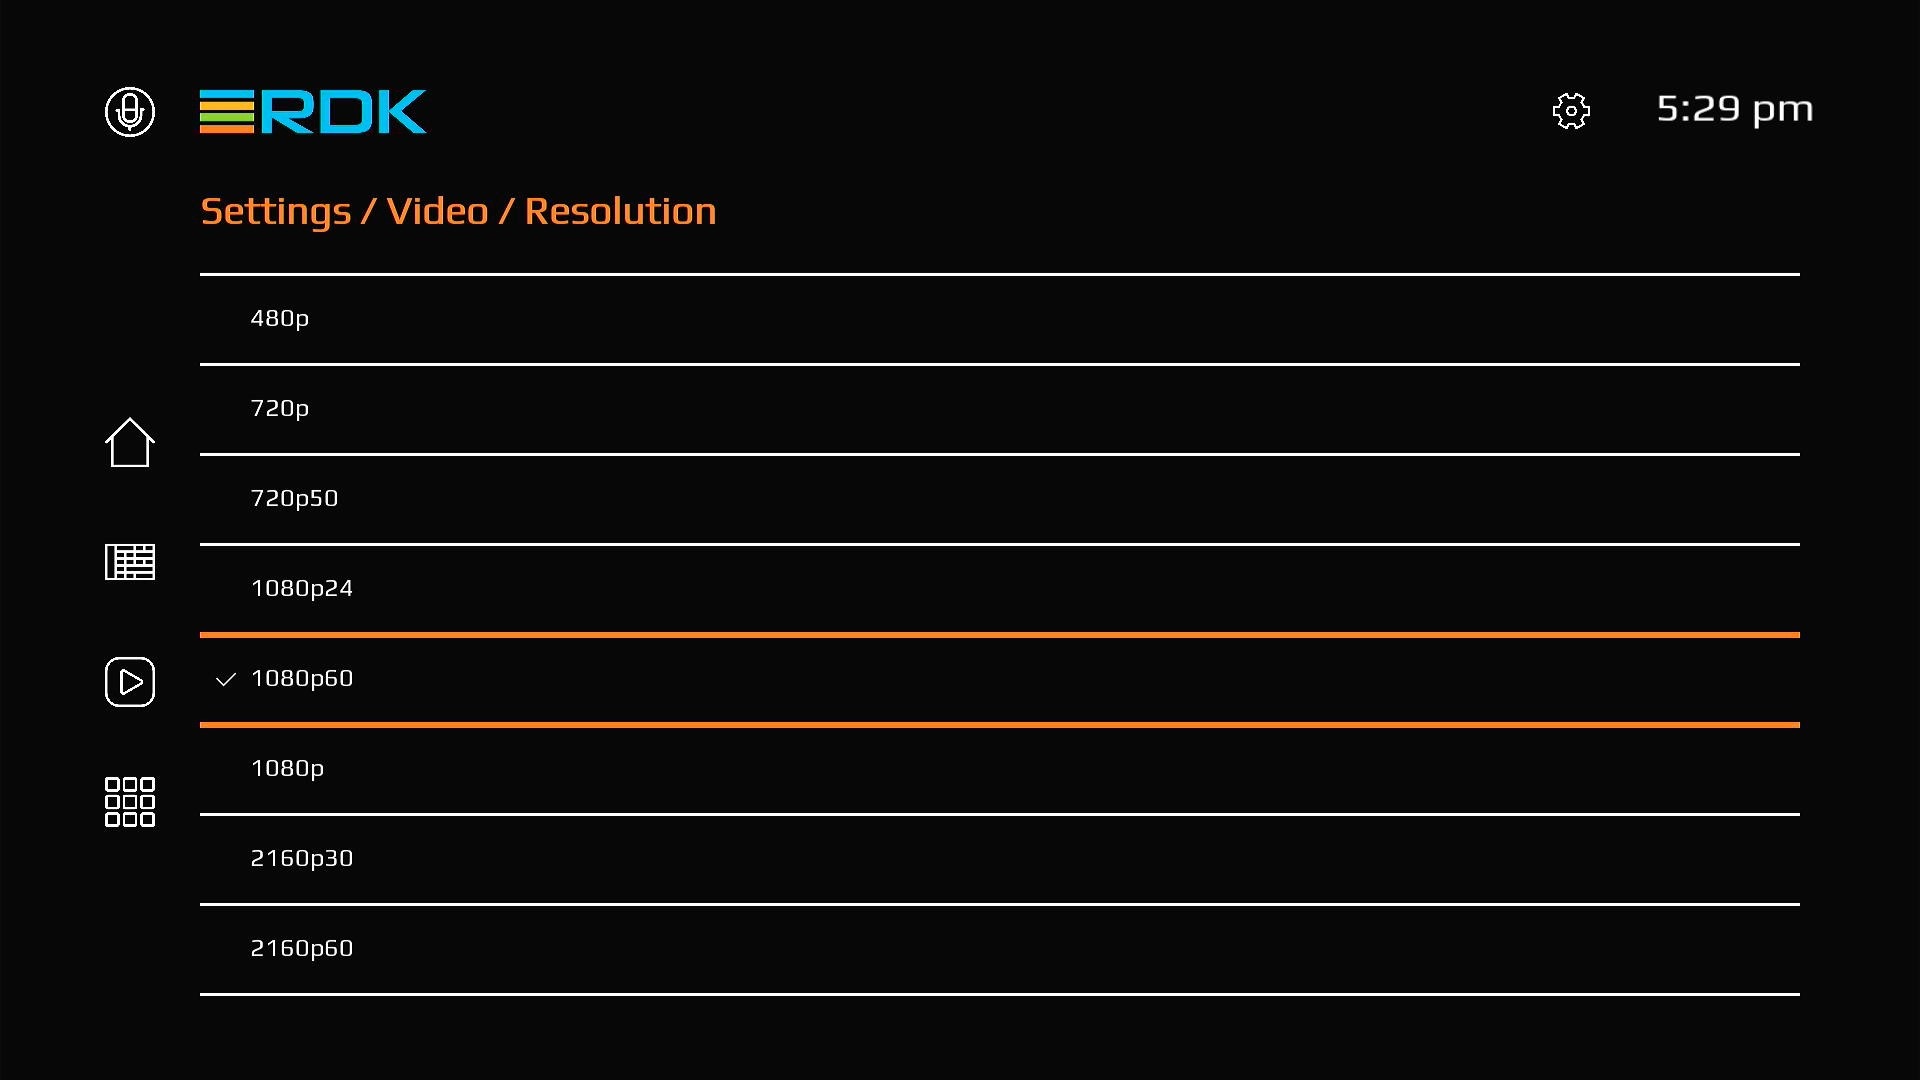
This screen presents the common resolutions supported by both source(device) and sink(display).
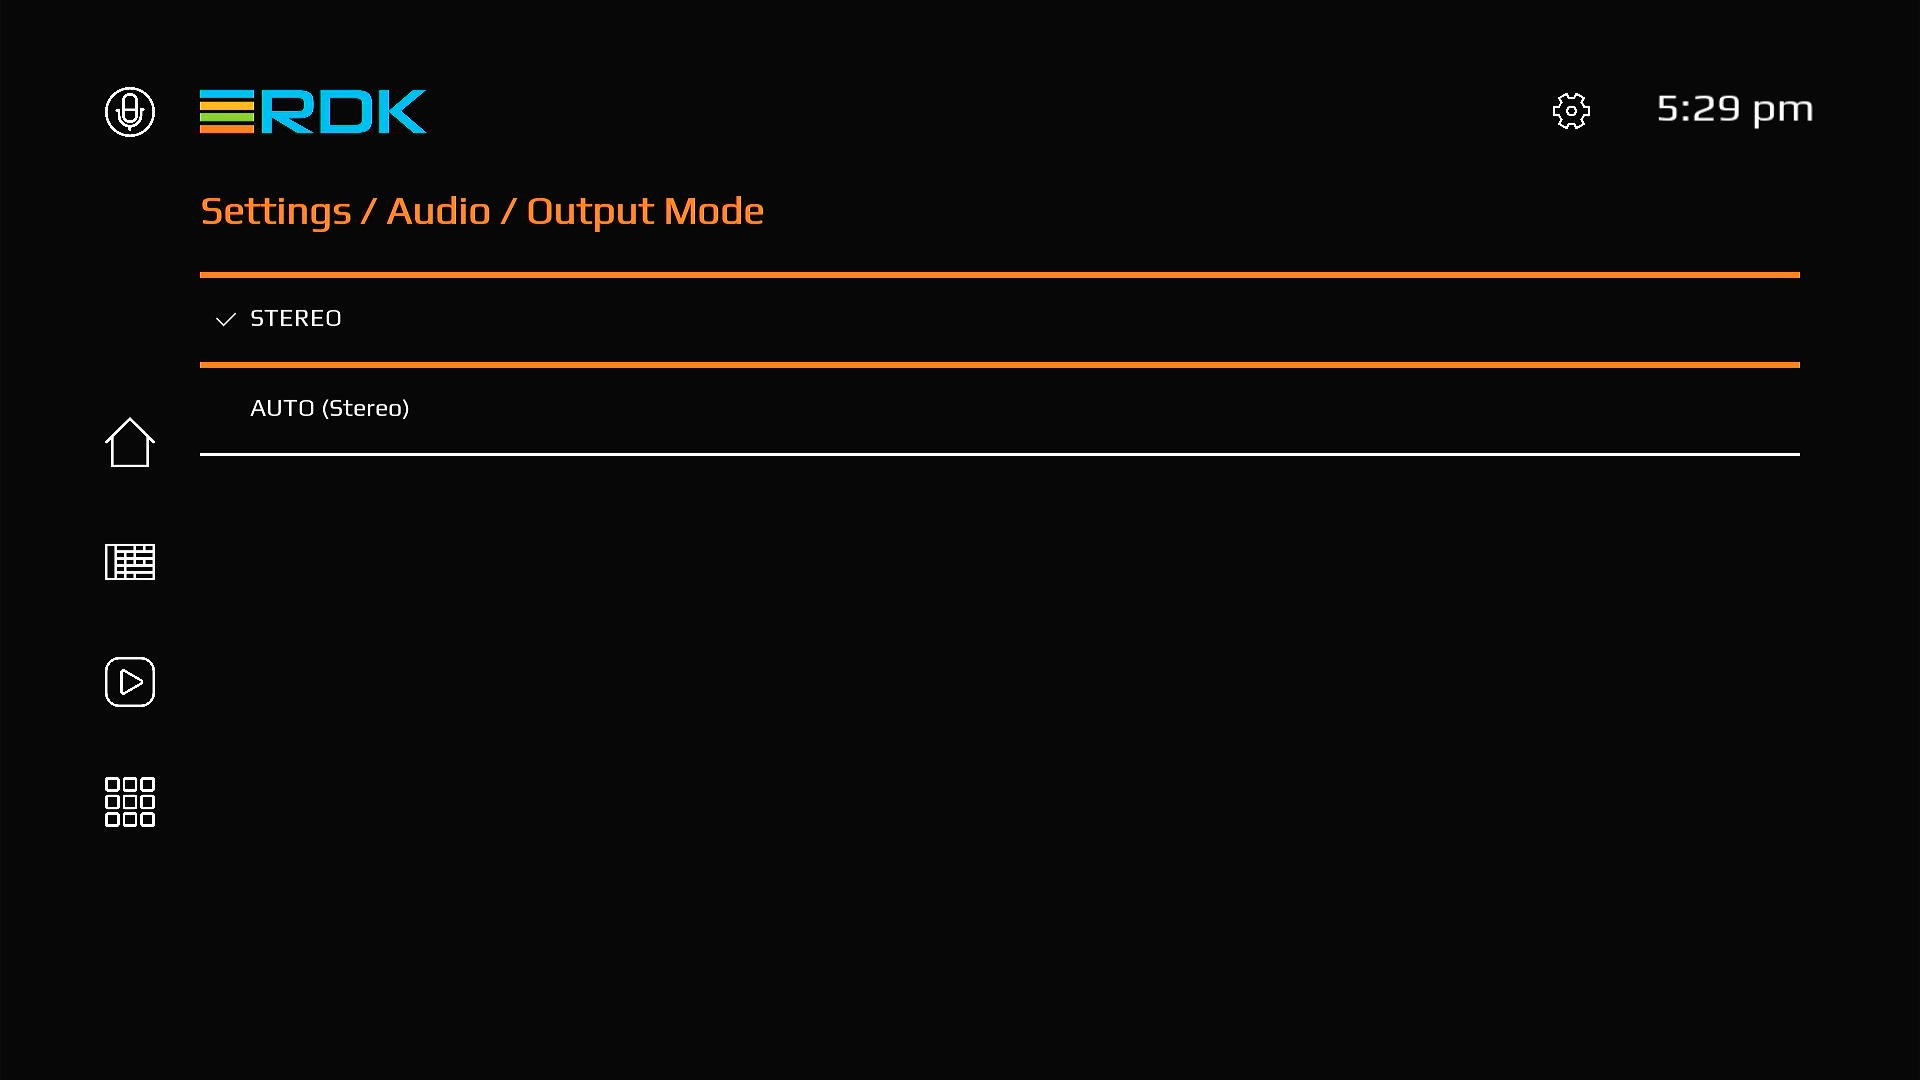
Provides option to change Output mode of the device.
Note: Transparent contents are currently work in progress
On selecting the Apps Icon from left banner; User shall be presented a new page with 3 tabs highlighted with "MyApps" which shall list the list of all available Apps on that particular platform. User shall be able to launch selected App from this page as well.
The redesigned video player utilizes UVE implementation and has kept the minimal controls such as a progress bar with pause, play, next and previous buttons. Various player controls are detailed below.
Settings screen has several new options which allows user to interact with device capabilities.
Native Frame State:
This page contains three subsections detailed below:
Allows user to connect to Human Interface devices like Remote, Bluetooth keyboard etc.
Below Images shows the flow.
Video settings provide users to change resolution of the screen. HDR and HDCP options are read only fields which confirms certain requirements for premium apps.
Note: Transparent(advanced settings) contents are currently work in progress
This screen presents the common resolutions supported by both source(device) and sink(display).
Provides option to change Output mode of the device.
Note: Transparent contents are currently work in progress
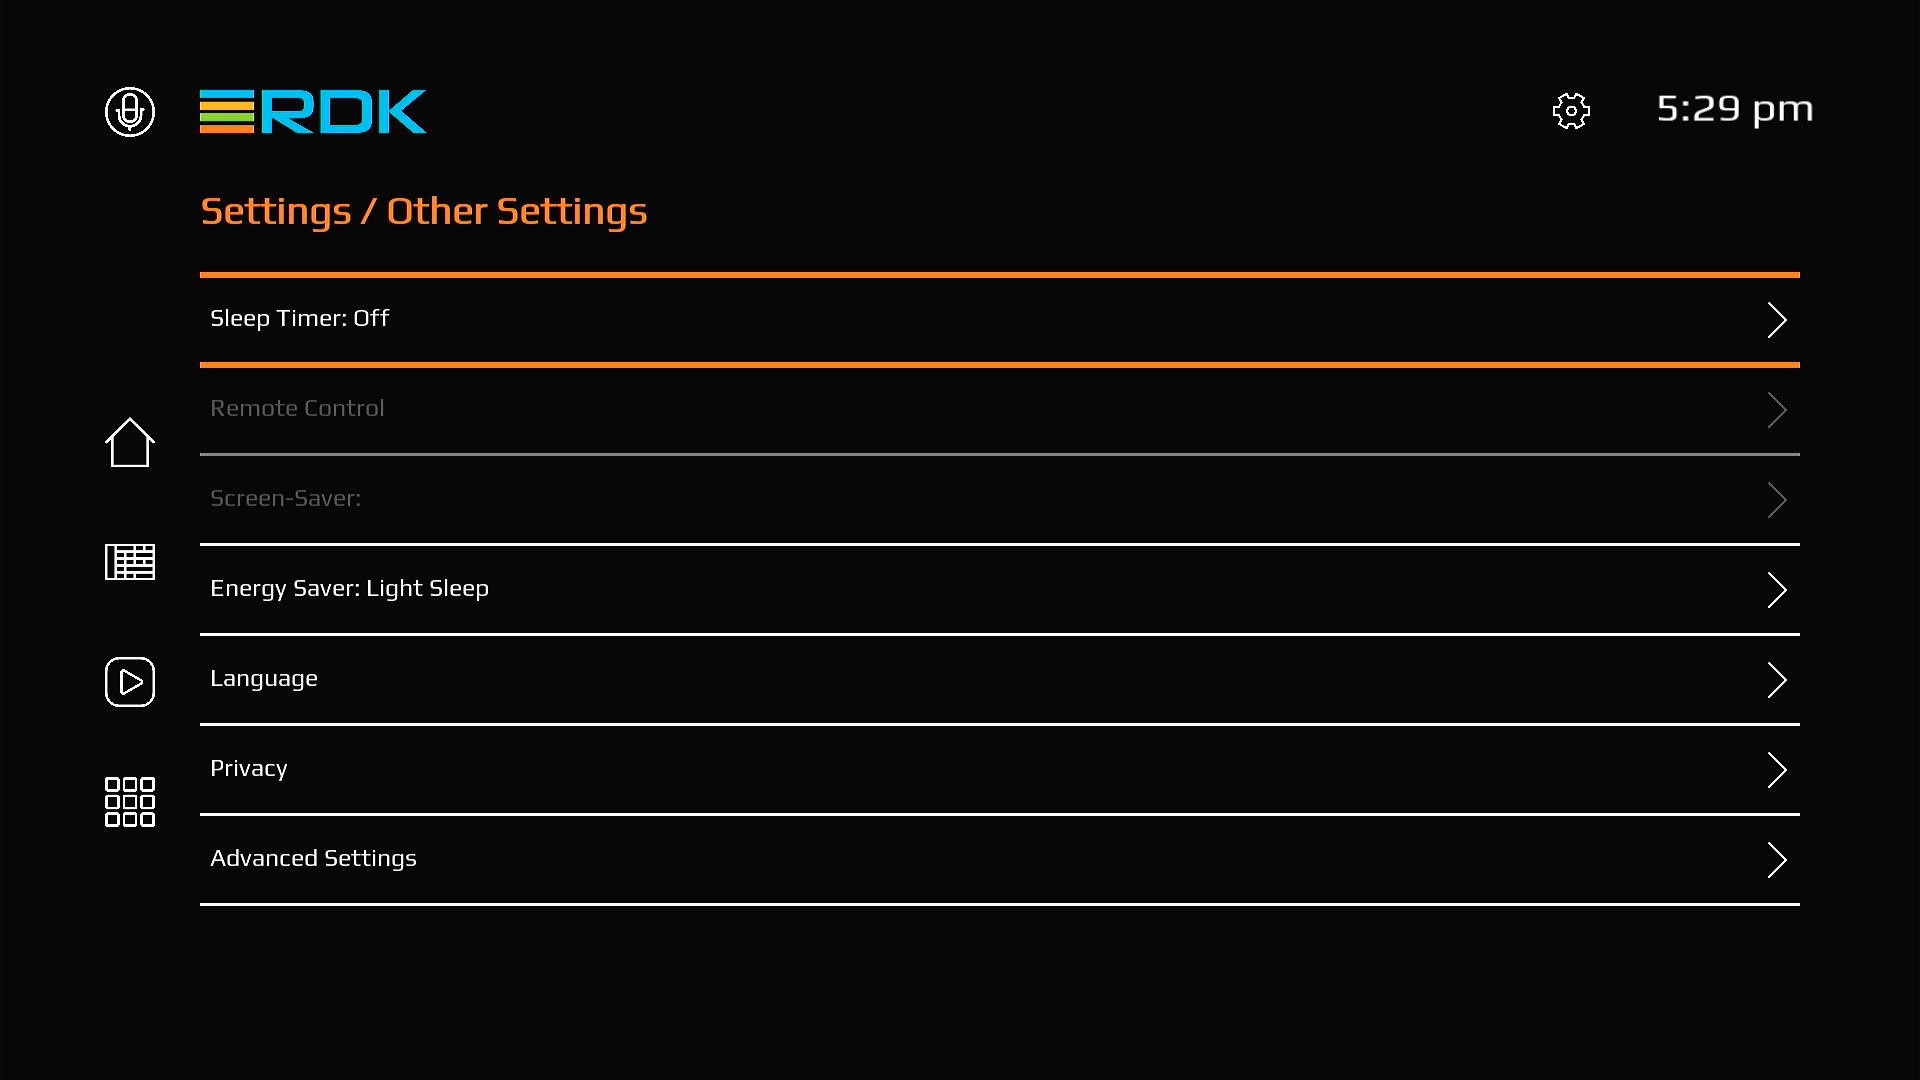
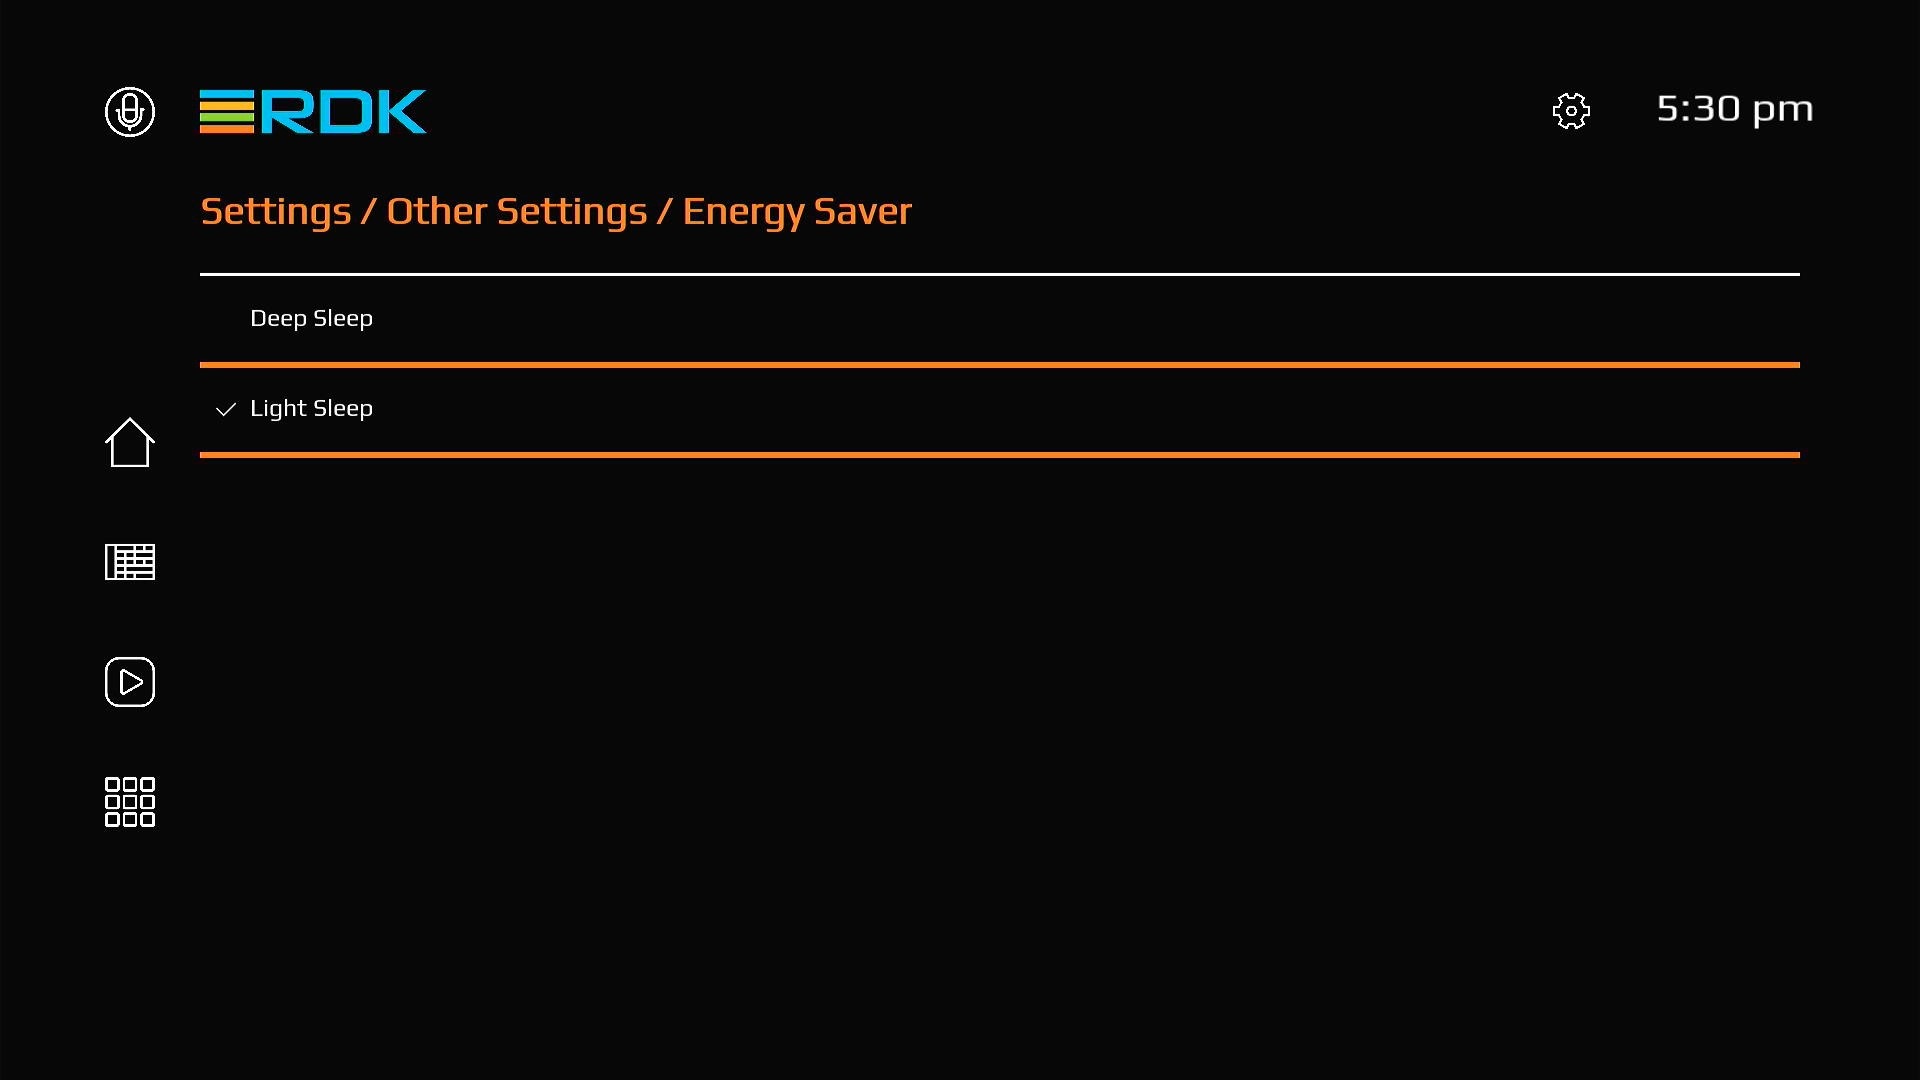
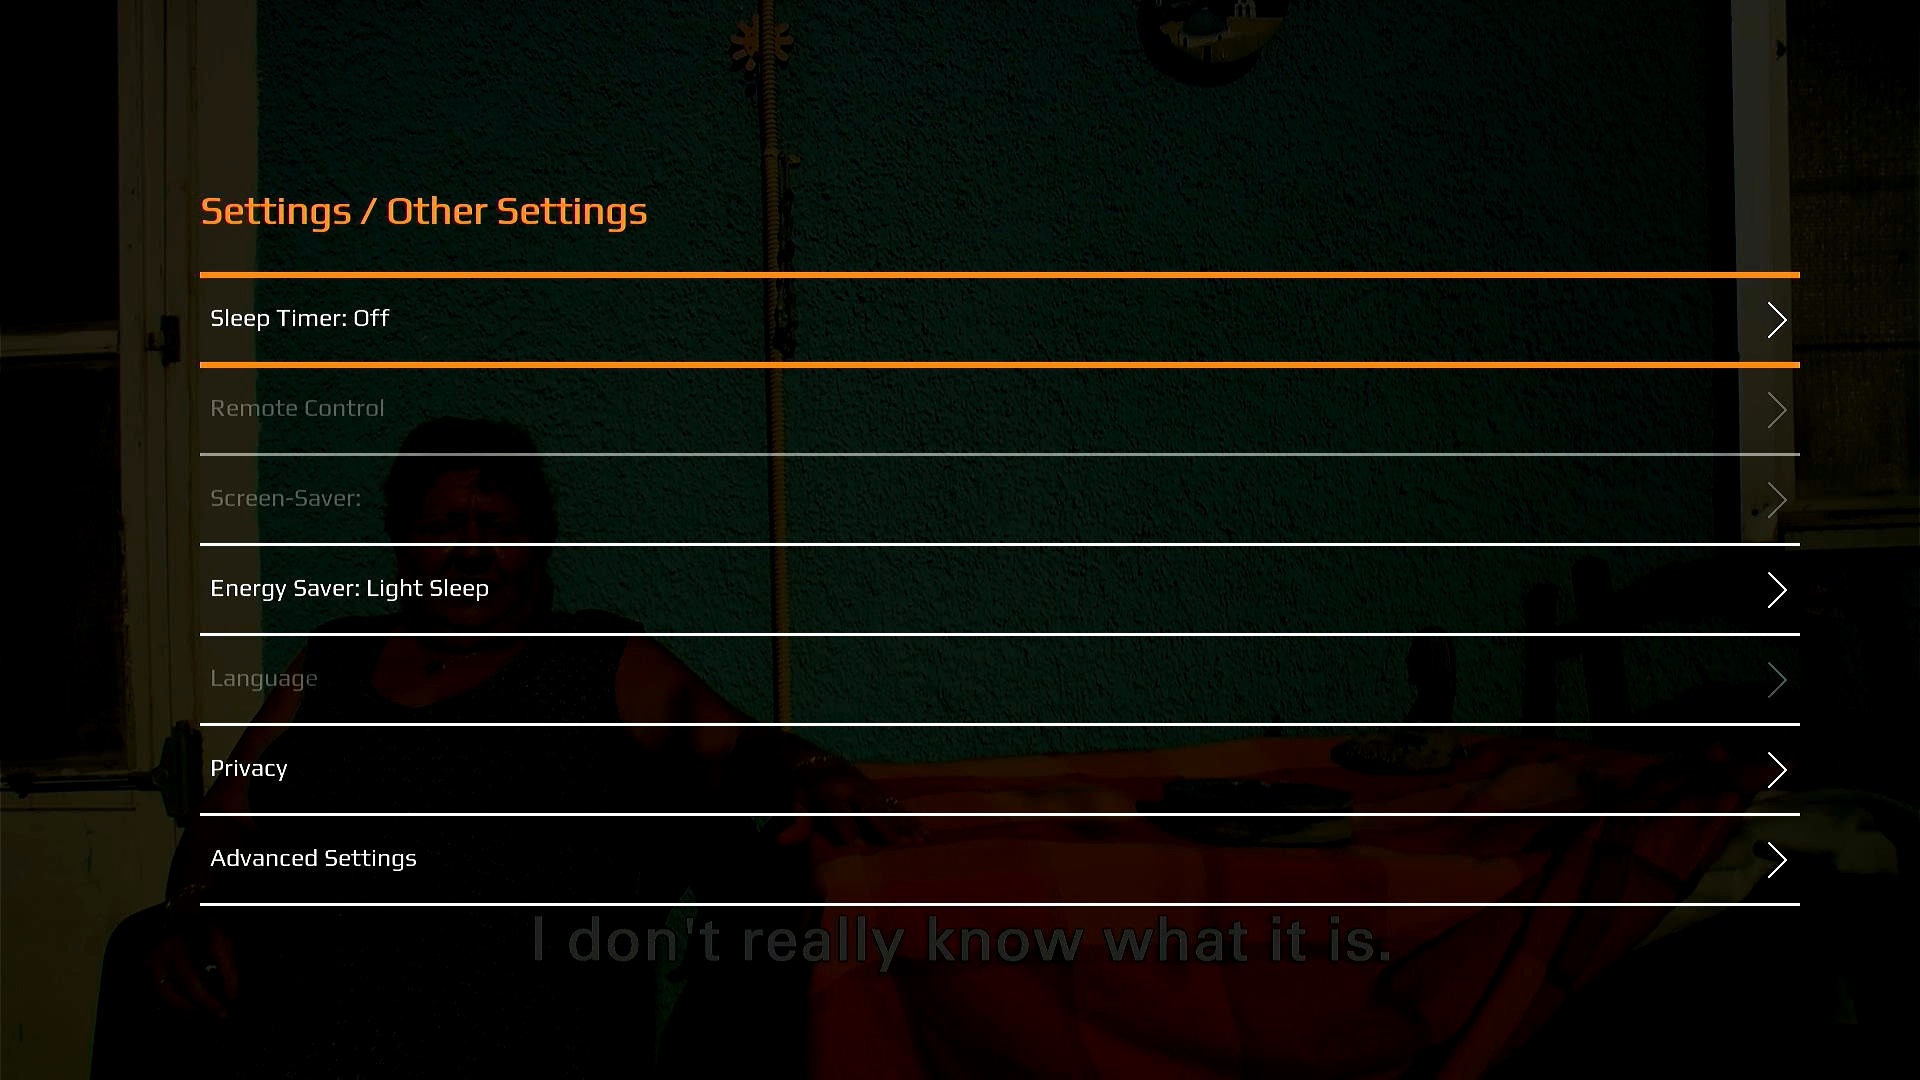
Sleep Timer turns off the screen Sleep Timer turns off the screen upon selecting a particular time frame from the options provided. Device will be in Light Sleep mode by default. User can change the default sleep(standby) mode from Energy Saver section.
...
Allows user to change the menu language of the UI. If changed, the UI will reload to refresh the entire settings and in that process user may see display going blank and a spinner appearing for the reload time.
Note: this spinner is being spawned as a separate app instance.

youtube languages changes with respect to device support

TBD: Need updated image
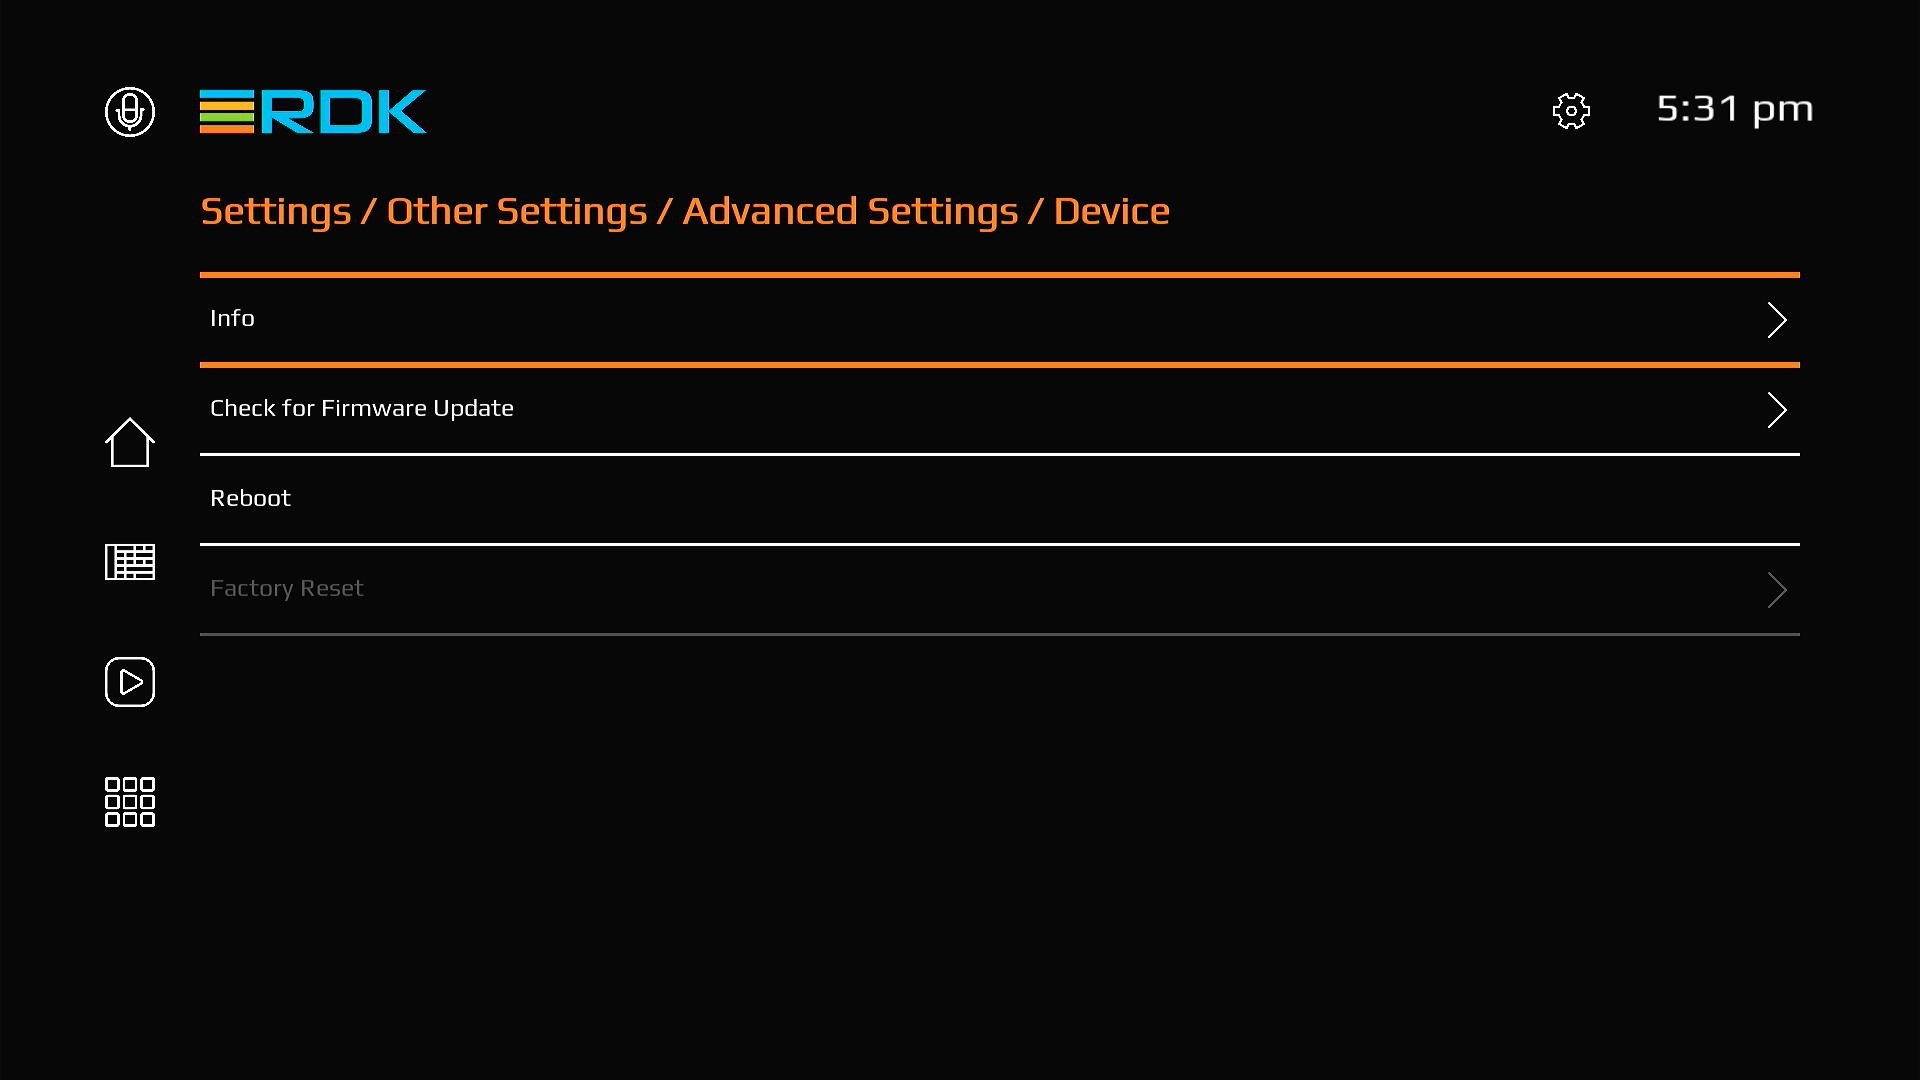

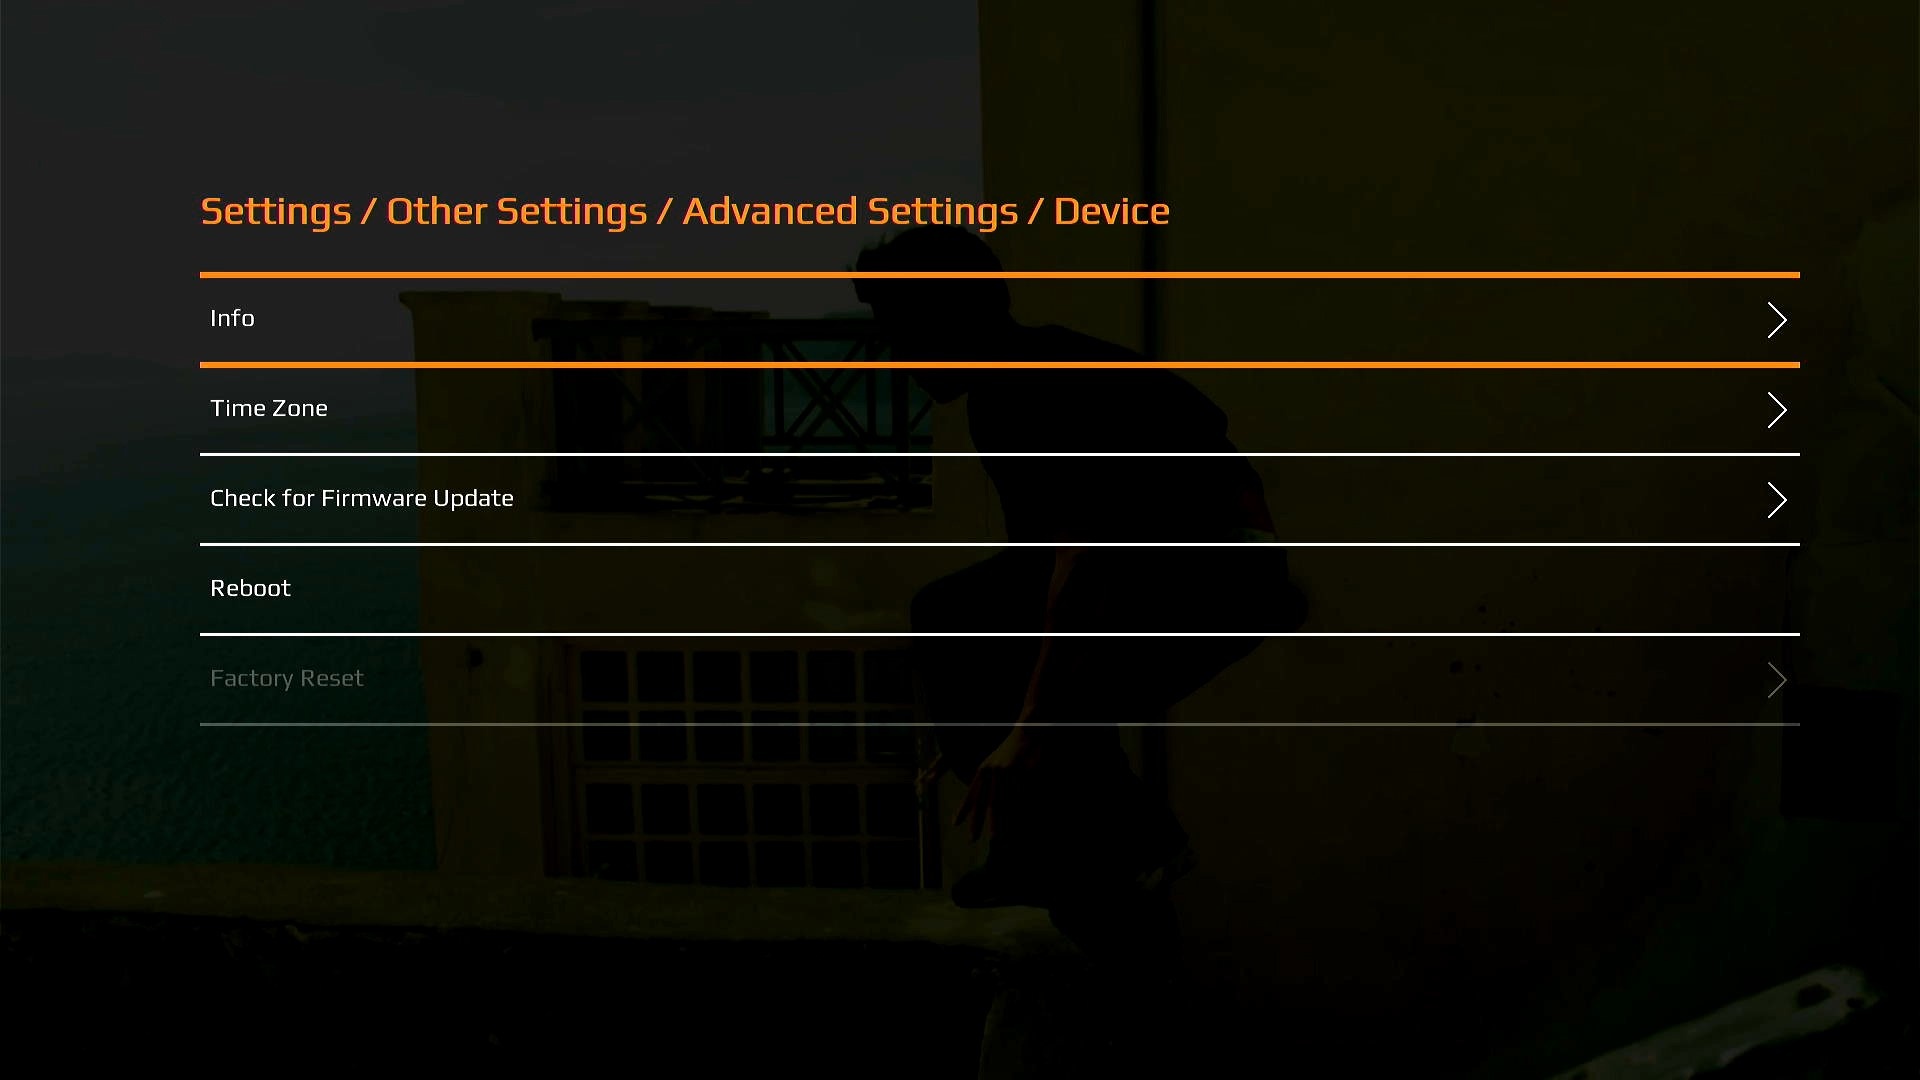
Device Details - Info - Lists down information about device like chipset, location, supported DRM systems, Firmware version etc.
...
...

 TBD: Need image
...

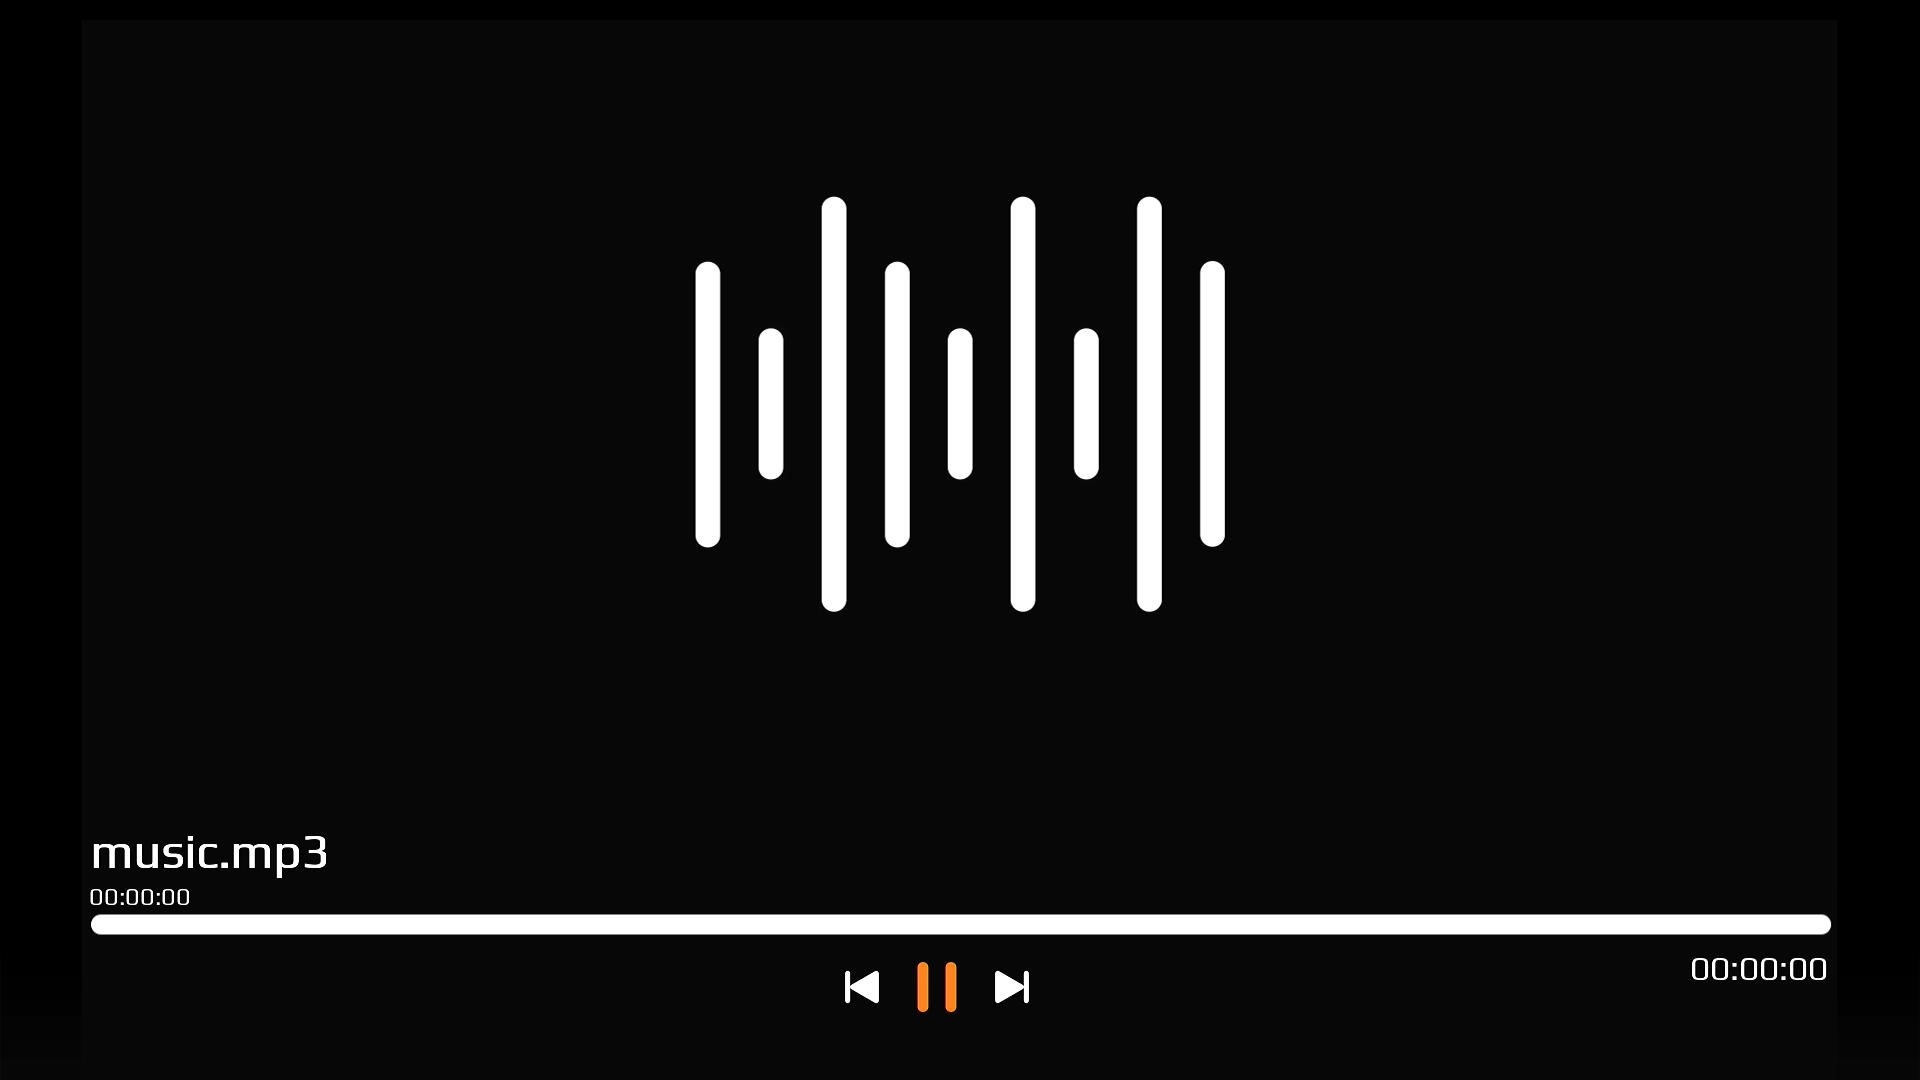
In this version you will get full access to USB Media device related features if the device has required support integrated. To name a few - viewing images, playing audio and video file, accessing internal folders of the USB Media device.
When the USB is plugged in UI will show USB icon on Featured Content row as shown in below content. New design allows the user to disable and enable USB Media support feature from Privacy Setting.
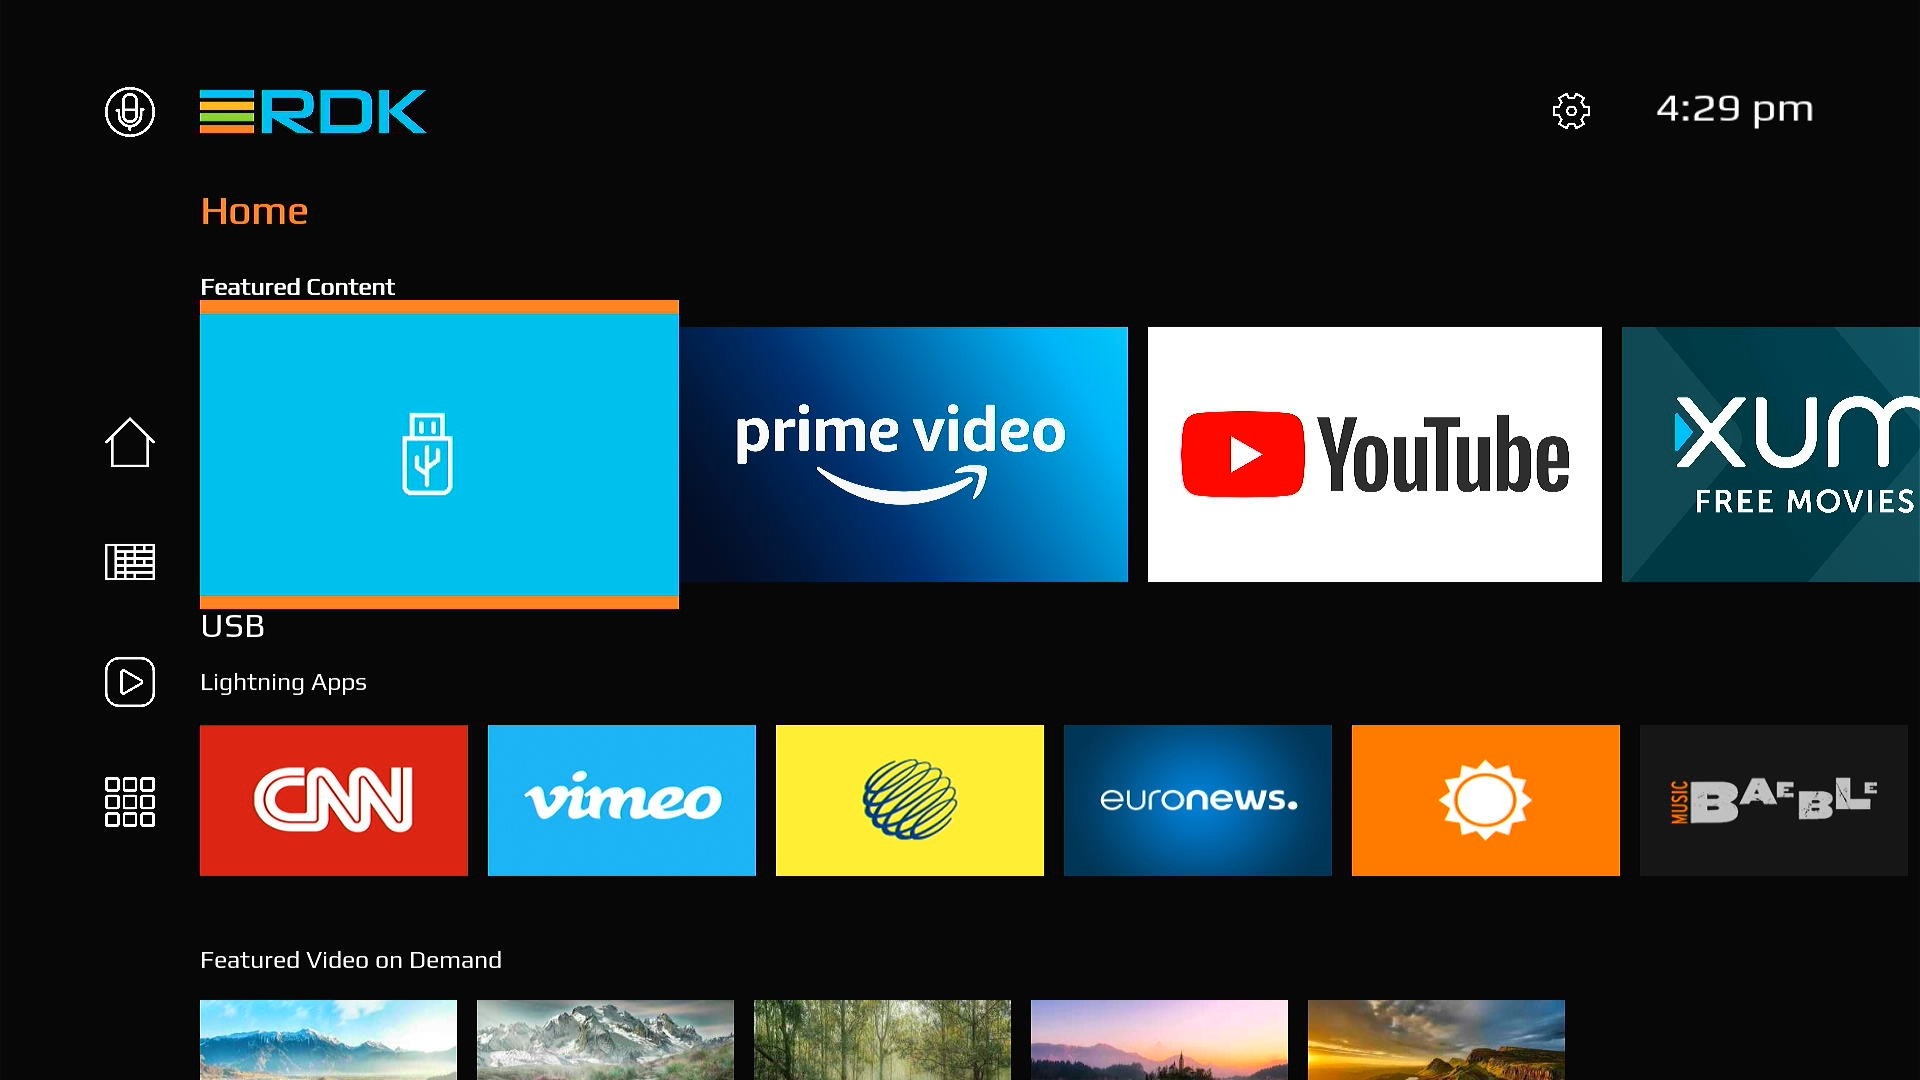
User can view the contents by pressing enter and he will see contents sorted based on Video, Audio, Photo, Folder.
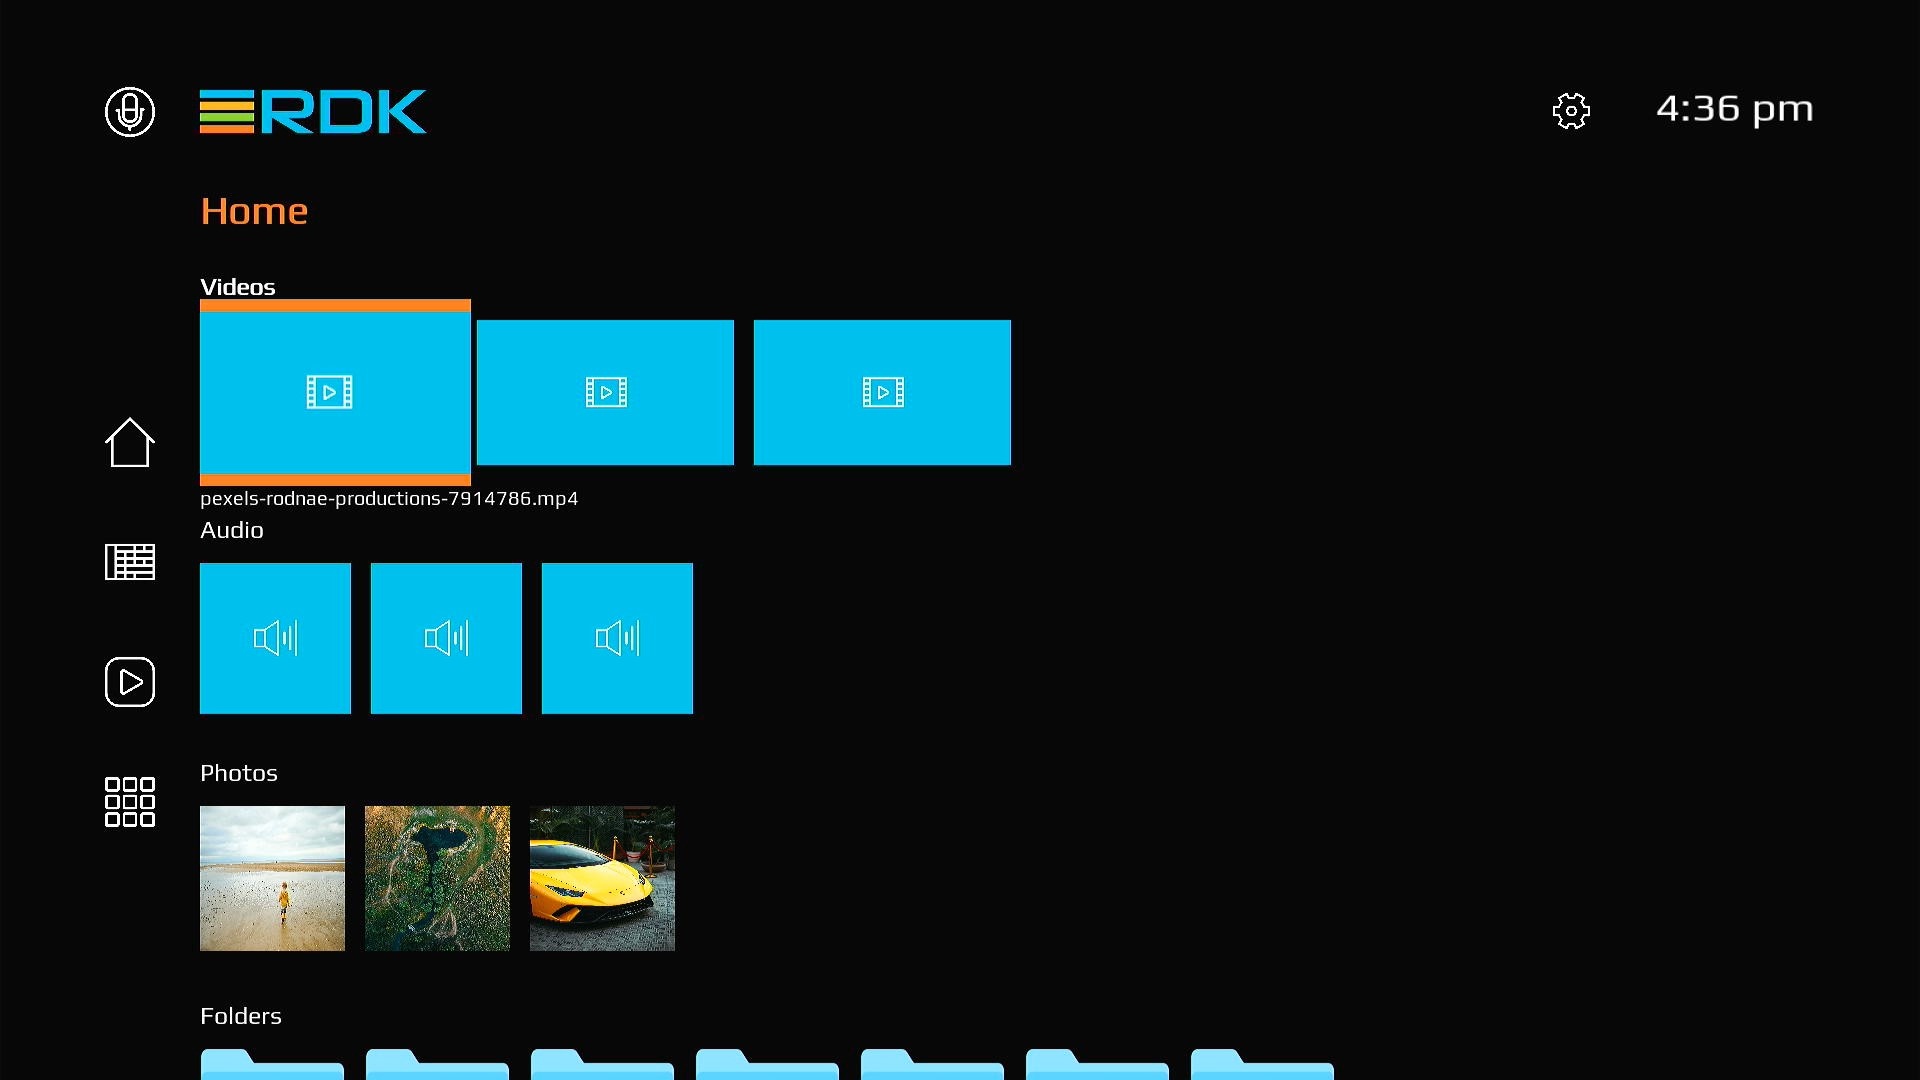

You can traverse using Left/Right/Up/Down and to access the content - press Enter. File format supported is limited only by UVE support and USBAccess plugin filter.


New widget for overlay - to display notifications such as volume change etc.
Note: Current release only has support for Volume change notification. User shall be able to see the volume change notifications in this overlay screen.
TBD: Need image [Volume change, Mute]
This feature adds additional overlay screens for changing TV related settings as detail;ed below.
TBD: Need images [Input Selection, Picture settings]
This feature allows the app developers to quickly test any app without modifying the Accelerator UI source code by adding details of the custom app in app manager registry file present in device. After updating this restart the device or residentapp service to reload the Home page which shall display a new row at home page with the Icon image. A sample app manager registry configuration and resulting UI screen will be as given below.
| Code Block | ||
|---|---|---|
| ||
root@HP44HRDK:~# cat /opt/appmanagerregistry.conf
{
  "applications":[
    {
      "displayName":"SampleApp",
      "uri":"https://apps.rdkcentral.com/rdk-apps/device-ui/index.html",
      "applicationType":"Lightning",
      "url":"http://127.0.0.1:50050/lxresui/static/images/info.png"
    }
  ]
} |
List of supported launch type for apps(applicationType)
...
...
...
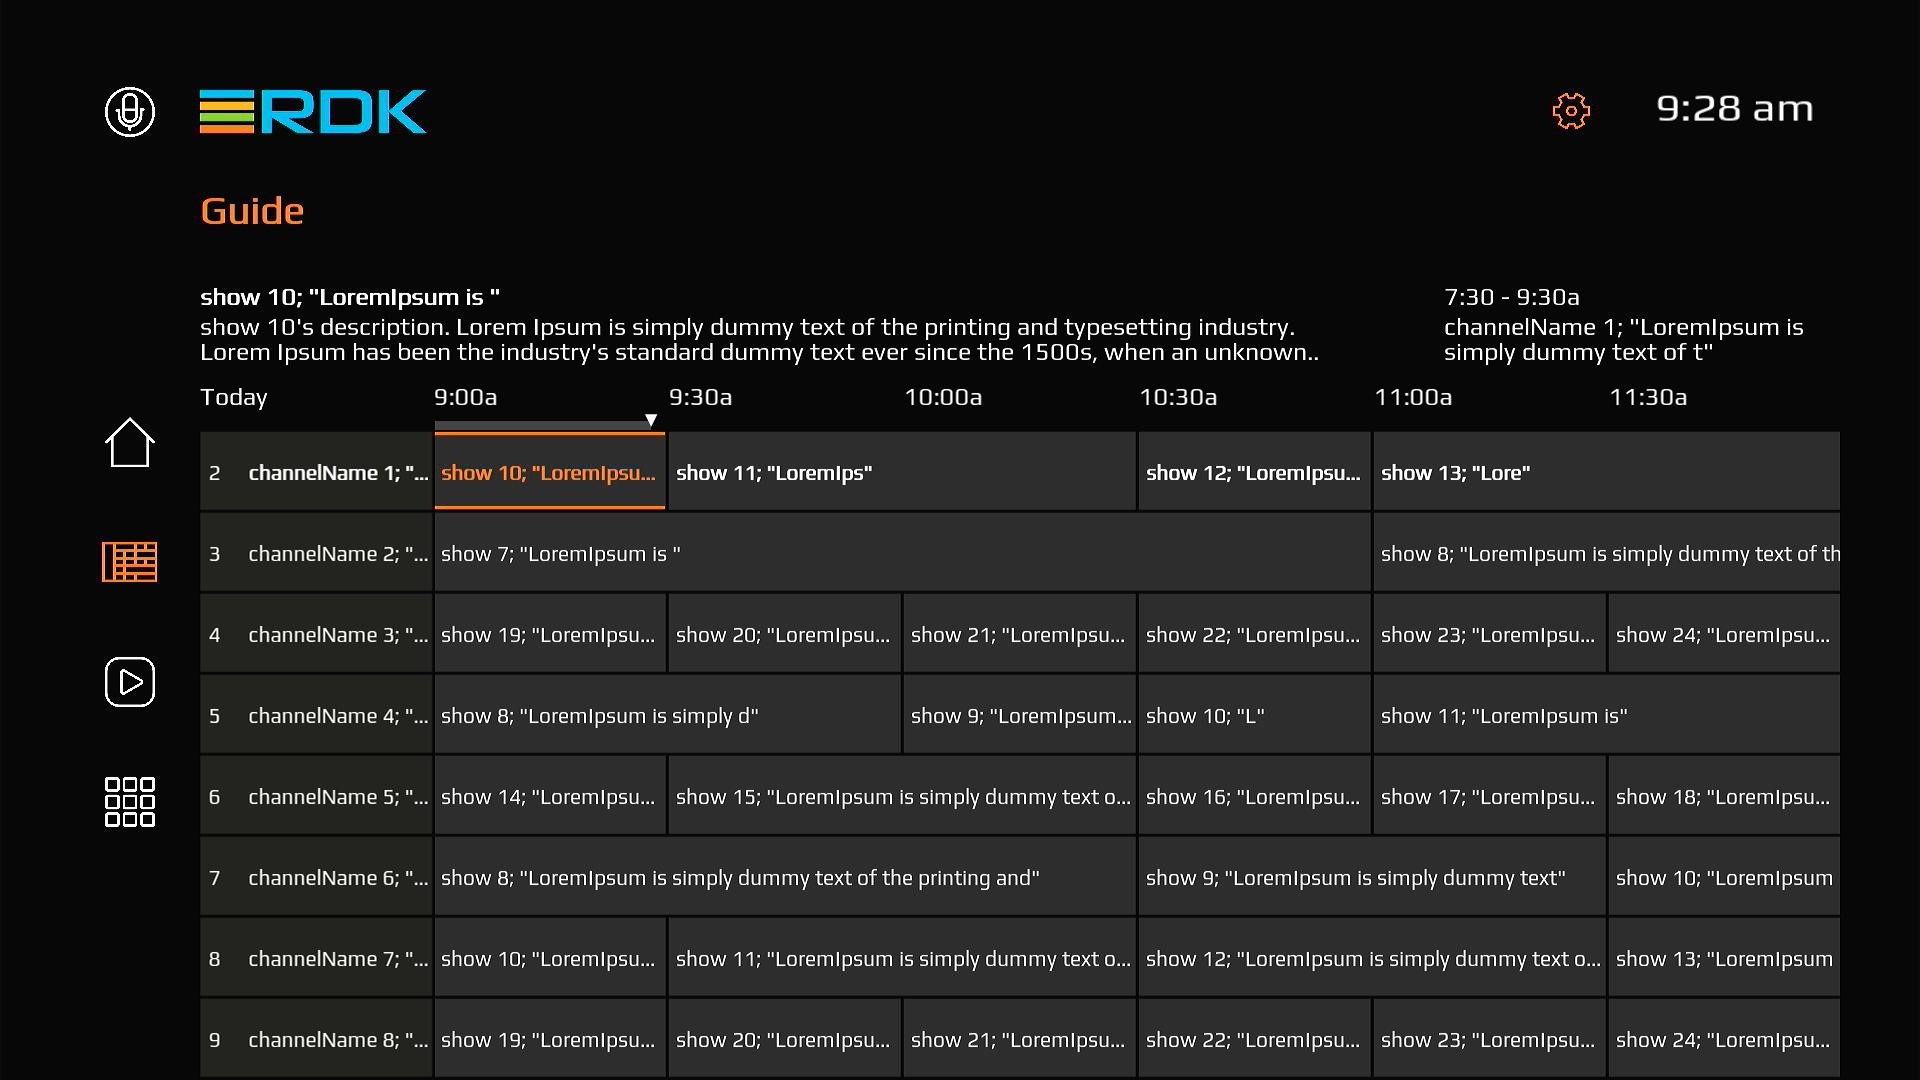
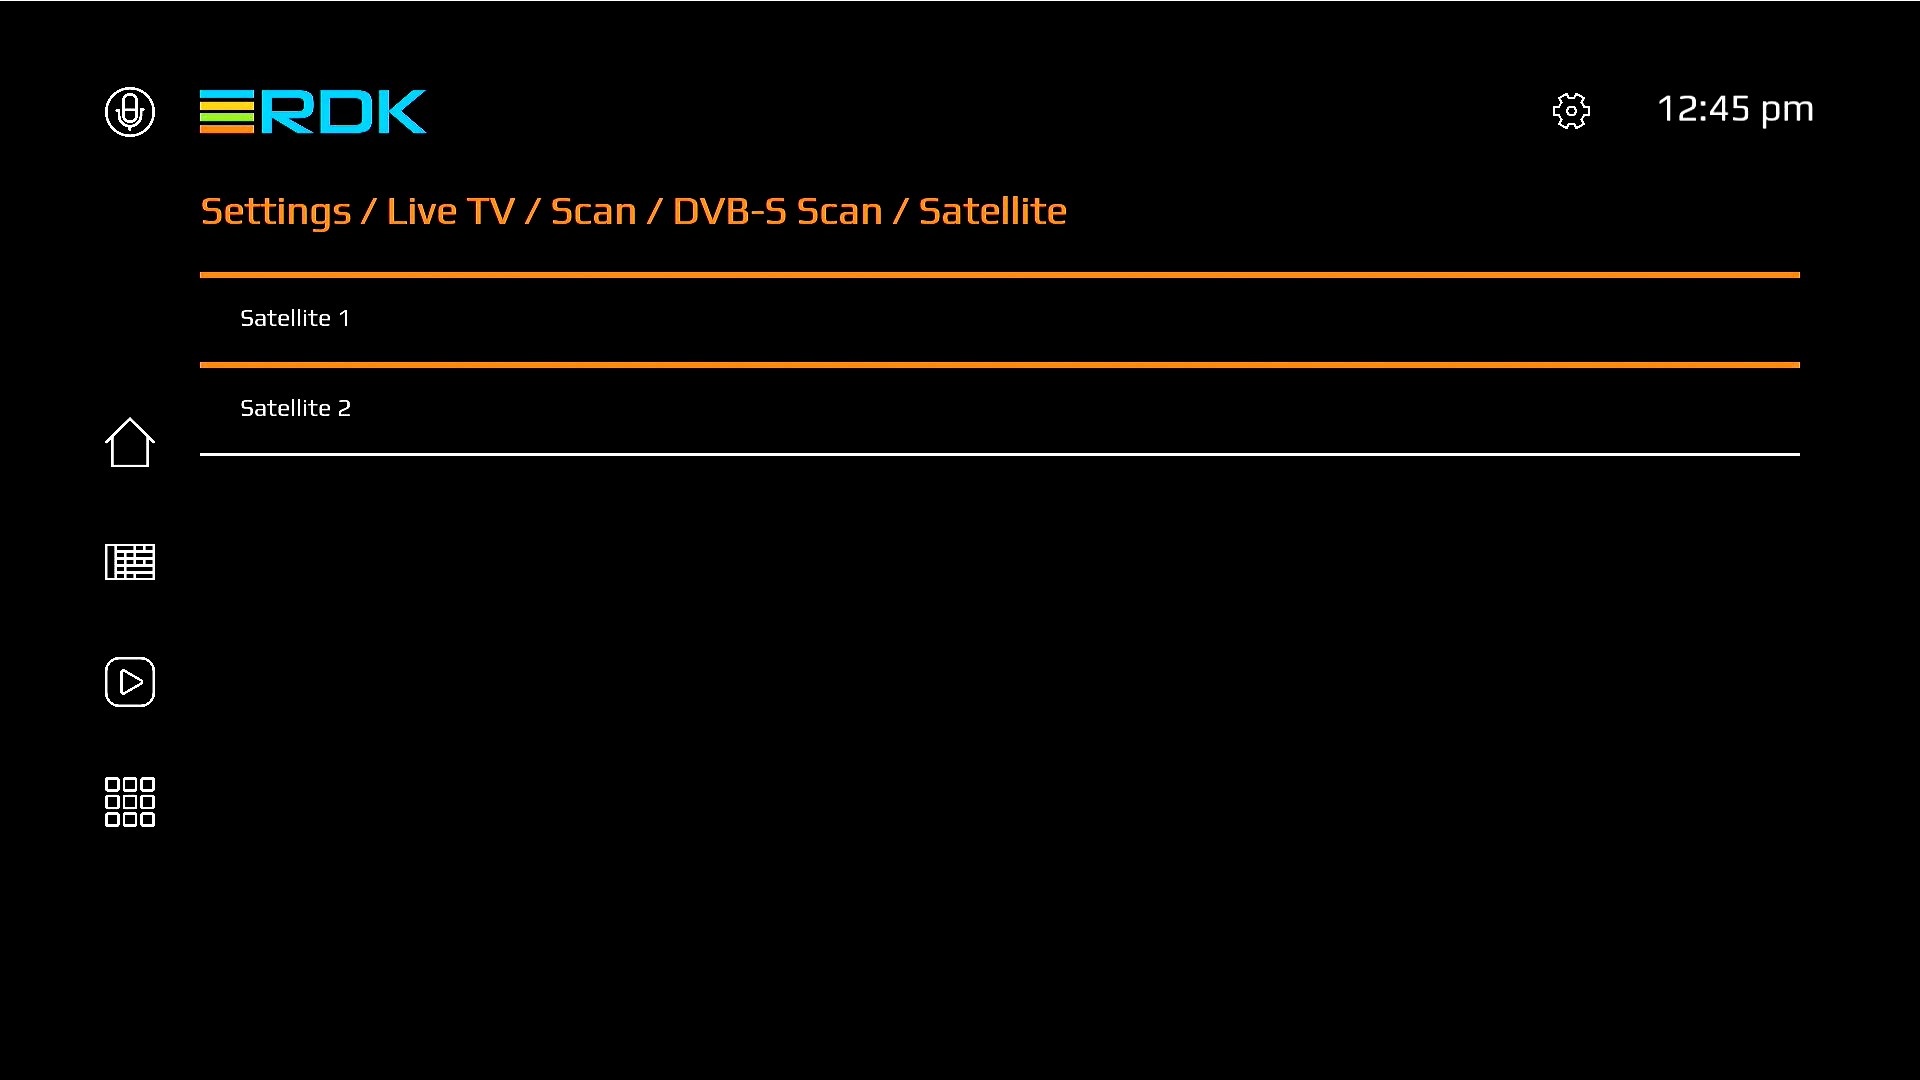
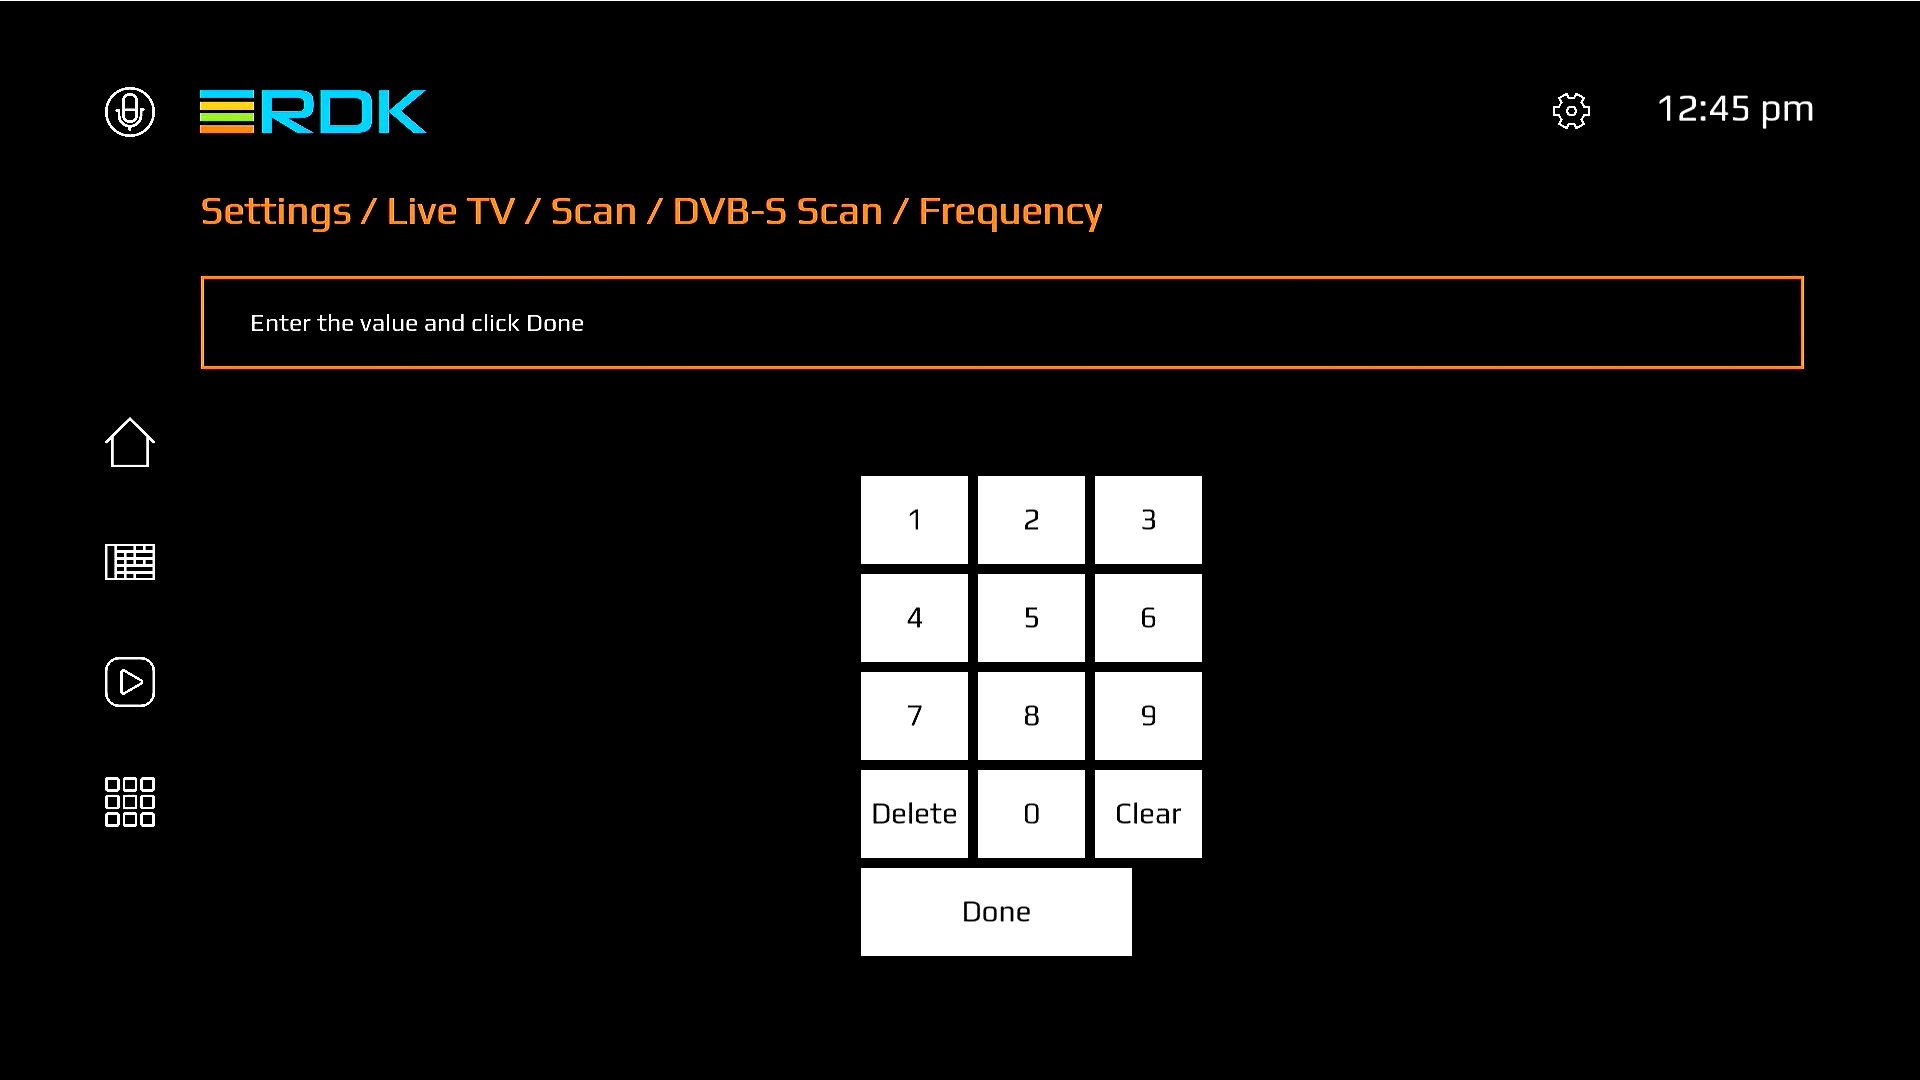
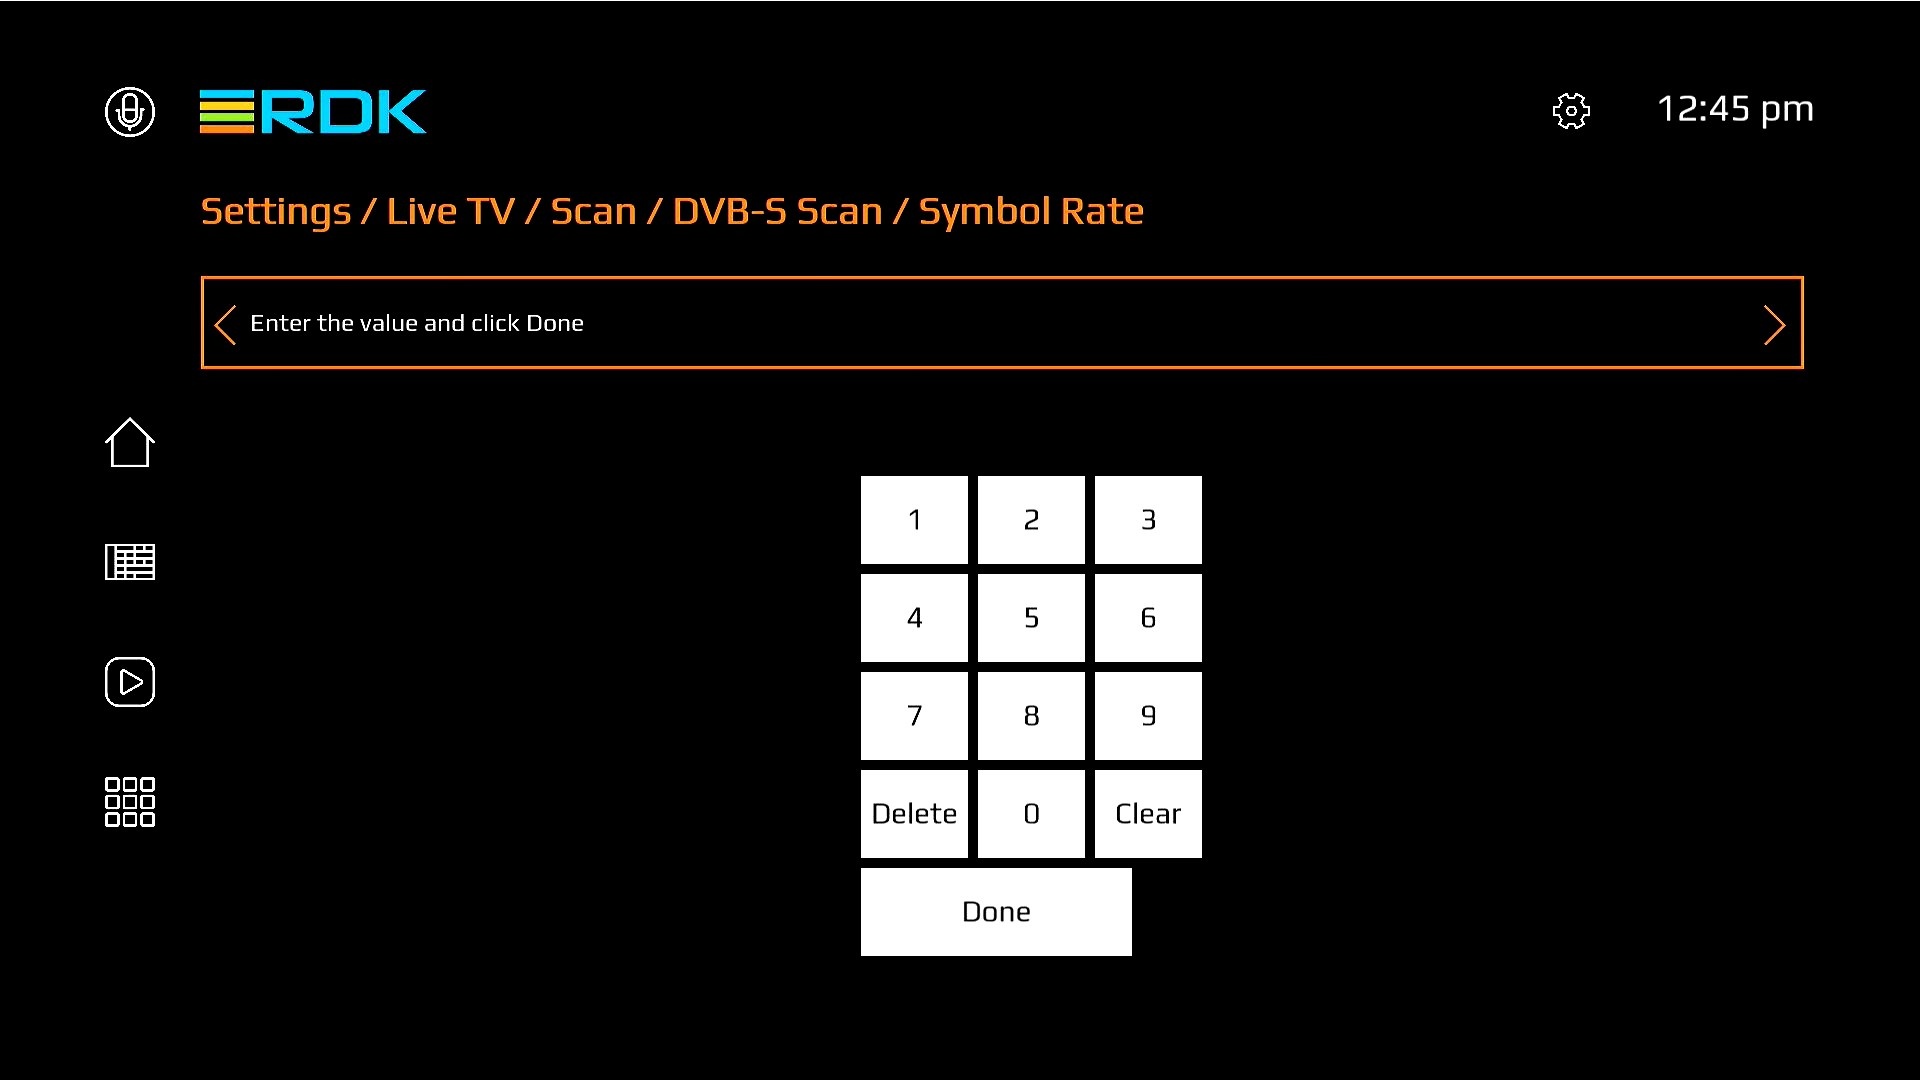
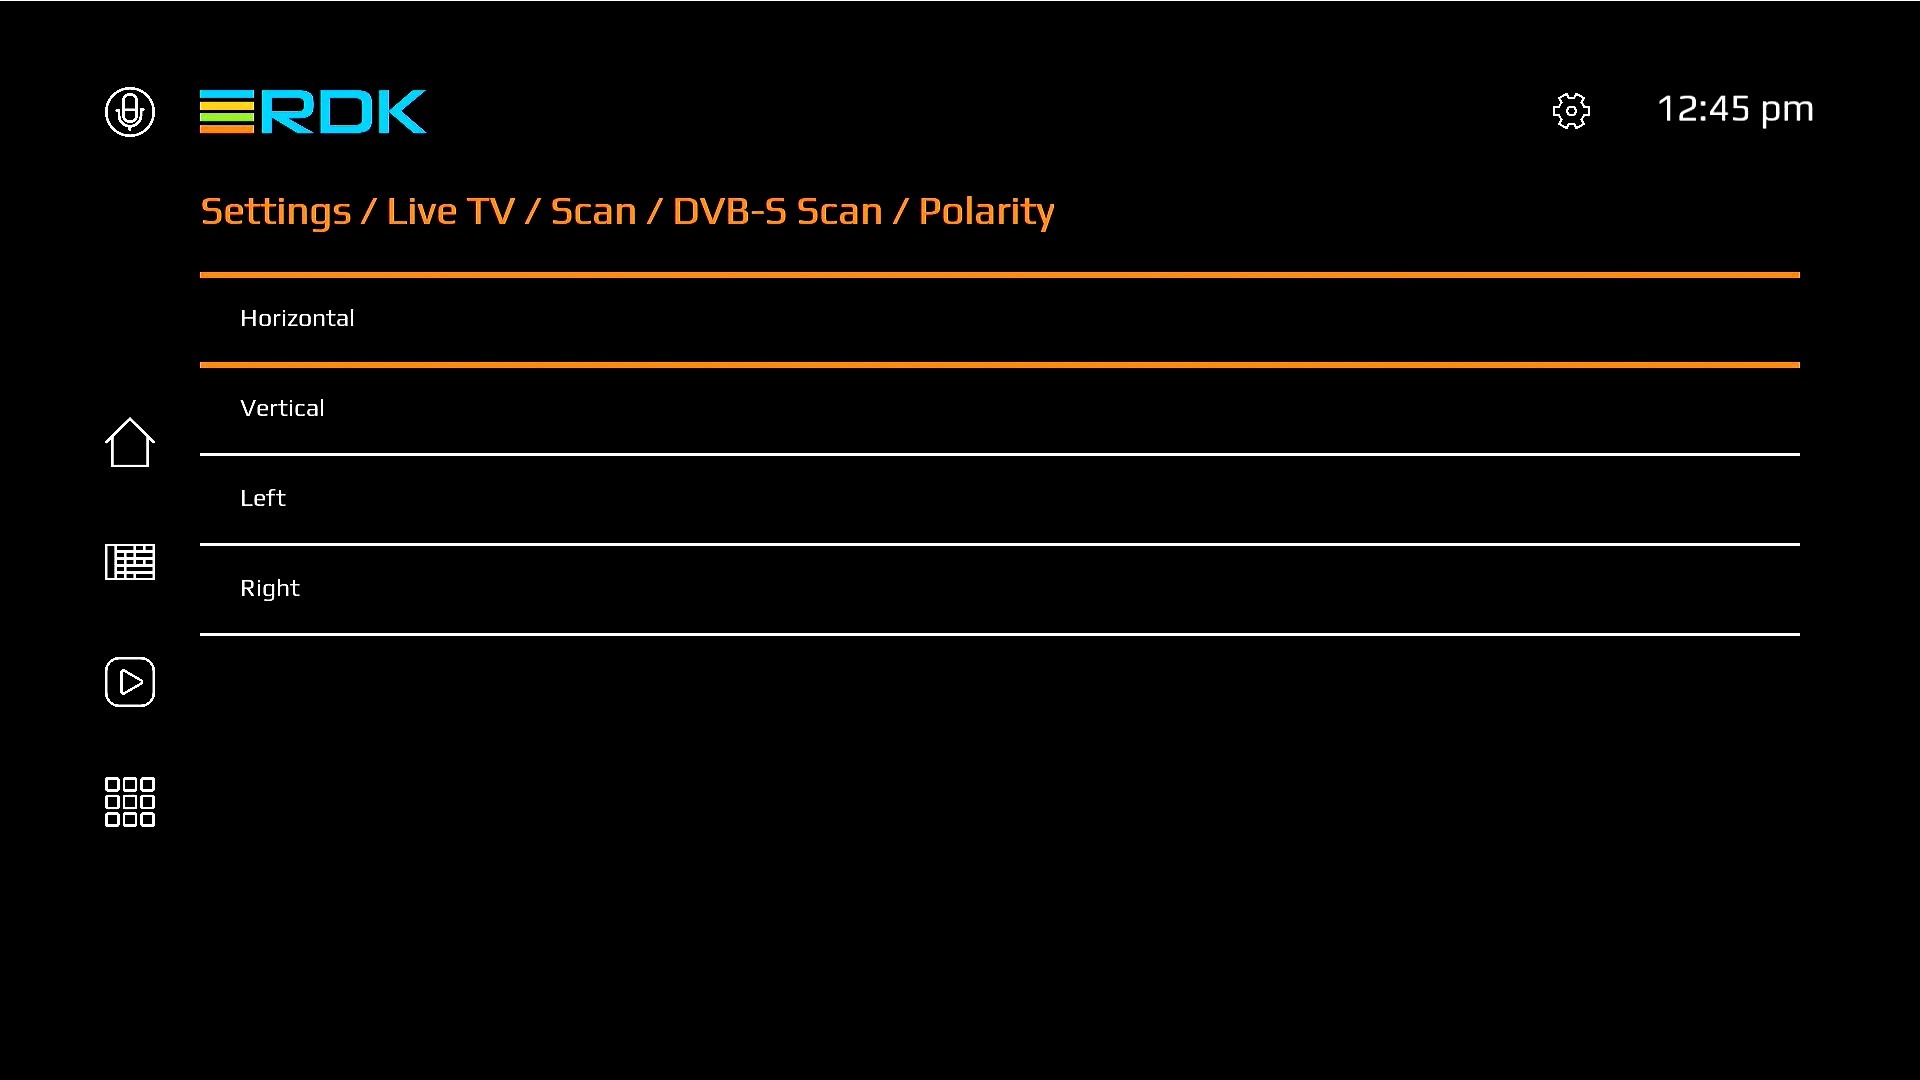
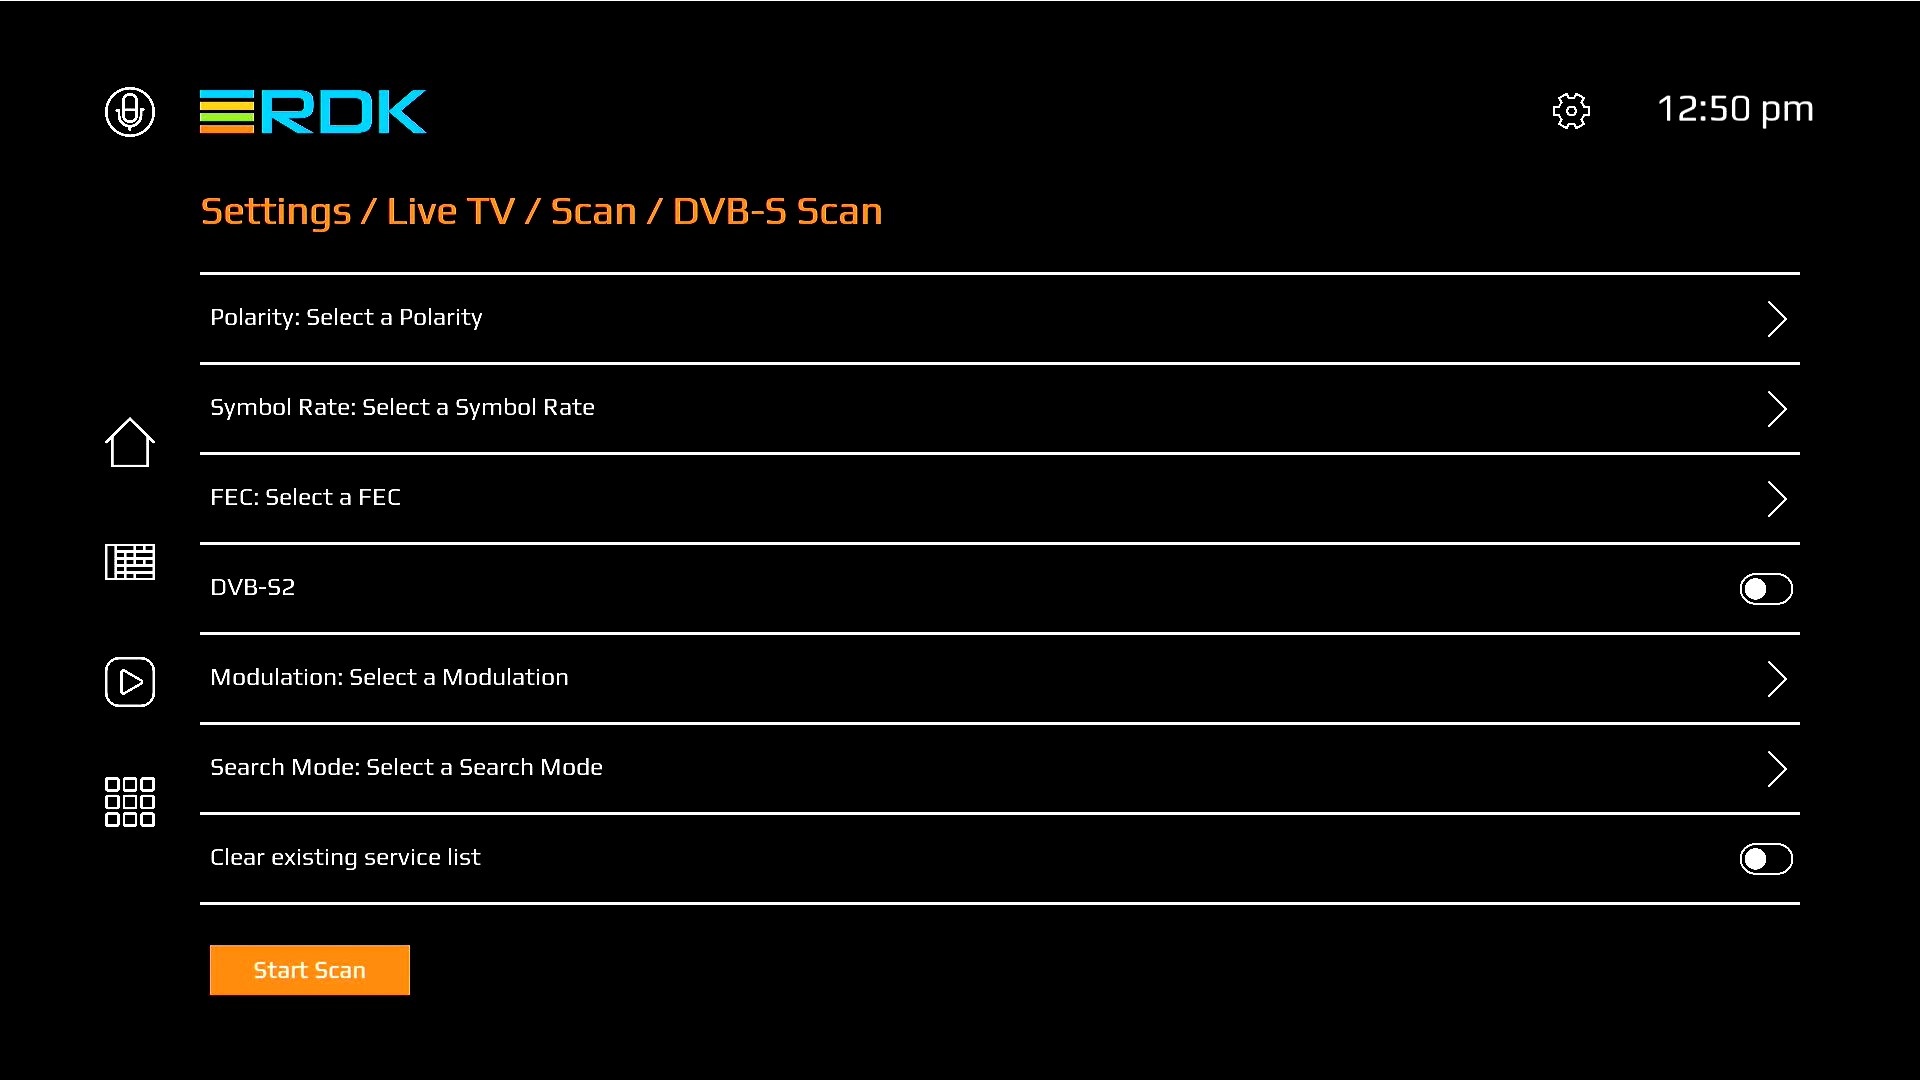
Dependent on DTV Plugin. This feature enables user to interact with the Tuner configuration and related features such a as Live TV - scan, channel tuning, Guide population, its playback etc.
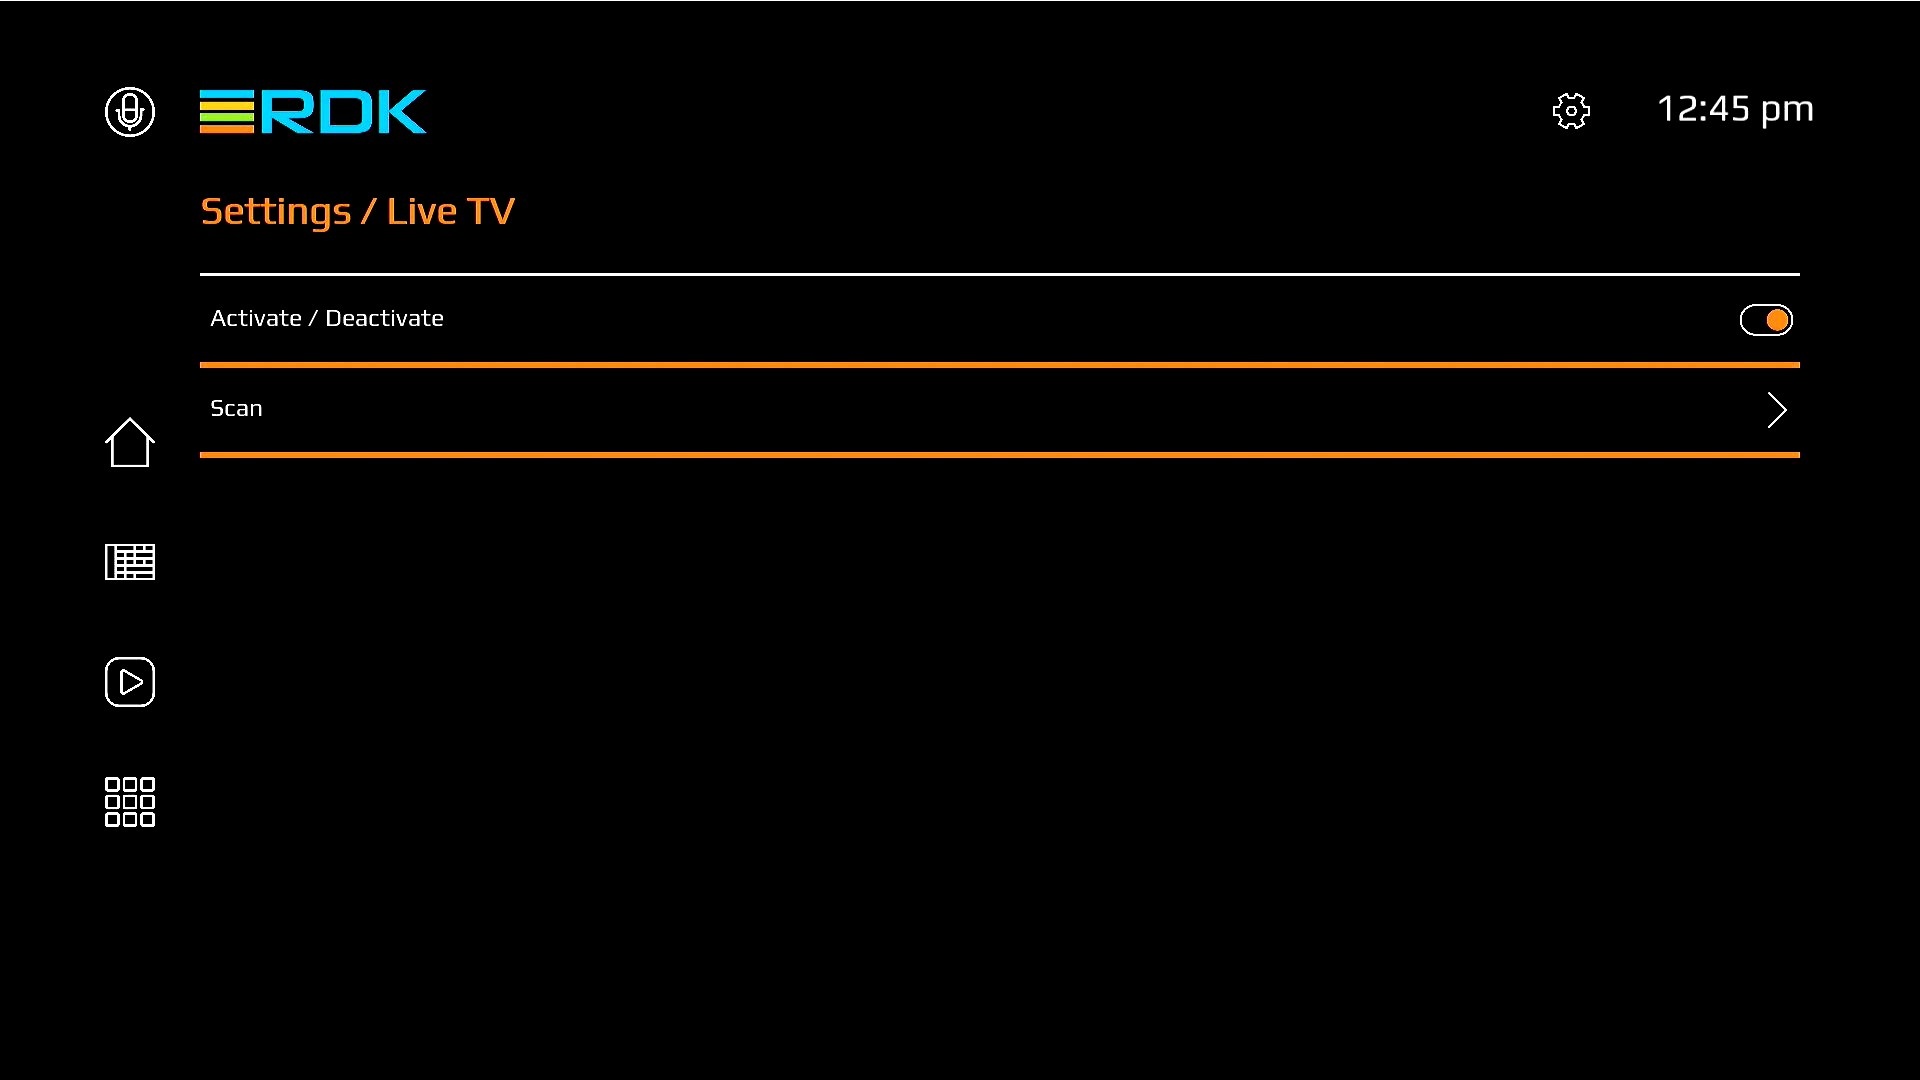
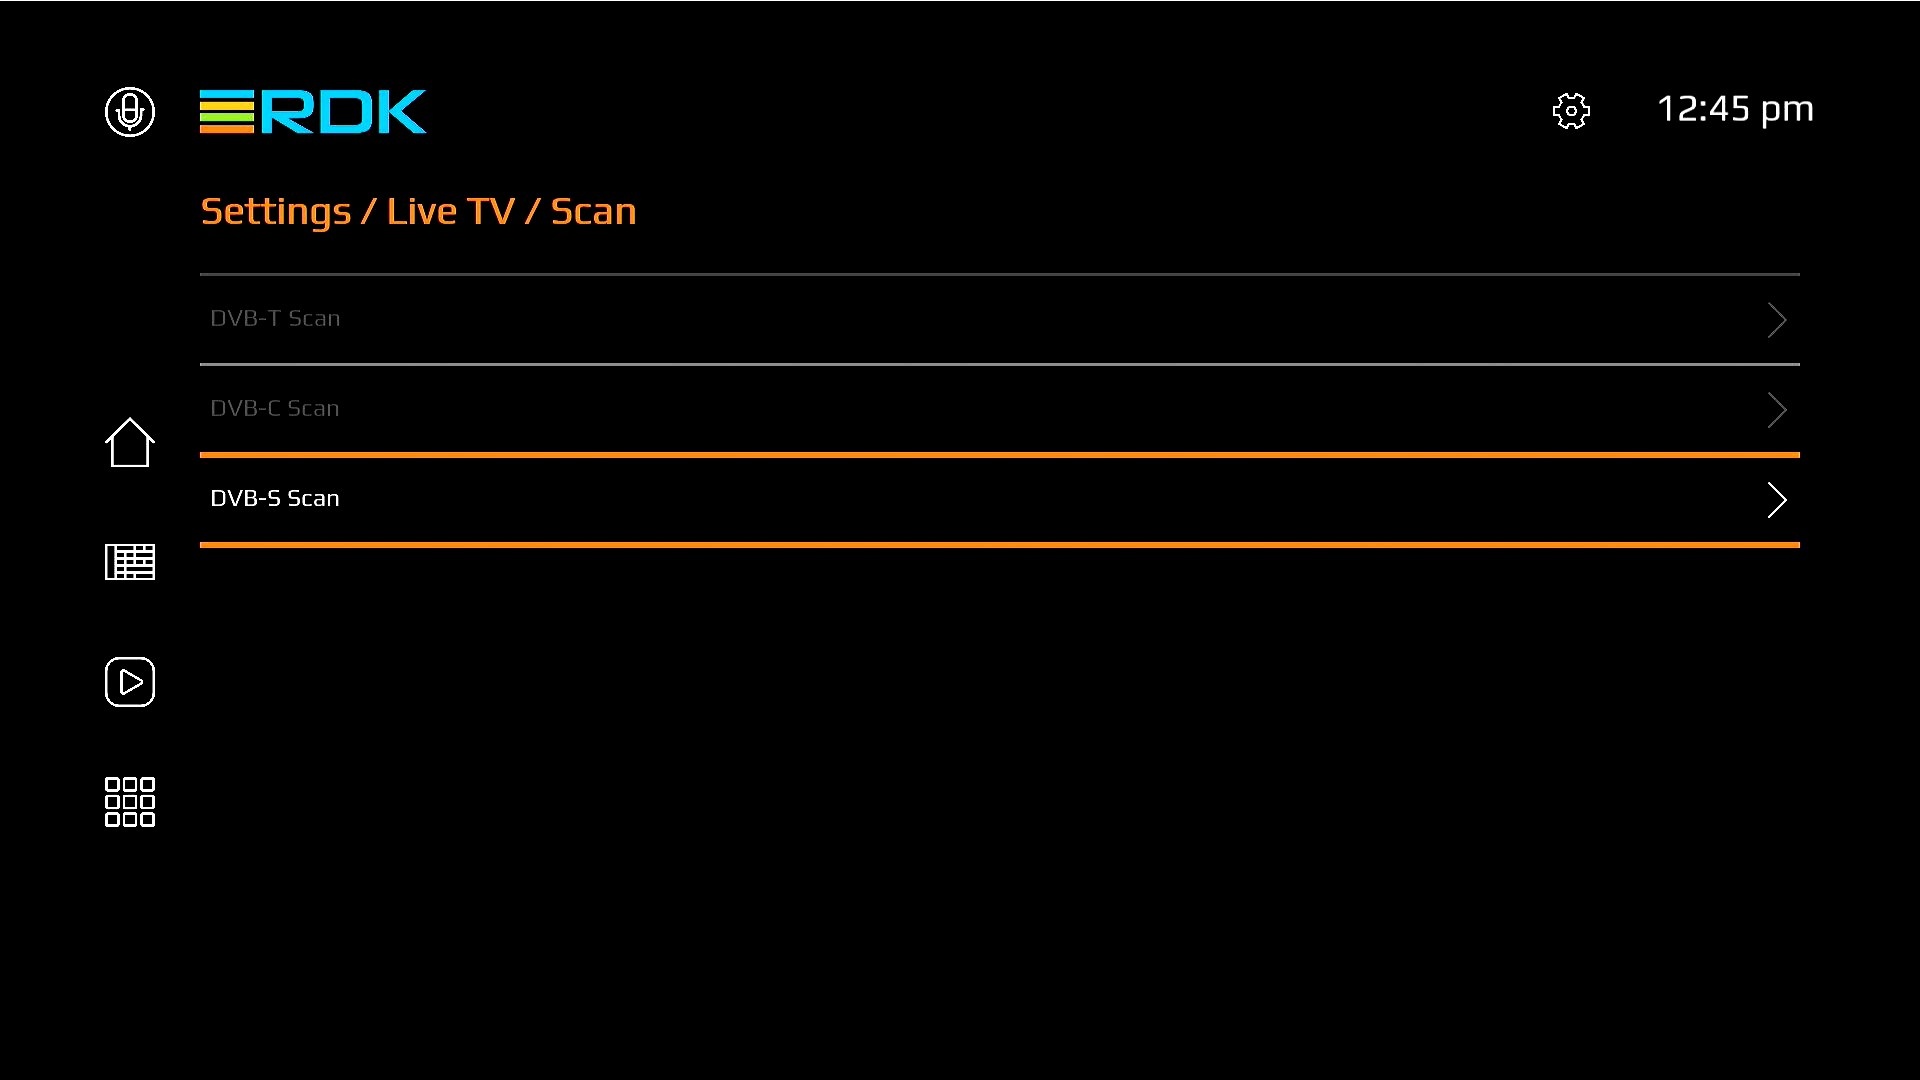
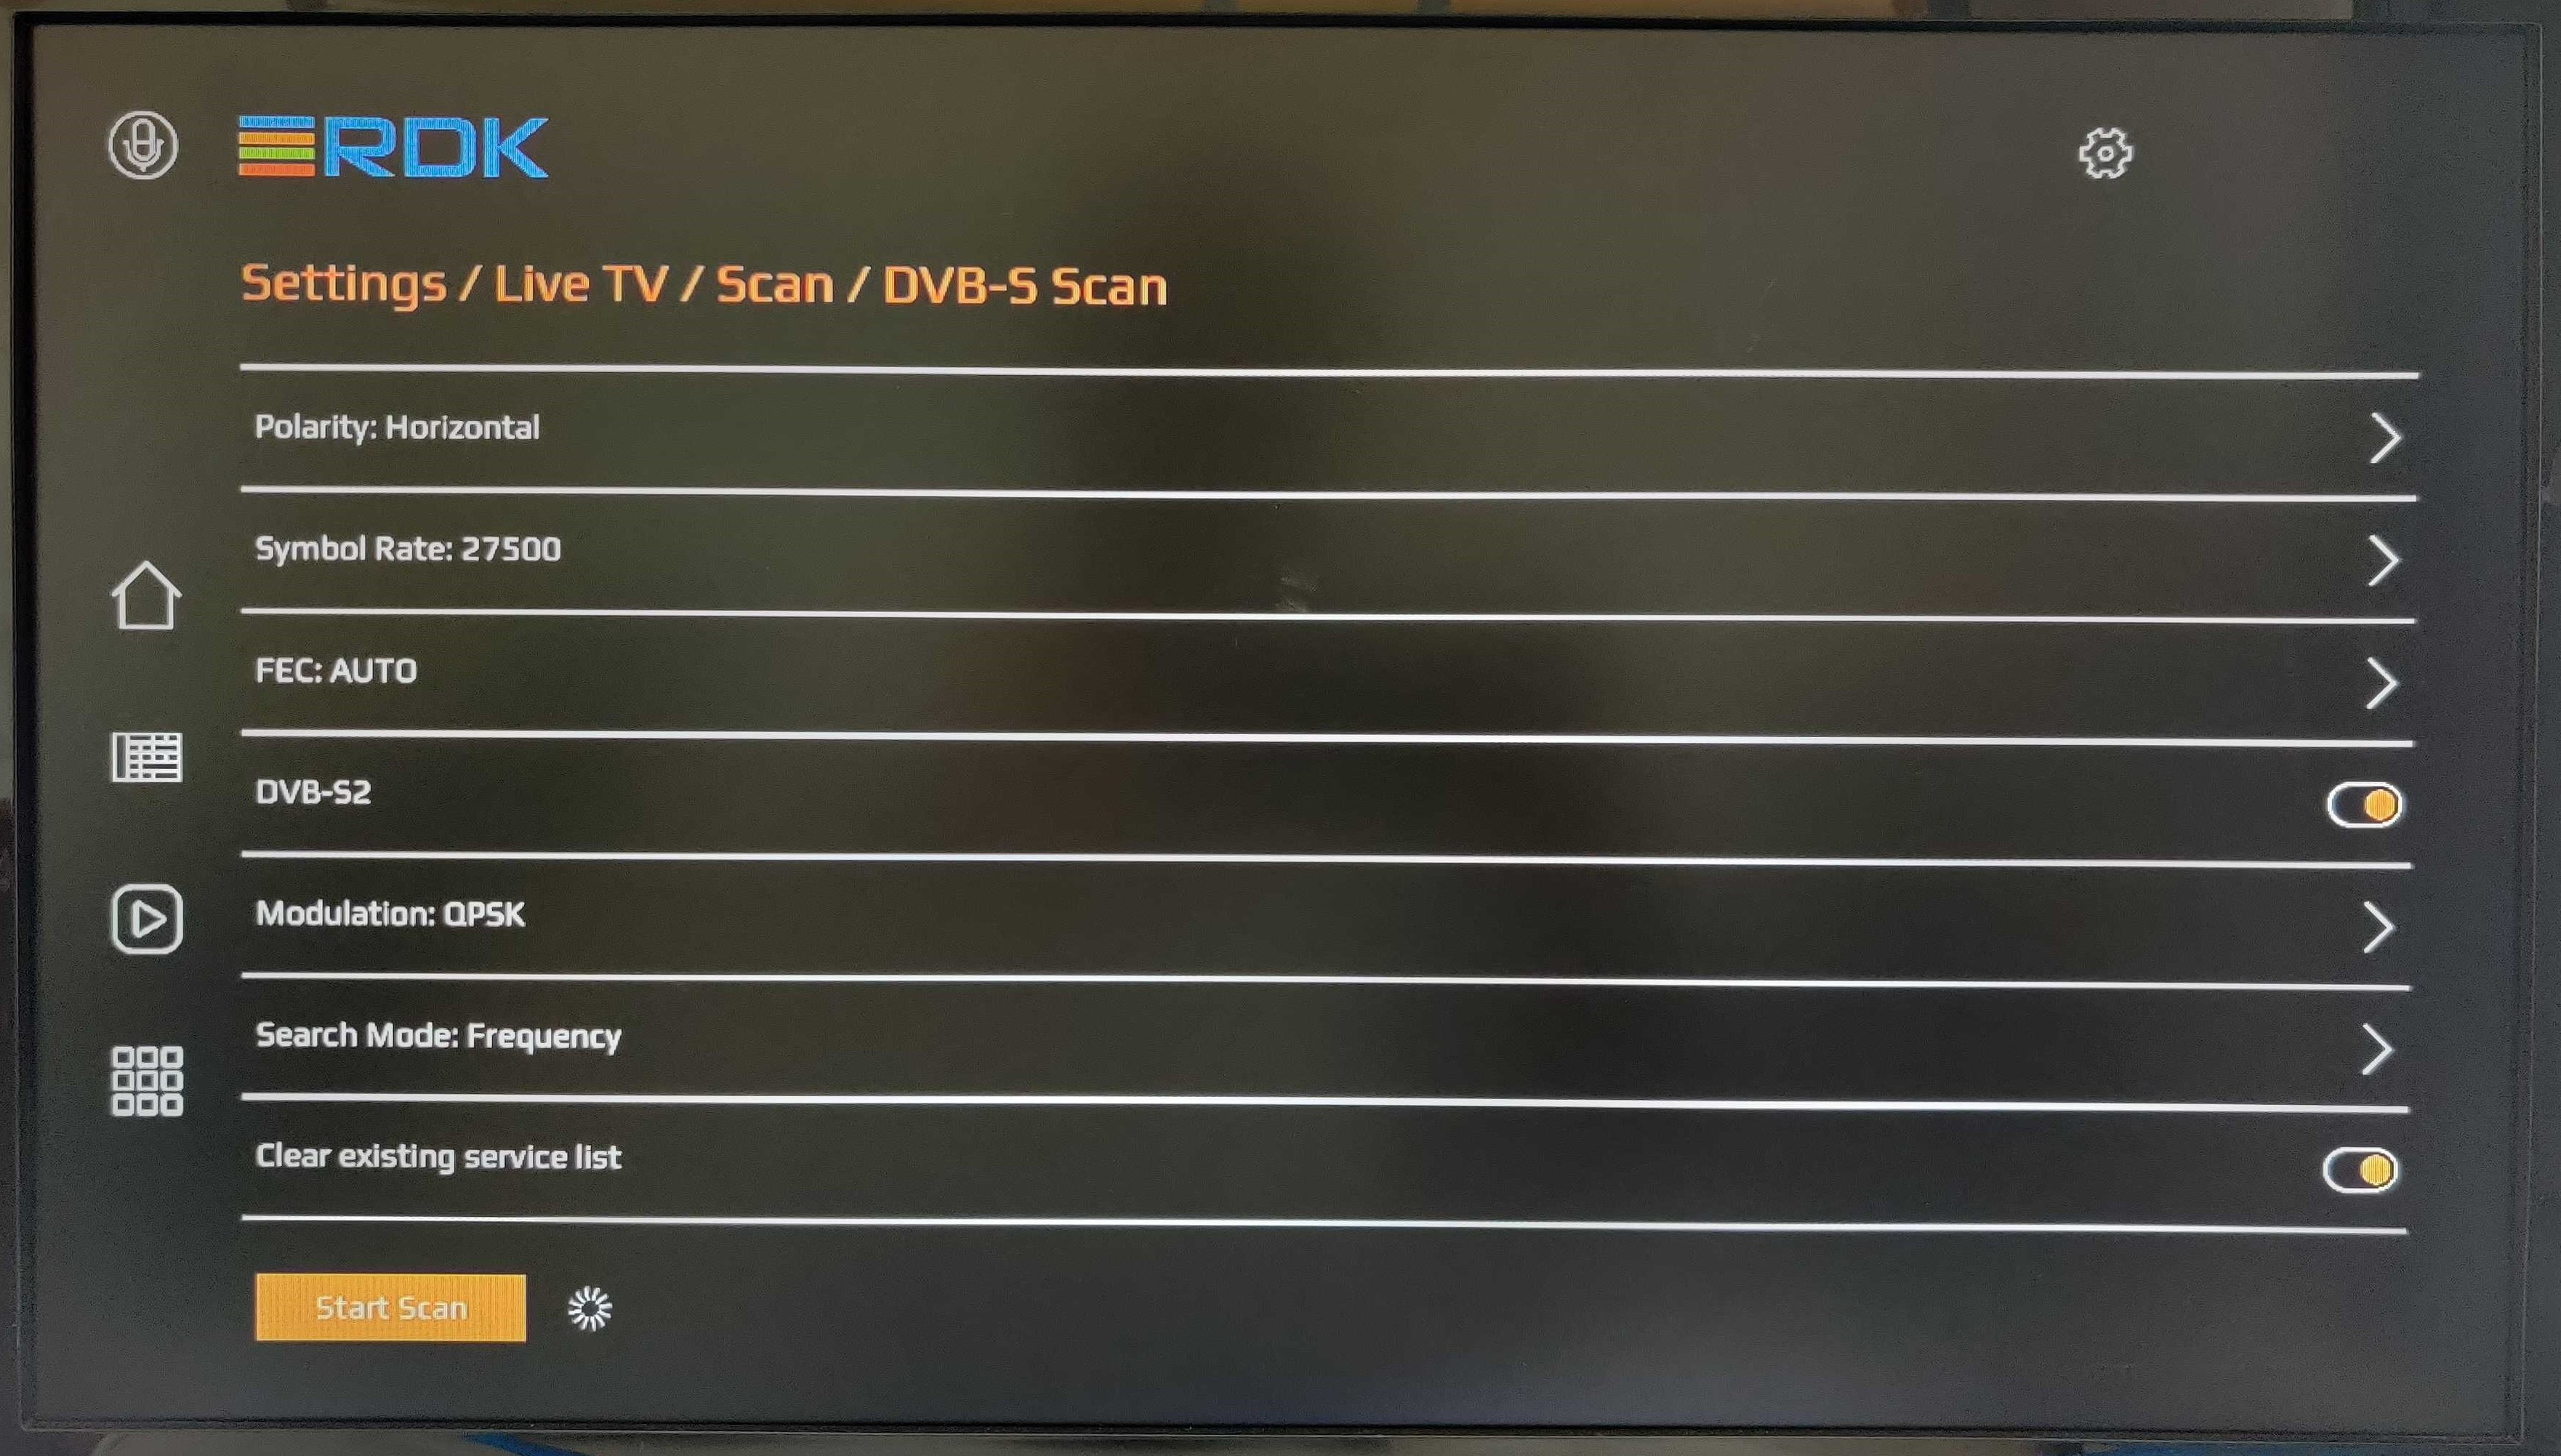
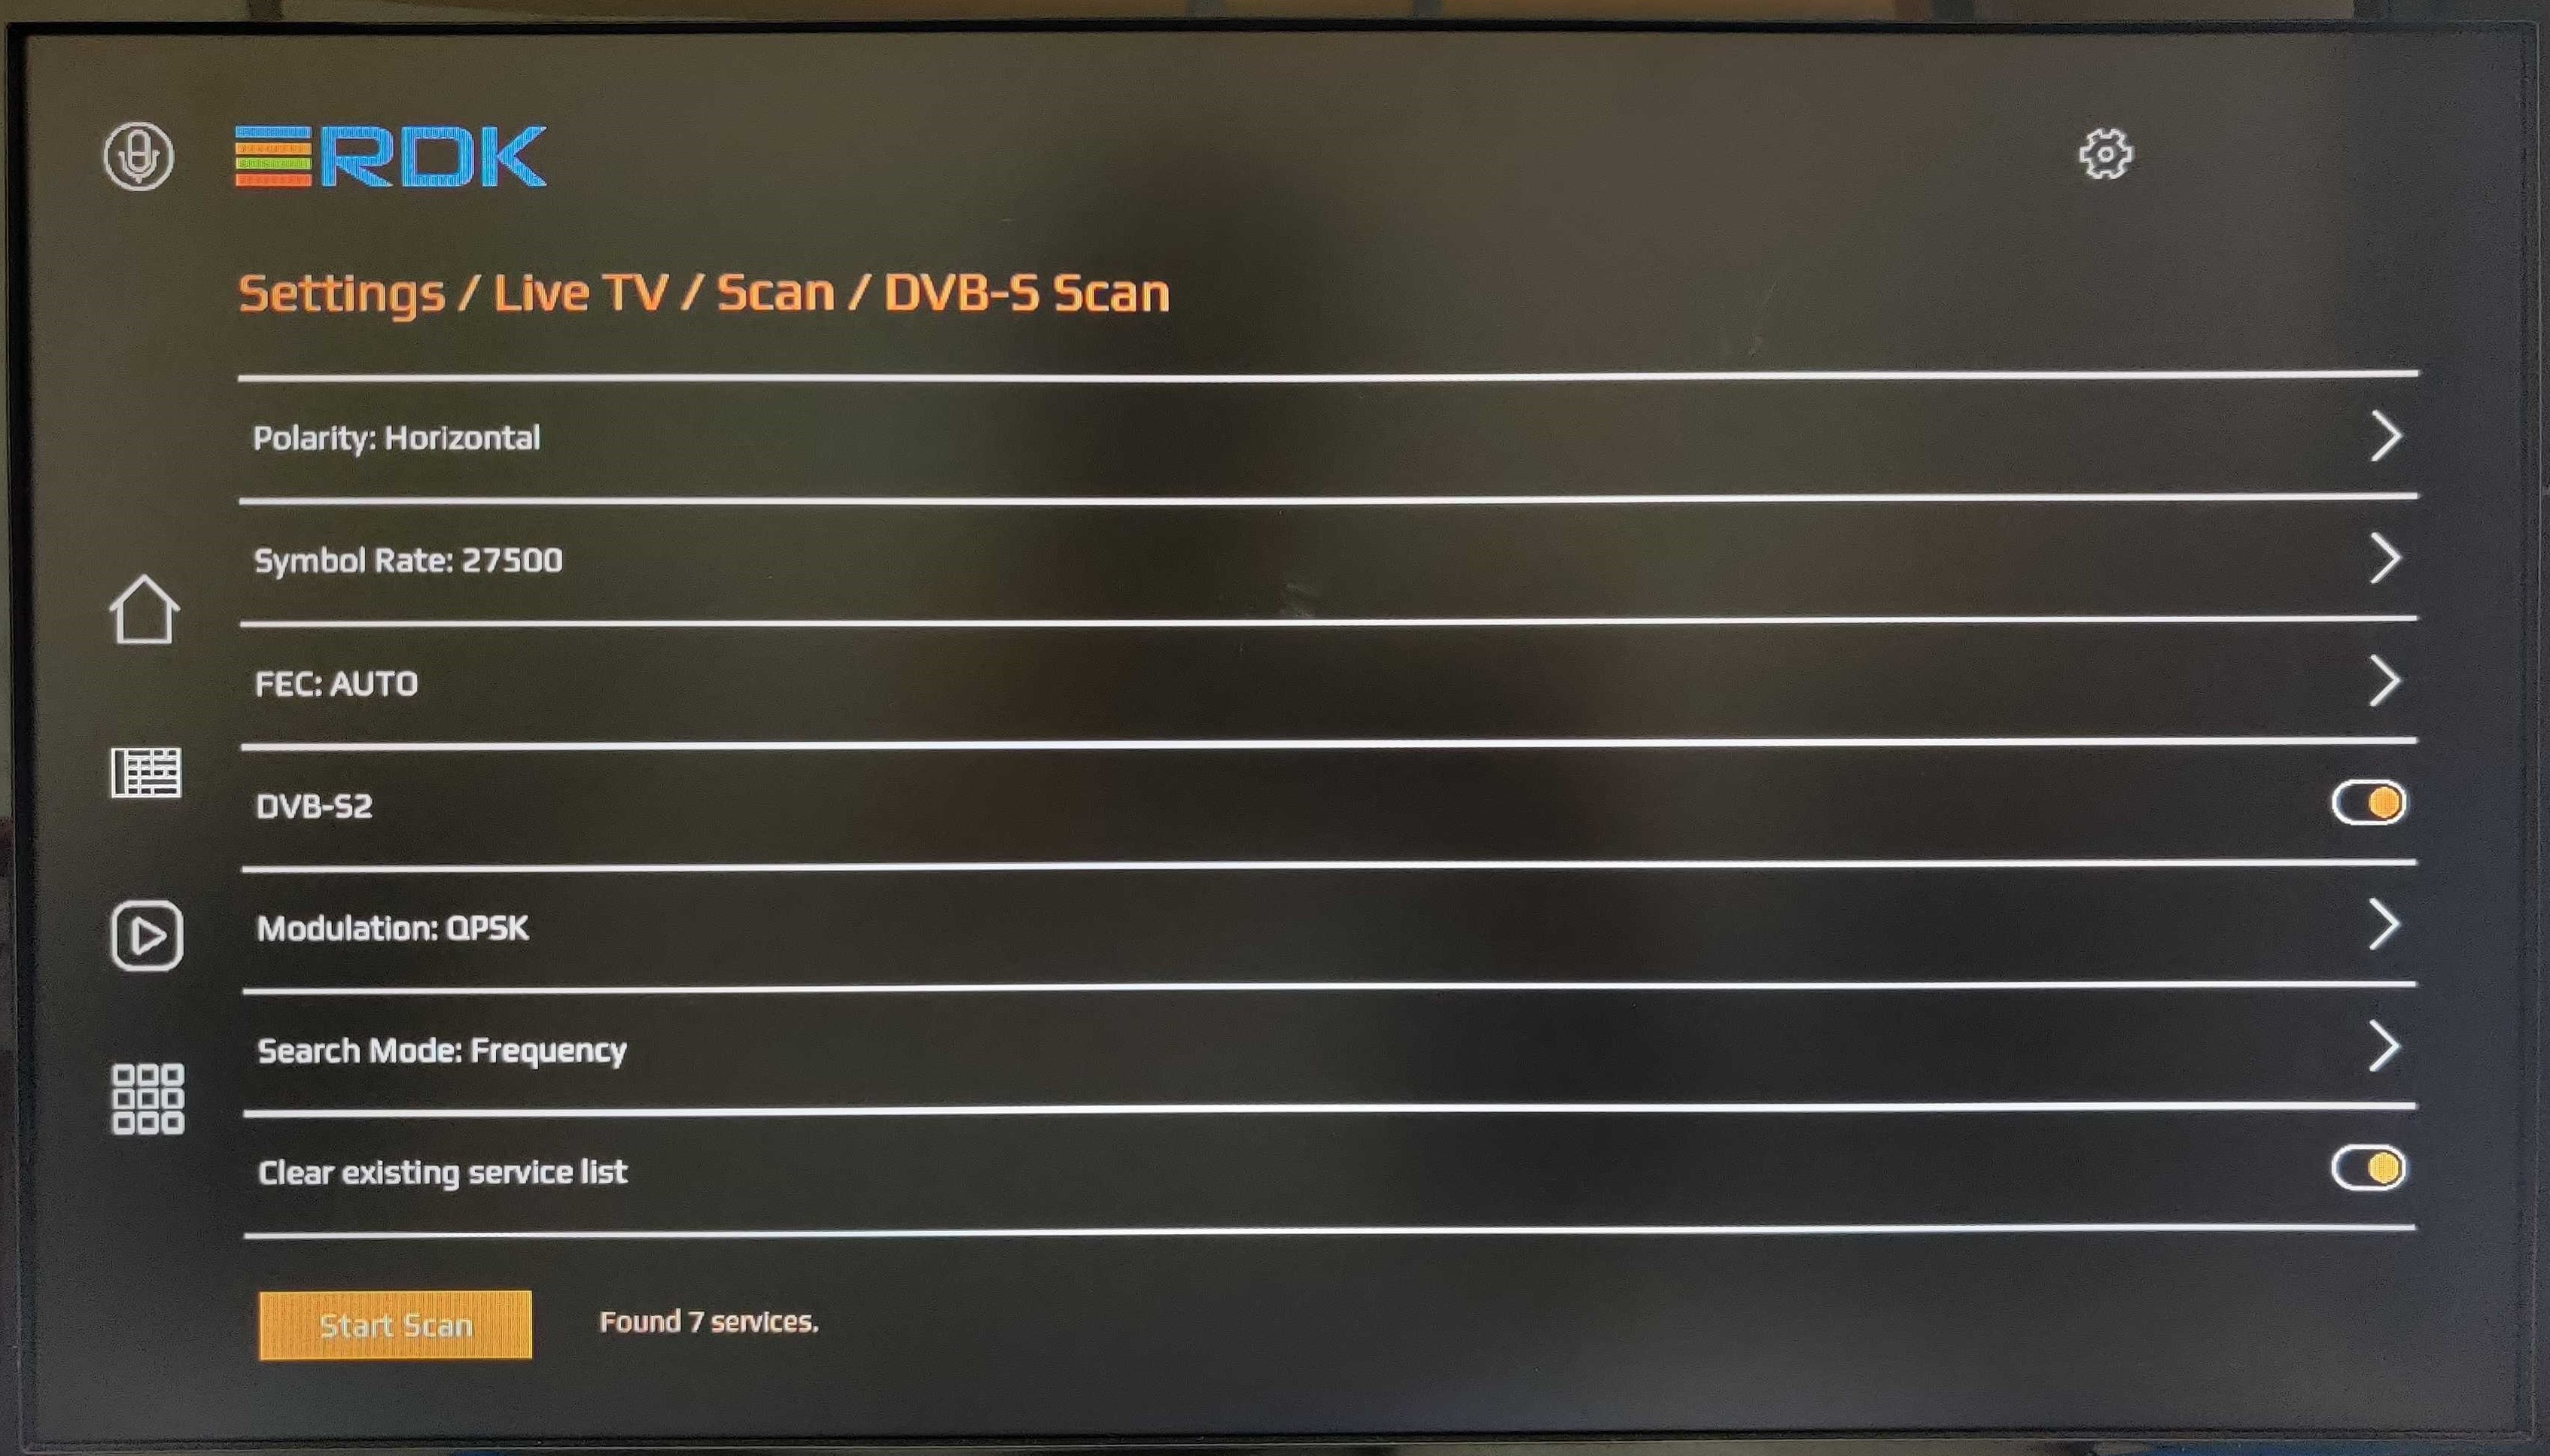
The Scan section exposes various DVB tuner sub-systems; DVB-S, DVB-T and DVB-C based on respective stack integration support.
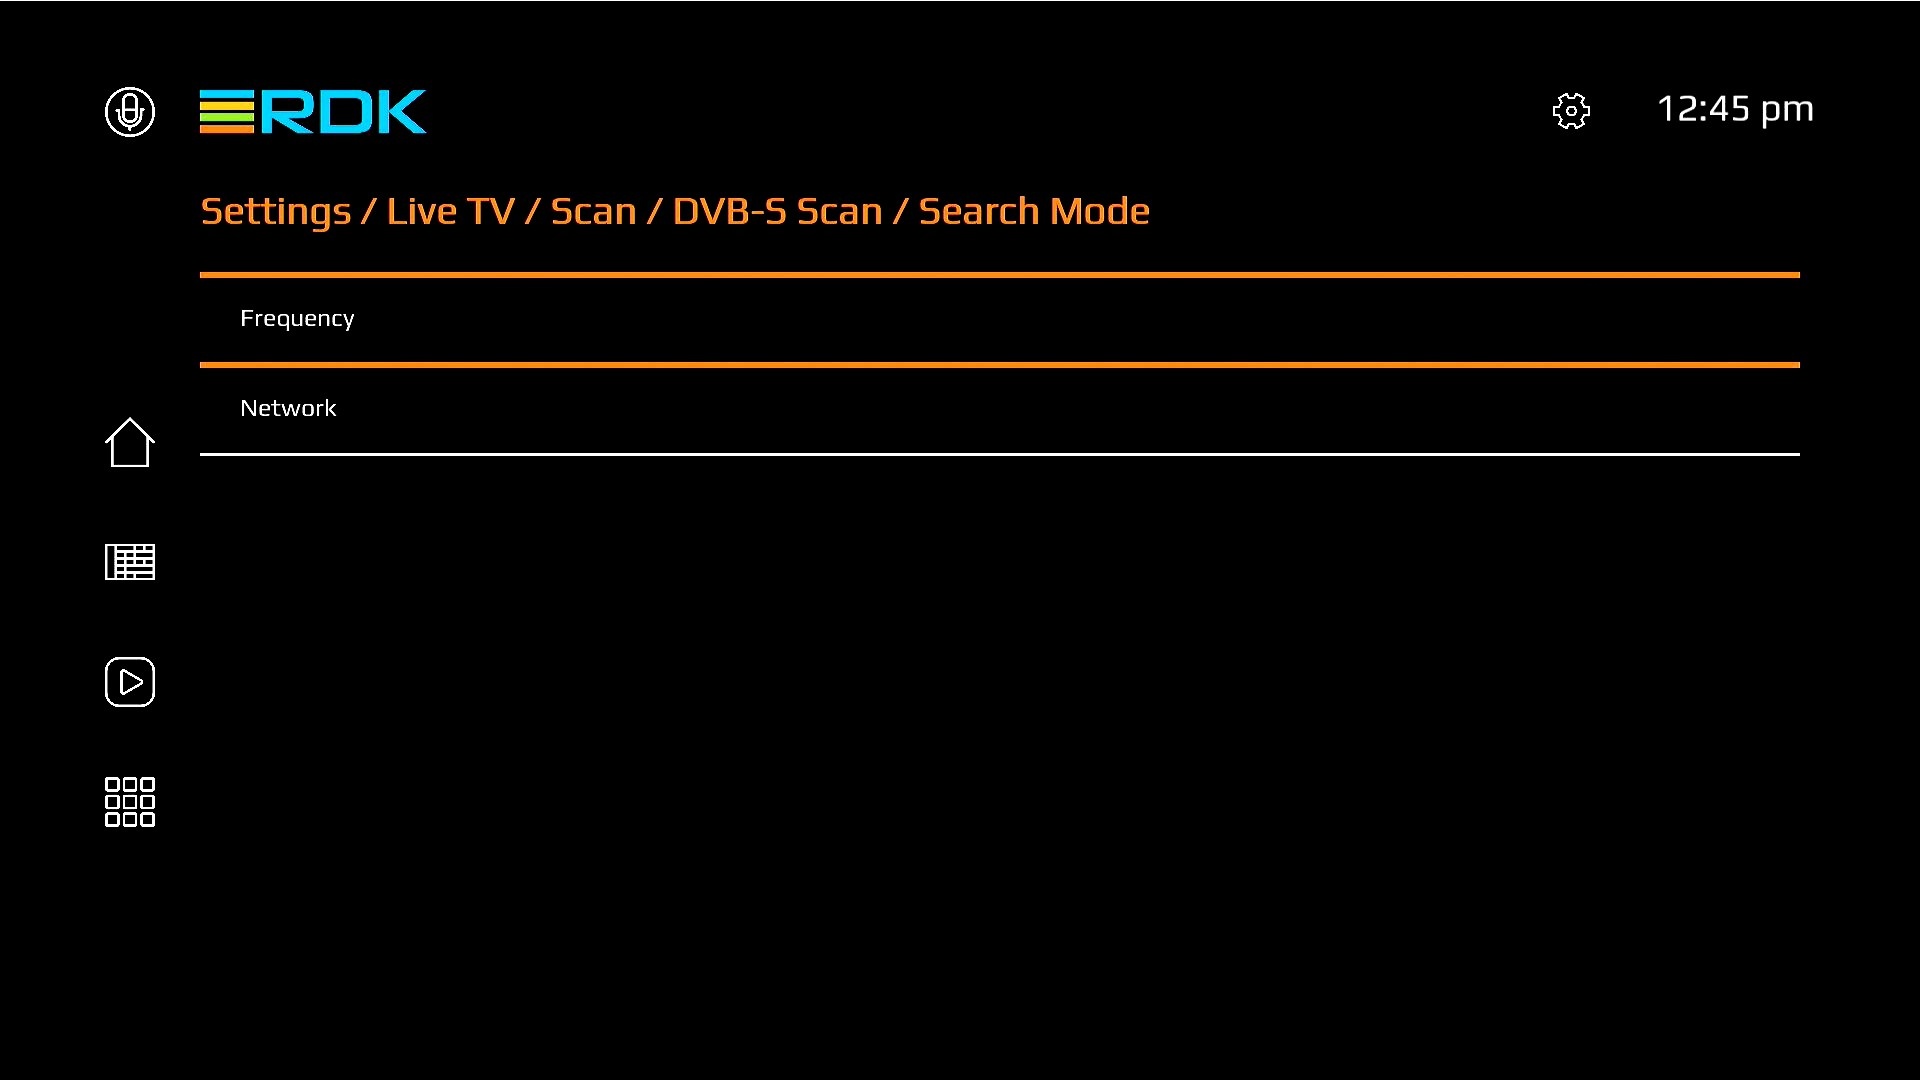
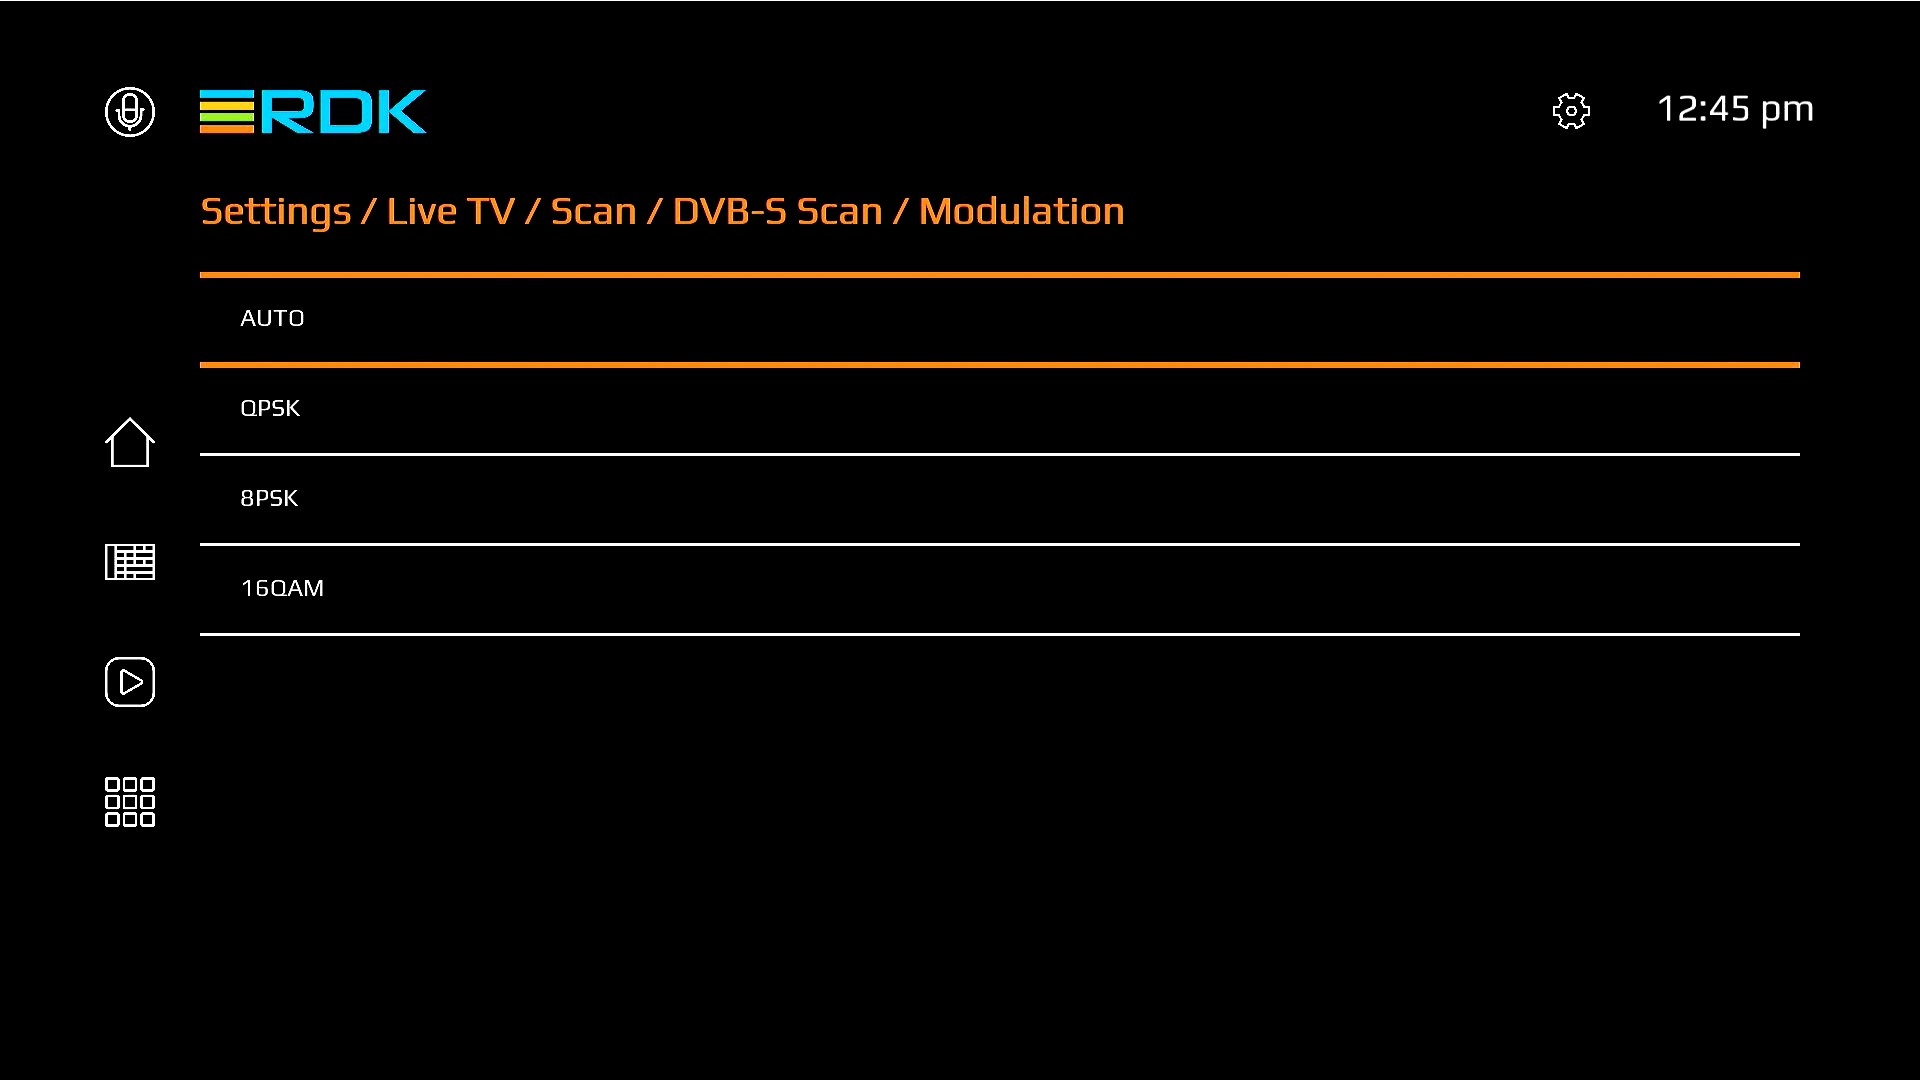
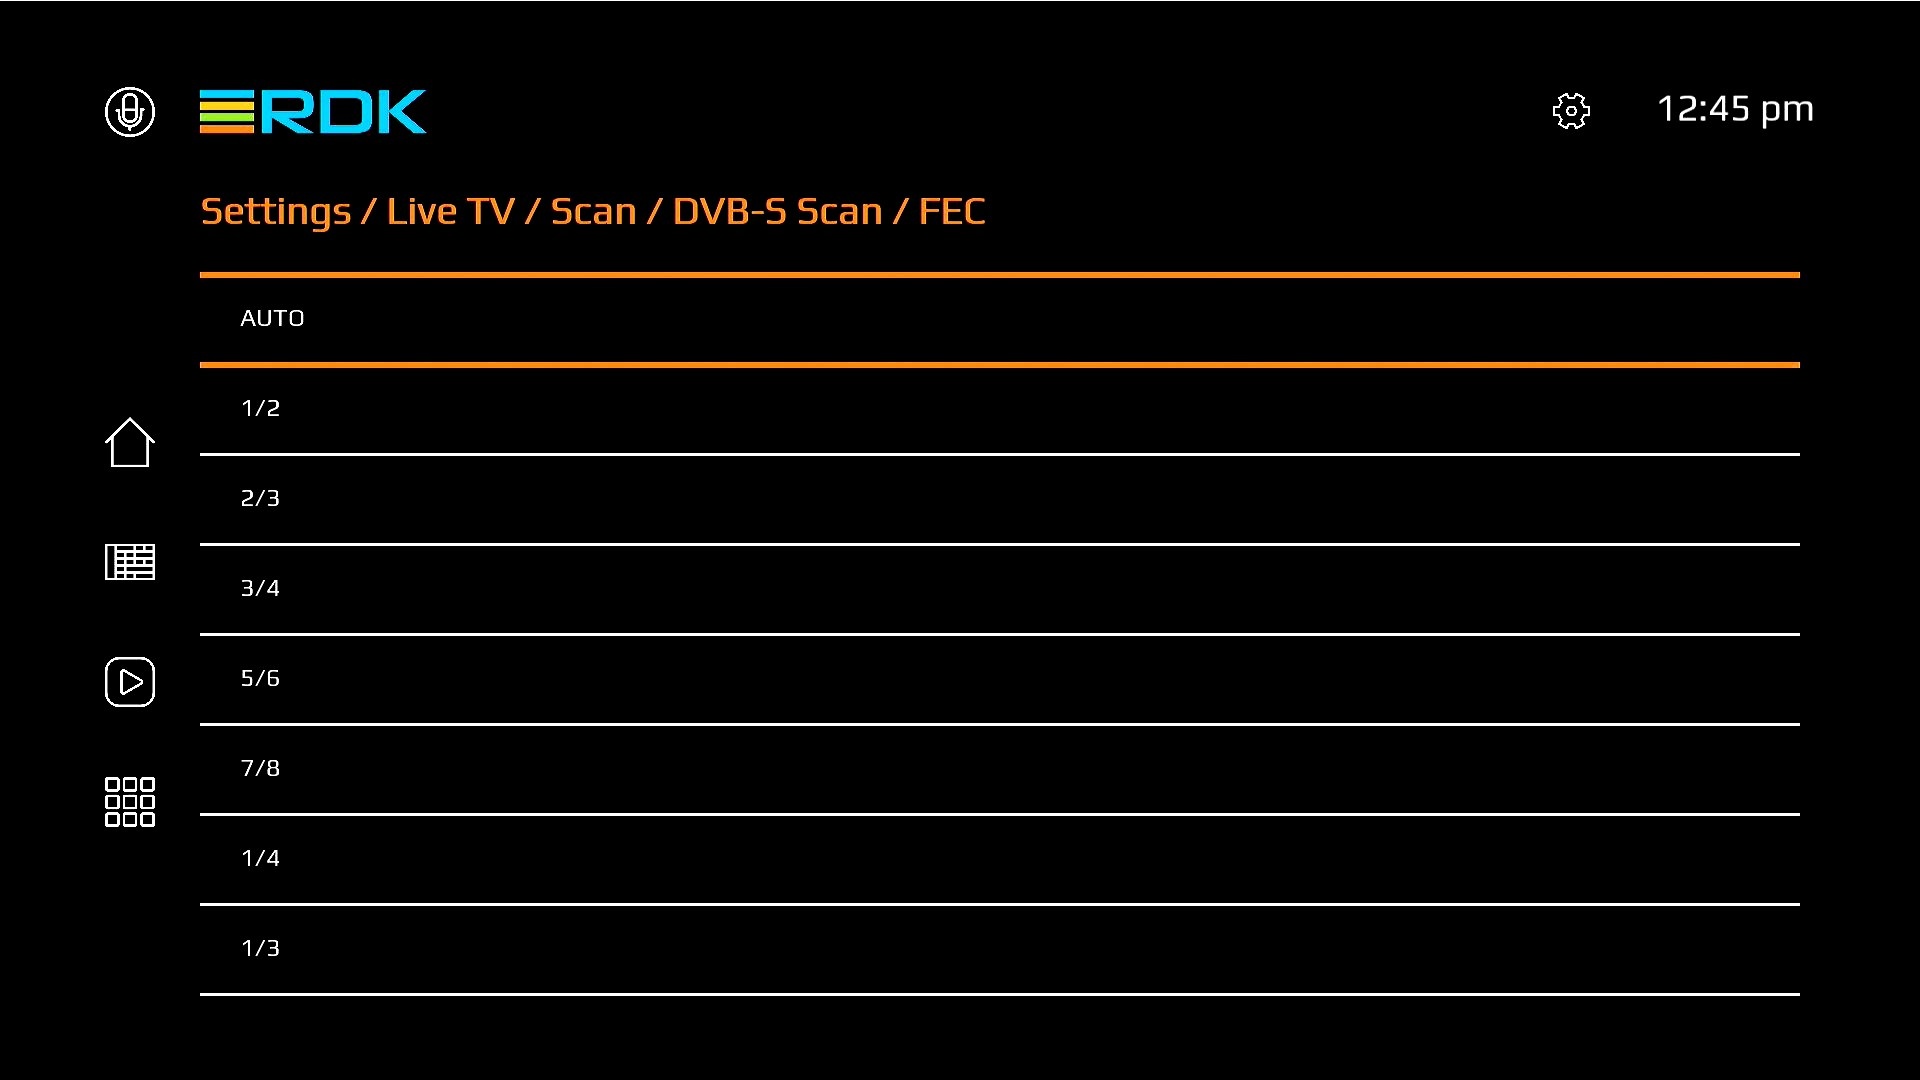
This subpage exposes various DVB-S Tuner parameters such as Satellite selection, Frequency, Polarity, Symbol rate etc. Each section allows user to select respective predefined option or enter a custom value(for selected parameters).
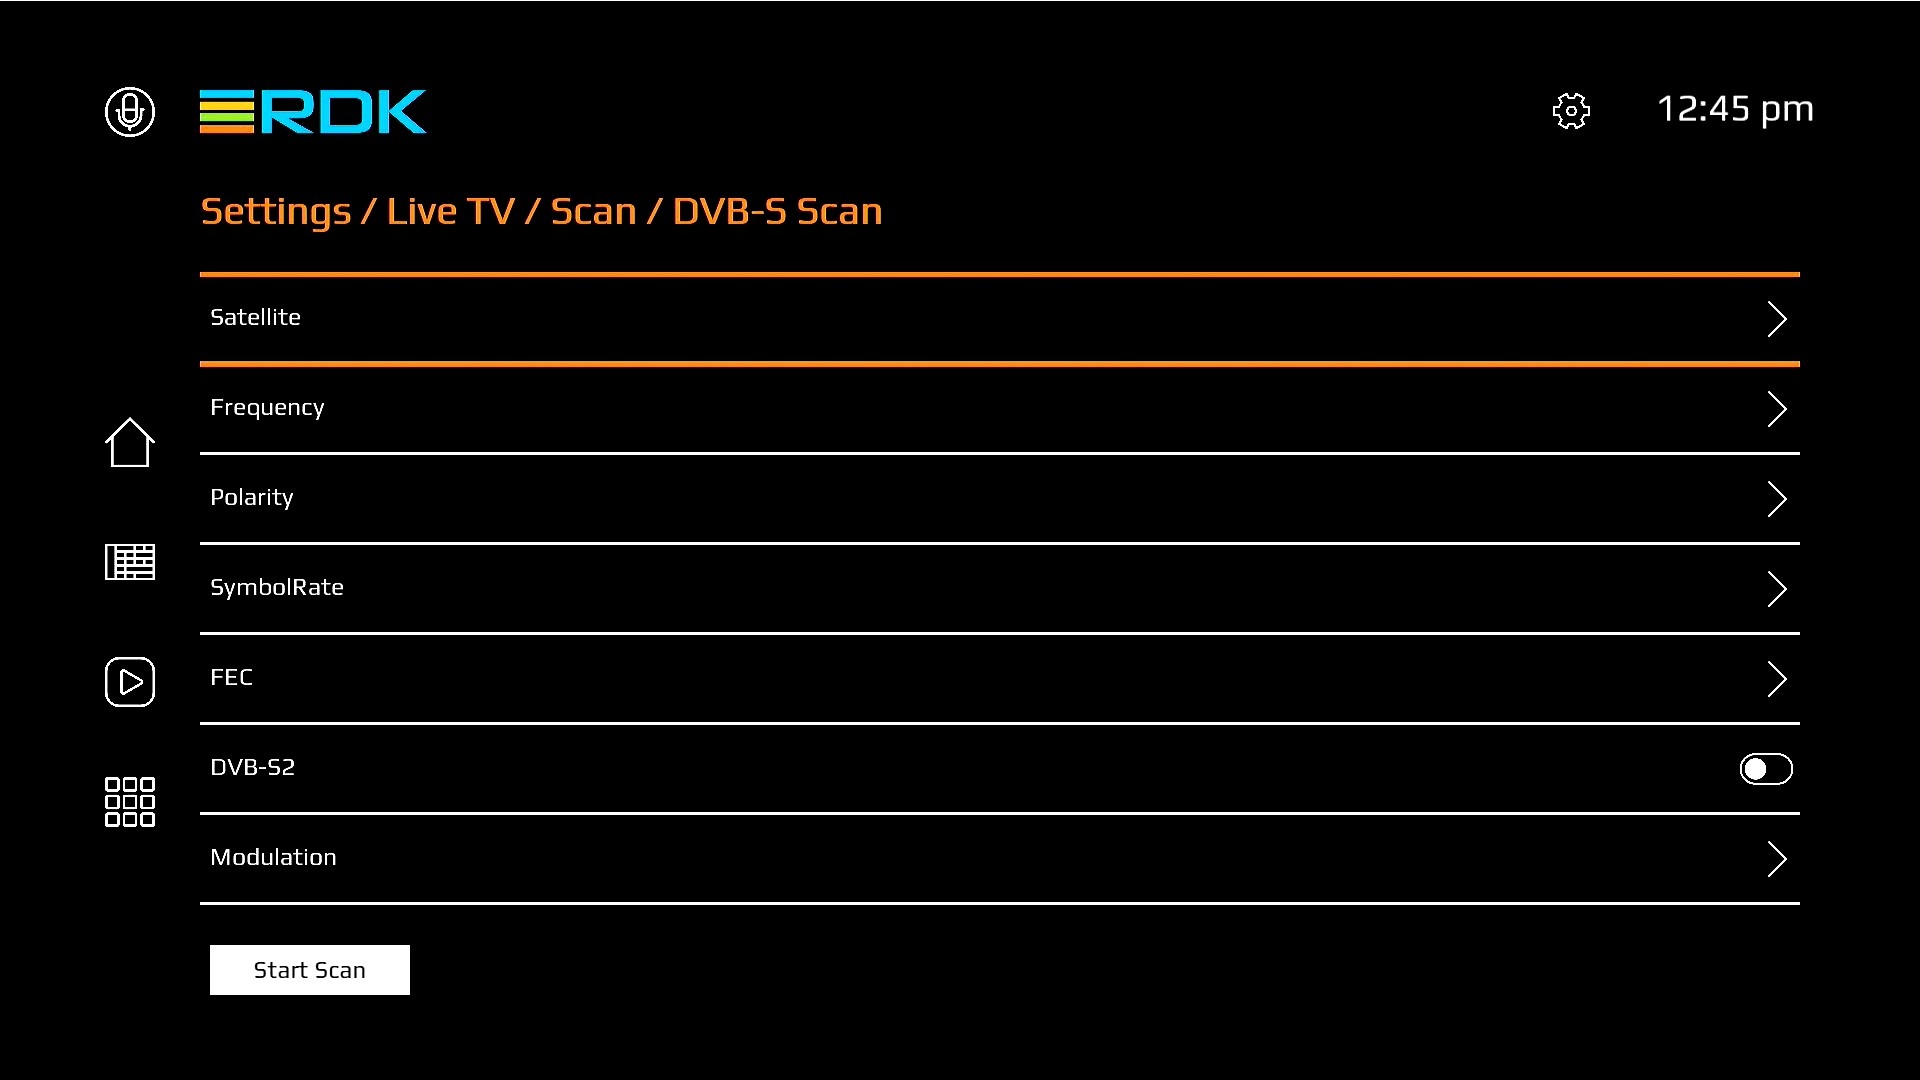
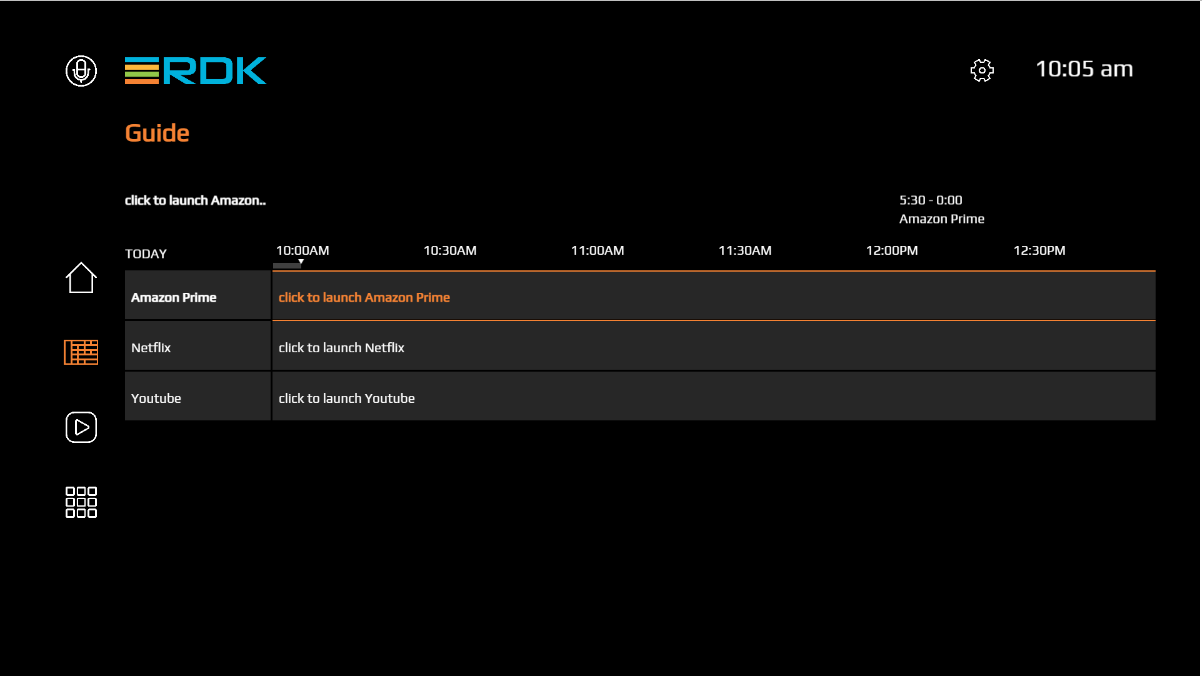
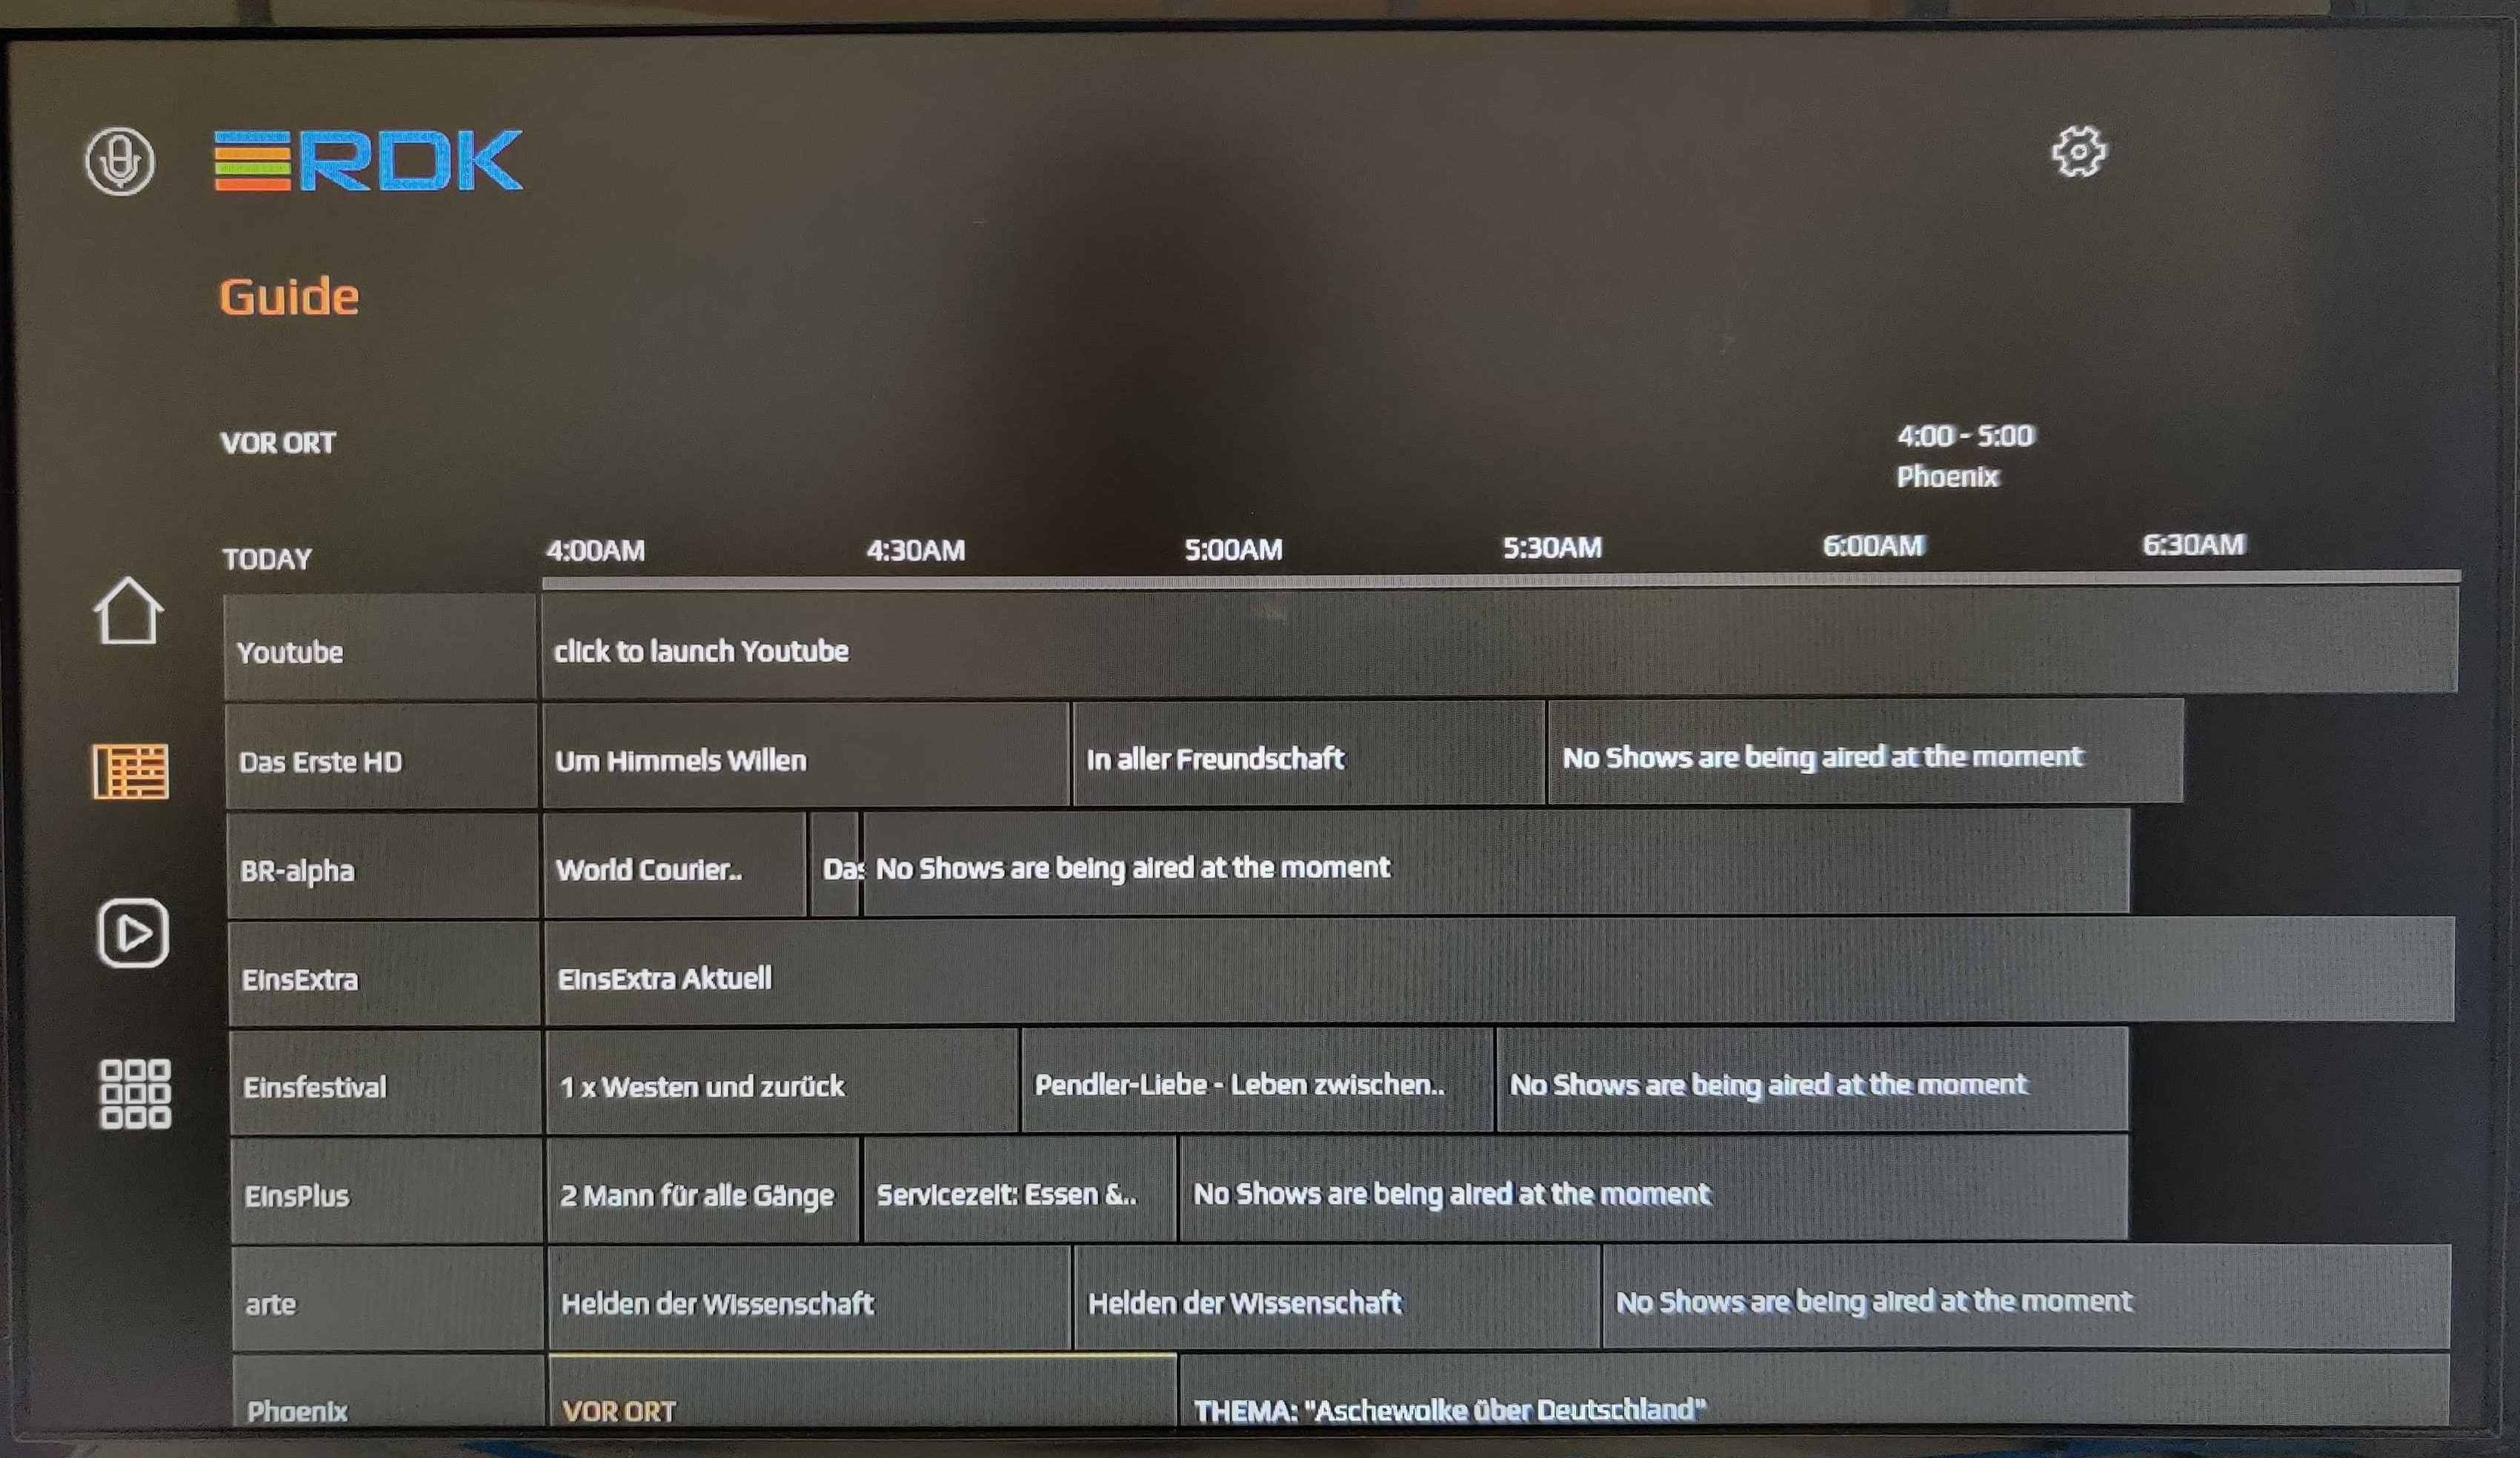
Based on the scan response, Guide screen shall get populated with actual live channel listing. User shall b e able to interact with the current available channels to initiate playback. From playback screen, user shall be able to change the channel also by bringing up the channel listing overlay.
Settings page tuner scan configurations and status:

Guide population:
Player:

In this version you will get full access to USB Media device related features if the device has required support integrated. To name a few - viewing images, playing audio and video file, accessing internal folders of the USB Media device.
Note: only the multimedia files are exposed through UI which are supported by UVE Player.
When the USB is plugged in UI will show USB icon on Featured Content row as shown in below content. New design allows the user to disable and enable USB Media support feature from Privacy Setting.
User can view the contents by pressing enter and he will see contents sorted based on Video, Audio, Photo, Folder.
You can traverse using Left/Right/Up/Down and to access the content - press Enter. File format supported is limited only by UVE support and USBAccess plugin filter.
Related RFC:
| Device.DeviceInfo.X_RDKCENTRAL-COM_RFC.Feature.USB_AutoMount.Enable |
|---|
In this new release settings is added as a overlay through widgets where user shall be able to launch settings though hot keypress on remote. Settings Hot-Key code is F10 equivalent (121).
New widget for overlay - to display notifications such as volume change etc.
Below snapshot shares how the overlay appears on various sections; At Home page, At Apps page and on a Playback screen.

TV profile supported stack has overlay for Volume change. Adding to that; it adds additional overlay screens for changing TV related settings as detailed below.
This overlay allows the user to switch between available Input options while enjoying an Input option.
Supported Hotkey is F3 (keycode 114).

Numeric value settings like brightness backlight, contrast etc can only be changed when picture mode is set to custom and color temperature is set to user defined.
Supported Hotkey is F4 (keycode 115).

This feature allows the app developers to quickly test any app without modifying the Accelerator UI source code by adding details of the custom app in app manager registry file present in device(if not present; can be created one with valid json content inside it). After updating this restart the device or residentapp service to reload the Home page which shall display a new row at home page with the Icon image. A sample app manager registry configuration and resulting UI screen will be as given below.
| Code Block | ||
|---|---|---|
| ||
root@HP44HRDK:~# cat /opt/appmanagerregistry.conf
{
  "applications":[
    {
      "displayName":"SampleApp",
      "uri":"https://keycode.info/",
      "applicationType":"WebApp",
      "url":"http://127.0.0.1:50050/lxresui/static/images/info.png"
    }
  ]
} |
List of supported launch type for apps(applicationType)
| Application Type | Sample appmanagerregistry.conf |
|---|---|
| For HTMLApps (online) | { "applications":[ { "displayName":"HTML App", "uri":"https://keycode.info/", "applicationType":"WebApp", "url":"http://127.0.0.1:50050/lxresui/test-tube.png" } ] } |
| For Native/ResidentApps (offline) | { "applications":[ { "displayName":"Native App", "uri":"http://localhost:50050/lxresui/static/loaderApp/index.html", "applicationType":"Native", "url":"http://127.0.0.1:50050/lxresui/test-tube.png" } ] } |
| For LightningApps (online) | { "applications":[ { "displayName":"Lightning App", "uri":"https://apps.rdkcentral.com/rdk-apps/device-ui/index.html", "applicationType":"Lightning", "url":"http://127.0.0.1:50050/lxresui/test-tube.png" } ] } |
...
The version 3 UI supports a configurable keymap. Below lists the general functionality and keycode of keys. Detailed information of the default keycode mappings can found here.
| Key | Functionality |
|---|---|
| Keycode - 37,39,38,40 (Left/Right/Up/Down Key) | To Move between the Contents Tiles To Navigate between settings screen |
| Keycode - 13 (Enter Key) | To launch app from App list To launch Video Player To Enable/Disable Features To Play/Pause Video |
| Keycode - 36,77,27 Home/m | To Navigate to home screen To return back to home screen from other apps |
| Keycode - 116 (Power Key) | To Power off the device |
| Keycode - 174 (AudioVolumeDown Key) | To decrease the volume of the STB |
| Keycode - 175 (AudioVolumeUp Key) | To increase the volume of the STB |
| Keycode - 173 (AudioVolumeMute Key) | To mute the STB |
| Keycode - 121 (F10, Settings key) | To launch the Settings Overlay over other apps |
One among the new feature in this version of UI is it allows to change the focus color, background color and logo if an operator wishes to by making necessary changes in config.js. Default config.js for reference is as below.
| Code Block | ||
|---|---|---|
| ||
const themeOptions = {
    partnerOne: {
      hex: 0xfff58233,
      logo: 'RDKLogo.png',
      background: '0xff000000'
    },
    partnerTwo: {
      hex: 0xff91c848,
      logo: 'RDKLogo.png',
      background: '0xff000000'
    },
} |
User can define an object inside theme options which need three parameters:
hex - Color accents on the UI. Default one is shade of orange.
logo - Logo at the splash and top left side on the home screen.
background - background color of the components.
User has to export a specific theme for it to apply through the UI.
| Code Block | ||
|---|---|---|
| ||
export var CONFIG = {
    theme: themeOptions['partnerOne'],
    language: localStorage.getItem('Language')!=null ? language[localStorage.getItem('Language')] : language['english']
} |
...
This section details about how to customize the current UI source code and develop further.
Follow the commands to run the application on you laptop.
Type lng to confirm the installation. You will see the below output.
| Code Block |
|---|
$ npm install -g @lightningjs/cli
$ lng
Usage: index lightning-cli <command> [options]

Options:
  -V, --version   output the version number
  -h, --help      display help for command

Commands:
  create - Create a new Lightning App
build - Build a local development |
The version 3 UI supports a configurable keymap. Below lists the general functionality and keycode of keys. Detailed information of the default keycode mappings can found here.
...
One among the new feature in this version of UI is it allows to change the focus color, background color and logo if an operator wishes to by making necessary changes in config.js. Default config.js for reference is as below.
| Code Block | ||
|---|---|---|
| ||
const themeOptions = {
    partnerOne: {
      hex: 0xfff58233,
      logo: 'RDKLogo.png',
      background: '0xff000000'
    },
    partnerTwo: {
      hex: 0xff91c848,
      logo: 'RDKLogo.png',
      background: '0xff000000'
    },
} |
User can define an object inside theme options which need three parameters:
hex - Color accents on the UI. Default one is shade of orange.
logo - Logo at the splash and top left side on the home screen.
background - background color of the components.
User has to export a specific theme for it to apply through the UI.
| Code Block | ||
|---|---|---|
| ||
export var CONFIG = {
    theme: themeOptions['partnerOne'],
    language: localStorage.getItem('Language')!=null ? language[localStorage.getItem('Language')] : language['english']
} |
This section details about how to customize the current UI source code and develop further.
Follow the commands to run the application on you laptop.
Type lng to confirm the installation. You will see the below output.
| Code Block |
|---|
$ npm install -g @lightningjs/cli $ lng Usage: index lightning-cli <command> [options] Options: -V, --version output the version number -h, --help display help for command Commands: create - Create a new Lightning App build - Build a local development version of the Lightning App serve - Start a local webserver and run a built Lightning App in a web browser watch - Watch for file changes and automatically rebuild the App dev - Build a local Lightning App, start a local webserver, run a built Lightning App in a web browser and watch for changes docs - Open the Lightning-SDK documentation dist [options] - Create a standalone distributable version of the Lightning App uploadserve - UploadStart thea Lightninglocal Appwebserver toand therun Metrologicala Backbuilt Office to be published in an App Store update - Update the Lightning-CLI to the latest version help [command] - display help for command |
Clone repo
| Code Block |
|---|
$ git clone "https://code.rdkcentral.com/r/components/opensource/RDK_apps"
$ cd RDK_apps
$ git checkout rdk-next
$ cd accelerator-home-ui
Note: if you are not able to launch offline UI, add .env file inside accelerator-home-ui/ and add 'LNG_BUNDLER=esbuild' to force the bundler. Make sure you have esbuild dependency (npm install esbuild)
$ npm install |
Build and Host
| Code Block |
|---|
$ lng build
$ lng serve |
App will be hosted on http://127.0.0.1:8080
The UI uses localstorage feature of WebkitBrowser's ResidentApp configuration for storing the user preferences. PLUGIN_RESIDENT_APP_LOCALSTORAGE and PLUGIN_RESIDENT_APP_PERSISTENTPATHPOSTFIX variables need to be configured build-time itself.
Note: the localstorage directory shall be pointed to a persistent ReadWrite section on device.
Packages that are needed for Accelerator UI v3 are from meta-rdk-video layer. They will get installed into the final rootfs with necessary startup and configuration scripts if the machine configuration is enabled with below mentioned DISTRO_FEATURES.
| Code Block |
|---|
$ DISTRO_FEATURES_append = " offline_apps build_rne " |
This section details the average loading time, CPU and memory utilization for this version of the UI alone. It has been measured by loading the offline version of the UI on a pre-activated webkitbrowser instance.
TBD
...
Lightning App in a web browser
  watch - Watch for file changes and automatically rebuild the App
  dev - Build a local Lightning App, start a local webserver, run a built Lightning App in a web browser and watch for changes
  docs - Open the Lightning-SDK documentation
  dist [options] - Create a standalone distributable version of the Lightning App
  upload - Upload the Lightning App to the Metrological Back Office to be published in an App Store
  update - Update the Lightning-CLI to the latest version
help [command] - display help for command |
Clone repo
| Code Block |
|---|
$ git clone "https://code.rdkcentral.com/r/components/opensource/RDK_apps"
$ cd RDK_apps
$ git checkout rdk-next
$ cd accelerator-home-ui
Note: if you are not able to launch offline UI, add .env file inside accelerator-home-ui/ and add 'LNG_BUNDLER=esbuild' to force the bundler. Make sure you have esbuild dependency (npm install esbuild)
$ npm install |
Build
| Code Block |
|---|
$ lng build |
Install as offline-app
| Code Block |
|---|
$ cd RDK_apps/accelerator-home-ui/dist/<es6>/Replace the dummy icons with original and then tar the entire contents to deploy on the offline UI location on device. |
Note: On a RDKV reference device; the lighttpd webserver is configured to load the offline UI from DOCROOT which includes the alias of the above dist file mapped for loading. Usually the dist directory contents are placed in the STB's /home/root/lxresui/
Host the app locally to test
| Code Block |
|---|
$ lng serve |
It will print the local url as : http://127.0.0.1:8080 which can be loaded as url to the residentApp.sh which is responsible for offline UI url loading on STB.
...
The UI uses localstorage feature of WebkitBrowser's ResidentApp configuration for storing the user preferences. PLUGIN_RESIDENT_APP_LOCALSTORAGE and PLUGIN_RESIDENT_APP_PERSISTENTPATHPOSTFIX variables need to be configured build-time itself.
Note: the localstorage directory shall be pointed to a persistent ReadWrite section on device.
Packages that are needed for Accelerator UI v3 are from meta-rdk-video layer. They will get installed into the final rootfs with necessary startup and configuration scripts if the machine configuration is enabled with below mentioned DISTRO_FEATURES.
| Code Block |
|---|
$ DISTRO_FEATURES_append = " offline_apps build_rne " |
This section details the average loading time, CPU and memory utilization for this version of the UI alone. It has been measured by loading the offline version of the UI on a pre-activated webkitbrowser instance.
TBD
| Platform | CPU (%‾) | Memory (MB‾) | Home page loading time [#menu] (in ms‾) |
|---|---|---|---|
| Raspberry Pi | |||
| Reference VA(IP) - HX44X | |||
| Reference VA(IP) - AH212 | 8000 | ||
| Reference VA(Hyb) - EKT |
To experience UIv3.X on a firebolt compliant RDK stack, below url can be used.
Current Stable Version(3.7): https://apps.rdkcentral.com/rdk-apps/accelerator-home-ui/index.html#splash
Previous Stable Version(3.6): https://apps.rdkcentral.com/rdk-apps/device-ui/index.html#splash
This section details the necessary platform integration support required to ensure the smooth functionality of UI version 3. Below are the details of RDKServices provided methods and notifications used in each UI feature or page implementation which shall aid debugging any functionality and integration or modification of the same. The Featured Video Player - UVE is used for Video-On-Demand sample streams.
| Functionality | Plugin | Method | Events |
|---|---|---|---|
| Launching Premium apps | org.rdk.RDKShell | launch | |
| Hide Resident App | org.rdk.RDKShell | setVisibility | |
| Hot Plug and Unplug of USB | org.rdk.UsbAccess | OnUSBMountChanged |
| Functionality | Plugin | Method | Events |
|---|---|---|---|
| Get Default Network Interface | org.rdk.Network | getDefaultInterface | |
| Test Internet Connection | org.rdk.Network | isConnectedToInternet | |
| Current IP settings | org.rdk.Network | getIpSettings | |
| Get Interfaces | org.rdk.Network | getInterfaces | |
| Get Connected SSIDs | org.rdk.Wifi | getConnectedSSID | |
| Set Default Interface | org.rdk.Network | setDefaultInterface | |
| Discover SSID | org.rdk.Wifi | startScan | |
| Stop Scan | org.rdk.Wifi | stopScan | |
| Connect to SSID | org.rdk.Wifi | connect | |
| Disconnect SSID | org.rdk.Wifi | disconnect | |
| Wifi State | org.rdk.Wifi | getCurrentState | |
| Enable/Disable Wifi | org.rdk.Wifi | setEnabled | |
| Paired SSIDs | org.rdk.Wifi | getPairedSSID | |
| Activate Wifi Plugin | Controller | activate | |
| Wifi state change | org.rdk.Wifi | onWifiStateChanged | |
| Error | org.rdk.Wifi | onError | |
| Available SSID | org.rdk.Wifi | onAvailableSSIDs | |
| Wifi state change | org.rdk.Wifi | onWifiStateChanged |
| Functionality | Plugin | Method | Events |
|---|---|---|---|
| Activate Bluetooth | Controller | activate | |
| Disable Bluetooth | org.rdk.Bluetooth | disable | |
| Enable Bluetooth | org.rdk.Bluetooth | enable | |
| Start Scan | org.rdk.Bluetooth | startScan | |
| Stop Scan | org.rdk.Bluetooth | stopScan | |
| Discovered Devices | org.rdk.Bluetooth | getDiscoveredDevices | |
| Paired Device | org.rdk.Bluetooth | getPairedDevice | |
| Connected Device | org.rdk.Bluetooth | getConnectedDevices | |
| Connect to Bluetooth device | org.rdk.Bluetooth | connect | |
| Disconnected to Bluetooth device | org.rdk.Bluetooth | disconnect | |
| Unpair a device | org.rdk.Bluetooth | unpair | |
| Pair a device | org.rdk.Bluetooth | pair | |
| Discovered Device | org.rdk.Bluetooth | onDiscoveredDevice | |
| Pairing Request | org.rdk.Bluetooth | onPairingRequest | |
| Connection Change | org.rdk.Bluetooth | onConnectionChange | |
| Discovery Complete | org.rdk.Bluetooth | onDiscoveryCompleted | |
| Discovery Started | org.rdk.Bluetooth | onDiscoveryStarted | |
| Request Failed | org.rdk.Bluetooth | onRequestFailed | |
| AutoPairing | org.rdk.RemoteControl | startPairing |
| Functionality | Plugin | Method | Events |
|---|---|---|---|
| Enable Display Setting plugin | Controller | org.rdk.DisplaySettings | |
| Get Resolution | org.rdk.DisplaySettings | getCurrentResolution | |
| Get HDCP Status | org.rdk.HdcpProfile | getHDCPStatus | |
| Get HRD Settings | DisplayInfo | hdrsetting | |
| Supported Resolutions | org.rdk.DisplaySettings | getSupportedResolutions | |
| Set Resolutions | org.rdk.DisplaySettings | setCurrentResolution |
| Functionality | Plugin | Method | Events |
|---|---|---|---|
| Sound mode | org.rdk.DisplaySettings | getSoundMode | |
| Supported Sound Modes | org.rdk.DisplaySettings | getSupportedAudioModes | |
| Set Sound Mode | org.rdk.DisplaySettings | setSoundMode |
| Functionality | Plugin | Method | Events |
|---|---|---|---|
| Set Power State | org.rdk.System | setPowerState | |
| Inactivity | org.rdk.RDKShell | onUserInactivity | |
| Inactivity Interval | org.rdk.RDKShell | setInactivityInterval | |
| Enable/Disable Inactivity Reporting | org.rdk.RDKShell | enableInactivityReporting |
| Functionality | Plugin | Method | Events |
|---|---|---|---|
| Get preferred Standby Mode | org.rdk.System | getPreferredStandbyMode | |
| Set preferred Standby Mode | org.rdk.System | setPreferredStandbyMode |
...
To experience UIv3.X on a firebolt compliant RDK stack, below url can be used.
Current Stable Version(3.6): https://apps.rdkcentral.com/rdk-apps/accelerator-home-ui/index.html#splash
Previous Stable Version(3.5): https://apps.rdkcentral.com/rdk-apps/device-ui/index.html#splash
This section details the necessary platform integration support required to ensure the smooth functionality of UI version 3. Below are the details of RDKServices provided methods and notifications used in each UI feature or page implementation which shall aid debugging any functionality and integration or modification of the same. The Featured Video Player - UVE is used for Video-On-Demand sample streams.
TBD: Need updation
...
OnUSBMountChanged
...
| Functionality | Plugin | Method | Events |
|---|---|---|---|
| Activate |
| USB Plugin | Controller (org.rdk.UsbAccess) | activate |
| Deactivate USB Plugin | Controller (org.rdk. |
| UsbAccess) | deactivate |
| Functionality | Plugin | Method | Events |
|---|---|---|---|
| Activate Xcast Plugin | Controller (org.rdk. |
| Xcast) |
| activate | |
| Deactivate Xcast Plugin | org.rdk. |
| Xcast |
| setEnabled |
| Functionality | Plugin | Method | Events |
|---|---|---|---|
| Activate CEC Plugin | Controller (org.rdk. |
| HdmiCec_2) | activate | |
| Deactivate CEC Plugin | Controller ( |
| org.rdk. |
| HdmiCec_2) | deactivate | |
| Check Enabled/Disabled | org.rdk. |
| HdmiCec_2 |
| getEnabled | |
| Set Enabled/Disabled | org.rdk. |
| HdmiCec_2 |
| setEnabled |
| PerformOtpAction | org.rdk. |
| HdmiCec_2 | performOTPAction |
| Functionality | Plugin | Method | Events |
|---|---|---|---|
| Serial Number | org.rdk. |
| System |
| getSerialNumber |
| System Version | org.rdk. |
| System | getSystemVersions | ||
| Activate OCDM Plugin | Controller (OCDM) | activate | |
| DRMs info | OCDM | drms | |
| Location info | LocationSync | location | |
| Device Info | DeviceIdentification | deviceidentification | |
| Location change | LocationSync | locationchange | |
| Firmware State | org.rdk. |
| System |
| getFirmwareUpdateState | |
| Downloaded Firmware Info | org.rdk. |
| System |
| getDownloadedFirmwareInfo | |
| Get Firmware Download Percentage |
| org.rdk. |
| System | getFirmwareDownloadPercent | |
| Update Firmware | org.rdk. |
| System |
| updateFirmware | |
| Reboot device | org.rdk. |
| System | reboot |
| Functionality | Plugin | Method | Events |
|---|---|---|---|
| Deactivate app | org.rdk. |
| RDKShell |
| destroy |
| Suspend app | org.rdk. |
| RDKShell |
| suspend | |
| Focus App |
| org.rdk. |
| RDKShell |
| setFocus | |
| Move app to top of zorder | org.rdk. |
| RDKShell | moveToFront | ||
| State change of application event | Controller | statechange | |
| Add key intercepts | org.rdk. |
| RDKShell |
| addKeyIntercept |
| Functionality | Plugin | Method | Events |
|---|
| Activate Xcast Plugin | Controller (org.rdk. |
| Xcast) |
| activate |
| Deactivate Xcast Plugin | Controller (org.rdk. |
| Xcast) |
| deactivate | |
| Enable/Disable Xcast Status | org.rdk. |
| Xcast |
| getEnabled | |
| Set Enable/Disable |
| Xcast Status | org.rdk. |
| Xcast |
| setEnabled | |
| Notify Application State |
| org.rdk. |
| Xcast |
| onApplicationStateChanged | |
| Launch Request event | org.rdk. |
| Xcast |
| onApplicationLaunchRequest | |
| Hide Request event |
| org.rdk. |
| Xcast |
| onApplicationHideRequest | |
| Resume Request event |
| org.rdk. |
| Xcast |
| onApplicationResumeRequest | |
| Stop Request event |
| org.rdk.Xcast |
| onApplicationStopRequest | |
| State Request event | org.rdk.Xcast |
| onApplicationStateRequest |
| Functionality | Plugin | Method | Events |
|---|
| Creates a symbolic link | org.rdk.UsbAccess | createLink | |
| Clears or removes the symbolic link | org.rdk. |
| UsbAccess | clearLink | |
| Gets a list of files and folders |
| org.rdk. |
| UsbAccess | getFileList | |
| Gets a list of files and folders | org.rdk. |
| UsbAccess |
| getFileList | |
| Triggered when a USB drive is mounted or unmounted | org.rdk. |
...
...
| UsbAccess | onUSBMountChanged |
| Functionality | Plugin | Method | Event |
|---|---|---|---|
| Get available countries | DTV | numberOfCountries | |
| Get list of country | DTV | countryList | |
| Get list of services(channels with name, uri and other details) | DTV | serviceList@dvbs | |
| Get list of available satellites | DTV | serviceList@dvbs | |
| Initiates a service search | DTV | startServiceSearch | |
| Get available services | DTV | numberOfServices | |
| Get schedule for given channel | DTV | scheduleEvents@PARAMS | |
| Get current and next event details for channel | DTV | nowNextEvents@PARAMS |
Functionality | Plugin | Method | Events |
Returns an array of available HDMI Input ports | org.rdk.HdmiInput | getHDMIInputDevices | |
Provides access to the current configured video output port resolution. | PlayerInfo.1.resolution (read only ) | ||
Activates the specified HDMI Input port as the primary video source. | org.rdk.HdmiInput | startHdmiInput | |
Deactivates the HDMI Input port currently selected as the primary video source. | org.rdk.HdmiInput | stopHdmiInput | |
Triggered whenever the status changes for an HDMI Input. | org.rdk.HdmiInput | onInputStatusChanged | |
Triggered whenever a new HDMI device is connected to an HDMI Input. | org.rdk.HdmiInput | onDevicesChanged | |
Triggered whenever the signal status changes for an HDMI Input. | org.rdk.HdmiInput | onSignalChanged |
Functionality | Plugin | Method | Events |
Get/Set Supported Picture Modes | org.rdk.tv.ControlSettings | setSupportedPictureModes / getSupportedPictureModes | |
Get/Set Picture Modes | org.rdk.tv.ControlSettings | setPictureMode / getPictureMode | |
Get/Set Brightness | org.rdk.tv.ControlSettings | setBrightness / getBrightness | |
Get/Set Contrast | org.rdk.tv.ControlSettings | setContrast / getContrast | |
Get/Set Sharpness | org.rdk.tv.ControlSettings | setSharpness /getSharpness | |
Get/Set Color Temperature | org.rdk.tv.ControlSettings | setColorTemperature /getColorTemperature | |
Get/Set Saturation | org.rdk.tv.ControlSettings | setSaturation /getSaturation | |
Get/Set Backlight | org.rdk.tv.ControlSettings | setBacklight /getBacklight | |
Reset Values | org.rdk.tv.ControlSettings | resetBrightness / resetContrast / resetSharpness / resetColorTemperature / resetSaturation / resetBacklight |
Functionality | Plugin | Method | Events |
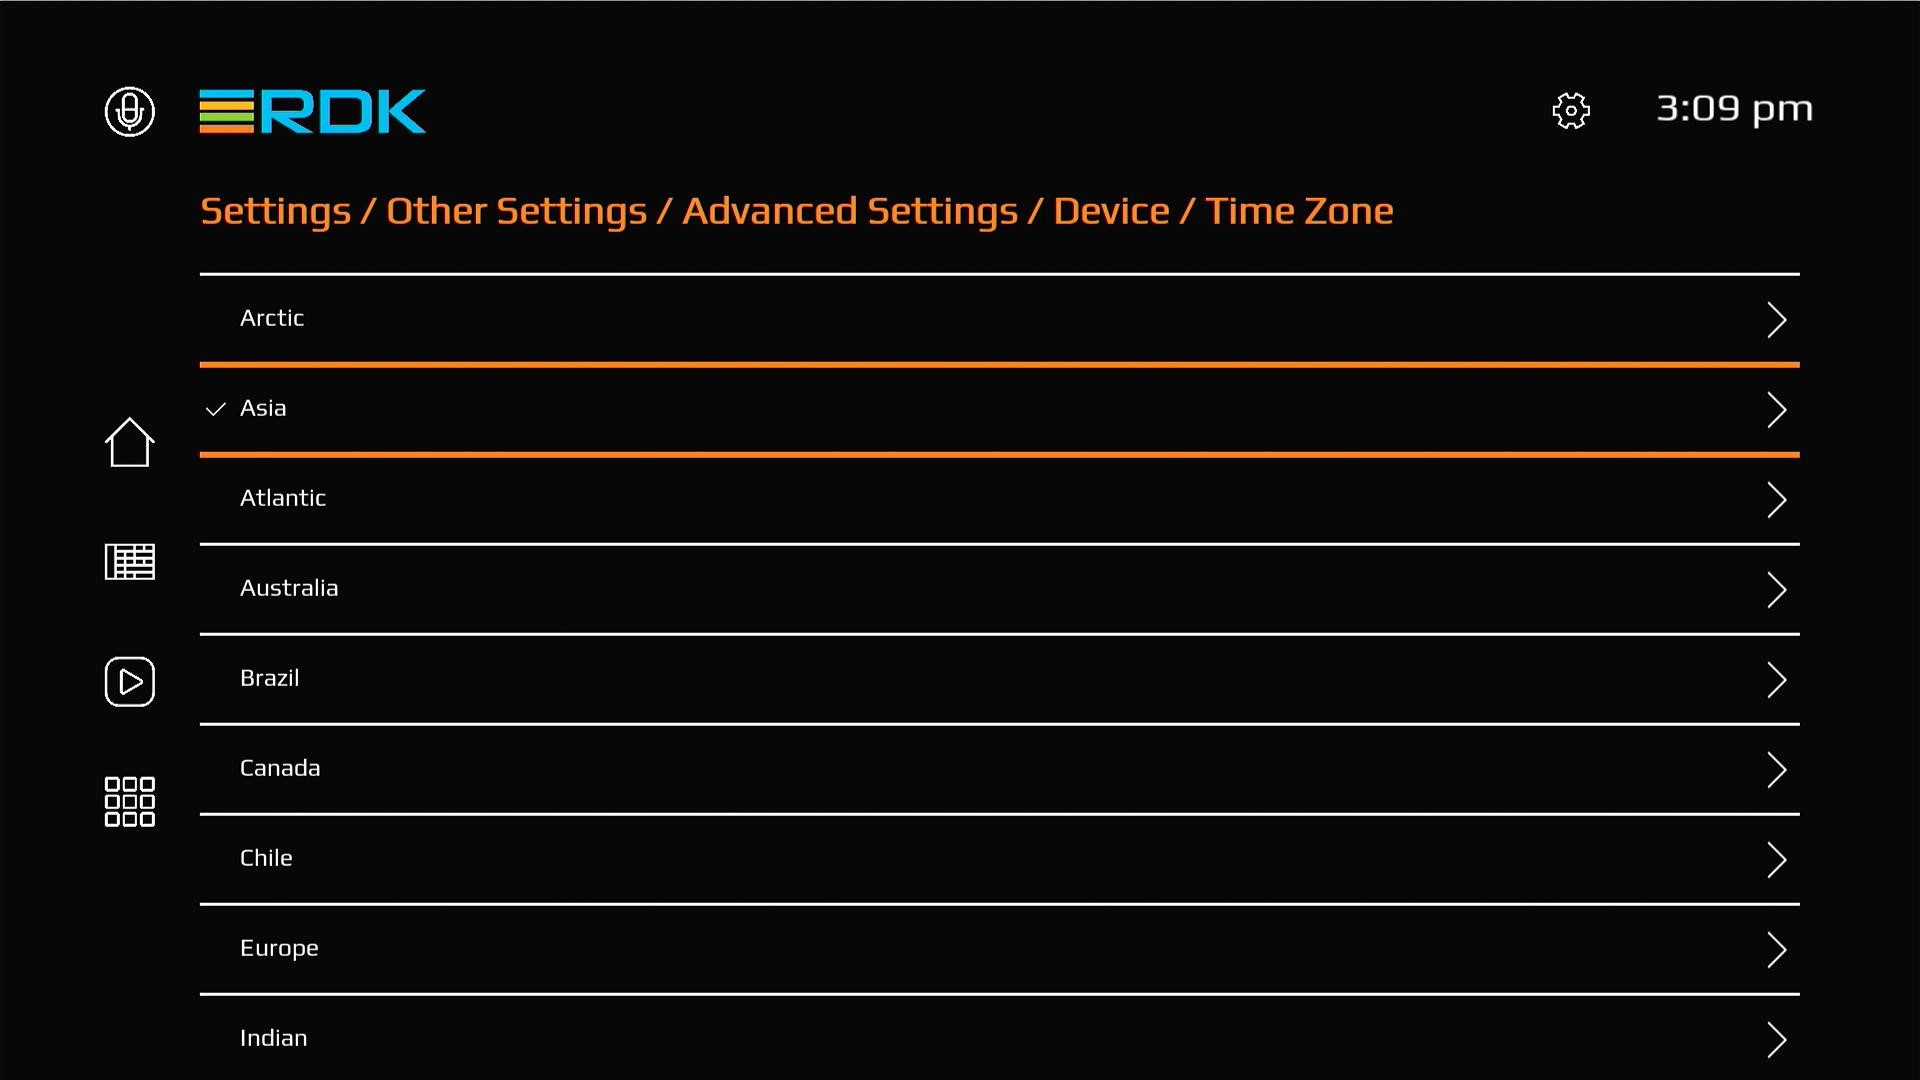
Gets the available timezones from the system’s time zone database | org.rdk.System | getTimeZones | |
Get the configured time zone from the file | org.rdk.System | getTimeZoneDST | |
Sets the system time zone | org.rdk.System | setTimeZoneDST |
...
...
Functionality | Plugin | Method | Events |
Returns connected audio output ports | org.rdk. |
DisplaySettings |
getConnectedAudioPorts |
Returns the current volume level | org.rdk. |
DisplaySettings |
getVolumeLevel | |
Returns whether audio is muted on a given port | org.rdk. |
DisplaySettings |
getMuted | |
Adjusts the Volume Level on a specific port | org.rdk. |
DisplaySettings |
setVolumeLevel | |
Mutes or unmutes audio on a specific port | org.rdk. |
DisplaySettings |
setMuted |