RDK Resources
[*RDK Preferred*]
Code Management Facility
RDK Forums
[RDK Conferences]
RDK Support
Archives
Papers & Presentations Archive![]()
Papers & Presentations Archive![]()
...
RDK Emulator does not support all components of RDK 2.0 stack .Currently RDK Emulator supports mediaframework, media-streamer, recorder, RDK-Browser and RDK-Logger, XRE components.
...
Abbreviation/Acronym | Description | |
RDK | Reference Development Kit | |
VM | Virtual Machine | |
VBox | Virtual Box | |
QAM | Quadrature Amplitude ModulationDVR | |
Digital Video Recorder | STB | Set Top Box |
TSB | Time Shift Buffer | |
XRE | Cross-Platform Runtime Environment | |
HDD | Hard Disk Drive | |
EOS | End of Stream | |
SPTS | Single Program Transport Stream | |
MPTS | Multi-Program Transport Stream | |
UPNP | Universal Plug and Play |
...
Build Types | RDK Components Involved | Features/Applications Supported | Final Image Name | Startup Application |
RDK Mediaclient |
|
| rdk-generic-mediaclient-image-qemux86.vmdk | RDK-Browser |
RDK Hybrid |
|
| rdk-generic-hybrid-image-qemux86.vmdk | RDK-Browser |
...
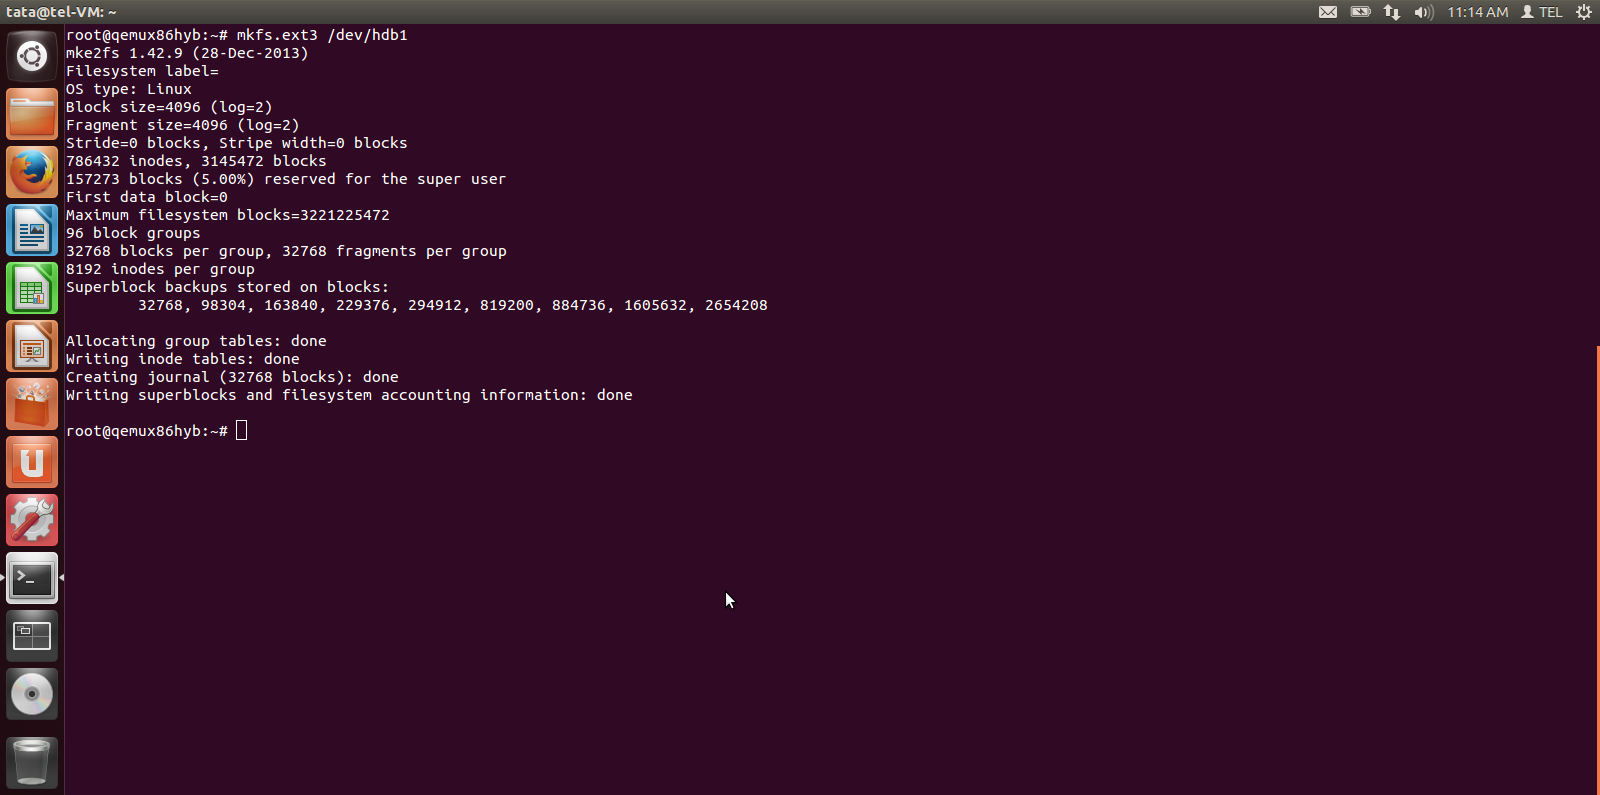
| $ mkfs.ext3 /dev/hdb1 |
|---|
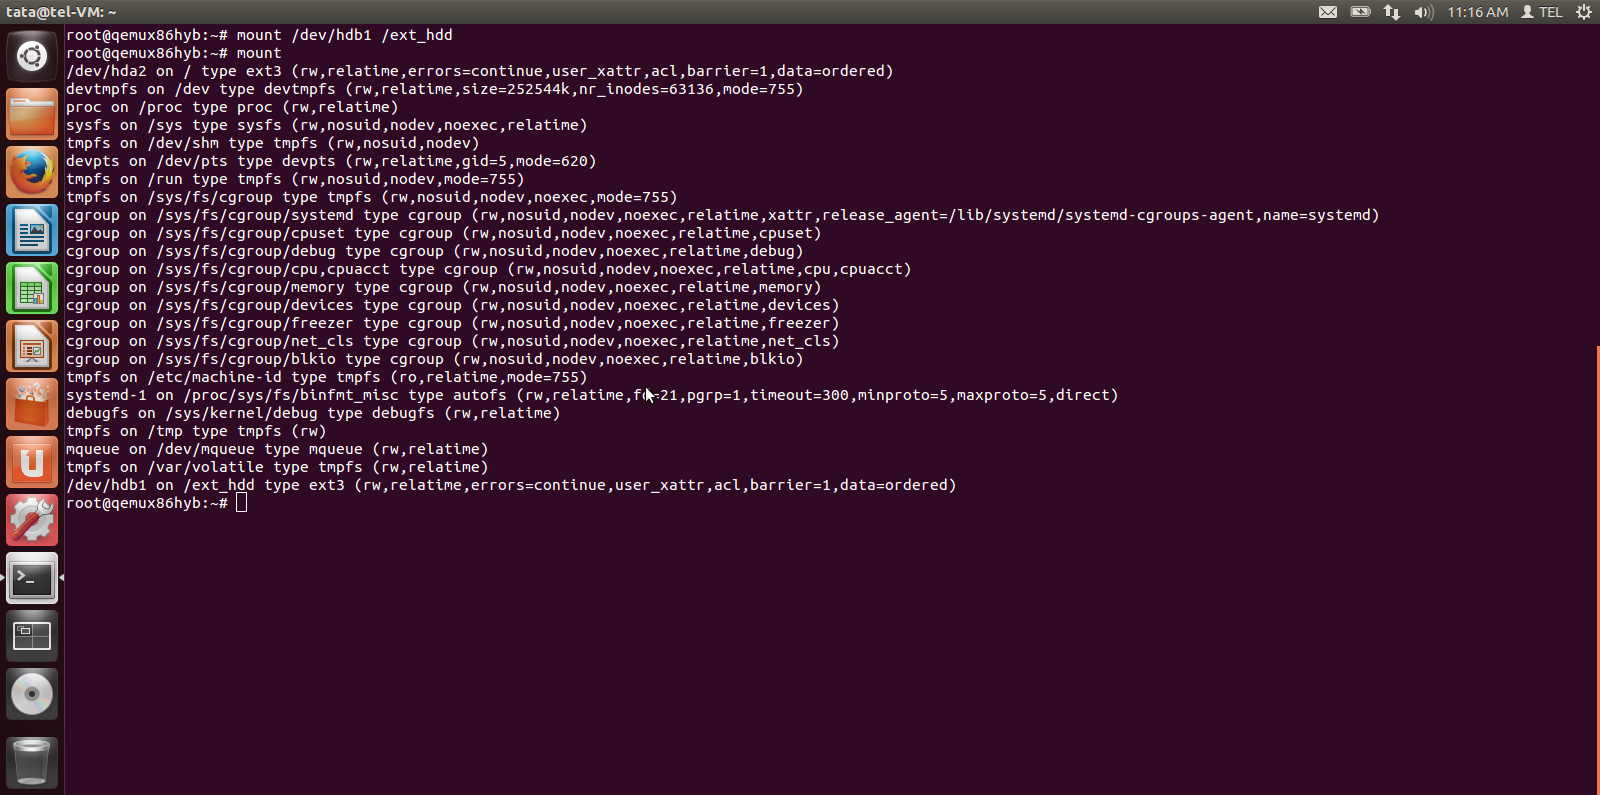
$ mkdir /ext_hdd $ mount /dev/hdb1 /ext_hdd |
|---|
| $ scp <your_spts_file_name>.ts root@<your_emulator_vm_ip>:/ext_hdd |
|---|
| $ ln -sf /ext_hdd/<your_spts_file_name> <your_spts_file_name> |
|---|

As described in the previous section, you can log in to your emulator VM from your Host Machine using the ssh command.
| $ ssh root@x.x.x.x |
|---|
Note: In order to learn the IP address of your VM, use the RDK Browser application “tab” key to navigate to "Device Info" which will provide you the IP address. Press "Enter" key to enter Device Info
The rmfApp application is supported for all build types. Once you SSH into your emulator VM, you can play a video stream located at a url using a source and a sink.
rmfApp is located in the folder: /usr/bin on your emulator VM
Navigate to the folder /usr/bin and run rmf App using command ./rmfApp. After the initial log statements when the rmfApp starts up, press "Enter" key to get the rmfApp prompt - "rmfApp>"
root@qemux86:~# rmfApp [-source SOURCE] [-sink SINK] [other options] url
SOURCE can be: hnsource,dvrsource ,qamsource
SINK can be: mediaplayersink dvrsink
Other options include:
• -recordingId <id>: id of recording to create where <id> is a decimal number
• -recordingTitle <title>: title of recording
Before using rmfApp, it will be better to terminate rdkbrowser as it may impact the performance of playback. You may use the systemctl command to terminate rdkbrowser as shown below.
| $ systemctl stop rdkbrowser.service |
|---|
rmfApp is located in the directory /usr/bin. Navigate to the directory containing the rmfApp:
| $ cd /usr/bin |
|---|
Launch RMF App using the command below:
| $ ./rmfApp |
|---|
Once the app is launched, press enter again to get the prompt "rmfApp->":
| $ rmfApp-> |
|---|
| NOTE: |
Note 1: There is an additional step required prior to using the emulator because it is built without the gsttee module in gst-plugins-rdk: Before invoking rmfapp, it is necessary to set the environment variable 'USE_GENERIC_GSTREAMER_TEE' to 'TRUE', so that mediaframework uses the generic gsttee that is built from Open Source gstreamer: example : root@qemux86hyb-morty:/usr/bin# export USE_GENERIC_GSTREAMER_TEE=TRUE root@qemux86hyb-morty:/usr/bin# ./rmfApp Note 2: In the streaming scenario it is necessary to kill the rmfStreamer process on the hybrid image, which is started automatically, and invoke it manually as illustrated below : Streaming Scenario : Hybrid : barracuda:~> ssh root@193.120.91.104 root@qemux86hyb-morty:/# root@qemux86hyb-morty:/# export USE_GENERIC_GSTREAMER_TEE=TRUE root@qemux86hyb-morty:/# cd /usr/bin root@qemux86hyb-morty:/usr/bin# ps -aef | grep rmf root@qemux86hyb-morty:/usr/bin#kill -9 <pid> root@qemux86hyb-morty:/usr/bin# ./rmfStreamer IP Client : barracuda:~> ssh root@193.120.91.132 root@qemux86mc-morty:/# root@qemux86mc-morty:/# export USE_GENERIC_GSTREAMER_TEE=TRUE root@qemux86mc-morty:/# cd /usr/bin root@qemux86mc-morty:/usr/bin# ./rmfApp rmfApp->launch -source hnsource -sink mediaplayersink http://193.120.91.104:8080/vldms/tuner?ocap_locator=ocap://0x125d |
In a simulated live playback, the following rmfApp command maybe used to playback the local SPTS video file:
launch -source qamsource -sink mediaplayersink ocap://0x125d
Where
| $ rmfApp-> launch –source qamsource –sink mediaplayersink ocap://0x125d |
|---|
launch –source hnsource –sink mediaplayersink http://127.0.0.1:50050/received_spts1.ts
Where
| $ rmfApp-> launch –source hnsource –sink mediaplayersink http://127.0.0.1:50050/received_spts1.ts |
|---|
In a simulated live playback, the following rmfApp command maybe used to playback the local SPTS video file:
launch –source hnsource –sink mediaplayersink http://<HYBRID IP>:8080/vldms/tuner?ocap_locator=ocap://0x125d
Where
| $ launch –source hnsource –sink mediaplayersink http://<HYBRID IP>:8080/vldms/tuner?ocap_locator=ocap://0x125d |
|---|
RDK recordings on the Hybrid device are created from a cloud-based scheduler using json messages. Once the recordings are created, the rmfApp on the media client device can be used to playback the newly recorded media content.
This section outlines the use case:
Step 1: Preconditions / Prerequisites:
mkdir -p /ext_hdd/data ln -sf /ext_hdd/data /opt/data |
|---|
Note: The above directory and the soft link needs to be in place each time before scheduling recordings.
Your recordings will get created in the following path on the Hybrid VM:
/opt/data/OCAP_MSV/0/0/DEFAULT_RECORDING_VOLUME/dvr /opt/data/OCAP_MSV/0/0/DEFAULT_RECORDING_VOLUME/dvr/chunks |
|---|
If there is a media file created in the /chunks folder above, then the recordings have been successfully created.
Step 2: Launching rmfStreamer on Hybrid VM
There are multiple scripts in the folder /usr/bin. There are two scripts for launching rmfStreamer:
Note that the name of each file is similar apart from the usage of upper case and lowercase "s" in each file name.
Launch rmfStreamer using the script: rmfstreamer
cd /usr/bin/ sh rmfstreamer |
|---|
if you run in into issues accessing rmfstreamer, then change the access permissions of file appropriately:
chmod 777 rmfstreamer |
|---|
Once rmfStreamer starts, you will see log print statements on the console.
Step 3: Start playback of recorded content on Hybrid emulator from your Media Client emulator
Now you can playback from the media client using the rmfApp on the media client VM using the following sample commands:
cd /usr/bin ./rmfApp rmfApp> launch -source hnsource -sink mediaplayersink http://<hybird_vm_ip>:8080/vldms/dvr?rec_id=6 |
|---|
Note: Where the recording id is "6" as set in the schedule.json message from the server. Users may write a small application to simulate the scheduler server json messages.
RDK emulator supports westeros compositor and renderer module as westeros-renderer-gl
| Code Block | ||
|---|---|---|
| ||
# To build the same for different build types, use the below command #Hybrid MACHINE=qemux86hyb-morty source meta-cmf/setup-environment bitbake rdk-generic-hybrid-wpe-image |
To test WPE image from the VM console
1)Boot the VM in NAT mode and ssh in to the VM to get the console as mentioned above.
ex: ssh -p 2222 root@localhost
2)Then type the following command
To support westeros surface width and height are HD so emulator need to set HD resolution
To enable support for 1280x720 resolution in emulator please follow the steps mentioned in this page.
This will help us in adding custom resolution in Virtual Box.
1) ssh login to the Emulator
Westeros compositor will run automatically in startup of Emulator image
run following commands in terminal for manual starting the compositor on Emulator if needed
| Code Block | ||
|---|---|---|
| ||
$ mkdir -p /run/user/0 $ export XDG_RUNTIME_DIR=/run/user/0/ $ westeros --renderer <renderer module> --display <socket-name> & $ westeros --renderer /usr/lib/libwesteros_render_gl.so.0.0.0 --display WPE & $ gdisplay start $ export WAYLAND_DISPLAY=WPE |
westeros compositor will launch
to test westeros compositor with simple egl test apliaction
run westeros_test
| Code Block | ||
|---|---|---|
| ||
# After Launching westeros compositor in emulator $ export XDG_RUNTIME_DIR=/run/user/0/ $ export WAYLAND_DISPLAY=WPE $ westeros_test (or) $ westeros_test --display WPE |

| Code Block | ||
|---|---|---|
| ||
$ export XDG_RUNTIME_DIR=/run/user/0/ $ export WAYLAND_DISPLAY=WPE #Check the plugin in image $ gst-inspect-1.0 westerossink # To play the video and render on westeros compositor $ gst-launch-1.0 playbin uri=http://localhost:50050/received_spts1.ts videosink=westerossink |
ssh to emulator VM terminal run following commands
| Code Block | ||
|---|---|---|
| ||
$ export XDG_RUNTIME_DIR=/run/user/0/ $ export WAYLAND_DISPLAY=WPE $ WPElancher <http url > Ex: WPELauncher http://easyhtml5video.com |

| Code Block | ||
|---|---|---|
| ||
$ export XDG_RUNTIME_DIR=/run/user/0/ $ export WAYLAND_DISPLAY=WPE $ WPELauncher http://www.youtube.com/tv |


Note: Video Positioning is not proper with the present video sink so positioning is not setting properly as of now in Emulator. We will update it once it is done**
1)Boot the VM in NAT mode and ssh in to the VM to get the console.
ex: ssh -p 3022 root@localhost
2)To check the closedcaption in rmfapp start the rmfapp and launch a 5)To pause and play the video after launching the video as shown below
ex: cd /usr/bin; ./ rmfApprmfApp->launch -source hnsource -sink mediaplayersink http://127.0.0.1:50050/received_spts1.ts
now you will be able to see ccdata displayed on sccsreen

3)To enable or disable closedcaption rendering in rmfApp user “e” or “enable” to enable closedcaption and “d” or “disable” to disable the closedcaption
ex: rmfApp->d
rmfApp->p (To Pause the video)
expected output: Stop the playing video also expexted output: closedcaption rendering should stop on screen.

To
enable closedcaption againresume the video paused type the command "
ep" again in rmfapp as shown below.
rmfApp->e>p (To play the video)
expected output: Closedcaption rendering should start on screen
4)To show and hide the closedcaption after enabling the cc rendering user “s” or “show” tp show the cc window and “h” or “hide” to hide the cc window
example: rmfApp->h
expected output: CC window should not be visible on screen

To show the closedcaption again type the command "s" in rmfapp as shown below.
rmfApp->s
expected output: CC window should be visible on screen.

5)To pause and play the video after launching the video as shown below
ex: rmfApp->launch -source hnsource -sink mediaplayersink http://127.0.0.1:50050/received_spts1.ts
rmfApp->p (To Pause the video)
expected output: Stop the playing video also closedcaption rendering should stop
To resume the video paused type the command "p" again in rmfapp as shown below.
rmfApp->p (To play the video)
expected output: Video playing should resume and closedcaption rendering aswell.

Video playing should resume and closedcaption rendering aswell.
6)To test for the video playing with tsb do as shown below.
Ex: rmfApp-> launch -source hnsource -sink mediaplayersink -tsb http://127.0.0.1:8080/vldms/tuner?ocap_locator=ocap://0x125d&tsb=60
rmfApp->p (to pause the video)
expected output: The video playing should stop and cc rendering aswell.
rmfApp->l (to switch to live)
expected output: Video should switch back to live and cc rendering should resume
...