RDK Resources
[*RDK Preferred*]
Code Management Facility
RDK Forums
[RDK Conferences]
RDK Support
Archives
Papers & Presentations Archive![]()
Papers & Presentations Archive![]()
...
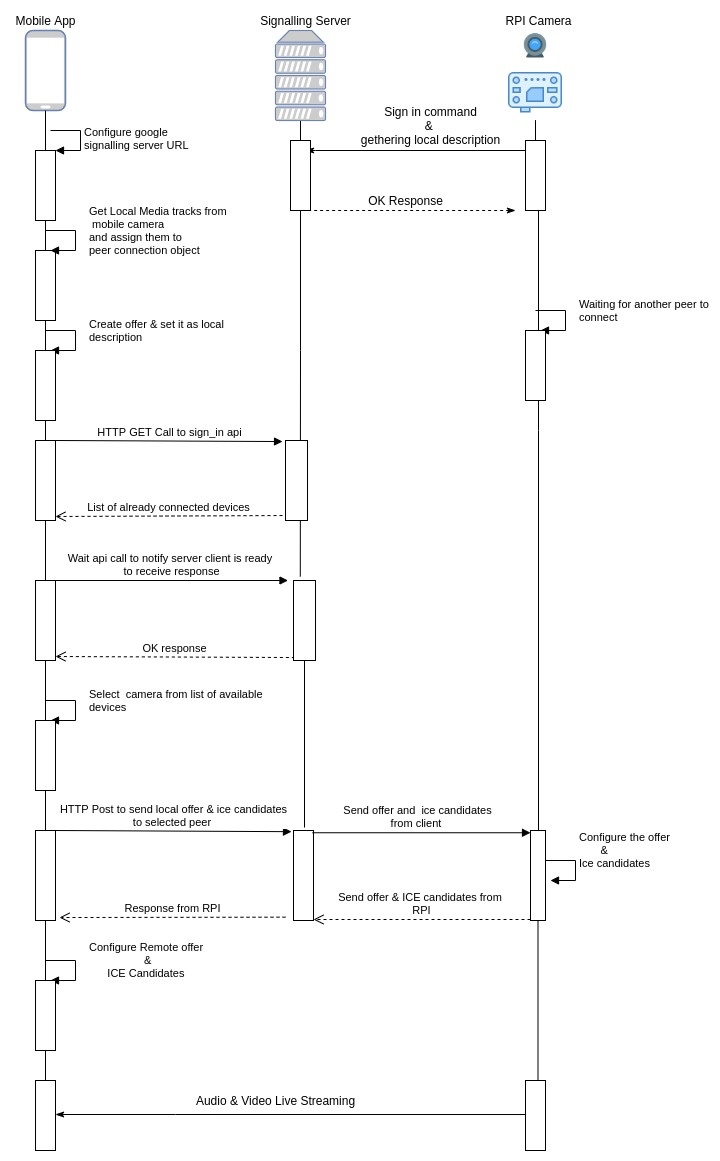
The two WebRTC Agents now know enough details to attempt to connect to each other. WebRTC then uses another established technology called ICE. ICE (Interactive Connectivity Establishment) is a protocol that pre-dates WebRTC. ICE allows the establishment of a connection between two Agents. These Agents could be on the same network, or or on the other side of the world. ICE is the solution to establishing a direct connection without a central server. The real magic here is ‘NAT Traversal’ and STUN/TURN Servers. These two concepts are all you need to communicate with an ICE Agent in another subnet. Once ICE successfully connects, WebRTC WebRTC then moves on to establishing an encrypted transport. This transport is used for audio, video, and data.
...
Now that we have bi-directional communication (via ICE) we need to establish secure communication. This is done through two protocols that pre-date WebRTC. The first protocol is DTLS (Datagram Transport Datagram Transport Layer Security) which is just TLS over UDP. TLS is the cryptographic protocol used to secure communication over HTTPS. The second protocol is SRTP (Secure Real-time Transport Protocol). FirstTransport Protocol). First, WebRTC connects by doing a DTLS handshake over the connection established by ICE. Unlike HTTPS, WebRTC doesn’t use a central authority for certificates. WebRTC WebRTC then uses a different protocol for audio/video transmission called RTP. We secure our RTP packets using SRTP. We initialize our SRTP session by extracting the keys from the negotiated DTLS negotiated DTLS session.
We now have two WebRTC Agents with secure bi-directional communication. we use two pre-existing protocols: RTP (Real-time Transport Protocol), and SCTP (Stream Control Transmission ProtocolTransmission Protocol). Use RTP to exchange media encrypted with SRTP, and use SCTP to send and receive DataChannel messages encrypted with DTLS.
...

To view live streaming video from rpi-camera in your mobile mobile you need to follow the below steps
Step 1: Please download the app-release.apk and install in your android device
Step 2: Please follow the steps from this URL to start R-PI camera client and peer connection server
Step 3: After successful completion of step 2, Navigate to Open_WebRTC/openwebrtc-m72/out/Default and ./peerconnection_server hit Enter to start the server
Step 4: SSH into R-PI and enter "./peerconnection_client" which asks for the server IP & Enter Server IP (Your machine IP where peerconnection_server is running) and port number as 8888.
| Console |
|---|
| root@raspberrypi3-rdk-camera:~# peerconnection_client Inside constructor CustomSocketServer()..... Initialized thread... "Registering PeerConnectionClient::RegisterObserver()" Enter server IP Address |
Step 5: Open your mobile app and click on scan in live-feed page to get the list of cameras in your network.
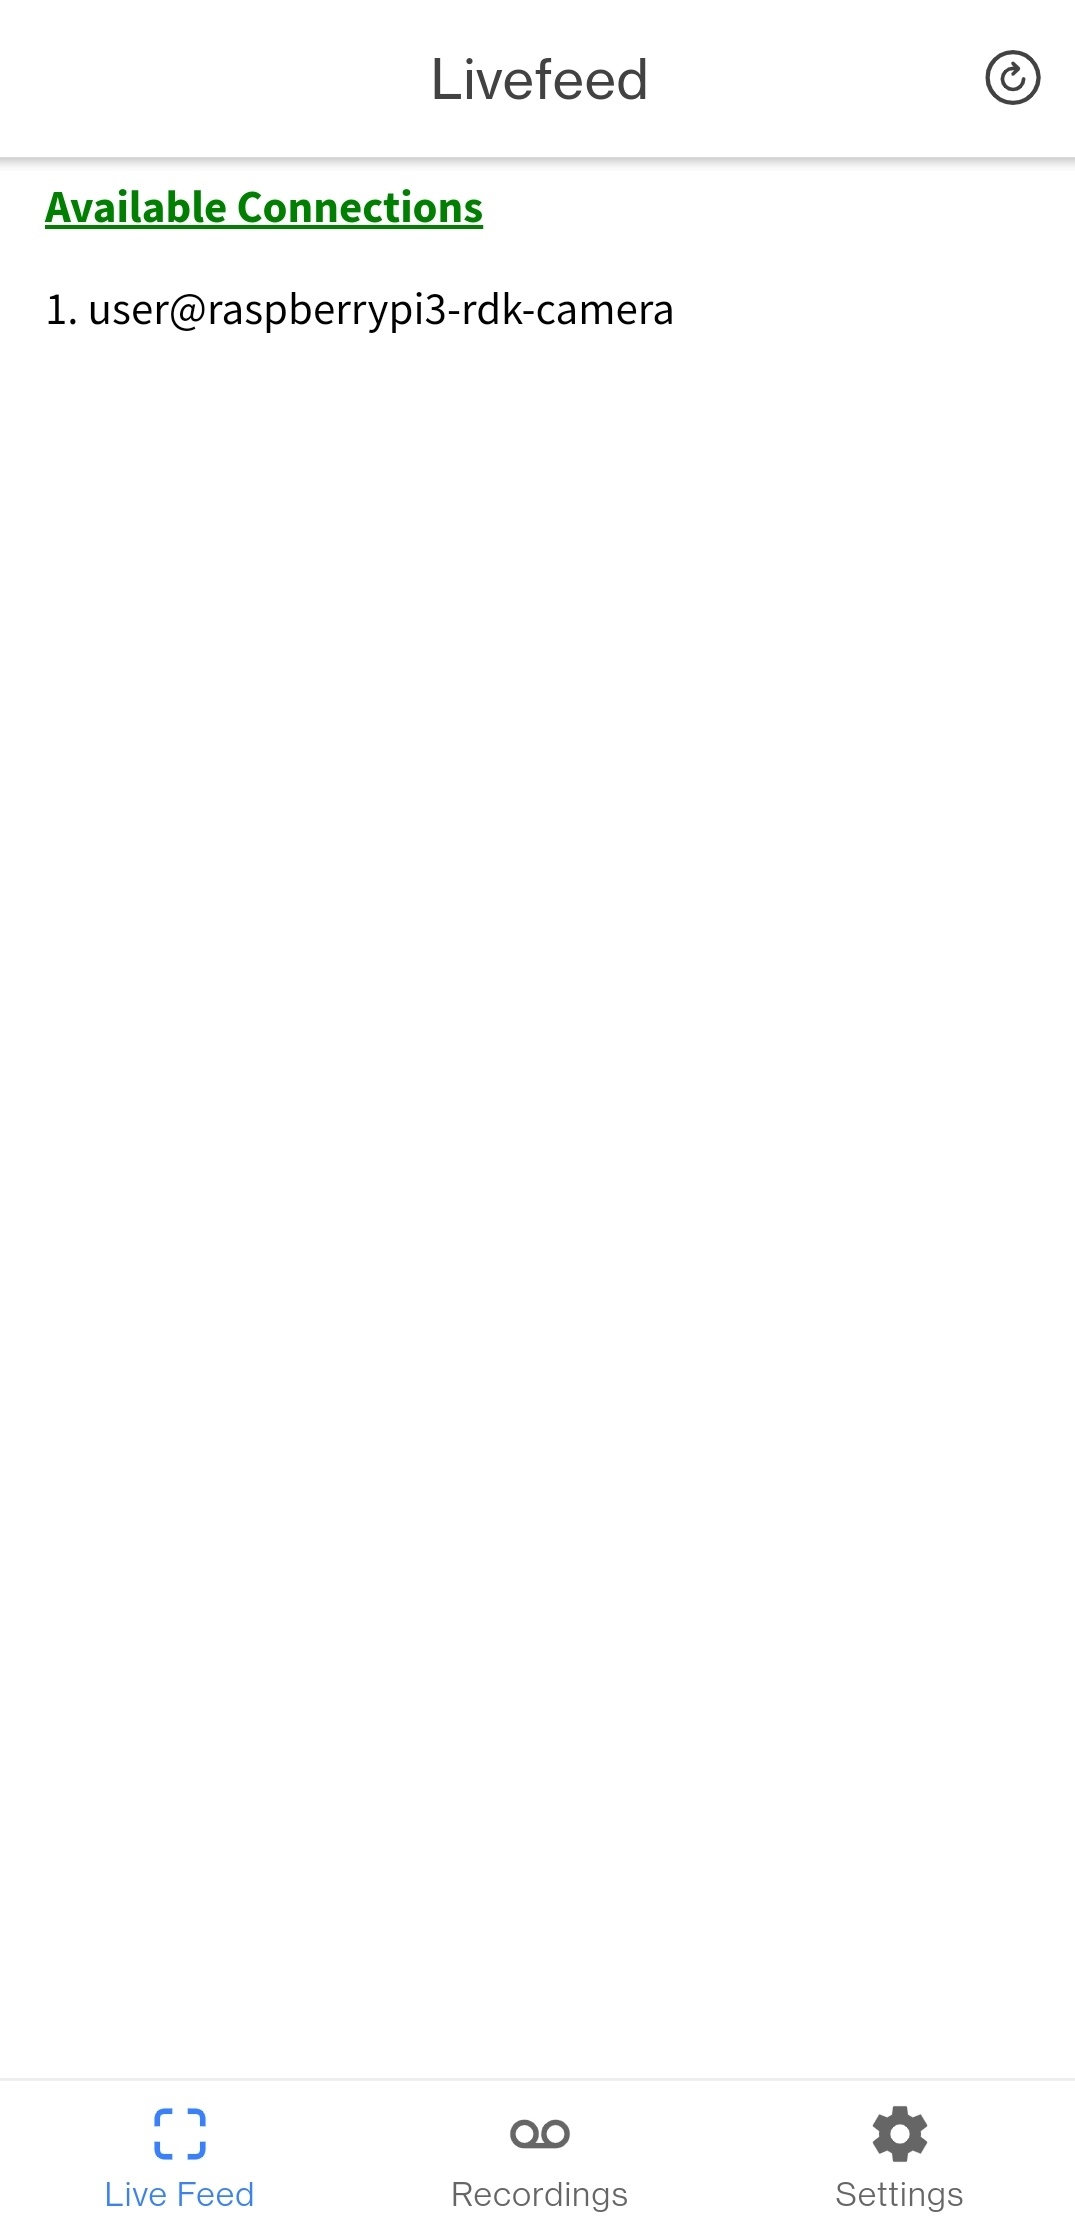
Step 6: Select the camera you want to watch the live feed.
Note: Make sure your R-PI board and mobile app should be in the same network.
Following are the mobile application features.
...
Sign-In: User should enter valid email and password to sign in into the application. Click register to register new user.

Sign-up: User should enter valid details then click sign up to register into the application.

Live Feed:Contains the Populates list of available cameras which are registered under the login user. Camera list contains Camera Nick Name, IP address and Camera running status (Red - Offline, Green - Online, Blue - Powering up).

Connection Setup: User should enter valid camera IP address and camera reference name and click on 'Connect' to view the live feed from specific RDK - Camera.
in your network which are connected to server and ready to stream the content
Note: To view the list of available cameras in the network user should configure the Server IP and Port in Settings tab > Server IP option
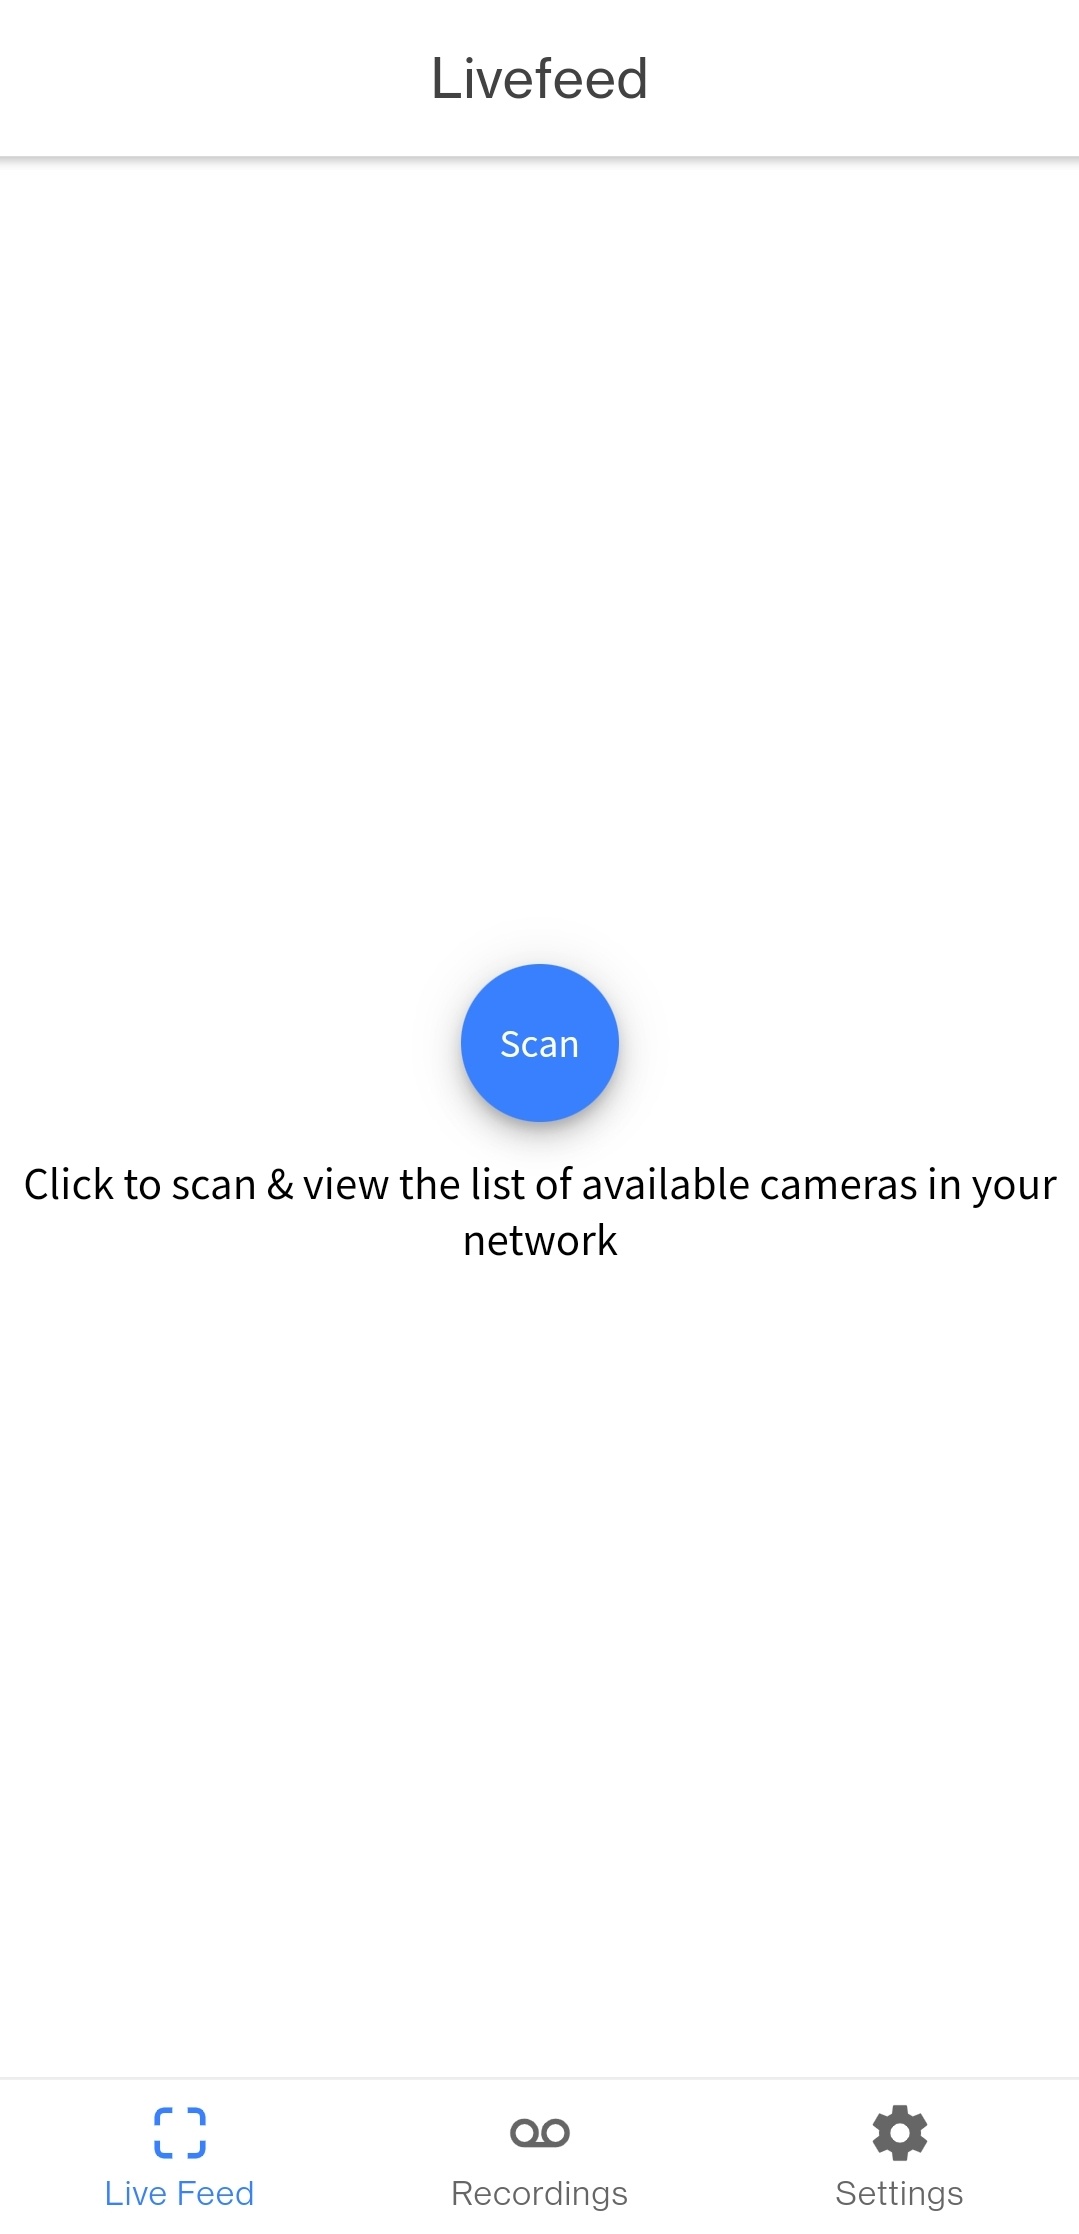

LiveFeed: Lists the available camera connections in your network. Click on any camera name to view the live streaming
Live Streaming: Playing live streaming video from rpi camera in the mobile app


Recordings: In this user can select the specific option such as today, last week and custom range to view the list of recordings stored in the cloud under logged in user id or user name. For custom user should suppose to select start and end date to get the list of recordings. In the list of recordings user can able to see the recording name, recording date and duration of recording.


Settings: From settings user can able to edit :
 
