RDK Resources
[*RDK Preferred*]
Code Management Facility
RDK Forums
[RDK Conferences]
RDK Support
Archives
Papers & Presentations Archive![]()
Papers & Presentations Archive![]()

![]()
...
Copyright 2015 2023 RDK Management, LLC. All rights reserved.
...
Document Control Number | D10-20141105 |
Document Title | RDK Emulator Users Guide |
Version | D05 |
Date | 20152022/0212/2310 |
Status | Issued (I) |
Distribution | RDK licensees & Preferred ASP Members |
...
The RDK emulator is an x86 based implementation of the RDK software stack. It is primarily targeted towards the RDK development community (integrators, component developers and application developers) that attempts to simplify the process of working with the RDK software stack without the need for a reference hardware platform. The key applications in the RDK Emulator are the rmfApp, Media streamer and the RDK-Browser. As RDK emulator runs on desktop computers, applications can be tested and debugged before trying to deploy them to real devices.
...
RDK Emulator does not support all components of RDK 24.0 stack. Currently RDK Emulator supports media-streamer, RDK-Browser and RDK-Logger, XRE componentsthere is no startup UI, system boots up in console mode.
...
...
The following table describes the The following table describes the acronyms and abbreviations used in this document
Abbreviation/Acronym | Description | |
RDK | Reference Development Kit | |
VM | Virtual Machine | |
VBox | Virtual BoxQAM | |
Quadrature Amplitude Modulation | STB | Set Top Box |
XRE | Cross-Platform Runtime Environment | |
HDD | Hard Disk Drive | |
EOS | End of Stream | |
SPTS | Single Program Transport Stream | |
MPTS | Multi-Program Transport Stream | |
UPNPUPNP | Universal Plug and Play |
...
...
...
Build Types | Build Types | RDK Components Involved | Features/Applications Supported | Final Image Name | Startup Application |
RDK RDKV Mediaclient |
|
|
| rdk-generic-mediaclient-image-qemux86.vmdk | RDK-Browser |
RDK Hybrid |
|
| rdk-generic-hybrid-image-qemux86.vmdk | RDK-Browser |
ResidentApp |
...
...
How to Build#SettinguptheHostEnvironment
...
...
...
Host Requirements
| Requirement | Remarks |
|---|---|
| Linux | 32 64 bit Ubuntu 1618.04 operating system |
| Free HDD Space | Minimum 100GB Free Memory |
| Oracle Virtual Box | 46.3.18 1 or higher |
Install OS - Ubuntu 16.04
The instructions provided below are meant to be executed via the command line on an Ubuntu machine:
Install the following packages for setting up your host VM:
$ sudo apt-get install build-essential gettext bison libfile-slurp-perl gawk libncurses-dev autoconf flex doxygen libtool automake libpcre3-dev zlib1g-dev libbz2-dev subversion minicom putty libssl-dev rpm python-pexpect python-svn python-argparse vim tofrodos meld dos2unix cmake uuid-dev ruby transfig libglib2.0-dev xutils-dev lynx-cur gperf autopoint python-dulwich python-dev curl vim diffstat texinfo chrpath openjdk-7-jre
Configure bash as default command interpreter for shell scripts:
$ sudo dpkg-reconfigure dash
Select “No”
To choose bash, when the prompt asks if you want to use dash as the default system shell - select “No”
Also install the below list of packages for Yocto build:
$ sudo apt-get install sed wget cvs subversion git-core coreutils unzip texi2html texinfo libsdl1.2-dev docbook-utils gawk python-pysqlite2 diffstat help2man make gcc build-essential g++ desktop-file-utils chrpath libgl1-mesa-dev libglu1-mesa-dev mercurial autoconf automake groff
Configure Git:
Upgrade your Git version to 1.8.x or higher
On Ubuntu 12.04 LTS, if you are unable to upgrade your git version using apt-get, then follow the below steps in order to upgrade
$ sudo apt-get install python-software-properties $ sudo add-apt-repository ppa:git-core/ppa $ sudo apt-get update $ sudo apt-get install git |
Once git is installed, configure your name and email using the below commands
$ git config --global user.email "you@example.com"
$ git config --global user.name "Your Name"
Configure repo
In order to use Yocto build system, first you need to make sure that repo is properly installed on the machine:
$ mkdir ~/bin
$ PATH=~/bin:$PATH
$ curl https://storage.googleapis.com/git-repo-downloads/repo > ~/bin/repo
$ chmod a+x ~/bin/repo
Trivia: Repo is a repository management tool that is built on top of Git. Its main purpose is to help manage projects that consist of many Git repositories, it can also be used to manage uploads to the CMF Gerrit instance and automate aspects of the development workflow.
Repo does not replace Git, it simply aids management of projects that contain multiple Git repositories into a single local working directory. Git will still be used for local operation such as commits etc.
Repo manages this for you by means of an XML based Manifest file. The Manifest file defines which repositories the project uses and links to appropriate revisions of each git repository, i.e where the upstream repositories reside and where they should be cloned locally. It is the manifest.xml (or default.xml) that determines which Git repositories and revisions repo will manage. This manifest.xml file is hosted in a Git repository along with all the other git repositories.
Setting up .netrc for RDK emulator
CMF git uses https. This step prevents the password prompt every now and then during code checkout and build.
Create a file .netrc in home directory.
$ vi .netrc
The contents of the .netrc should be as follows:
machine code.rdkcentral.com login <gerrird_userid> password <gerrit_password>
The following commands fetches the source code of emulator using repo tool
$ mkdir emulator && cd emulator
$ repo init -u https://code.rdkcentral.com/r/manifests -m emulator.xml
...
$ repo sync
$ source meta-cmf/setup-environment
| Note |
|---|
|
The above step configures and sets up your directory to start an appropriate build for hybrid or media client.
There are different kinds of builds listed. Please read the options and select the number of the build you need.
Following options are just a sample guide:
For Hybrid:
Select option for qemux86hyb-morty - 1 if you need to build a hybrid device.
Note: For RDK2.1 emulator builds, the option would be option 3.
For Media Client:
Select option qemux86mc-morty - 2 if you need to build a media client device.
Next, you would need to initiate the build using the following command:
For Hybrid:
$ bitbake rdk-generic-hybrid-image
For Media Client:
$ bitbake rdk-generic-mediaclient-image
On Successful build, the ROOTFS (in vmdk format) would be available at the following reference location based on whether your build type was Hybrid (qemux86hyb-morty) or Media Client (qemux86mc-morty):
- ${HOME}/emulator/build-qemux86hyb-morty/tmp/deploy/images/qemux86hyb-morty or
- ${HOME}/emulator/build-qemux86mc-morty/tmp/deploy/images/qemux86mc -morty
...
Note: The qt3d repo has changed and this causes older builds (10/24 and earlier) to fail while fetching qt. A fix can be applied by changing the repo in the qt3d recipe.
Before you build, you need to edit the file /meta-qt5/recipes-qt/qt5/qt3d_git.bb and set the QT_MODULE_BRANCH to "dev" instead of "master" as outlined below:
For more information regarding the change, please refer: https://github.com/meta-qt5/meta-qt5/commit/adeaa6128b665920eb98eb7c064f4aacbd74b873
...
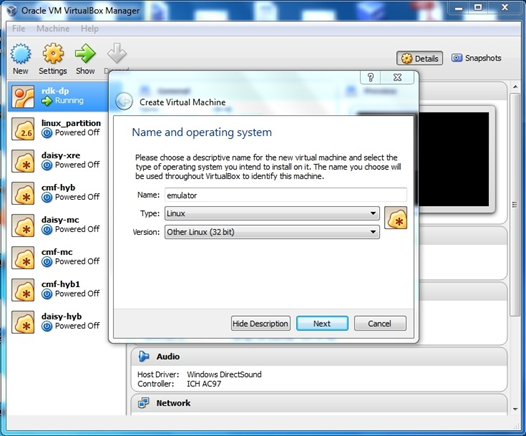
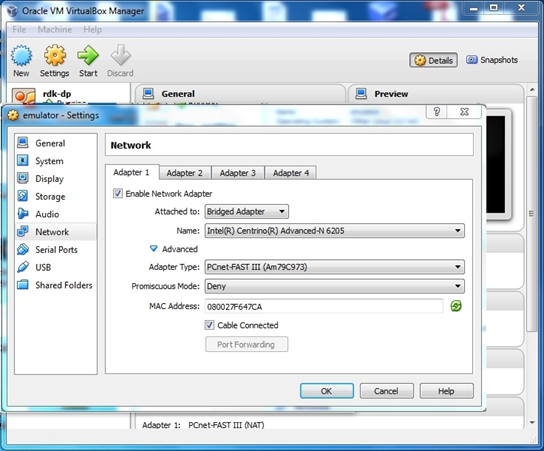
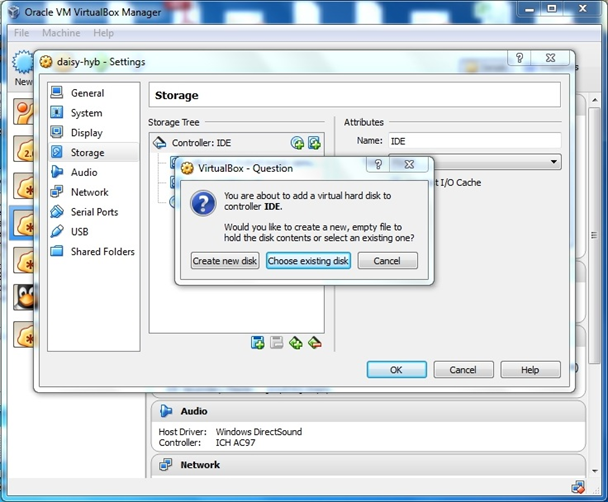
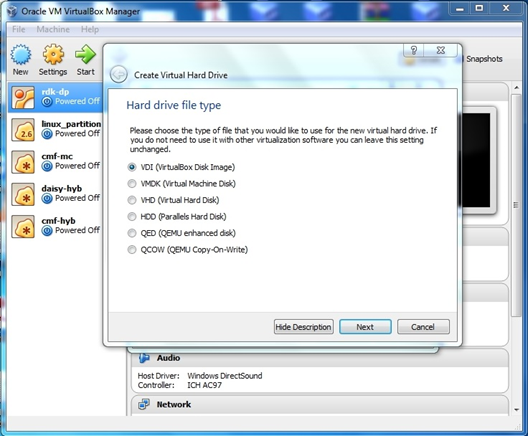
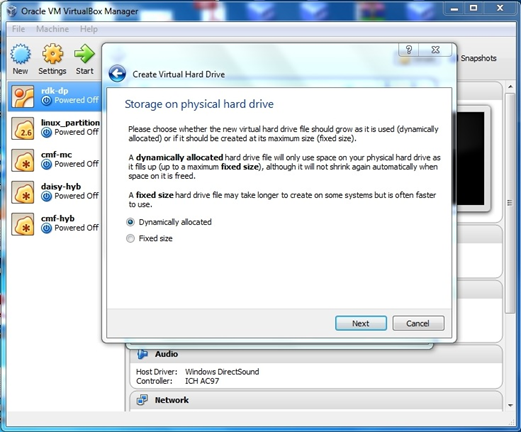
Install Virtual Box and follow the following steps to bring up RDK Emulator on Virtual Box:
In the following steps, it is recommended to review the description and screenshot completely before proceeding with steps.
Open Virtualbox
Select New [A popup will come up]
Select Type as ‘Linux’
Select Version as ‘Other Linux (32 Bit)’
Click on “Next”
Your VM has been built with very limited hard drive space. In order to run emulator and play video files, you need to copy your video files into the file system for playback. For this, you will need to setup a virtual external hard drive.

| $ ssh root@x.x.x.x |
|---|
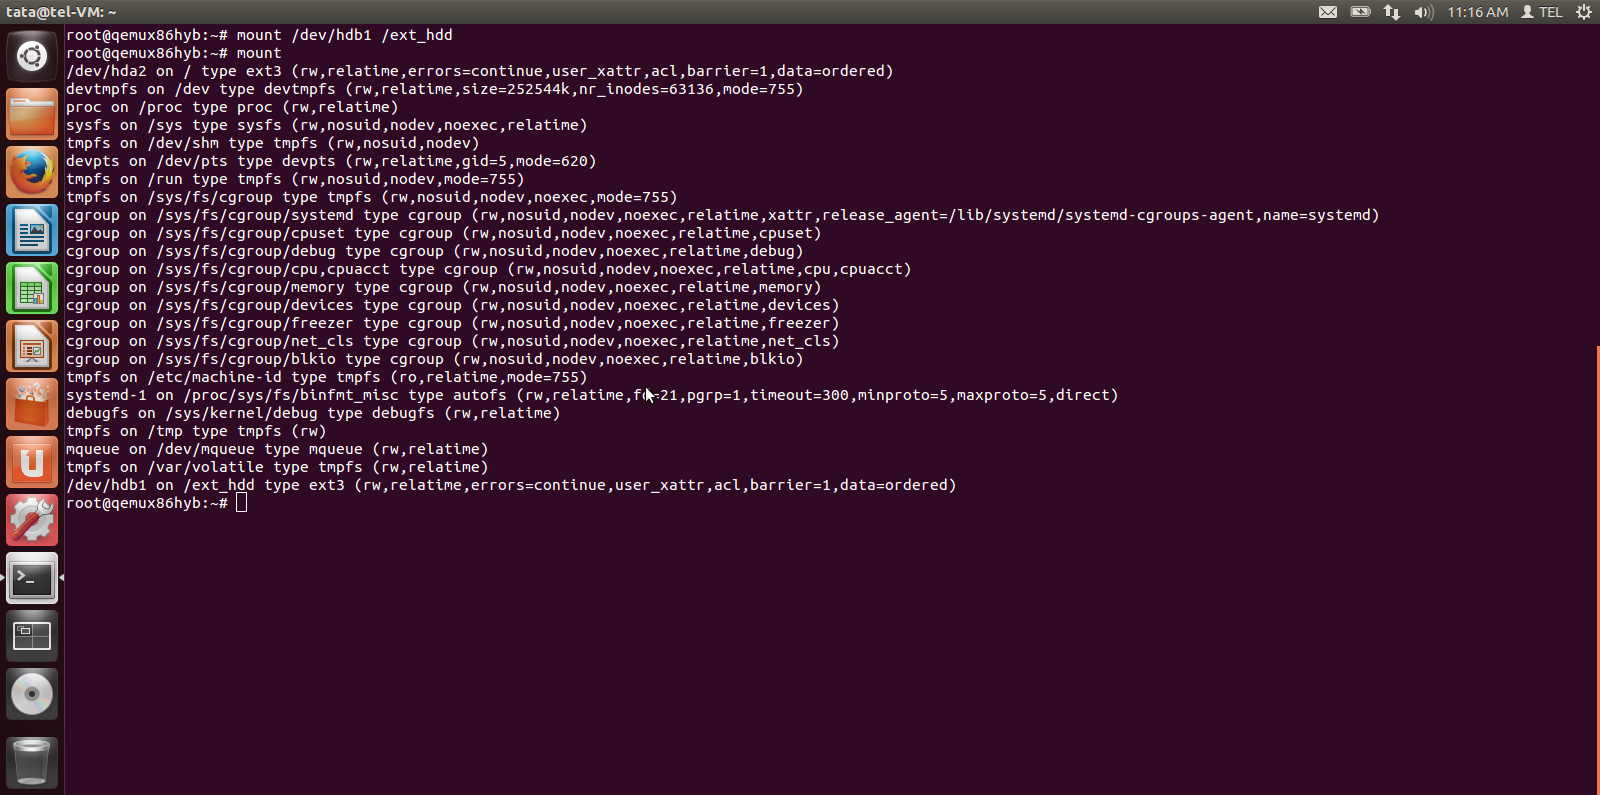
| $ mount |
|---|
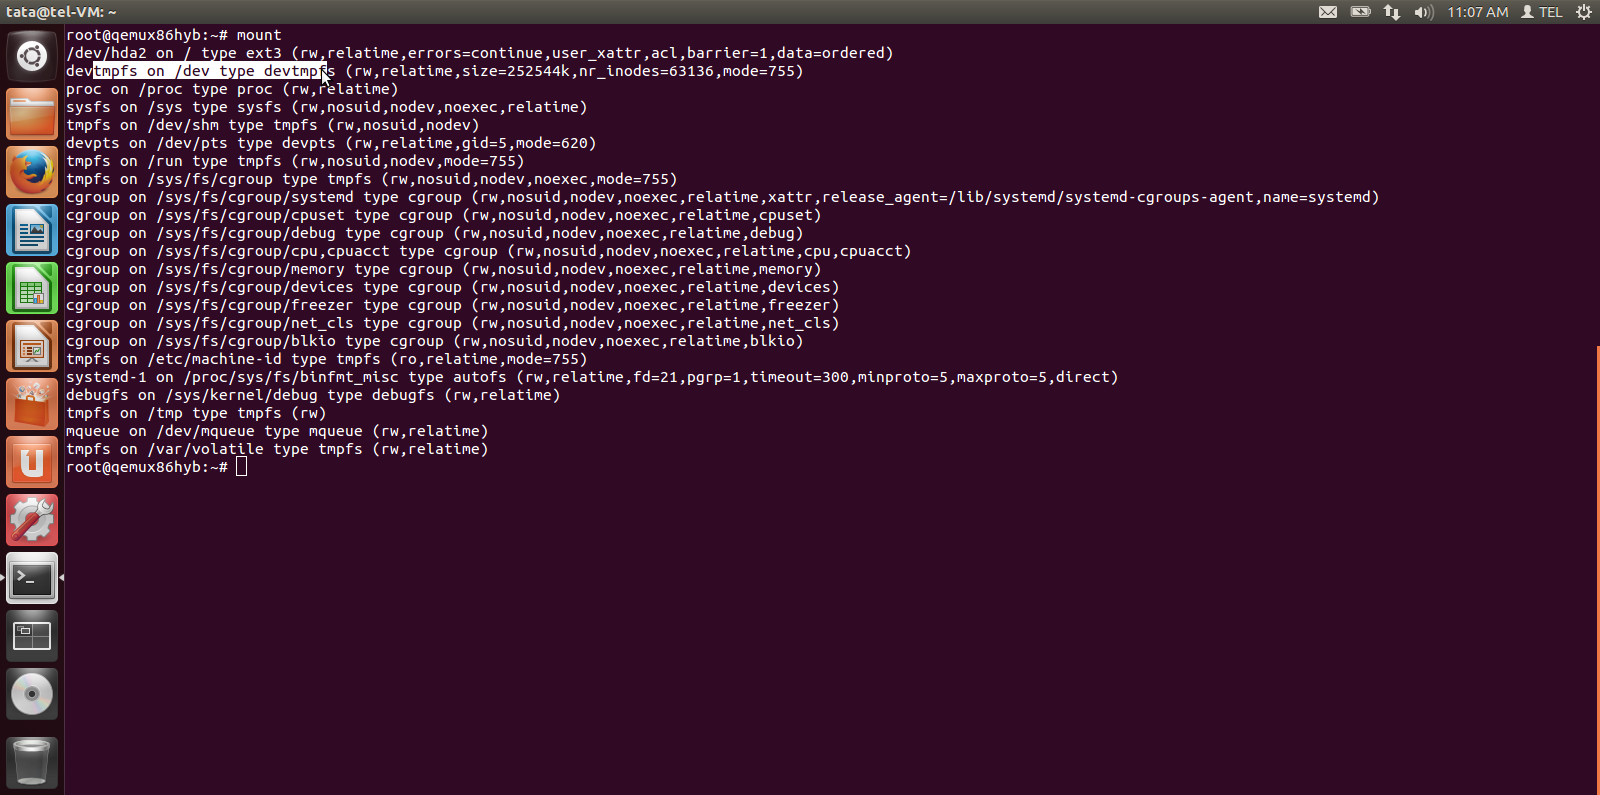
| $ fdisk -l |
|---|

| $ fdisk /dev/hdb |
|---|
Review the description of the steps during fdisk operation below and the following screenshot for reference before proceeding.
| $ Command (m for help): n |
|---|
$ Partition type: p primary (0 primary, 0 extended, 4 free) e extended Select (default p): p |
|---|
| $ Partition number (1-4, default 1): 1 |
|---|
| $ Command (m for help): p |
|---|
| $ Command (m for help): w |
|---|

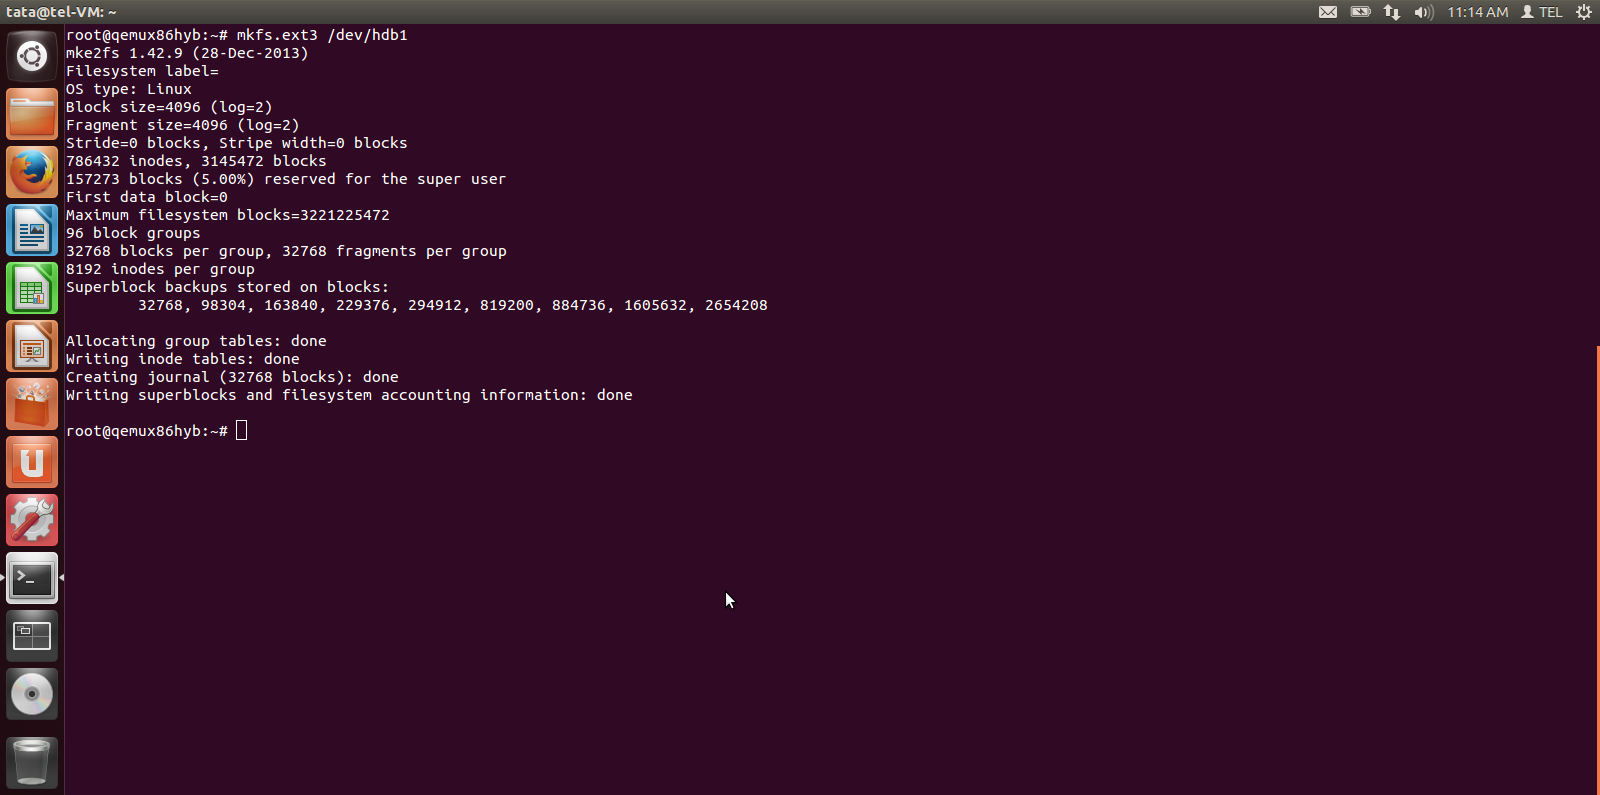
| $ mkfs.ext3 /dev/hdb1 |
|---|
$ mkdir /ext_hdd $ mount /dev/hdb1 /ext_hdd |
|---|
| $ scp <your_spts_file_name>.ts root@<your_emulator_vm_ip>:/ext_hdd |
|---|
| $ ln -sf /ext_hdd/<your_spts_file_name> <your_spts_file_name> |
|---|

...
As described in the previous section, you can log in to your emulator VM from your Host Machine using the ssh command.
| $ ssh root@x.x.x.x |
|---|
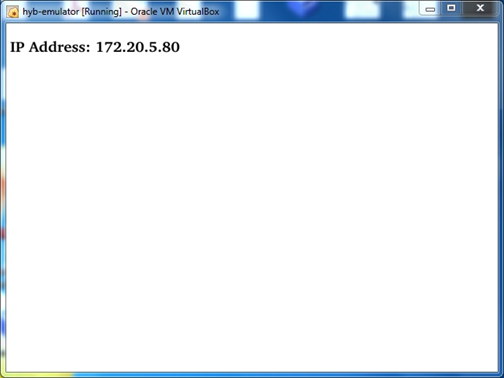
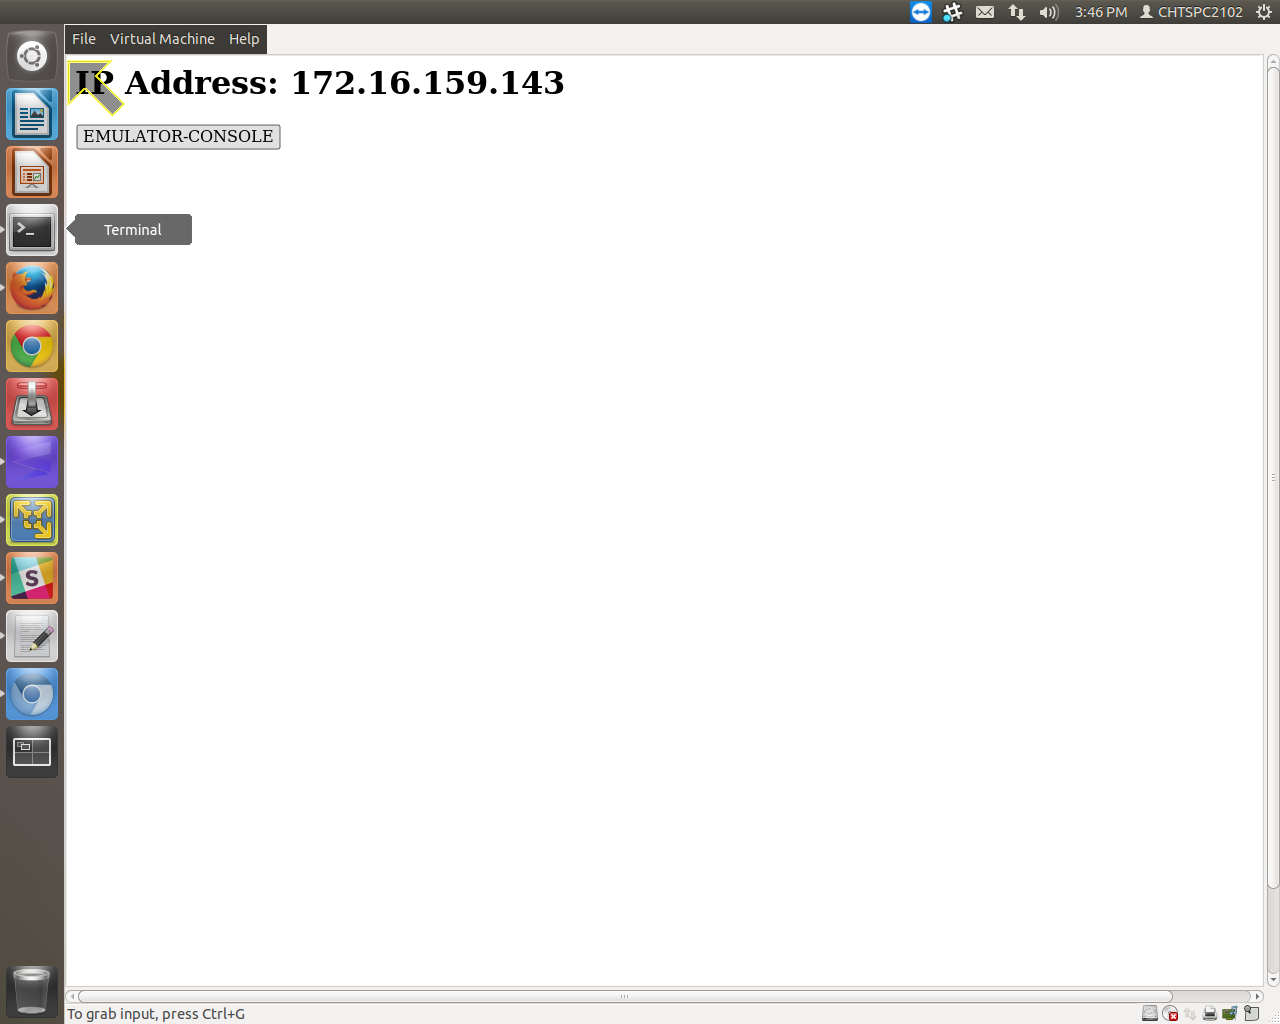
Note: In order to learn the IP address of your VM, use the RDK Browser application “tab” key to navigate to "Device Info" which will provide you the IP address. Press "Enter" key to enter Device Info
The rmfApp application is supported for all build types. Once you SSH into your emulator VM, you can play a video stream located at a url using a source and a sink.
rmfApp is located in the folder: /usr/bin on your emulator VM
Navigate to the folder /usr/bin and run rmf App using command ./rmfApp. After the initial log statements when the rmfApp starts up, press "Enter" key to get the rmfApp prompt - "rmfApp>"
root@qemux86:~# rmfApp [-source SOURCE] [-sink SINK] [other options] url
SOURCE can be: hnsource ,qamsource
SINK can be: mediaplayersink
Other options include:
• -recordingId <id>: id of recording to create where <id> is a decimal number
• -recordingTitle <title>: title of recording
Before using rmfApp, it will be better to terminate rdkbrowser as it may impact the performance of playback. You may use the systemctl command to terminate rdkbrowser as shown below.
| $ systemctl stop rdkbrowser.service |
|---|
rmfApp is located in the directory /usr/bin. Navigate to the directory containing the rmfApp:
| $ cd /usr/bin |
|---|
Launch RMF App using the command below:
| $ ./rmfApp |
|---|
Once the app is launched, press enter again to get the prompt "rmfApp->":
| $ rmfApp-> |
|---|
...
Note 1: There is an additional step required prior to using the emulator because it is built without the gsttee module in gst-plugins-rdk:
Before invoking rmfapp, it is necessary to set the environment variable 'USE_GENERIC_GSTREAMER_TEE' to 'TRUE',
example :
root@qemux86hyb-morty:/usr/bin# export USE_GENERIC_GSTREAMER_TEE=TRUE root@qemux86hyb-morty:/usr/bin# ./rmfApp
Note 2: In the streaming scenario it is necessary to kill the rmfStreamer process on the hybrid image, which is started automatically, and invoke it manually as illustrated below :
Streaming Scenario :
Hybrid :
barracuda:~> ssh root@193.120.91.104
root@qemux86hyb-morty:/#
root@qemux86hyb-morty:/# export USE_GENERIC_GSTREAMER_TEE=TRUE root@qemux86hyb-morty:/# cd /usr/bin root@qemux86hyb-morty:/usr/bin# ps -aef | grep rmf root@qemux86hyb-morty:/usr/bin#kill -9 <pid> root@qemux86hyb-morty:/usr/bin# ./rmfStreamer
IP Client :
barracuda:~> ssh root@193.120.91.132
root@qemux86mc-morty:/#
root@qemux86mc-morty:/# export USE_GENERIC_GSTREAMER_TEE=TRUE root@qemux86mc-morty:/# cd /usr/bin root@qemux86mc-morty:/usr/bin# ./rmfApp
rmfApp->launch -source hnsource -sink mediaplayersink
http://193.120.91.104:8080/vldms/tuner?ocap_locator=ocap://0x125d
In a simulated live playback, the following rmfApp command maybe used to playback the local SPTS video file:
launch -source qamsource -sink mediaplayersink ocap://0x125d
Where
...
Virtual Box and follow the following steps to bring up RDK Emulator on Virtual Box:
In the following steps, it is recommended to review the description and screenshot completely before proceeding with steps.
Open Virtualbox
Select New [A popup will come up]
Select Type as ‘Linux’
Select Version as ‘Other Linux (32 Bit)’
Click on “Next”
| $ scp <file_name> root@<your_emulator_vm_ip>:/<path> |
|---|
As described in the previous section, you can log in to your emulator VM from your Host Machine using the ssh command.
| $ ssh root@x.x.x.x |
|---|
RDK emulator supports westeros compositor and renderer module as westeros-renderer-gl. Do the following to check westeros animation using westeros_test command line utility.
| Code Block |
|---|
$ killall westeros

Comment the last line in /usr/bin/westeros-init.sh so that compositor is not started automatically on bootup
#westeros --renderer /usr/lib/libwesteros_render_gl.so.0.0.0 --display WPE |
| Code Block | ||
|---|---|---|
| ||
$ mkdir -p /run/user/0
|
launch –source hnsource –sink mediaplayersink http://127.0.0.1:50050/received_spts1.ts
Where
...
In a simulated live playback, the following rmfApp command maybe used to playback the local SPTS video file:
launch –source hnsource –sink mediaplayersink http://<HYBRID IP>:8080/vldms/tuner?ocap_locator=ocap://0x125d
Where
| $ launch –source hnsource –sink mediaplayersink http://<HYBRID IP>:8080/vldms/tuner?ocap_locator=ocap://0x125d |
|---|
RDK recordings on the Hybrid device are created from a cloud-based scheduler using json messages. Once the recordings are created, the rmfApp on the media client device can be used to playback the newly recorded media content.
This section outlines the use case:
Step 1: Preconditions / Prerequisites:
mkdir -p /ext_hdd/data ln -sf /ext_hdd/data /opt/data |
|---|
Note: The above directory and the soft link needs to be in place each time before scheduling recordings.
Your recordings will get created in the following path on the Hybrid VM:
...
/opt/data/OCAP_MSV/0/0/DEFAULT_RECORDING_VOLUME/
/opt/data/OCAP_MSV/0/0/DEFAULT_RECORDING_VOLUME/chunks
If there is a media file created in the /chunks folder above, then the recordings have been successfully created.
Step 2: Launching rmfStreamer on Hybrid VM
There are multiple scripts in the folder /usr/bin. There are two scripts for launching rmfStreamer:
Note that the name of each file is similar apart from the usage of upper case and lowercase "s" in each file name.
Launch rmfStreamer using the script: rmfstreamer
cd /usr/bin/ sh rmfstreamer |
|---|
if you run in into issues accessing rmfstreamer, then change the access permissions of file appropriately:
chmod 777 rmfstreamer |
|---|
Once rmfStreamer starts, you will see log print statements on the console.
Step 3: Start playback of recorded content on Hybrid emulator from your Media Client emulator
Now you can playback from the media client using the rmfApp on the media client VM using the following sample commands:
...
cd /usr/bin
./rmfApp
rmfApp> launch -source hnsource -sink mediaplayersink http://<hybird_vm_ip>:8080/vldms/
Note: Where the recording id is "6" as set in the schedule.json message from the server. Users may write a small application to simulate the scheduler server json messages.
RDK emulator supports westeros compositor and renderer module as westeros-renderer-gl
| Code Block | ||
|---|---|---|
| ||
# To build the same for different build types, use the below command

#Hybrid
MACHINE=qemux86hyb-morty source meta-cmf/setup-environment
bitbake rdk-generic-hybrid-wpe-image |
To test WPE image from the VM console1)Boot the VM in NAT mode and ssh in to the VM to get the console as mentioned above.
ex: ssh -p 2222 root@localhost
2)Then type the following command
To support westeros surface width and height are HD so emulator need to set HD resolution
To enable support for 1280x720 resolution in emulator please follow the steps mentioned in this page.
This will help us in adding custom resolution in Virtual Box.
1) ssh login to the Emulator
Westeros compositor will run automatically in startup of Emulator image
run following commands in terminal for manual starting the compositor on Emulator if needed
| Code Block | ||
|---|---|---|
| ||
$ mkdir -p /run/user/0
$ export XDG_RUNTIME_DIR=/run/user/0/
$ westeros --renderer <renderer module> --display <socket-name> &
$ westeros --renderer /usr/lib/libwesteros_render_gl.so.0.0.0 --display WPE &
$ gdisplay start
$ export WAYLAND_DISPLAY=WPE |
westeros compositor will launch
to test westeros compositor with simple egl test apliaction
run westeros_test
| Code Block | ||
|---|---|---|
| ||
# After Launching westeros compositor in emulator
$ export XDG_RUNTIME_DIR=/run/user/0/
$ export WAYLAND_DISPLAY=WPE
$ westeros_test
(or)
$ westeros_test --display WPE |

| Code Block | ||
|---|---|---|
| ||
$ export XDG_RUNTIME_DIR=/run/user/0/
$ export WAYLAND_DISPLAY=WPE

#Check the plugin in image
$ gst-inspect-1.0 westerossink

# To play the video and render on westeros compositor
$ gst-launch-1.0 playbin uri=http://localhost:50050/received_spts1.ts videosink=westerossink |
ssh to emulator VM terminal run following commands
| Code Block | ||
|---|---|---|
| ||
$ export XDG_RUNTIME_DIR=/run/user/0/
$ export WAYLAND_DISPLAY=WPE
$ WPElancher <http url >

Ex: WPELauncher http://easyhtml5video.com |
...
| Code Block | ||
|---|---|---|
| ||
$ export XDG_RUNTIME_DIR=/run/user/0/
$ export WAYLAND_DISPLAY=WPE
$ WPELauncher http://www.youtube.com/tv
|


Note: Video Positioning is not proper with the present video sink so positioning is not setting properly as of now in Emulator. We will update it once it is done**
1)Boot the VM in NAT mode and ssh in to the VM to get the console.
ex: ssh -p 3022 root@localhost
2)To check the closedcaption in rmfapp start the rmfapp and launch a video as shown below
ex: cd /usr/bin; ./rmfApp
rmfApp->launch -source hnsource -sink mediaplayersink http://127.0.0.1:50050/received_spts1.ts
now you will be able to see ccdata displayed on sccsreen

3)To enable or disable closedcaption rendering in rmfApp user “e” or “enable” to enable closedcaption and “d” or “disable” to disable the closedcaption
ex: rmfApp->d
expexted output: closedcaption rendering should stop on screen.

...
rmfApp->e
expected output: Closedcaption rendering should start on screen
4)To show and hide the closedcaption after enabling the cc rendering user “s” or “show” tp show the cc window and “h” or “hide” to hide the cc window
example: rmfApp->h
expected output: CC window should not be visible on screen

To show the closedcaption again type the command "s" in rmfapp as shown below.
rmfApp->s
expected output: CC window should be visible on screen.

5)To pause and play the video after launching the video as shown below
ex: rmfApp->launch -source hnsource -sink mediaplayersink http://127.0.0.1:50050/received_spts1.ts
rmfApp->p (To Pause the video)
expected output: Stop the playing video also closedcaption rendering should stop
To resume the video paused type the command "p" again in rmfapp as shown below.
rmfApp->p (To play the video)
expected output: Video playing should resume and closedcaption rendering aswell.

6)Checking closedcaptioning in recorded content.
After recording the video using the method provided in the above link using rmfApp try to play the recorded content.
Ex: To view the recording list
rmfApp-> l
expected output : To show the list.
total Space: 1886208000 bytes
free Space: 358744064 bytes
number of recordings= 1
-------------------------------------
recording 0 id 30 title "Recording_tile"
-------------------------------------

Now play the recorded content as shown below.
RmfApp->launch -source -sink mediaplayersink path://local/30
expected output: Recording content should play along with closedcaption rendering.

Note: To play the recorded content use path://local/id where id is the recordingid.
8) To exit from the rmfApp first kill the running proccess and then press q to quit
Ex: rmfApp->kill 1
rmfApp->q
The following commands fetches the source code of emulator using repo tool
#Yocto-2.2 Build (morty builds)
$ mkdir emulator-morty && cd emulator-morty
# Download code in yocto integration mode
$ repo sync# To build the same for different build types, use the below command # MediaclientMACHINE=qemux86mc-morty source meta-cmf/setup-environmentbitbake rdk-generic-mediaclient-wpe-image #HybridMACHINE=qemux86hyb-morty source meta-cmf/setup-environmentbitbake rdk-generic-hybrid-wpe-image# NoteVMWare Player 6.X or less only supported to get wpe-webkit browser support Host OS ubuntu 12.04 32-Bit#Yocto-2.2 Build (RDK-DEV-1901 builds)
$ mkdir emulator-rdk-dev && cd emulator-rdk-dev
# Download code in yocto integration mode
for Non-Preferred:$ repo init -u https://code.rdkcentral.com/r/manifests -b rdk-dev-1901 -m rdkv-extsrc.xml
for Preferred:
$ repo init -u https://code.rdkcentral.com/r/manifests -b rdk-dev-1901 -m rdkv-asp-extsrc.xml
$ repo sync
# To build the same for different build types, use the below command
# MediaclientMACHINE=qemux86mc-morty source meta-cmf/setup-environmentbitbake rdk-generic-mediaclient-wpe-image #HybridMACHINE=qemux86hyb-morty source meta-cmf/setup-environmentbitbake rdk-generic-hybrid-wpe-image
#To build TDK-images
# MediaclientMACHINE=qemux86mc-morty source meta-cmf/setup-environmentbitbake rdk-generic-mediaclient-wpe-tdk-image #HybridMACHINE=qemux86hyb-morty source meta-cmf/setup-environmentbitbake rdk-generic-hybrid-wpe-tdk-image
# NoteVMWare Player 6.X or less only supported to get wpe-webkit browser support Host OS ubuntu 12.04 32-Bit
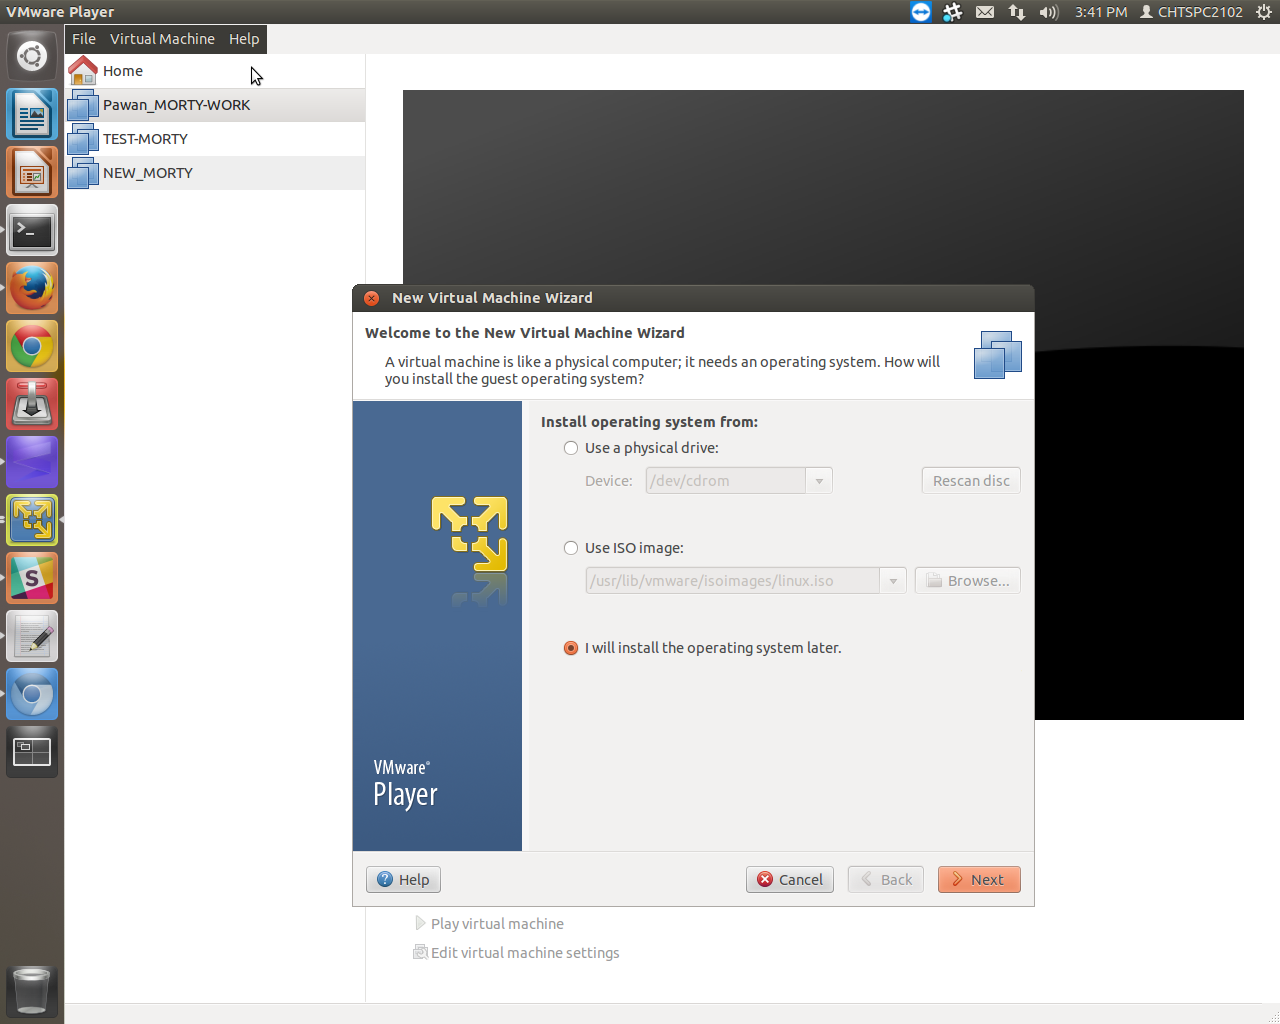
Install VMplayer in Host Machine
Use the below Link download to install VMware Player on host
After downloading
sudo ./VMware-Player-<Version>.bundle (LInux OS)
Run VMware-Player-<Version>.exe (Windows OS)
Reason for VMplayer: in Mesa Higher versions EGL-PLATFORM fbdev is not available as it is deprecated so we tried using DRM (Direct Rendering Manager driver for graphics)
for DRM driver is available only in vmware only (vmwgfx so we have gone for VMware Player)
1 Once VMware Player is installed, open the VMWare Player using the command
vmplayer & or open using GUI
2 Click File --> Create a New Virtual Machine --> Select 'i will install my operating system later' --> click Next
3 Select 'Linux' --> Version 'Other Linux 3.x kernel' --> Click Next --> Give name --> Click Next
4 Maximum Disk Size : 8 Gb --> Select 'Store Virtual Disk as a Single File' --> Click Next --> Memory for this Virtual Machine '512 Mb' --> Click 'Close' --> Click 'Finish'
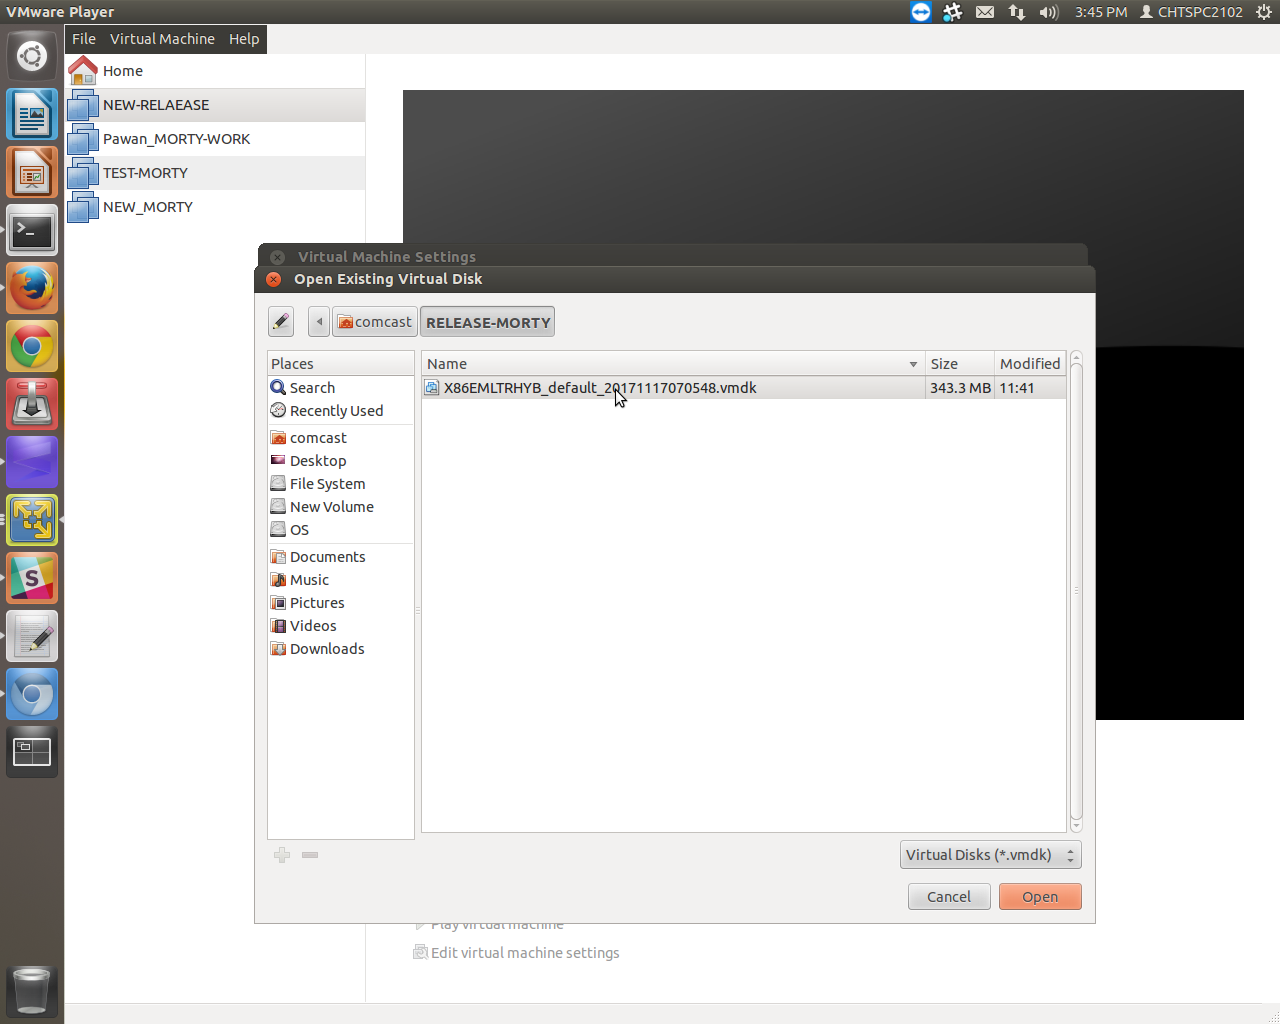
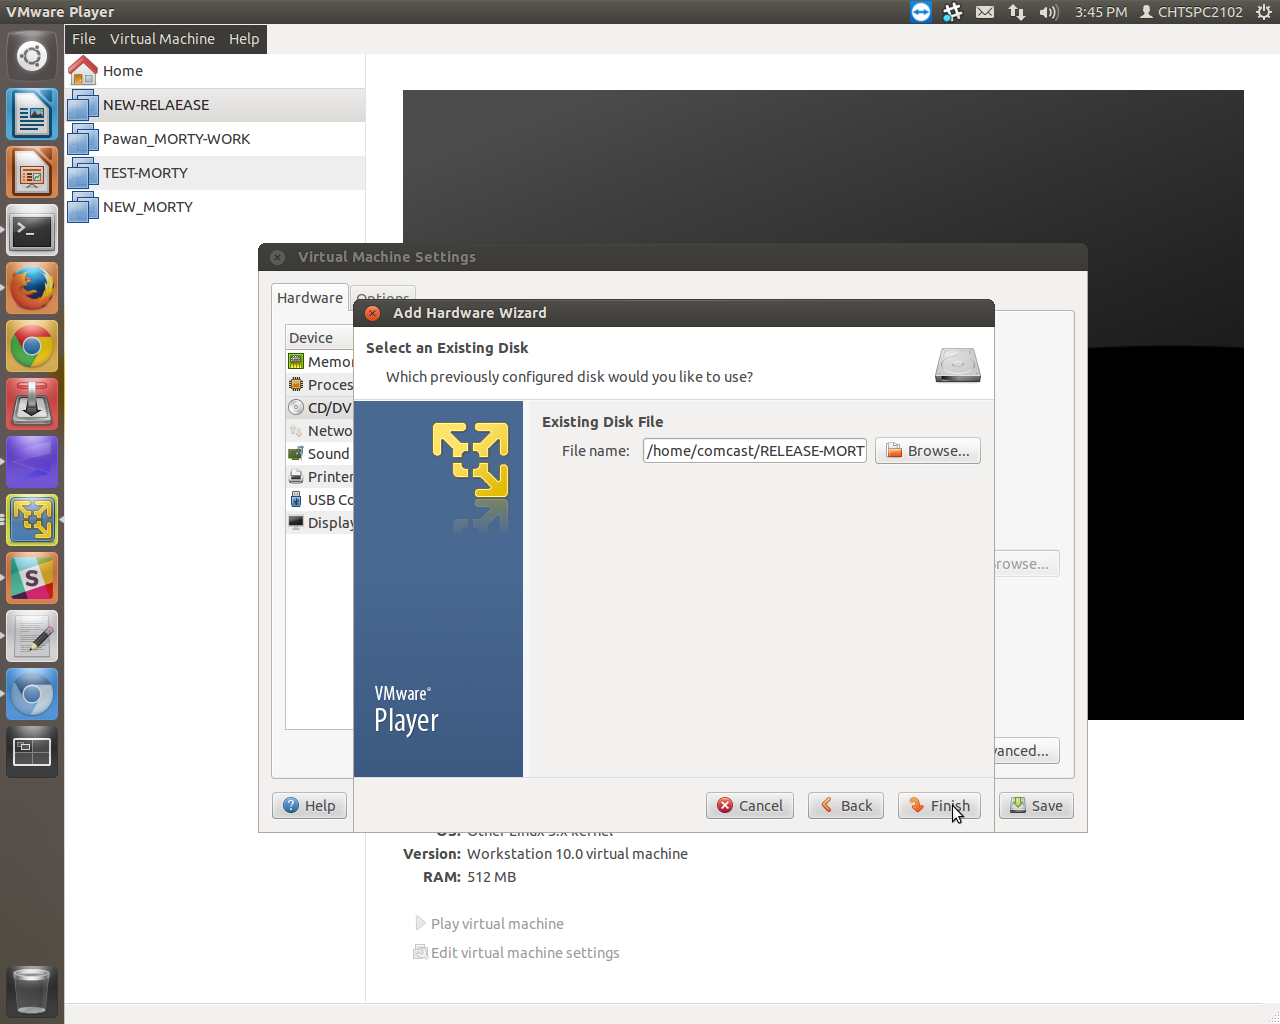
5 Click 'Edit virtual machine settings' --> select Hard Disk (IDE) --> Click 'Remove' -->Click 'Add' --> Select Hard Disk --> Select 'Use existing Virtual Hard disk'
6 File browse and set the path to the *.vmdk file --> Click Finish --> Click 'Keep Existing Format'
7 Network Adapter select Bridge Adapter --> Click Save
8 Click Play Virtual Machine
Cannot connect the virtual device ide1:0 because no corresponding device is available on the host.
Do you want to try to connect this virtual device every time you power on the virtual machine? [YES] [NO]
You select [NO]
9 This will bring the emulator up with the initial splash screen followed by RDK-Browser as startup application.
*** Note : No support for Shared Folder.
step 1:
Step 2:

Step3:

Step 4:

Step 5:

Click 'Save' --> Click 'Finish'
Click 'Edit virtual machine settings' --> select Hard Disk (IDE) --> Click 'Remove' -->Click 'Add' --> Select Hard Disk --> Select 'Use existing Virtual Hard disk'
Step 6:

Step 7:

Step 8:

Step 9:
Step 10:
Step 11:

step 12:
WPELauncher (wpewebkit default browing Application)
1) ssh login to the Emulator
systemctl stop wpe-launcher ( this will stop the wpe-webkit browser
to launch any url through wpe launcher use this script sh startWPE.sh
ex:
sh startWPE.sh http://www.easyhtml5video.com
sh startWPE.sh http://www.google.com
for using rmfApp in morty builds need to follow the below steps
in ssh terminal of emulator type the following commands
now you can see tty terminal console of emulator
from ssh terminal follow the normal rmfApp playback usage steps mentioned in this guide
Known Issues:
for using morty emulator WPE image we can validate pxscene examples in emulator
Pxscene works over the wayland compositor (westeros compositor)
Before launching pxscene examples need to export these parameters and run pxscene examples
| Code Block | ||
|---|---|---|
| ||
$ export XDG_RUNTIME_DIR=/run/user/0/
$ export WAYLAND_DISPLAY=WPE
Example 1 :
$ ./pxscene ( will launch default browser.js)
Example 2 :
$ ./pxscene http://www.pxscene.org/examples/px-reference/gallery/fancy.js
Example 3 :
$ ./pxscene http://www.pxscene.org/examples/px-reference/gallery/gallery.js
Example 4 :
$ ./pxscene http://www.pxscene.org/examples/px-reference/gallery/picturepile.js
|
Please find screen shots attached

2.Fancy.js
Gallery.js

Picturepile.js

for using morty emulator WPE image we can validate rdkbrowser2 examples in emulator
works over the wayland compositor (westeros compositor)
For testing rdkbrowser2
| Code Block | ||
|---|---|---|
| ||
$ export XDG_RUNTIME_DIR=/run/user/0/ $ export WAYLANDLD_DISPLAY=WPE Example 1 : $ ./rdkbrowser2 ( will launch http://www.example.com) Example 2 : $ ./rdkbrowser2 --url http://www.google.com Example 3 : $ ./rdkbrowser2 --url http://www.youtube.com/tv Example 4 : $ ./rdkbrowser2 --url http://www.easyhtml5video.com Note: Video performance is gittery in emulator with westerosink ( software of emulator WEBBGL related urls not suported as graphics GPU available in the VMplayer is having limitation with 3d graphics renderering |
Cursor will work with rdkbrowser2
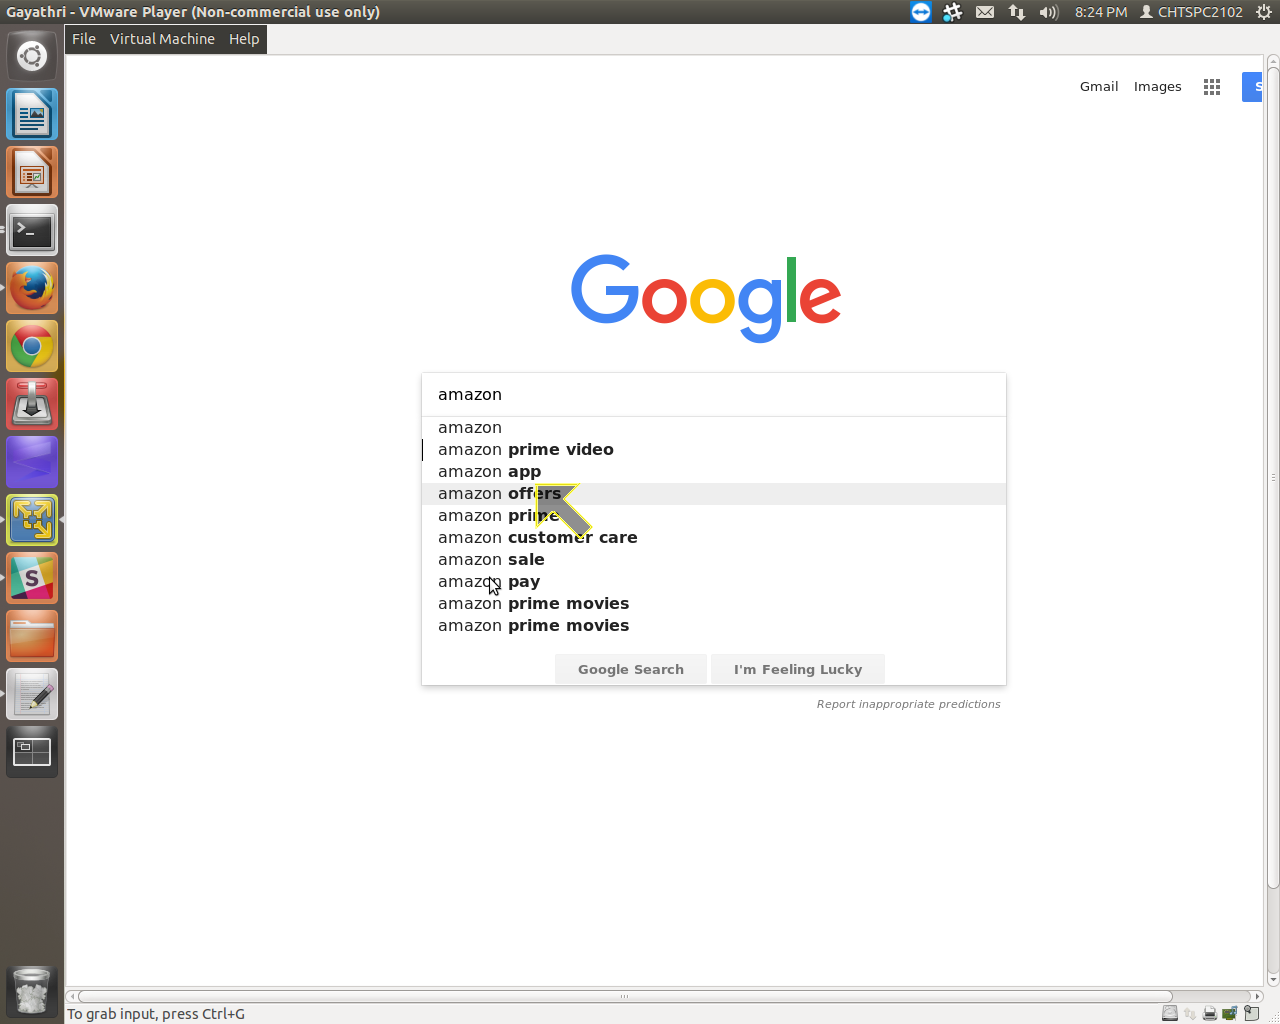
Ex: Picture-1 google.com
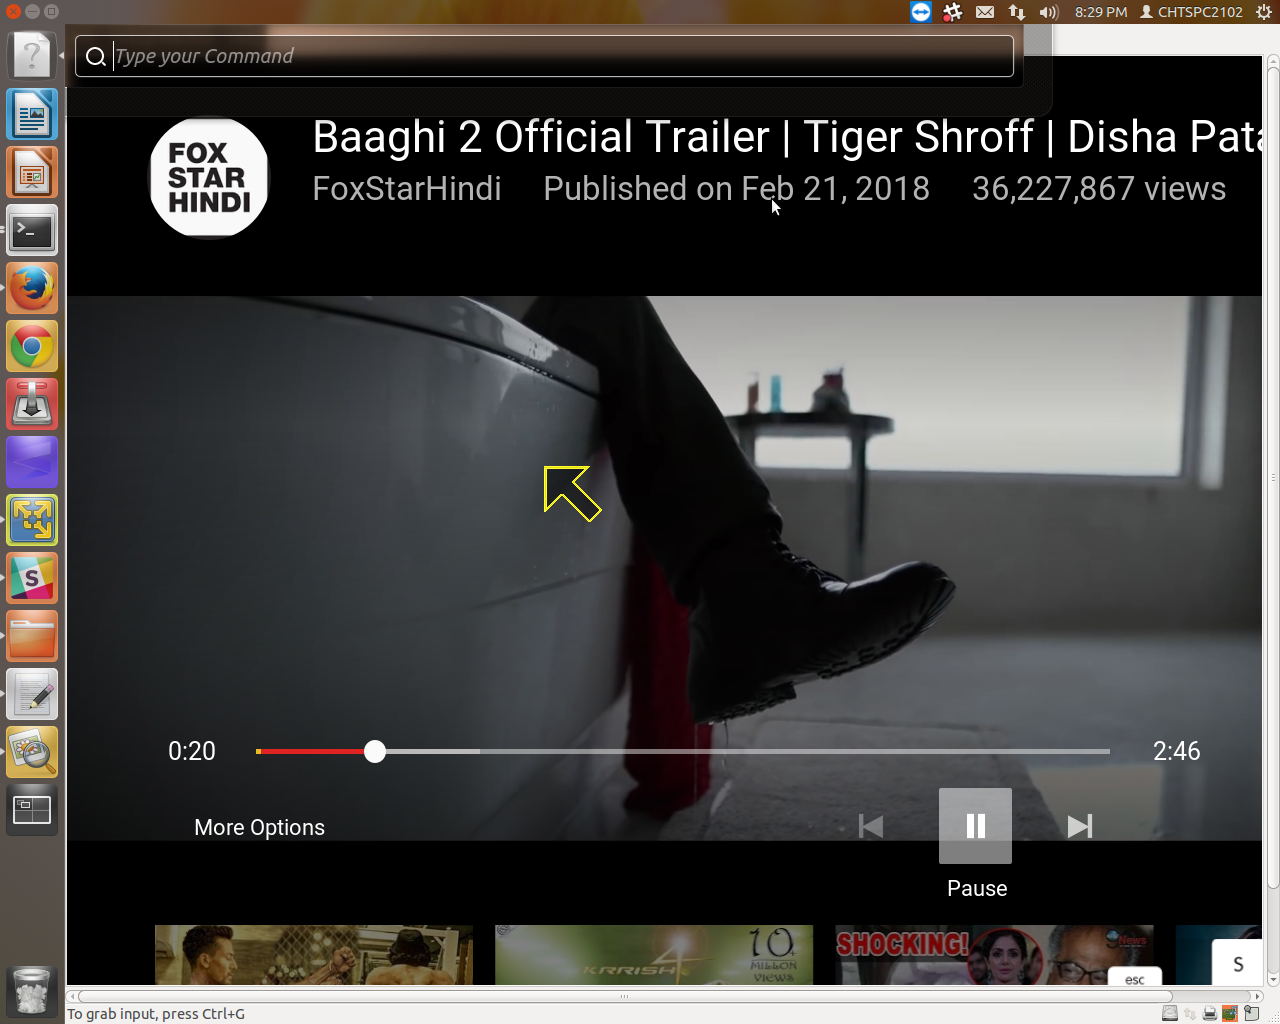
Ex 2: Youtube.com playback with westeros-sink
Ex 3 easyhtml5video.com

PRELOAD=/usr/lib/libwesteros_gl.so.0.0.0
$ westeros --renderer /usr/lib/libwesteros_render_gl.so.0.0.0 --display WPE
|
| Code Block | ||
|---|---|---|
| ||
$ westeros_test |
| Code Block | ||
|---|---|---|
| ||
$ gst-launch-1.0 playbin uri=file:///<video file name with full path> |
| Code Block | ||
|---|---|---|
| ||
$ aamp-cli <url>
e.g.
$ aamp-cli http://devimages.apple.com/iphone/samples/bipbop/bipbopall.m3u8 |