RDK Resources
[*RDK Preferred*]
Code Management Facility
RDK Forums
[RDK Conferences]
RDK Support
Archives
Papers & Presentations Archive![]()
Papers & Presentations Archive![]()
| Platform | Build support | Push-to-talk | Hands Free | Wake-Word-Engine (Supported) | Alert Sounds | LEDs | General Skill | RDK Specific Skill |
|---|---|---|---|---|---|---|---|---|
| RaspberryPi | Complete | T4H BLE RCU | USB MIC | Kitt.Ai | Available | Traffic Light LEDs | Integrated | Integrated |
RDK Accelerator | Complete | T4H BLE RCU | USB MIC | Kitt.Ai | Available | Front Panel LEDs | Integrated | Integrated |
| Feature | Handler | How to? |
|---|---|---|
| General skills | Alexa | Audio will be played for generic skills such as time, news and weather |
| Youtube | Alexa → Cobalt | Voice command will be routed to Thunder |
| App Launch | Alexa → UX | Voice command will be routed to Thunder |
| Google search | Alexa → UX | Interactive command handled by Alexa and routed to Thunder |
| Player controls | Alexa → App | Play/pause/back commands routed to app |
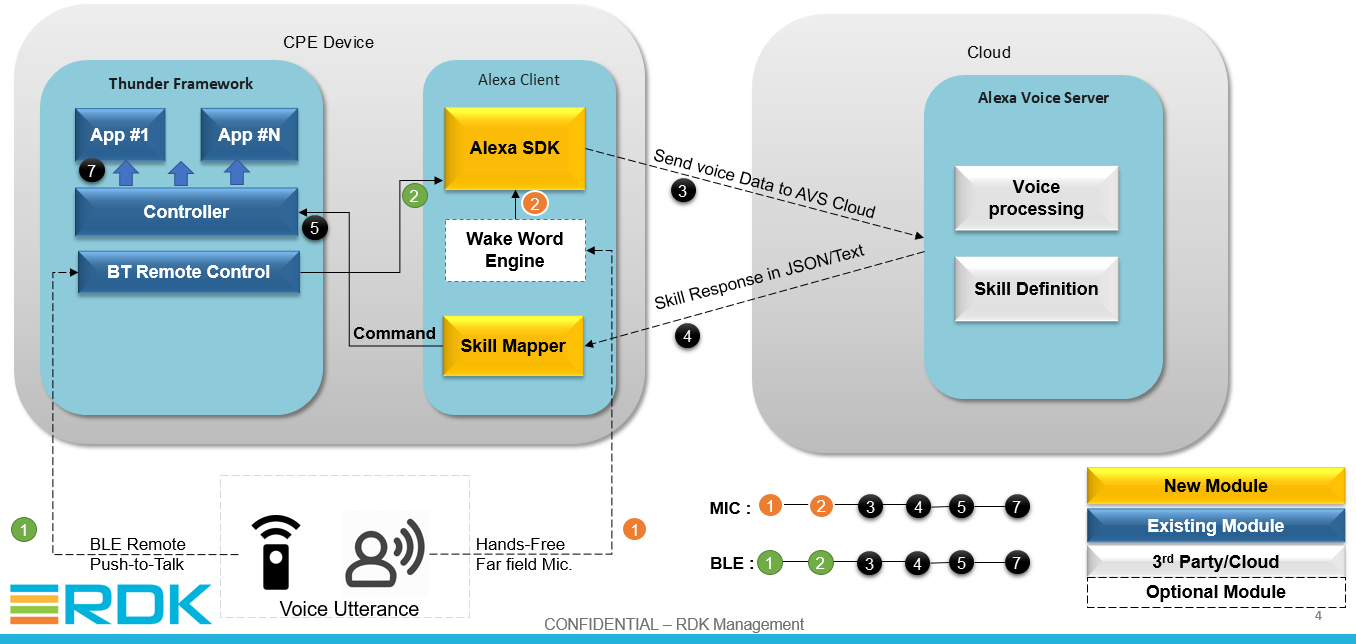
Alexa related recipes are bundled inside meta-rdk-voice/recipes-avs and contains below build targets
| Recipe | Functionality | Current status |
|---|---|---|
| openblas | Recipe required in case of Wake-word-engine mode is selected. | CMF Hosted |
| wpe-alexa.bb | Main recipe for downloading the AVS SDK and its compilation, linking it with RDK skill mapping module. | CMF hosted |
1. Initialize and download the code base
 - Example for RaspberryPi:
 $ repo init -u https://code.rdkcentral.com/r/manifests -m rdkv-nosrc.xml -b thunder-next
 $ repo sync

2. Download the meta-rdk-voice layer in project root
 $ git clone https://code.rdkcentral.com/r/components/generic/rdk-oe/meta-rdk-voice

3. Add to BBLAYERS
 $ vi meta-rdk/conf/bblayers.conf.sample
 BBLAYERS += "${@'${RDKROOT}/meta-rdk-voice' if os.path.isfile('${RDKROOT}/meta-rdk-voice/conf/layer.conf') else ''}"

4. Optionally if wanted to use MIC based implementation (Ignore if using BLE voice remote)
 $ vi meta-rdk-voice/conf/layer.conf
 - enable the below commented line
 #DISTRO_FEATURES_append = " alexa_ffv"

 # Please follow the steps mentioned in section #3.2 to enable USB audio kernel parameters (Not required for RaspberryPI).

5. Optionally For the external source builds (such as some Broadcom platforms) add below line in manifest/auto.conf
 - In <Manifest>.xml
   <project name="components/generic/avs/alexa_skill_mapper" revision="rdk-next"/>
 - In auto.conf (where brcmexternalsrc is enabled)
   BRCMEXTERNALSRC_pn-wpe-alexa += "components/generic/avs/alexa_skill_mapper:git/VoiceToApps"
   SRCPV_pn-wpe-alexa = "${BRCMEXTERNAL-SRCPV-CMF}"
 $ repo sync
6 .Build the image target
 - Example for RaspberryPi
 $ source meta-cmf-raspberrypi/setup-environment
 ### select meta-cmf-raspberrypi/conf/machine/raspberrypi-rdk-hybrid-thunder.conf ###
 $ bitbake rdk-generic-hybrid-thunder-image
Note: This configuration is not required for RaspberryPi platforms
# If FFV profile is enabled (DISTRO_FEATURES_append = " alexa_ffv") & we want to simulate audio input using a USB mic the below kernel configuration need to be enabled for non RPI platforms:

CONFIG_SND_HWDEP=m
CONFIG_SND_RAWMIDI=m
CONFIG_SND_USB_AUDIO=m

# After enabling the above kernel configs, recompile the kernel so that the support for USB audio will be enabled
Please refer the wiki link AVS Developer Account and Skill Creation Guidelines for RDK for creating a developer account.
Modify below section to map with relevant developer account.
1. Login to the device
 $ ssh root@<RDKV-Client-IP>

2. Edit the Configuration file
 $ cd /home/root
 $ vi Alexa_SDK/Integration/AlexaClientSDKConfig.json
     "deviceInfo":{
        // Unique device serial number. e.g. 123456
        "deviceSerialNumber":"<SERIAL_NO>",
        // The Client ID of the Product from developer.amazon.com
        "clientId":"<CLIENT_ID>",
        // Product ID from developer.amazon.com
        "productId":"<PRODUCT_ID>",
        // The name of the device manufacturer.
        "manufacturerName": "<MANUFACTURER_NAME>",
        // The description of the device which should contain the manufacturer name or how the device is connected.
        "description": "<DESCRIPTION"
    },
Prerequisite : Alexa Client uses IOConnector plugin to set different LED notifications, so IOConnector need to be enabled for the platform
https://github.com/rdkcentral/ThunderNanoServices/tree/master/IOConnector
$ cd /home/root
$ vi Alexa_SDK/Integration/AlexaCurl.json
Set below GPIO to appropriate value
   "PinOne":"9",
   "PinTwo":"10",
   "PinThree":"11"

Example: For RaspberryPi we can use the Traffic light LED where GPIO PIN 9, 10, 11 represents the Red, Yellow & Green LEDS
The above customization can be done either during build time or in the device. If it is done on the device, a reboot will be required after modifications are done.
This Feature consists two mode "General Mode" and "Skill Mode",
One can switch from the "General Mode" to "Skill Mode" by using steps mentioned in the section "skill invocation enable" and you can switch back to "General Mode" following the steps in the section "skill invocation disable".
Note: By default when device is booted it will be in the general mode
Note :click on the mic button on the RDK Tech4Home remote and give voice command and release the button
On first time launch, we need to authorize the device with a amazon account. This steps will not be required for subsequent application launch.
We can check the authorization code using below command:
$ systemctl status alexa
We will be able to see a message similar to below format. Note the code that appears in console window, this will be required while authorizing with developer account.
##################################
#       NOT YET AUTHORIZED       #
##################################
#       To authorize, browse to: 'https://amazon.com/us/code' and enter the code: EXEA99
###############################################################
#       Checking for authorization (1)...       #
#################################################

Note: If there is a prompt for OTP at this stage, Get it from linked phone number.
########################################
#       Alexa is currently idle!       #
########################################
At this stage, we can provide voice commands to alexa.
a) General Usage
ex: 1) User: what is the the time?
Alexa: respond with current time
2) User : what is the weather outside ?
Alexa: it will ask for you location
User: if give the Location
Alexa: respond with the climate in the current location.
b) Skill Invocation Enable
User: My Device
Alexa: respond with "how can i help you"
User : invocation enable
Alexa : respond with "invocation enabled"
c) Skill Invocation Disable
(note :It is done when "skill mode" is already enabled & we want to switch back to "general mode" )
User: invocation disable
Alexa: respond with "invocation disabled"
d) Launching Metro Applications
ex : 1) launching RadioLine Application
User: radioline
Alexa : respond with "radioline" by launching the application
User : "metro" or "main UI"
Alexa: speaks back "main UI" & navigation moves back to metro UI main screen
2) launching Wall Street Journal Application
User: WallStreetJournal
Alexa : respond with "WallStreetJournal" by launching the application
User : "metro" or "main UI"
Alexa: speaks back "main UI" & navigation moves back to metro UI main screen

| Feature | Status |
|---|---|
| Context specific functionalities | In progress |
| Multi room Music | Open |
| Integration with other Alexa products | Open |
| Smart Screen integration | Open |
