RDK Resources
[*RDK Preferred*]
Code Management Facility
RDK Forums
[RDK Conferences]
RDK Support
Archives
Papers & Presentations Archive![]()
Papers & Presentations Archive![]()
Wi-Fi Extender Reference Targets
https://doc.turris.cz/doc/en/troubleshooting/serial_link#turris_omnia
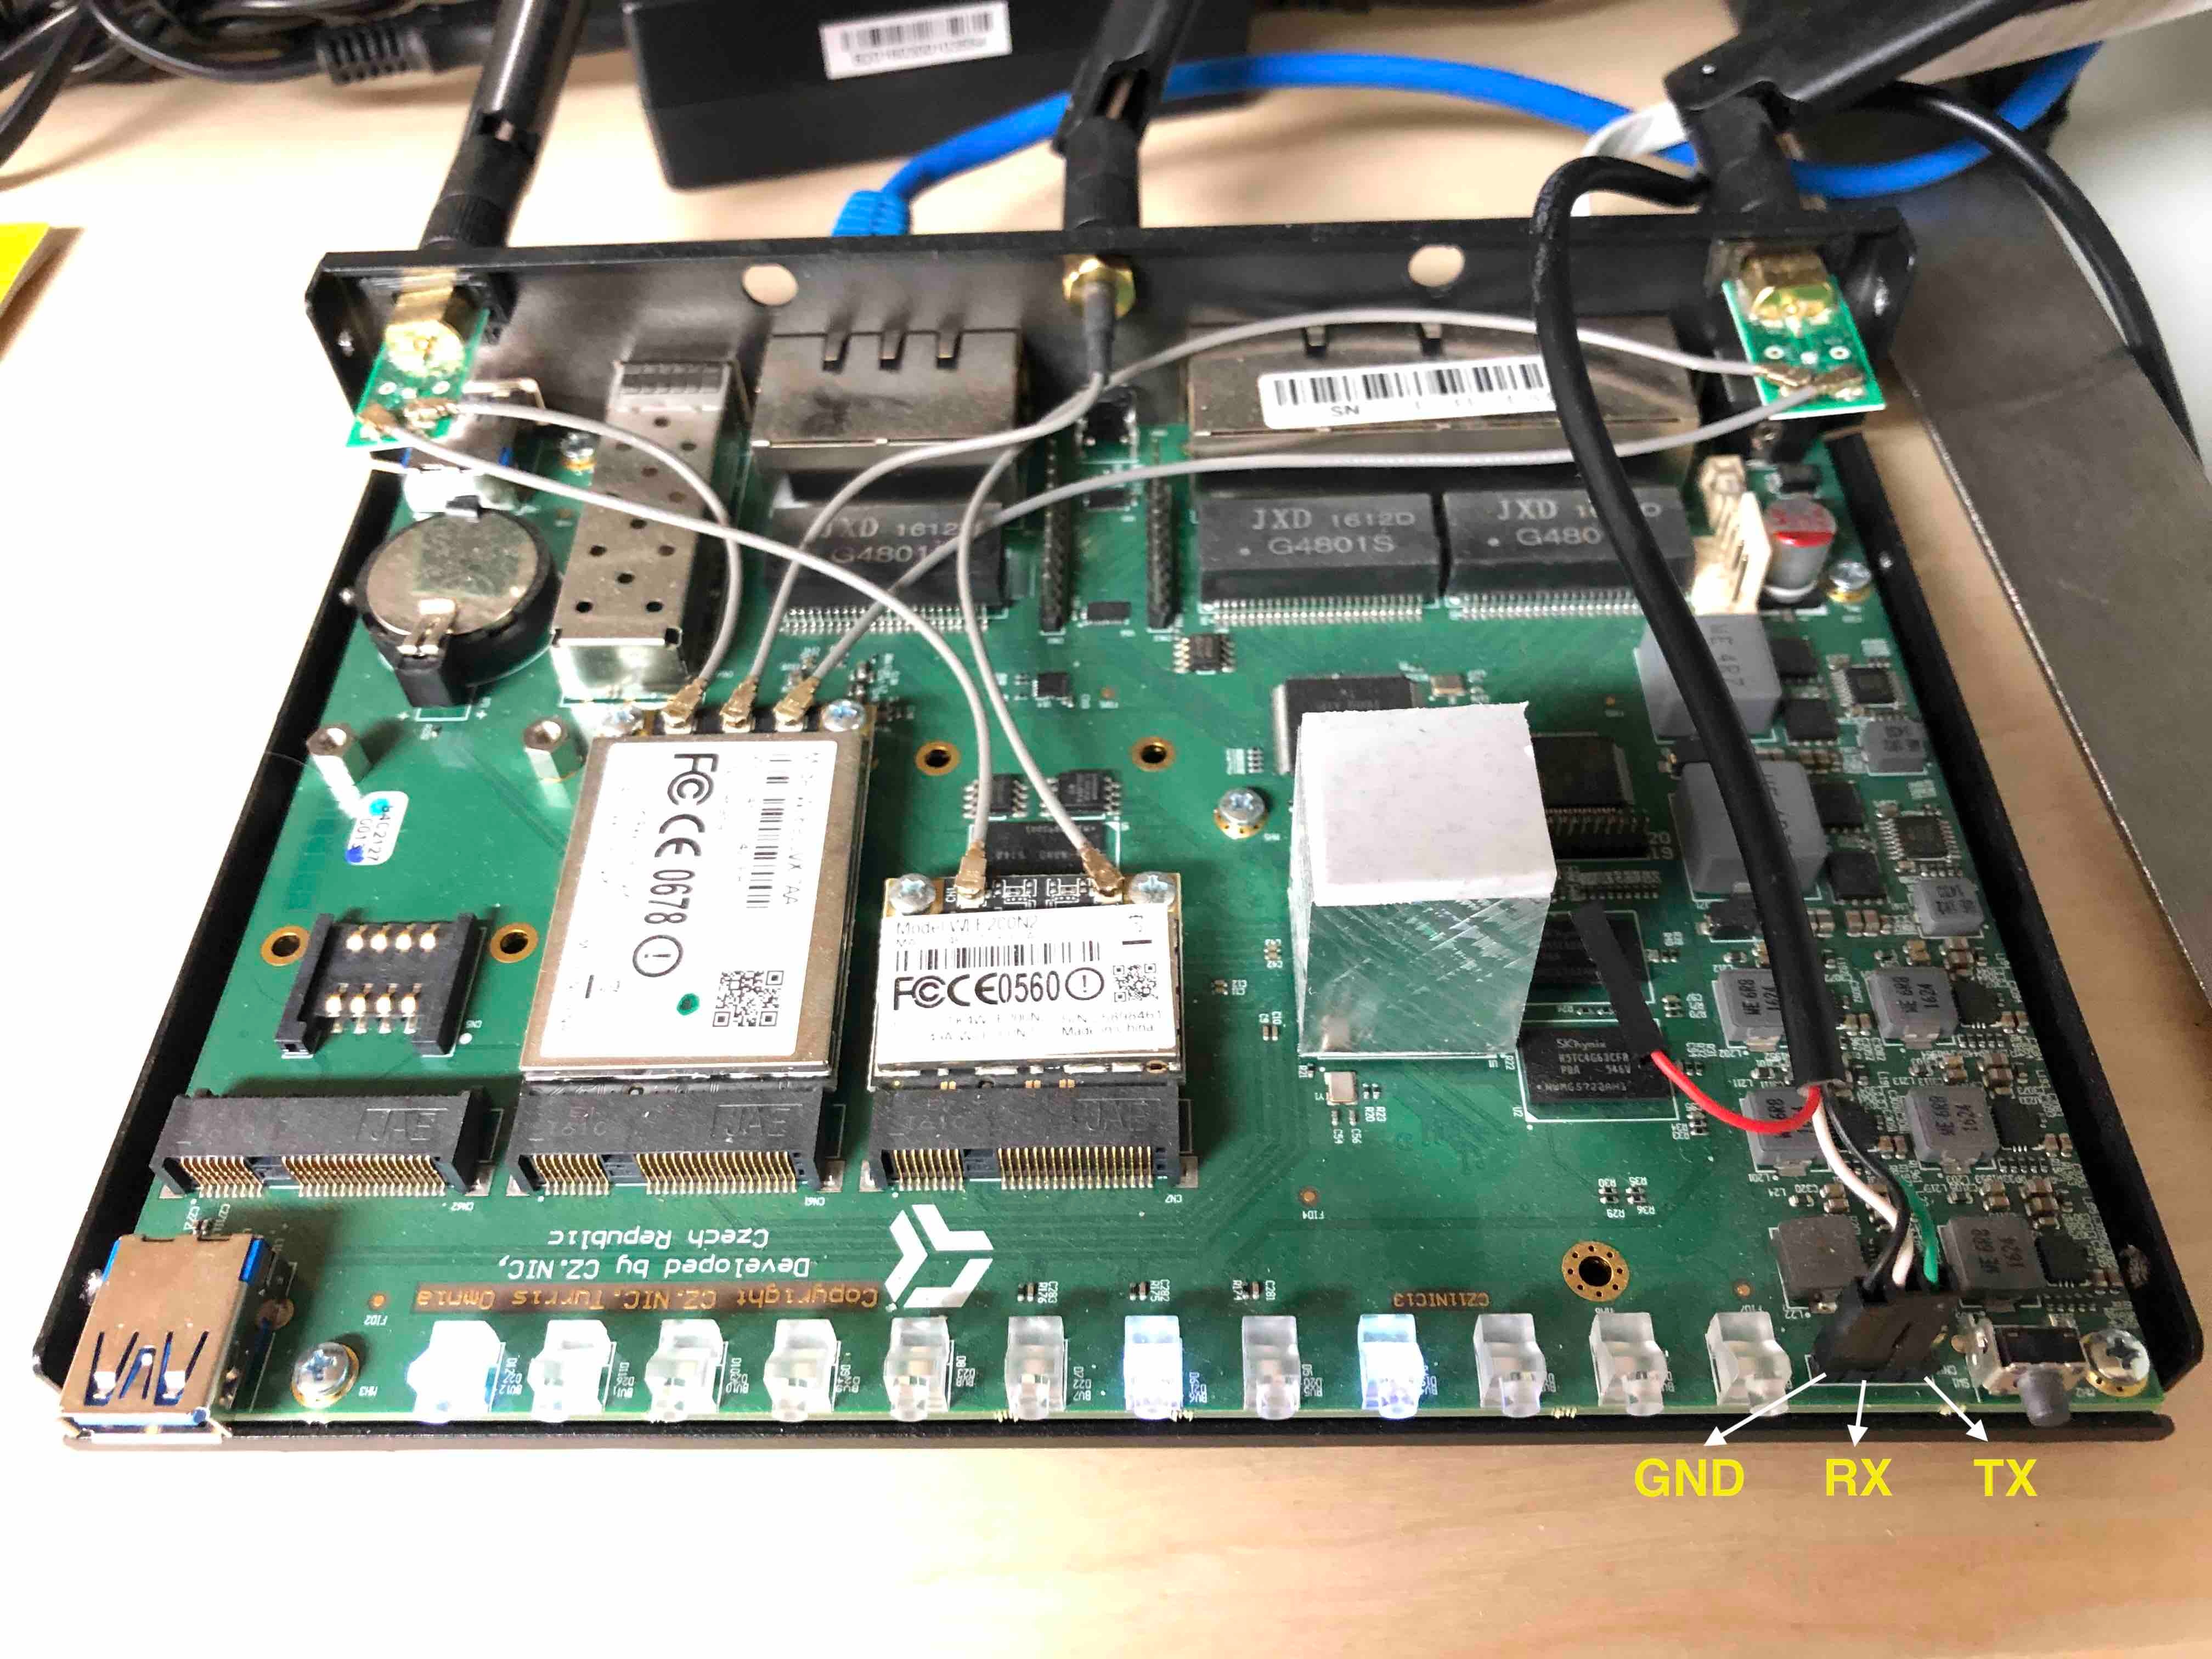
Caution: Do not connect Vcc!
NOTE: shared links and information on taking serial connection and flashing OpenWRT image
In serial console, press "Enter" key to get into u-boot prompt
Type "version" u-boot command to check the u-boot version
If the version found to be "U-Boot 2015.10-rc2", then type "reset" u-boot command. Then skip this section and move on to sub section(Setting default U-boot environment)
If version is other than U-Boot 2015.10-rc2, follow below steps (derived from https://wiki.debian.org/InstallingDebianOn/TurrisOmnia#Bootloader_update)
dhcp
tftpboot 0x1000000 uboot-turris-omnia-spl.kwb
sf probe
sf update 0x1000000 0 $filesize
In serial console, press "Enter" key to get into u-boot prompt
Run following u-boot commands to set default U-boot environment
env default -a
saveenv
reset
The Omnia ships with TurrisOS preinstalled. This is an OpenWrt fork with the older Linux 4.4 kernel. It uses btrfs to manage the eMMC flash.
We do not use it in this mode. The RDK-B port is closer to the mainline OpenWrt port, which uses Linux 4.14, and a traditional partition table.
Reflashing procedure from TurrisOS:
Download openwrt-18.06.2-mvebu-cortexa9-turris-omnia-sysupgrade.img.gz and omnia-medkit-openwrt-18.06.2-mvebu-cortexa9-turris-omnia-initramfs.tar.gz from http://downloads.openwrt.org/releases/18.06.2/targets/mvebu/cortexa9/ and copy both files to the root of the flash drive.
Disconnect other USB devices from the Omnia and connect the flash drive to either USB port. (I have only verified this with the USB port at the front).
Hold down the reset button (backside, bottom centre) and plug in the power cord. Wait until the fourth LED lights up (green), then release (before the 5th LED lights up). Please click here to see more detail on rescue modes.
Either use the serial console, or connect a computer to a LAN port (LAN0 to LAN4) of the Turris Omnia with a DHCP client.
From a computer:
ssh root@192.168.1.1
Then, from the ssh session or a serial console:
mount /dev/sda1 /mnt
sysupgrade /mnt/openwrt-18.06.2-mvebu-cortexa9-turris-omnia-sysupgrade.img.gz
Wait another minute for the final OpenWrt image to be flashed. The Turris Omnia will reboot itself and you can remove the flash drive.
The eMMC disk is now regularly partitioned.
root@OpenWrt:~# fdisk /dev/mmcblk0

Welcome to fdisk (util-linux 2.32).
Changes will remain in memory only, until you decide to write them.
Be careful before using the write command.

Command (m for help): p
Disk /dev/mmcblk0: 7.3 GiB, 7818182656 bytes, 15269888 sectors
Units: sectors of 1 * 512 = 512 bytes
Sector size (logical/physical): 512 bytes / 512 bytes
I/O size (minimum/optimal): 512 bytes / 512 bytes
Disklabel type: dos
Disk identifier: 0x15344058

Device         Boot Start    End Sectors   Size Id Type
/dev/mmcblk0p1 *     2048  35327   33280  16.3M  c W95 FAT32 (LBA)
/dev/mmcblk0p2      36864 561663  524800 256.3M 83 Linux
If fdisk is not preset
root@OpenWrt:~# opkg update
root@OpenWrt:~# opkg install fdisk
Create a new partitions for RDK-B.
The devicetree database and the Linux kernel are in the FAT32 partition:
root@OpenWrt:~# mount /dev/mmcblk0p1 /mnt
root@OpenWrt:~# ls -l /mnt
-rwxr-xr-x    1 root     root         17353 Aug 17  2018 armada-385-turris-omnia.dtb
-rwxr-xr-x    1 root     root       2445072 Aug 17  2018 zImage
Copy the kernel in the FAT32 partition.
Reconfigure U-boot to boot from your kernel and root partition.
It is strongly recommend to keep the OpenWrt partition and kernel. If boot fails, it is easy to change the U-boot environment and boot back into OpenWrt.
Follow instruction from wiki page(https://wiki.rdkcentral.com/display/RDK/Wifi-Extender+Yocto+Build+Instructions) to make yocto's RDK-B image from yocto workspace in your PC.
Boot into openwrt based linux system in turris omnia board. Its downlink interface will have 192.168.1.1 IP address and have it connected to your PC.
Create one primary partition for zImage. Create another extended partition for holding logical partitions for rootfs and /nvram.
After reboot, format /dev/mmcblk0p3, /dev/mmcblk0p5, /dev/mmcblk0p6 and /dev/mmcblk0p7 as ext2 partitions.
Copy zImage, dtb and a rootfs tar file from yocto workspace to turris omnia(whose IP is 192.168.1.1).
(in your PC)
$ scp <yocto_workspace>build-turris/tmp/deploy/images/turris/zImage root@192.168.1.1:/tmp
$ scp <yocto_workspace>build-turris/tmp/deploy/images/turris/zImage-armada-385-turris-omnia.dtb root@192.168.1.1:/tmp/armada-385-turris-omnia.dtb
$ scp <yocto_workspace>build-turris/tmp/deploy/images/turris/rdkb-generic-broadband-image_default_<image-timestamp>.rootfs.tar.gz root@192.168.1.1:/tmp/
(in turris omnia)
root@OpenWrt:~# mount /dev/mmcblk0p3 /mnt
root@OpenWrt:~# mv /tmp/zImage /mnt
root@OpenWrt:~# mv /tmp/armada-385-turris-omnia.dtb /mnt
root@OpenWrt:~# umount /mnt
root@OpenWrt:~# mount /dev/mmcblk0p5 /mnt
root@OpenWrt:~# tar -xzf /tmp/rdkb-generic-broadband-image_default_<image-timestamp>.rootfs.tar.gz -C /mnt
root@OpenWrt:~# umount /mnt
root@OpenWrt:~# reboot
Press enter while turris omnia reboots to get u-boot prompt. Then type following u-boot commands for booting yocto based RDKB image instead of openwrt image.
=> env set yocto_bootargs earlyprintk console=ttyS0,115200 root=/dev/mmcblk0p5 rootfstype=ext2 rw rootwait
=> env set yocto_mmcload setenv bootargs \"\$yocto_bootargs cfg80211.freg=\$regdomain\"\; ext2load mmc 0:3 0x01000000 zImage\; ext2load mmc 0:3 0x02000000 armada-385-turris-omnia.dtb
=> env set mmcboot run yocto_mmcload \|\| run openwrt_mmcload \|\| run factory_mmcload\; bootz 0x01000000 - 0x02000000
=> saveenv
=> reset
Now, Turris Omnia will boot with Yocto based RDKB image.
RDK firmware upgrade with XConf server: Firmware upgrade through XCONF server - Turris-Omnia - User Manual - 2020 - M6
Copy zImage and rootfs files(not *dbg* rootfs file) from PC or VM to /tmp/ directory of Turris Omnia which is currently running RDK Image.
For example
scp zImage--4.14.22-r0-turris-20200720105910.bin root@<TurrisOmnia-IP>:/tmp/
scp rdkb-generic-broadband-image_default_20200720105910.rootfs.tar.gz root@<TurrisOmnia-IP>:/tmp/
In Turris Omnia, execute /lib/rdk/TurrisFwUpgrade.sh to flash new RDK image present in /tmp folder
sh /lib/rdk/TurrisFwUpgrade.sh
Go back to OpenWrt OS (please refer Fallback to OpenWrt OS section above ).
Have Ethernet connection from your PC to LAN port of Turris Omnia.
Keep rootfs(rdkb-generic-broadband-image_default_*.rootfs.tar.gz) and zImage(zImage--4.14.22-r0-turris-*.bin) files in home directory of your PC.
In OpenWrt OS, create a script(yocto-fw-upgrade.sh) with following commands with updates as it needs.
MYPC_IP=192.168.1.83
USER_NAME=manigandan
scp $USER_NAME@$MYPC_IP:*$1* /tmp/
mount /dev/mmcblk0p3 /mnt
mv /tmp/zImage-* /mnt/zImage
umount /mnt
mount /dev/mmcblk0p5 /mnt
rm -rf /mnt/*
tar -xzf /tmp/rdkb-* -C /mnt/
umount /mnt
reboot
Run the script from inside OpenWrt OS.
root@OpenWrt:/# ./yocto-fw-upgrade.sh <image-timestamp>
Press enter while turris omnia reboots to get into u-boot prompt. Then type following u-boot commands to get back to Yocto based RDKB image.
=> env set yocto_bootargs earlyprintk console=ttyS0,115200 root=/dev/mmcblk0p5 rootfstype=ext2 rw rootwait
=> env set yocto_mmcload setenv bootargs \"\$yocto_bootargs cfg80211.freg=\$regdomain\"\; ext2load mmc 0:3 0x01000000 zImage\; ext2load mmc 0:3 0x02000000 armada-385-turris-omnia.dtb
=> env set mmcboot run yocto_mmcload \|\| run openwrt_mmcload \|\| run factory_mmcload\; bootz 0x01000000 - 0x02000000
=> saveenv
=> reset
Turris Omnia will now run upgraded version of Yocto based RDK image.
To fallback to openwrt OS, enter following u-boot commands.
=> env set mmcboot run openwrt_mmcload \|\| run factory_mmcload\; bootz 0x01000000 - 0x02000000
=> saveenv
=> reset