RDK Resources
[*RDK Preferred*]
Code Management Facility
RDK Forums
[RDK Conferences]
RDK Support
Archives
Papers & Presentations Archive![]()
Papers & Presentations Archive![]()
The build procedure for broadband are as follows:
sd-card size requisite
It is must to have minimal size of 8GB SD-Card for Firmware upgrade support
Generated image has to be flashed to an SD card using this command in local PC:
|
Ex:
|
The SD card is inserted to the Raspberry Pi board and booted to check for containers created.
The Raspberry Pi board is connected to the PC via a USB to serial converter and the logs can be checked in console or can be connected via HDMI cable to a TV and logs will be shown in the terminal
It is necessary to flash the stable image during upgrade. So checksum file has to be created for the image to be uploaded using below command
md5sum checksum creation
md5sum "<imagefile_name>.rootfs.rpi-sdimg" > imagefile_name.txt
After checksum file is created, place this file in tftp location along with actual image file which is expected by firmware upgrade script. Without which firmware upgrade wont be allowed by scripts
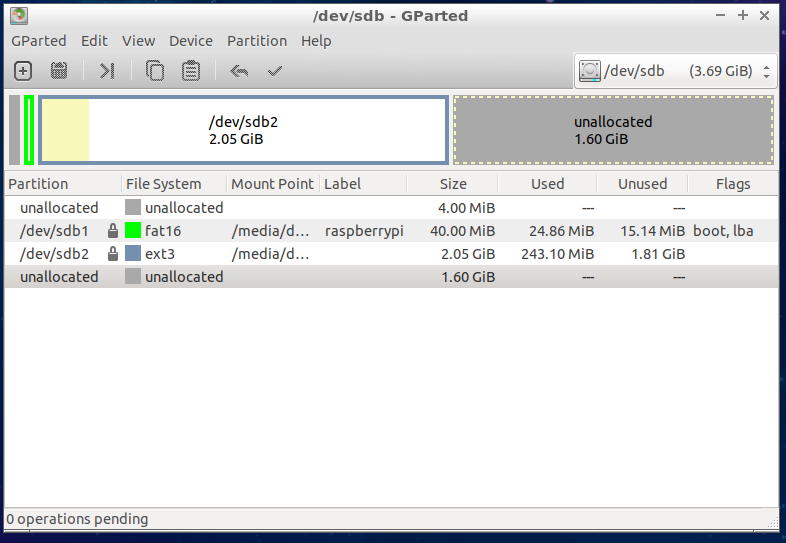
If firmware upgrade is intended for multi-boot, it is necessary to have partizion size matching to RDKB image size ( especially rootfs ).
To make compatible, size of RDKB rootfs partition should be increased to 2 GB ( 2098 MB) from 300MB default
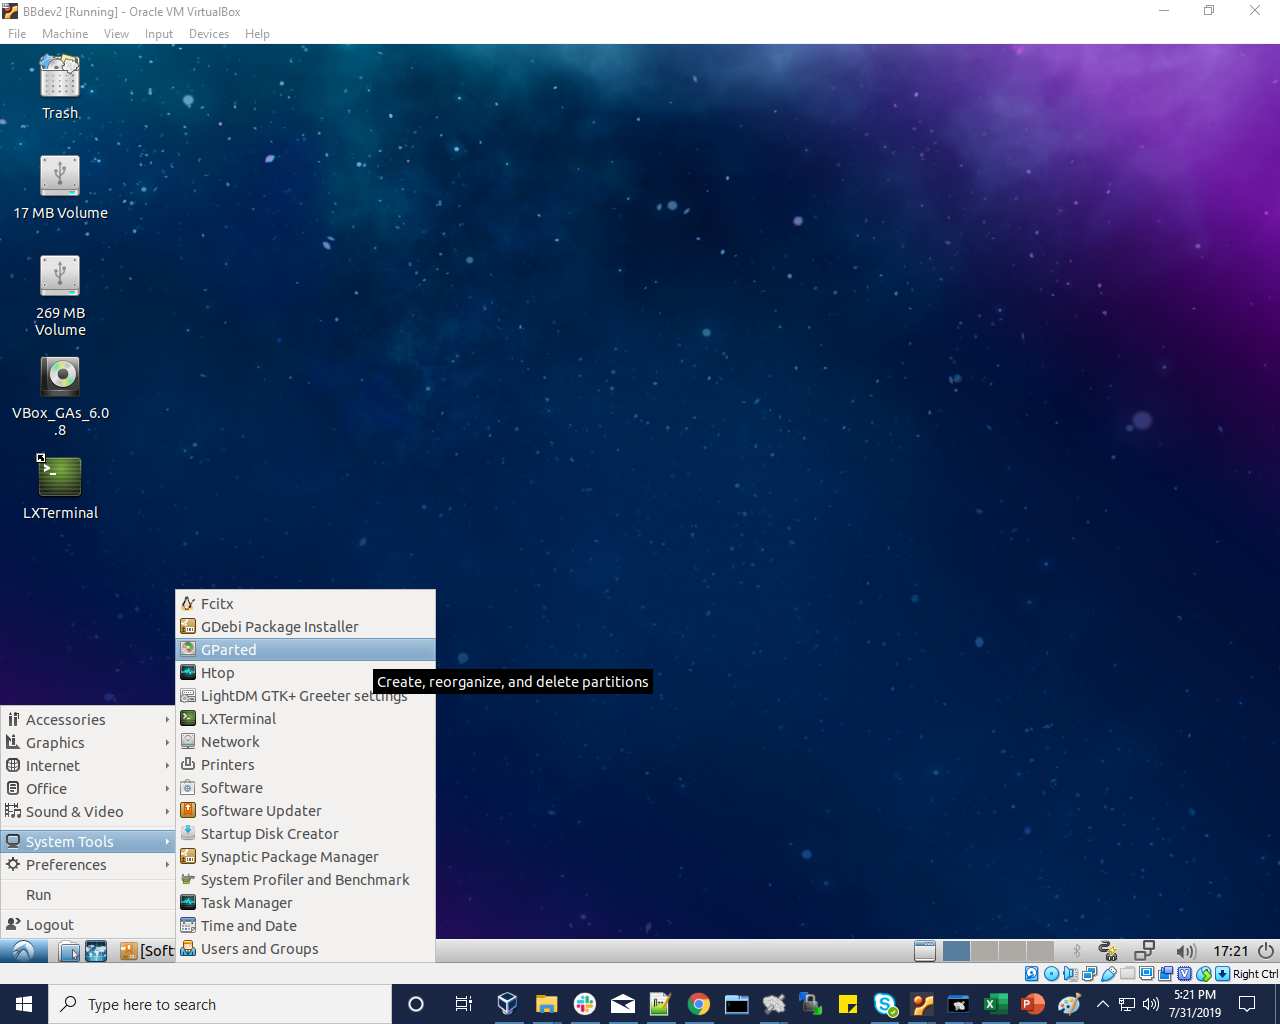
This resize can be achieved using gpartedui tool which should be available in host pc
gparted tool Install and usage
sudo apt-get install gparted
https://gparted.org/display-doc.php%3Fname%3Dmoving-space-between-partitions
Please resize the rootfs partition to 2098 MB or 2GB (/dev/sdb1) accordingly from below procedure as captured in various stages
2. Select the rootfs partition of format ext3 for resize/move option

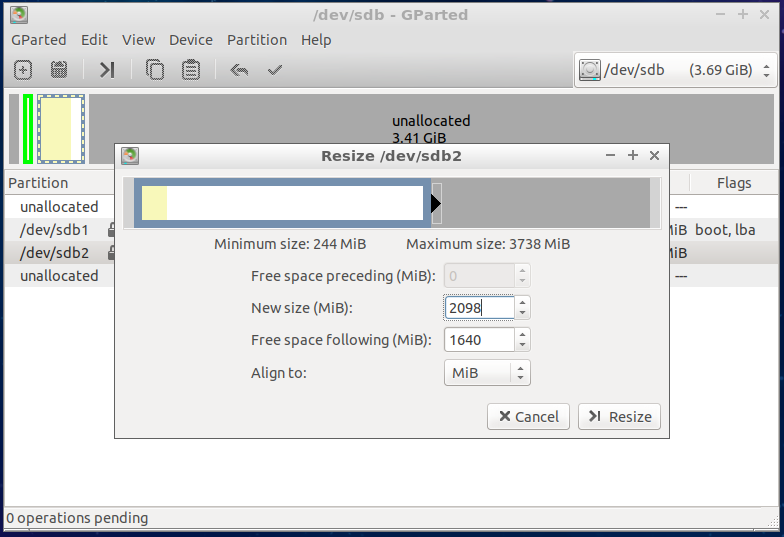
3. Resize the rootfs partition by giving new size image to 2098 MiB
4. After resize , position stands as below
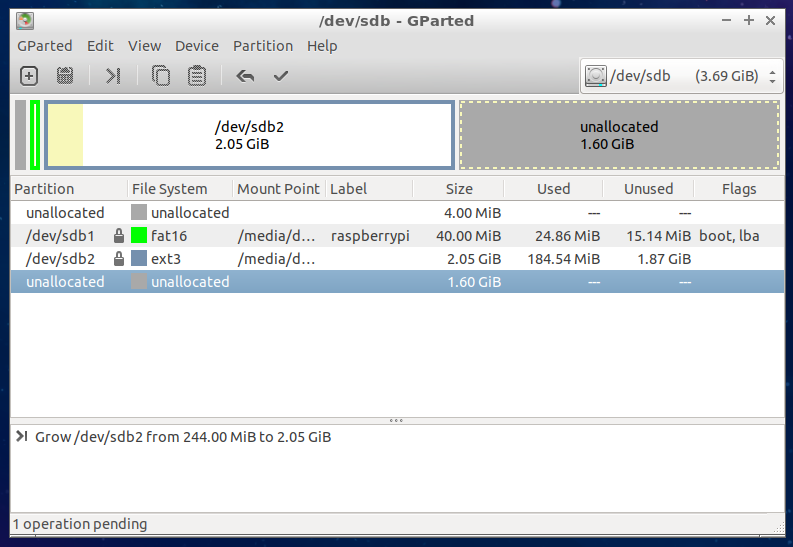
5.After modifying size, "Apply all operations" using tick symbol in UI which displays icon as below

6. After giving "Apply icon" position stands as below

7. After resizing is completed
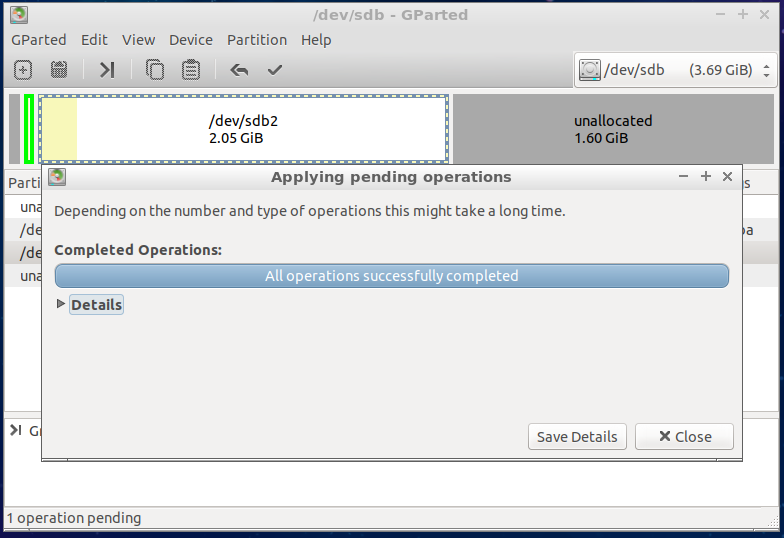
8. After applying close size increased to 2 GB can be seen
Using the below command to re-start the firmware service.
systemctl restart swupdate.service |
|---|
Firmware logs generation path.
| cat /rdklogs/logs/swupdate.log |
|---|
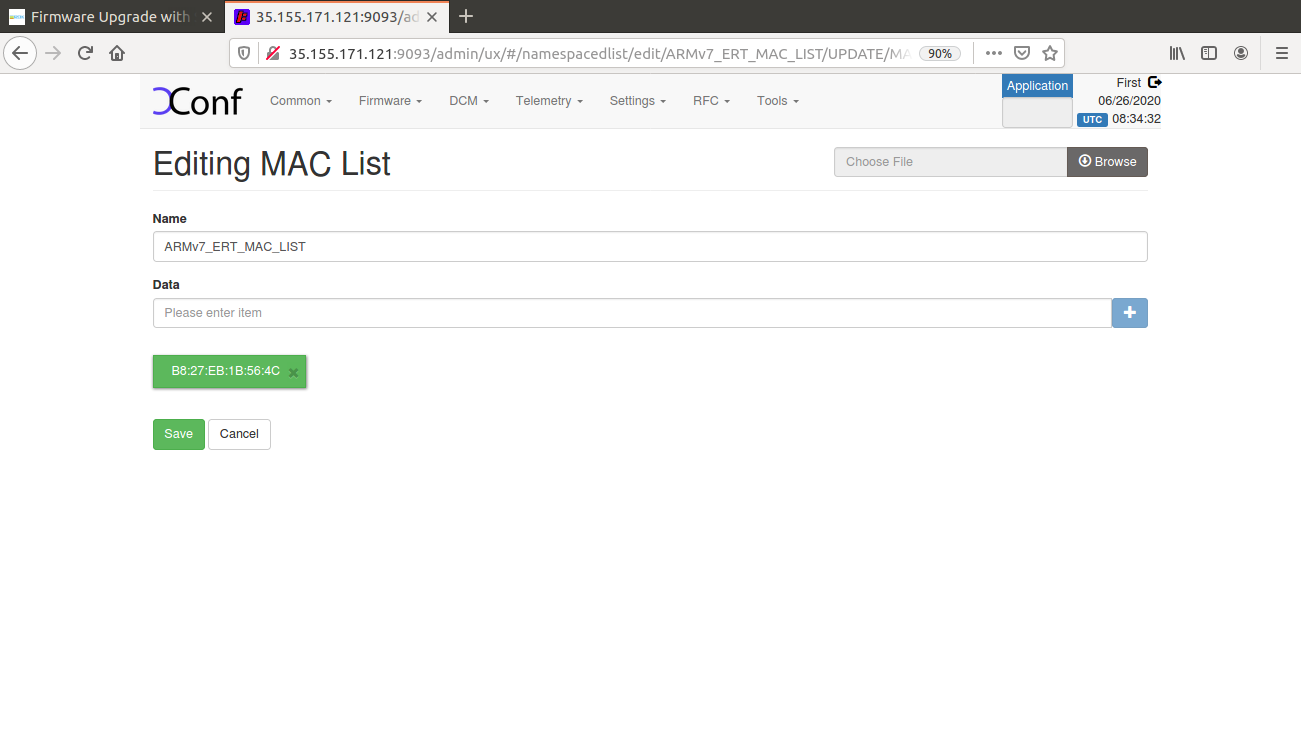
Please follow the below procedure in xconf server for placing new firmware for upgrade to specific device and model ( RPI in this case ) as a reference:

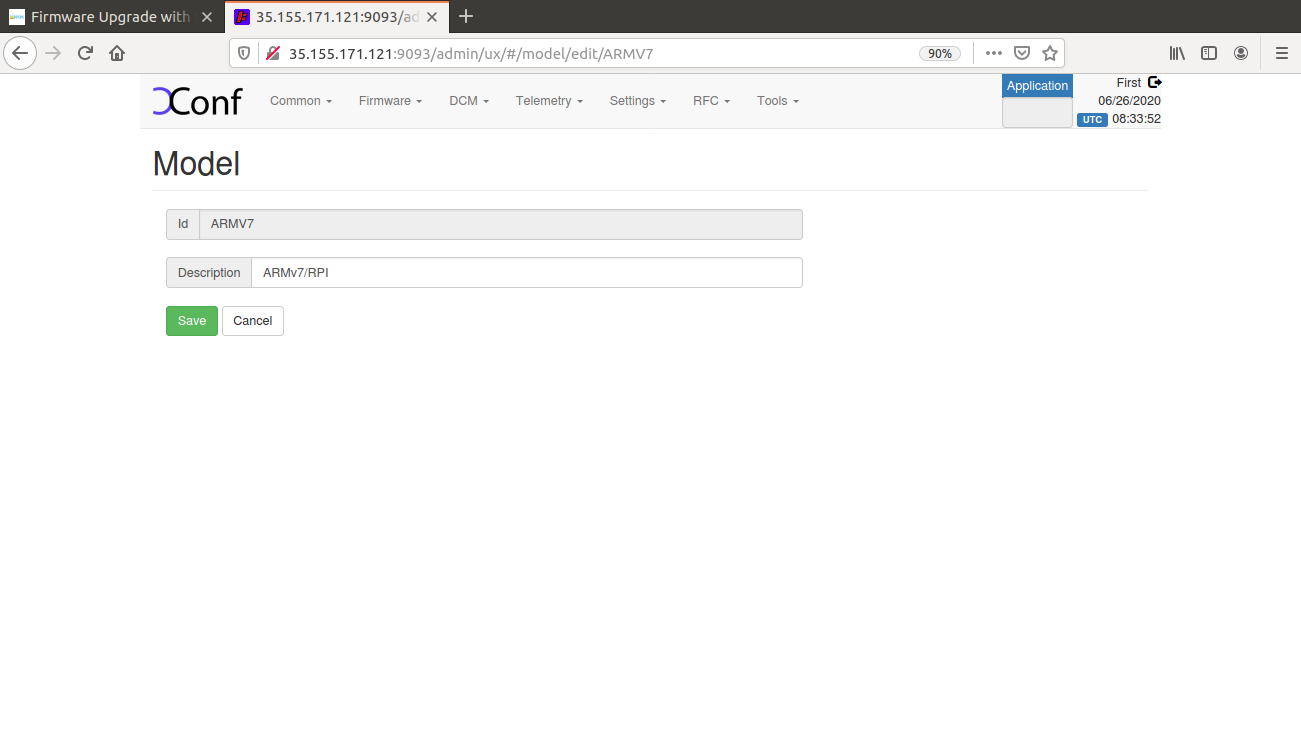
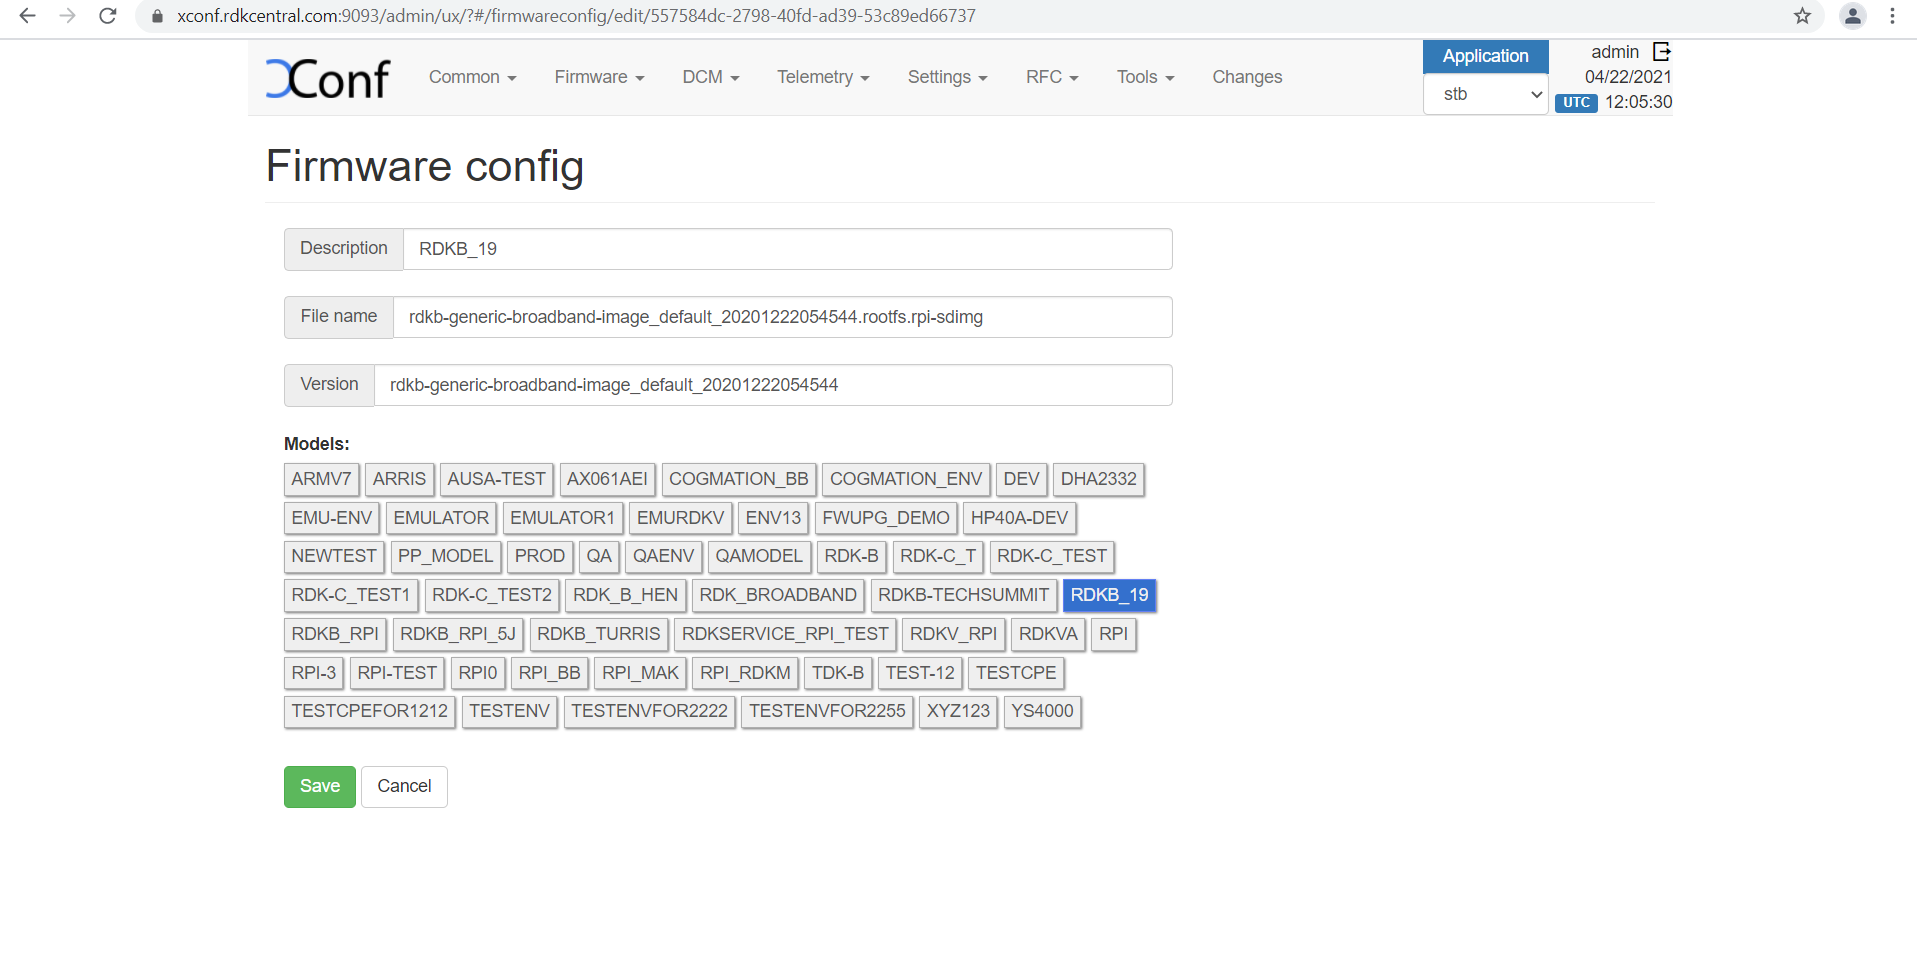
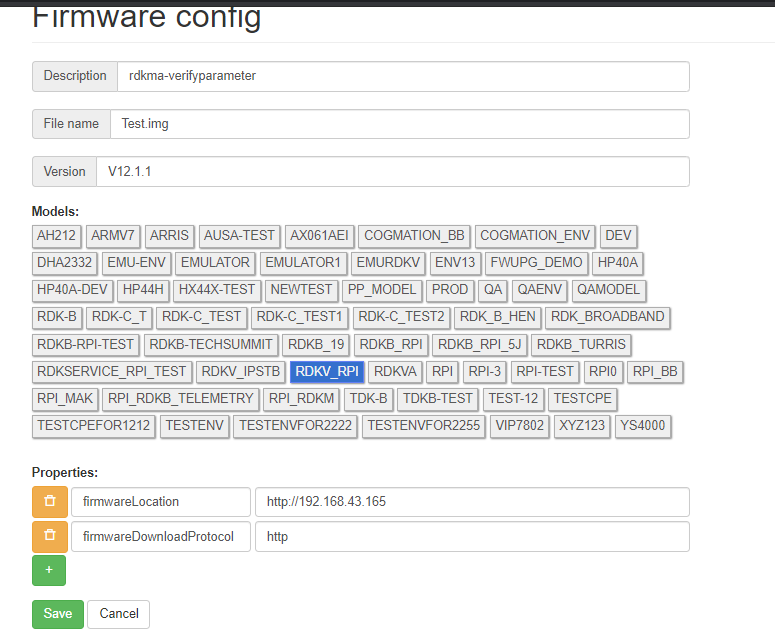
1. Firmware config can be created via Firmware - > Firmware Configs -> Create. Enter a description for this config. Also we can define the file name and version of the image/firmware that need to be downloaded to the CPE device. The models that we defined in Common → Models section will be available here, We can select the required models by clicking on it.
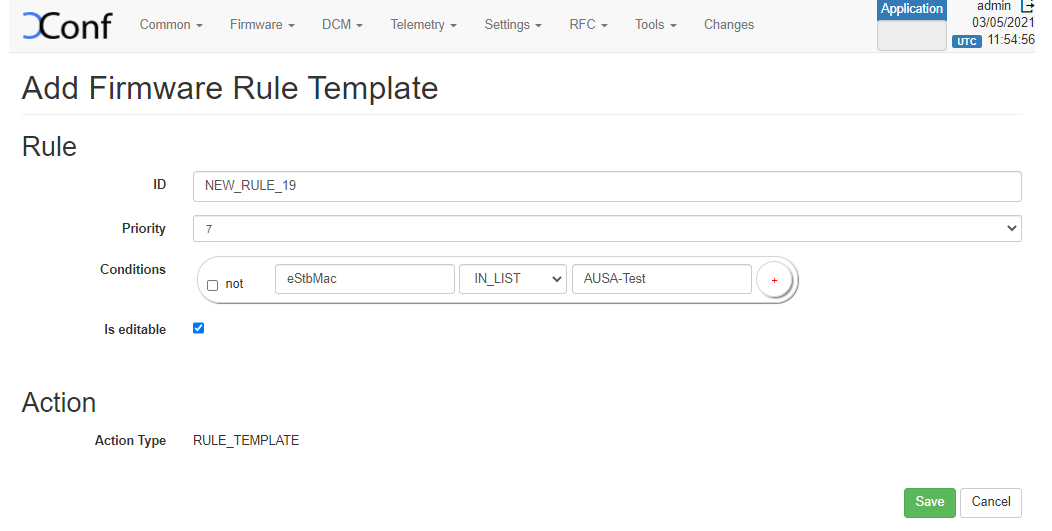
2. To create a firmware template, go to Firmware → Firmware templates. Enter the ID name. Select priority from the 'Priority' drop down menu. Add conditions. There are some already existing templates, if you are using the existing Firmware Templates for configuration ,you can skip this step.
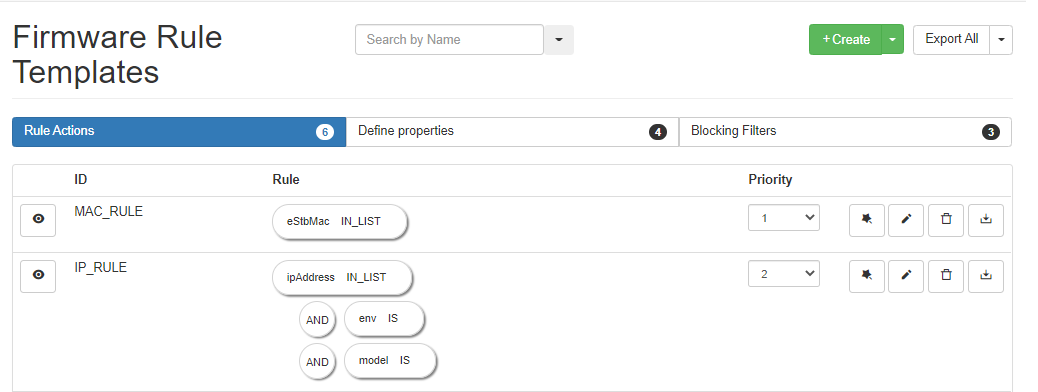
3. Firmware rule can be create via Firmware -> Firmware rules -> Rule Action -> Create. On clicking on Create button, a list of templates will be presented. We can select the required template (There will be default templates like ENV_MODEL_RULE, IP_RULE, MAC_RULE etc. and also the custom templates created from Firmware->Firmware template -> Create).
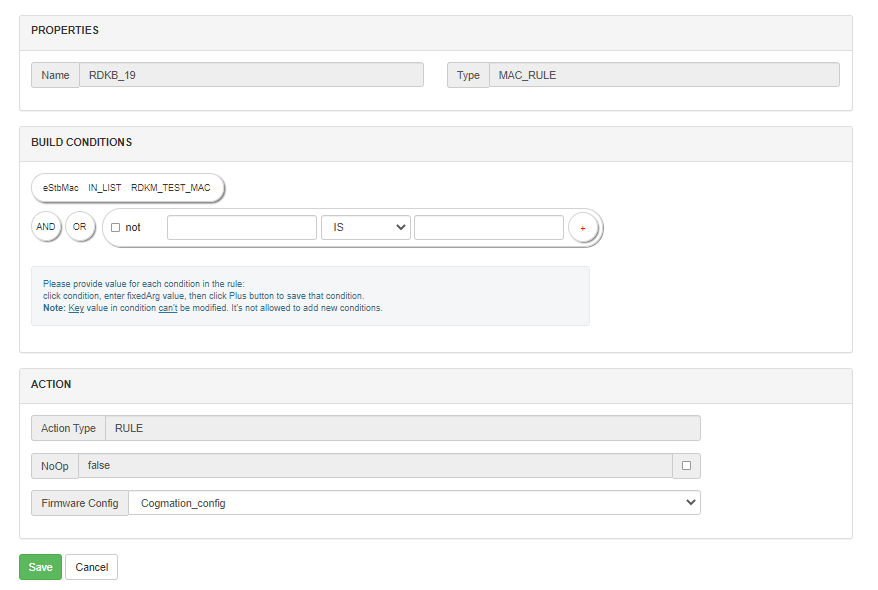
After we select the required template, 'Add firmware Rule' page will be displayed. Here the build conditions will be present from the 'template' that we added and in addition to that we can add additional Build Conditions also. To add firmware config , go to the 'Actions' tab and select the firmware config from 'Firmware config' drop down list (Select the firmware config that you have created).

Server Set-up :
Verify that image file and its respective md5 checksum file is present in the http folder:
keerthana@keerthana-INVALID:/var/www/html$ ls
rdkb-generic-broadband-image_default_20200529140558.rootfs.rpi-sdimg
folder rdkb-generic-broadband-image_default_20200529140558.txt
There is a new option added in the Firmware Config, where we can add parameters. For example if we add parameters 'firmwareLocation' and 'firmwareDownloadProtocol'. then we will be able to override the default download location set from the 'DownLoad Location Filter' page.
To create a new firmware configuration for a particular set of devices with http download location :
2. Create a firmware rule like the steps given in 'Configuration' and map this Firmware Config to it. Check using the steps in below 'Verification' sections and verify if the firmwareLocation and firmwareDownloadProtocol are the same as we configured in FirmwareConfig page.
Sample curl response(refer below steps to check) - https://xconf.rdkcentral.com:19092/xconf/swu/stb?eStbMac=AA:BB:CC:DD:AA:AA

a. Verification of Firmware test page.
After creating the Firmware configs and Firmware rules , go to Firmware->Test page and give a parameter that will match the one of the rule that you have created. Then matched rule will be displayed like below.

b. Verification via curl command
The curl command mocks the request being sent from an STB like below and sample response is also given. It can be given as a curl command or as a get request via postman or browser.
eg :
$ curl 'https://<XCONF_IP>:19092/xconf/swu/stb?eStbMac=B8:27:EB:BE:D7:12
Sample Response :
|
| CURL Command | curl 'http://<XCONF_IP>:19092/xconf/swu/stb?eStbMac=B8:27:EB:BE:D7:12&model=ARMv7&capabilities=RCDL&capabilities=supportsFullHttpUrl' |
|---|---|
| CPE Script (RDK-V) | /lib/rdk/swupdate_utility.sh |
| CPE Service (RDK-V) | /lib/systemd/system/swupdate.service |
An HTTP location will be returned by default to all devices. To enable tftp(If you have the download location of the firmware as tftp, then only you need to setup this)as download location for a particular set of devices, we need to override it from firmware rules.
2. A page will be displayed with options to select the template. Select ‘DOWNLOAD_LOCATION_FILTER’ from the list

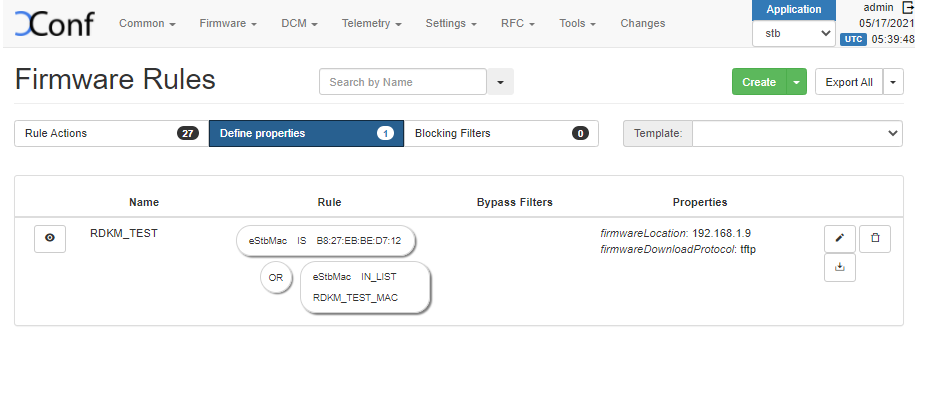
3. In this 'firmware rule' page with type 'DOWNLOAD_LOCATION_FILTER', we need to specify the ‘Build Conditions’ and ‘Action’ , The build condition should be same as that we used to set rule actions(which will set rules for our intended devices). In ‘Properties’ option under ‘Action’, add ‘firmwareDownloadProtocol’ as ‘tftp’, ‘firmwareLocation’ as ‘your tftp location IPV4 address’. This property will override the default value set from ‘Download Round Robin location filter’.
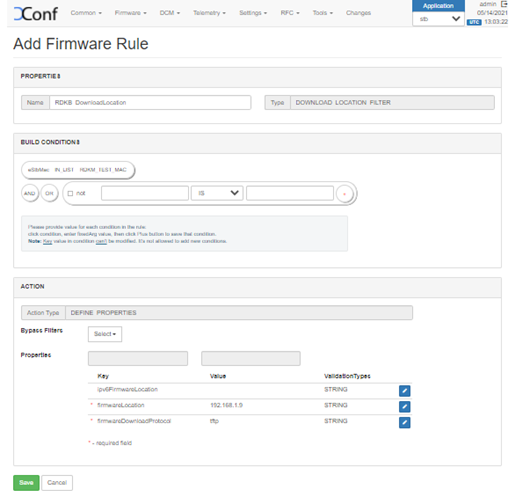
4. To add IPV6 address of tftp servers, you can either specify it here in the define properties rule or else from ‘Download Round Robin Filter’ page. To add IPV6, add it as ‘ipv6FirmwareLocation’ Property in ‘define properties rule’ page (ipv6FirmwareLocation key will be there by default, you need to add the value as tftp ipv6 address).
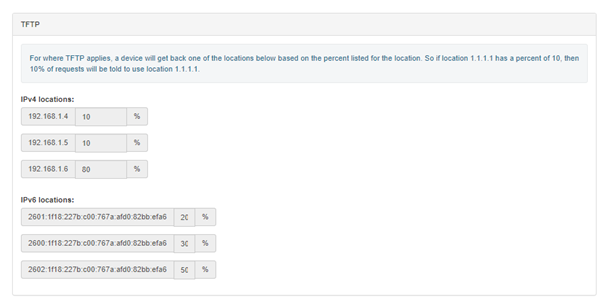
5. To add IPV6 address of tftp servers in ‘Download Round Robin Filter’, Go to Firmware - > Download Location Filter. Enter the tftp IPV6 locations and also the percentages. The devices will get back one of the locations based on the percentage listed for the location.
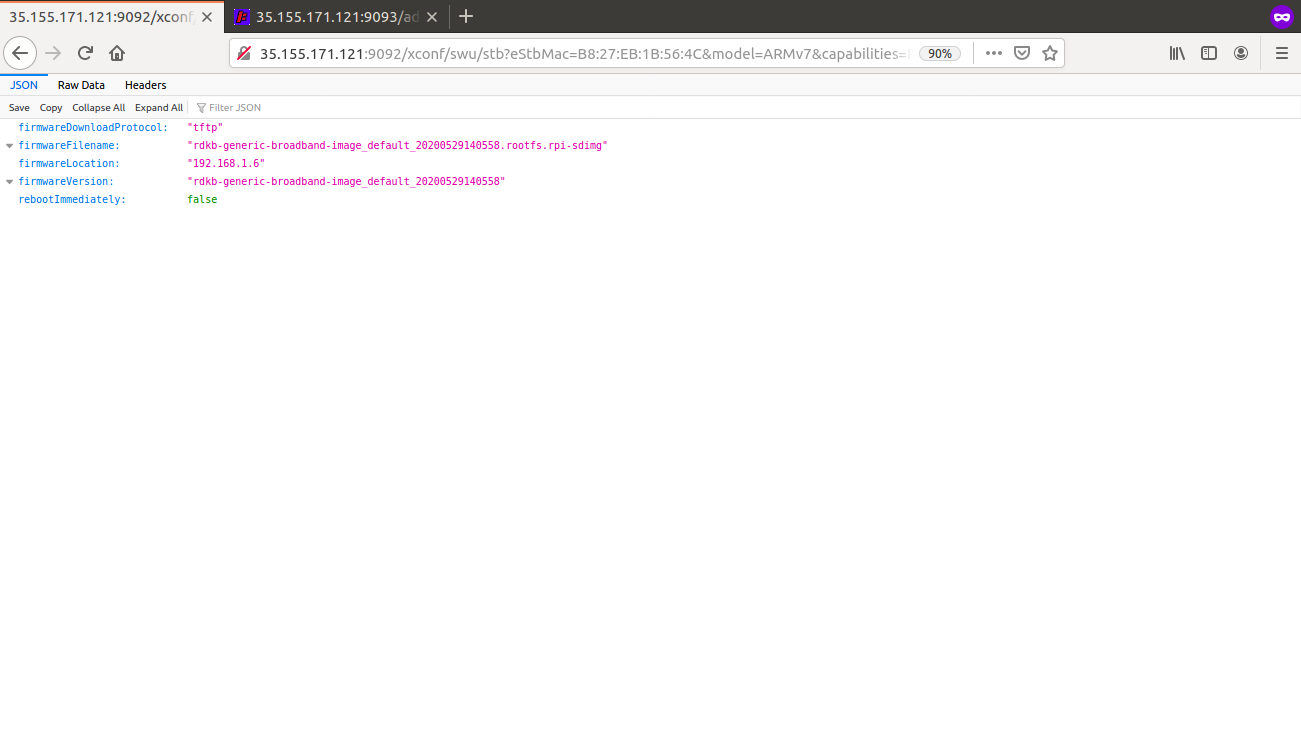
6. Response example for https://{xconf-ip}:{port}/xconf/swu/stb?eStbMac={mac}. Here the 'firmwareLocation' and 'firmwareDownloadProtocol' are overrided at 'Define Properties' firmware rule.
The 'ipv6' addresses will be one of the addresses mentioned in the 'Download Filter' page . If you don't want "ipv6FirmwareLocation", then don't setup it in 'Define Properties' or in the 'Download location filter' pages and you will get only "firmwareLocation" in the response
{
"firmwareDownloadProtocol": "tftp",
"firmwareFilename": "rdkb-generic-broadband-image_default_20200406103506.rootfs.rpi-sdimg",
"firmwareLocation": "192.168.1.9",
"firmwareVersion": "rdkb-generic-broadband-image_default_20200406103506.txt",
"ipv6FirmwareLocation": "2601:1f18:227b:c00:767a:afd0:82bb:efa6",
"rebootImmediately": false
}
7. Setting up IPV4 locations via ‘Download Location Round Robin Filter’ is not supported. This can be set only by the property 'firmwareLocation' from the 'Define Properties' firmware rule page.
8. Note : Just like we added tftp location and protocol here, we can also override the default value with http as well. For firmwareDownloadProtocol, add 'http' and for the 'firmwareLocation', add http location
Verify that XConf Server configuration displays the Json response from the mentioned URL:
Using the below url to view the JSON Format result of http protocol ,
https://xconf.rdkcentral.com:19092/xconf/swu/stb?eStbMac=<RPI MAC ADDRESS>&model=<model_name>&capabilities=RCDL&capabilities=supportsFullHttpUrl
Configure tftp server and keep the image file and reapective md5 checksum file inside tftp folder. Example given below:
1.Verify the content of tftp file (use vi /etc/xinetd.d/tftp command)
service tftp
{
protocol = udp
port = 69
socket_type = dgram
wait = yes
user = nobody
server = /usr/sbin/in.tftpd
server_args = -c -v -s /home/amrita/tftphome
disable = no
}
2. Verify the content of tftpd-hpa:
# /etc/default/tftpd-hpa
TFTP_USERNAME="tftp"
TFTP_DIRECTORY="/home/amrita/tftphome/"
TFTP_ADDRESS="0.0.0.0:69"
TFTP_OPTIONS="-s -c -1"
3. Verify the tftp folder location:
amrita@amrita-OptiPlex-9020:~/tftphome$ pwd
/home/amrita/tftphome
4. Verify that image file and its respective md5 checksum file is present in the tftp folder:
amrita@amrita-OptiPlex-9020:~/tftphome$ ls
rdkb-generic-broadband-image_default_20190812074412.rootfs.rpi-sdimg
rdkb-generic-broadband-image_default_20190812074412.txt
5. Start tftp server and xinetd:
sudo service tftpd-hpa restart
/etc/init.d/xinetd restart
Please find the summary on firmware upgrade explained above
Note : 1. RPI will go for reboot while booting for the first time, since two more partition needs to be created which requires reboot. Depends on the image present in xconf and RPI, further reboot will happen for upgrade. Please refer to design (RDKB RPI Firmware Upgrade with support of HTTP protocol - Design - 2020 M6) for how firmware upgrade works with bank switching
2. SD card should be zero filled formatted before starting the firmware upgrade procedure. DriveWipe software is used for this. Please refer the you-tube video link for the SD card full format process.
3. If the user wants to view swupdate.log file then follow below steps:
a) Disable log rotation feature - This wipes out the log file if size exceeds after 1min
For B image command - systemctl disable rdkbLogMonitor
b) Reboot the box - This will make swupdate.service restart and user can start getting swupdate.log for B image
4. Broadband(size 292MB) image takes roughly 20 min time from Cloud server(Xconf).
5. Minimum extended partition should be 1GB, to verify firmware feature.
