RDK Resources
[*RDK Preferred*]
Code Management Facility
RDK Forums
[RDK Conferences]
RDK Support
Archives
Papers & Presentations Archive![]()
Papers & Presentations Archive![]()
This Page is under Development
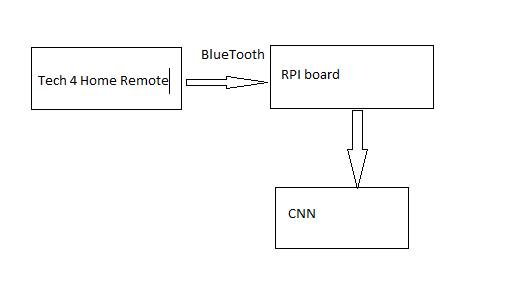
This document describes the Voice control of RPI board using Tech 4 Home remote. Voice command from remote is transferred to RPI board via bluetooth and is processed by Voice plugin to proceed further./
The build procedure is as follows:
|
|---|
Image is flashed to SD card before inserting to RPI board.
sd-card size requisite It is must to have minimal size of 8GB SD-Card for Firmware upgrade support |
Command to flash the image
Generated image has to be flashed to an SD card using this command in local PC:
$ sudo dd if=<path to ImageName.rpi-sdimg> of=<path to SD card space> bs=4M
Ex: $ sudo dd if=rdk-generic-hybrid-thunder-image_default_20200302530659.rootfs.rpi-sdimg of=/dev/sdc bs=4M |
|---|
The SD card is then inserted to the Raspberry Pi board and booted to check for containers created.
The Raspberry Pi board is connected to the PC via a USB to serial converter and the logs can be checked in console or can be connected via HDMI cable to a TV and logs will be shown in the terminal.
For testing Voice plugin , we need Tech 4 Home remote and RPI board with bluetooth support.
<Briefly describe and graphically depict as appropriate the equipment, communications, and network configuration of the system in a way that a non-technical user can understand>
<Briefly describe and graphically depict as appropriate the equipment, communications, and network configuration of the system in a way that a non-technical user can understand>
<Provide detailed information and describe the procedures necessary to access the system. If applicable, include how to get a user ID and log on to the system, as well as the actions a user must take to change and/or reset a password.>
<Describe how system flow is happening mentioning checkpoints which can be verified during flow to ensure system is working as expected>
<Mention the validation artifacts that are essential to ensure the functionality is working as expected. Also any limitation while closing the validation process>
Describe the specific system function or feature in detail and depict graphically by including screen prints and descriptive narrative as appropriate. Ensure each screen print is captioned and has an associated tag providing appropriate alternative text
Follow the above for sub feature / use cases
<Identify the error messages that a user may receive and the likely cause(s) and/or possible corrective actions for the error>
<If applicable, describe any special circumstances, actions, exceptions, etc., that should be considered for troubleshooting.>
Contact | Organization | Phone | Role | |
<Contact Name> | <Organization> | <Phone> | <Email> | <Role> |
