RDK Resources
[*RDK Preferred*]
Code Management Facility
RDK Forums
[RDK Conferences]
RDK Support
Archives
Papers & Presentations Archive![]()
Papers & Presentations Archive![]()
<work in progress>
This document guides users to perform the below activties on a Raspberry Pi (Rpi) platform as well as an Amlogic Reference platform
| Info | ||||
|---|---|---|---|---|
| ||||
On this Page:
|
| Background Color | ||
|---|---|---|
| ||
Before you begin |
Though not mandatory, the below skills will help the user to understand RDK, RDK build, and to try out RDK better :
| AUI Tab Group |
|---|
|
| Requirement | Yocto 3.1 LTS (Dunfell) |
|---|---|
Linux PC | 64 bit Ubuntu 18.04 LTS Precise supported distributions and versions are here |
Free HDD Space | Minimum 100GB Free memory space |
Host Tools version | Git 1.8.3.1 or greater tar 1.24 or greater Python 2.7.3 |
| Raspberry Pi development kit | |
| IPSTB Reference board | Access to repositories hosting code and binaries for reference board |
| Peripherals | TV, Keyboard |
| Background Color | ||
|---|---|---|
| ||
Environment |
| Expand | ||||||||||||
|---|---|---|---|---|---|---|---|---|---|---|---|---|
| ||||||||||||
RPI & IPSTB similarities:
Difference between Raspberry Pi (RPI) and IPSTB:
|
The instructions provided below are meant to be executed via the command line on an Ubuntu machine
| Code Block | ||||||
|---|---|---|---|---|---|---|
| ||||||
# essential packages installation # super user mode is required # major essential packages sudo apt-get install gawk wget git-core diffstat unzip texinfo gcc-multilib g++-multilib build-essential chrpath socat bison curl cpio python3 python3-pip python3-pexpect xz-utils debianutils iputils-ping python3-git python3-jinja2 libegl1-mesa libsdl1.2-dev pylint3 xterm |
| Code Block | ||||
|---|---|---|---|---|
| ||||
sudo dpkg-reconfigure dash |
Select “No”
To choose bash, when the prompt asks if you want to use dash as the default system shell - select “No”
Upgrade your Git version to 1.8.x or higher
Once git is installed, configure your name and email using the below commands
| Code Block | ||||
|---|---|---|---|---|
| ||||
# review your existing configuration git config --list --show-origin # configure user name and email address git config --global user.name "John Doe" git config --global user.email johndoe@example.com # configure git cookies. Needed for Gerrit to only contact the LDAP backend once. git config --global http.cookieFile /tmp/gitcookie.txt git config --global http.saveCookies true |
In order to use Yocto build system, first you need to make sure that repo is properly installed on the machine:
| Code Block | ||||
|---|---|---|---|---|
| ||||
# create a bin directory mkdir ~/bin export PATH=~/bin:$PATH # Download the repo tool and ensure that it is executable curl http://commondatastorage.googleapis.com/git-repo-downloads/repo > ~/bin/repo chmod a+x ~/bin/repo |
Credential configuration (Only for Amlogic reference board)
Note: it is also recommended to put credentials in .netrc when interacting with the repo.
A sample .netrc file is illustrated below
machine code.rdkcentral.com login <YOUR_USERNAME> password <YOUR_PASSWORD> |
|---|
| Background Color | ||
|---|---|---|
| ||
Build basic image for RPI |
| Code Block | ||||
|---|---|---|---|---|
| ||||
# initialize the manifest with repo tool repo init -u https://code.rdkcentral.com/r/manifests -b dunfell -m rdkv-nosrc.xml repo sync -j `nproc` --no-clone-bundle --no-tags MACHINE=raspberrypi-rdk-mc source meta-cmf-raspberrypi/setup-environment bitbake rdk-generic-mediaclient-wpe-image |
build-<MACHINE>/tmp/deploy/images/<MACHINE> of the Yocto workspace| Background Color | ||
|---|---|---|
| ||
Build basic image for Amlogic Reference Board |
Enabled the distro(ipclient) for IPSTB as a setup environment option, so during build time we can pass this as an argument.
| Code Block | ||
|---|---|---|
| ||
repo init -u https://code.rdkcentral.com/r/rdk/soc/amlogic/aml-manifests -b rdk-next -m aml_ipstb.xml repo sync -j4 --no-clone-bundle export LOCAL_BUILD=1 source meta-rdk-aml/set-env.sh mesonsc2-5.4-lib32-ah212 --ipclient --playready --widevine bitbake lib32-rdk-generic-mediaclient-image |
The generated image resides under the directory build-<MACHINE>/tmp/deploy/images/<MACHINE> of the Yocto workspace
| Background Color | ||
|---|---|---|
| ||
Flash image and bring up Rpi |
1. Insert an SD card in the SD card port of the USB SD card reader (or Laptop).
Prefer to use 32gb sd card and there should be minimum 12gb free space available in the device .
2. Verify that the SD card has been detected by executing either of the commands listed below
| Code Block | ||
|---|---|---|
| ||
$lsblk $sudo fdisk –l |
| Code Block | ||
|---|---|---|
| ||
$ lsblk NAME MAJ:MIN RM SIZE RO TYPE MOUNTPOINT sda 8:0 0 931.5G 0 disk ├─sda1 8:1 0 350M 0 part ├─sda2 8:2 0 3G 0 part ├─sda3 8:3 0 896.4G 0 part / ├─sda4 8:4 0 1K 0 part └─sda5 8:5 0 31.8G 0 part [SWAP] sdb 8:16 1 14.9G 0 disk ├─sdb1 8:17 1 40M 0 part /media/raspberrypi └─sdb2 8:18 1 552M 0 part /media/dd5efb34-1d40-4e50-bbc2-a75d3e02af97 sr0 11:0 1 1024M 0 rom |
3. Type the following command to ensure that the partitions, if present, on the SD card are not mounted
| Code Block | ||
|---|---|---|
| ||
$mount |
| Code Block | ||
|---|---|---|
| ||
$ mount /dev/sda3 on / type ext4 (rw,errors=remount-ro) proc on /proc type proc (rw,noexec,nosuid,nodev) sysfs on /sys type sysfs (rw,noexec,nosuid,nodev) none on /sys/fs/fuse/connections type fusectl (rw) none on /sys/kernel/debug type debugfs (rw) none on /sys/kernel/security type securityfs (rw) udev on /dev type devtmpfs (rw,mode=0755) devpts on /dev/pts type devpts (rw,noexec,nosuid,gid=5,mode=0620) tmpfs on /run type tmpfs (rw,noexec,nosuid,size=10%,mode=0755) none on /run/lock type tmpfs (rw,noexec,nosuid,nodev,size=5242880) none on /run/shm type tmpfs (rw,nosuid,nodev) binfmt_misc on /proc/sys/fs/binfmt_misc type binfmt_misc (rw,noexec,nosuid,nodev) rpc_pipefs on /run/rpc_pipefs type rpc_pipefs (rw) nfsd on /proc/fs/nfsd type nfsd (rw) none on /tmp/guest-zdrO76 type tmpfs (rw,mode=700) gvfs-fuse-daemon on /var/lib/lightdm/.gvfs type fuse.gvfs-fuse-daemon (rw,nosuid,nodev,user=lightdm) /dev/sdb1 on /media/raspberrypi type vfat (rw,nosuid,nodev,uid=136,gid=148,shortname=mixed,dmask=0077,utf8=1,showexec,flush,uhelper=udisks) /dev/sdb2 on /media/dd5efb34-1d40-4e50-bbc2-a75d3e02af97 type ext3 (rw,nosuid,nodev,uhelper=udisks) |
4. Repeat the below command to unmount all the mounted partition present on the SD card.
| Code Block | ||
|---|---|---|
| ||
$umount <partition-mountpoint> |
| Code Block | ||
|---|---|---|
| ||
$ sudo umount /dev/sdb1 $ lsblk NAME MAJ:MIN RM SIZE RO TYPE MOUNTPOINT sda 8:0 0 931.5G 0 disk ├─sda1 8:1 0 350M 0 part ├─sda2 8:2 0 3G 0 part ├─sda3 8:3 0 896.4G 0 part / ├─sda4 8:4 0 1K 0 part └─sda5 8:5 0 31.8G 0 part [SWAP] sdb 8:16 1 14.9G 0 disk ├─sdb1 8:17 1 40M 0 part └─sdb2 8:18 1 552M 0 part /media/dd5efb34-1d40-4e50-bbc2-a75d3e02af97 sr0 11:0 1 1024M 0 rom $ sudo umount /dev/sdb2 $ lsblk NAME MAJ:MIN RM SIZE RO TYPE MOUNTPOINT sda 8:0 0 931.5G 0 disk ├─sda1 8:1 0 350M 0 part ├─sda2 8:2 0 3G 0 part ├─sda3 8:3 0 896.4G 0 part / ├─sda4 8:4 0 1K 0 part └─sda5 8:5 0 31.8G 0 part [SWAP] sdb 8:16 1 14.9G 0 disk ├─sdb1 8:17 1 40M 0 part └─sdb2 8:18 1 552M 0 part sr0 11:0 1 1024M 0 rom |
5. Execute the following command to flash the image on the SD card
| Code Block | ||||
|---|---|---|---|---|
| ||||
$sudo dd if=<path to ImageName.rpi-sdimg> of=<path to SD card space> bs=4M Example: $sudo dd if=rdk-generic-mediaclient-wpe-image.rpi-sdimg of=/dev/sdb bs=4M 149+0 records in 149+0 records out 624951296 bytes (625 MB) copied, 39.7752 s, 15.7 MB/s |
6. Remove the SD card and insert it to the Raspberry Pi SD card slot
7. Power on the RPI and Bring up the device

| Code Block | ||
|---|---|---|
| ||
root@raspberrypi-rdk-ipmc:~# cat /version.txt imagename:rdk-generic-ip-stb-client_rdk-next_20210902101930 BRANCH=rdk-next YOCTO_VERSION=dunfell VERSION=4.09.02.21 SPIN=0 BUILD_TIME="2021-09-02 10:19:30" Generated on Thu Sep 02 10:19:30 UTC 2021 root@raspberrypi-rdk-ipmc:~# |

eg :- gst-launch-1.0 playbin uri=aamp://bitdash-a.akamaihd.net/content/MI201109210084_1/m3u8s/f08e80da-bf1d-4e3d-8899-f0f6155f6efa.m3u8 video-sink=westerossink
| Background Color | ||
|---|---|---|
| ||
Flash image and bring Amlogic Reference Platform : In progress |
ToDo: Flashing using dd command
aamp-cli https://demo.unified-streaming.com/k8s/features/stable/video/tears-of-steel/tears-of-steel-dash-playready.ism/.mpd
aamp-cli https://wowzaec2demo.streamlock.net/live/bigbuckbunny-enc-wv.stream/manifest_mvlist.mpd
| Background Color | ||
|---|---|---|
| ||
Yocto recipe structure of relevant components - wpeframework and RDKServices : In progress |
What is Wpeframework?
WPEFramework provides a unified web-based interface with a consistent navigation model. In this model, plugins (custom or generic) are controlled and queried, through the WPEFramework application.
The main responsibilities of WPEFramework application are:
Each instance of a plugin in the WPE id identified by a name. This name is referred to as Callsign of the plugin. The callsign must be unique in the context of all configured plugins.
What is RDKServices?
RDK services are a set of JSON-RPC services that provide access to the RDK core components on set-top devices. RDK services are implemented as Thunder plugins for the Thunder framework. The Thunder framework is responsible for, among other things, managing plugins and handling client requests. RDK services are invoked over HTTP or Web Sockets using their JSON-RPC services-based interface. This makes RDK services accessible to any client that can process JSON, such as Lightning JavaScript applications or HTML5 web applications. For native applications, you can also invoke RDK services directly using C/C++ native code.
Explain layer structures in RDK-V build
ToDo
../meta-cmf-video/recipes-extended/rdkservices/rdkservices_git.bbappend
../meta-rdk-broadcom-generic-rdk/meta-brcm-refboard/meta-rdk-video/recipes-extended/rdkservices/rdkservices_git.bbappend
../meta-rdk-bsp-emulator/recipes-extended/rdkservices/rdkservices_git.bbappend
../meta-rdk-ext/recipes-extended/rdkservices/rdkservices_%.bbappend
../meta-rdk-oem-comm-bcm-accel/meta-vip7802/recipes-extended/rdkservices/rdkservices_git.bbappend
../meta-rdk-oem-comm-bcm-accel/meta-vip5202w/recipes-extended/rdkservices/rdkservices_git.bbappend
../meta-rdk-soc-broadcom/meta-brcm/recipes-extended/wpe-framework/rdkservices_git.bbappend
../meta-rdk-soc-broadcom/meta-brcm/recipes-extended/wpe-framework/rdkservices-comcast_git.bbappend
../meta-rdk-video/recipes-extended/rdkservices/rdkservices_git.bb
| Background Color | ||
|---|---|---|
| ||
Setup and Develop Thunder plugin |
Steps involved in implementing new RDK services Plug-In
Reference : https://github.com/rdkcentral/rdkservices/pull/960
In RDK services -plugins workspace:
Cloned from https://github.com/rdkcentral/rdkservices
$ git clone https://github.com/rdkcentral/rdkservices
PluginTemplate/
├── CMakeLists.txt
├── PluginTemplate.config
├── PluginTemplate.cpp
├── PluginTemplate.h
├── PluginTemplate.json
├── Module.cpp
├── Module.h
├── README.md
├── cmake
| ├── FindDS.cmake
│ └── FindIARMBus.cmake
└── doc
└── PluginTemplate.md
This file contains the plugin's information like schema, information and interface json file.
Syntax :
| Code Block | ||
|---|---|---|
| ||
   {
    {
    "$schema": "plugin.schema.json",
    "info": {
    "title": "Plugin Name Plugin",
    "callsign": "PluginName",
    "locator": "libWPEFrameworkPluginName.so",
    "status": "production",
    "description": "The PluginName plugin allows retrieving of various plugin-related information.",
    "version": "1.0"
     },
     "interface": {
    "$ref": "{interfacedir}/PluginName.json#"
     }
} |
eg: PluginTemplate.json
| Code Block | ||
|---|---|---|
| ||
 {
     "locator":"libWPEFrameworkPluginTemplate.so",
     "classname":"PluginTemplate",
     "precondition":[
      "Platform"
     ],
     "callsign":"org.rdk.PluginTemplate",
     "autostart":false
} |
.config files are files used to configure the parameters and initial settings for some computer programs.
| Code Block | ||||
|---|---|---|---|---|
| ||||
set (autostart false) #we are setting autostart condition disable set (preconditions Platform) set (callsign "org.rdk.PluginTemplate") #The callsign name was given to an instance of a plugin. #One plugin can be instantiated multiple times. but each instance, the instance-name "callsign" must be unique. here we using org.rdk.PluginTemplate. |
Declare the plugin class in this which should contain all the structures, variables, and methods which are needed for plugin implementation.
| Code Block | ||||
|---|---|---|---|---|
| ||||
 namespace WPEFramework {
  namespace Plugin {

   class PluginName : public PluginHost::IPlugin, public PluginHost::IWeb, public PluginHost::JSONRPC {
   public:
     PluginName()
      : _skipURL(0)
      , _service(nullptr)
      , _subSystem(nullptr)
     {
      RegisterAll();
     }

     virtual ~PluginName()
     {
      UnregisterAll();
     }
   }
   ---------------------------------------
   ---------------------------------------
  }
} |
eg: PluginTemplate.h
for more information refer PluginTemplate.h
This class does contain all the definitions for the methods declared in the PluginTemplate.h and those definitions should be defined inside the below namespace.
The plugin should register using service registration MACRO as declared below :
| Code Block | ||||
|---|---|---|---|---|
| ||||
  namespace WPEFramework {
   namespace Plugin {
    SERVICE_REGISTRATION(Plugin, 1, 0);
    ---------------------------------------
    ---------------------------------------
    ---------------------------------------
   }
} |
To initialize and deinitialize or activate or deactivate handler for the plugin services :
| Code Block | ||||
|---|---|---|---|---|
| ||||
const string PluginTemplate::Initialize(PluginHost::IShell* /* service */)
	{
	//shared pointer initialized
	//initialize external library
        LOGINFO();
        return (string());
        }
void PluginTemplate::Deinitialize(PluginHost::IShell* /* service */)
        {
 	//shared pointer deinitialized
	//deinitialize external library
        LOGINFO();
} |
eg:
| Code Block | ||||
|---|---|---|---|---|
| ||||
namespace WPEFramework {
    namespace Plugin {
         SERVICE_REGISTRATION(Plugin, 1, 0);

          //registration
          //All the methods declared in Plugin.h should be registered here

          //initialize and deinitialize the handlers for the plug-in service

          //All the methods declared in Plugin.h should be defined here

    }
} |
Using the CMake utility this file contains the task needed to be done to make a plug-in. Also contains packages, libraries needed to compile, its path, and other plugin-in configuration option.
This file contains a set of directives and instructions describing the project's source files and targets (executable, library, or both).
| Code Block | ||||
|---|---|---|---|---|
| ||||
set(PLUGIN_NAME PluginTemplate)                          # to set a environment variable set(<variable> <value>)
set(MODULE_NAME ${NAMESPACE}${PLUGIN_NAME})
find_package(${NAMESPACE}Plugins REQUIRED)               # to Finds and loads settings from an external project.

#Adds a library target called <name> to be built from the source files listed in the command invocation. The <name> corresponds to the logical target name and must be globally unique within a project.
add_library(${MODULE_NAME} SHARED
        PluginTemplate.cpp
        Module.cpp
../helpers/utils.cpp) |
In rdkservices directory open CmakeLists.txt :
$ vi CmakeLists.txt
add these lines ( by default its disabled ) :
| Code Block | ||
|---|---|---|
| ||
if(PLUGIN_PLUGINTEMPLATE) add_subdirectory(PluginTemplate) endif() |
it will invoke your CMakeLists.txt file present in your plugin directory.
To include plugintemplate plugin in build sequence, Open rdkservices recipe file and add below line. By default; its configured to be disabled while building rdkservices.
$ vi meta-rdk-video/recipes-extended/rdkservices/rdkservices_git.bb
| Code Block | ||
|---|---|---|
| ||
PACKAGECONFIG[plugintemplate] = " -DPLUGIN_PLUGINTEMPLATE=OFF,-DPLUGIN_PLUGINTEMPLATE=ON, " |
To include the plugin in rdkservises build; add the same in packageconfig in rdkservices recipe:
PACKAGECONFIG += " plugintemplate"
to compile and install in build directory :
$ bitbake -c compile -f rdkservices
once build complete copy .json, .so file into raspberry Pi.
Copy the Plugin.json (eg: PluginTemplate.json) file to “/etc/WPEFramework/plugins” in raspberry Pi
Copy the plugin library (libWPEFrameworkPluginTemplate.so) to “/usr/lib/wpeframework/plugins”
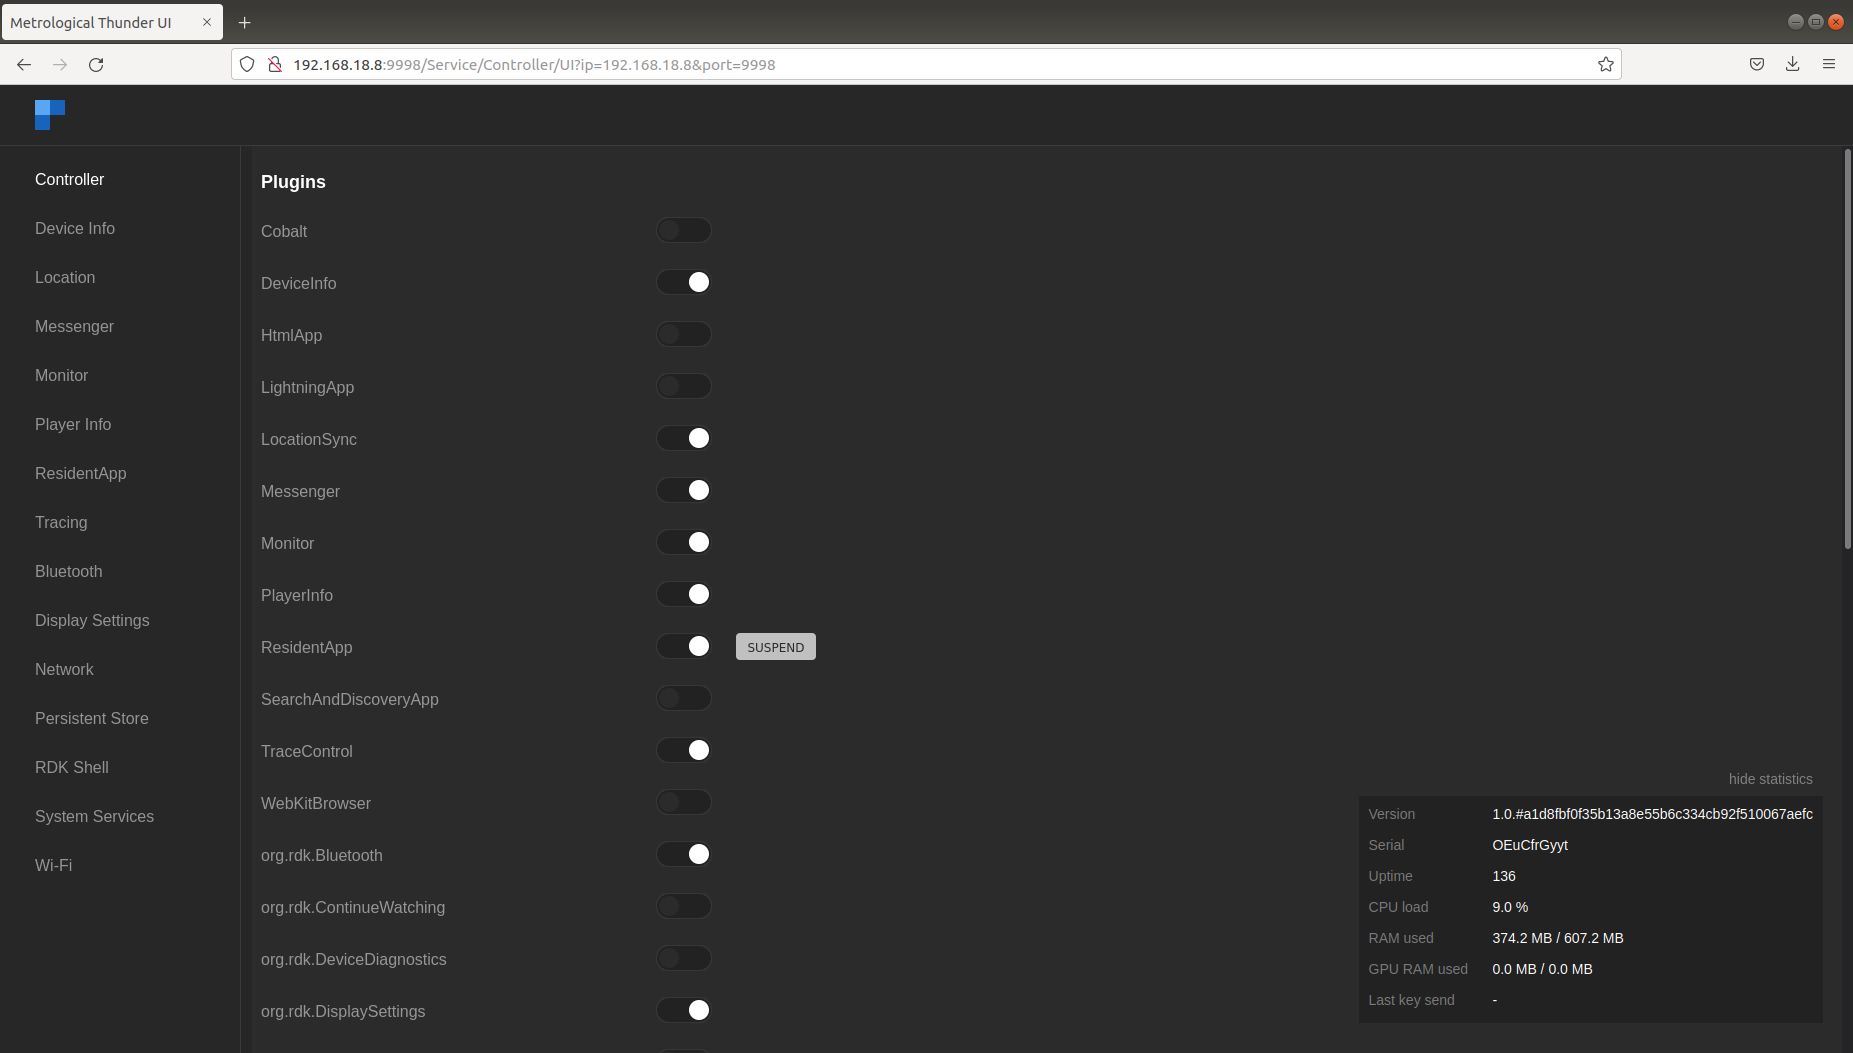
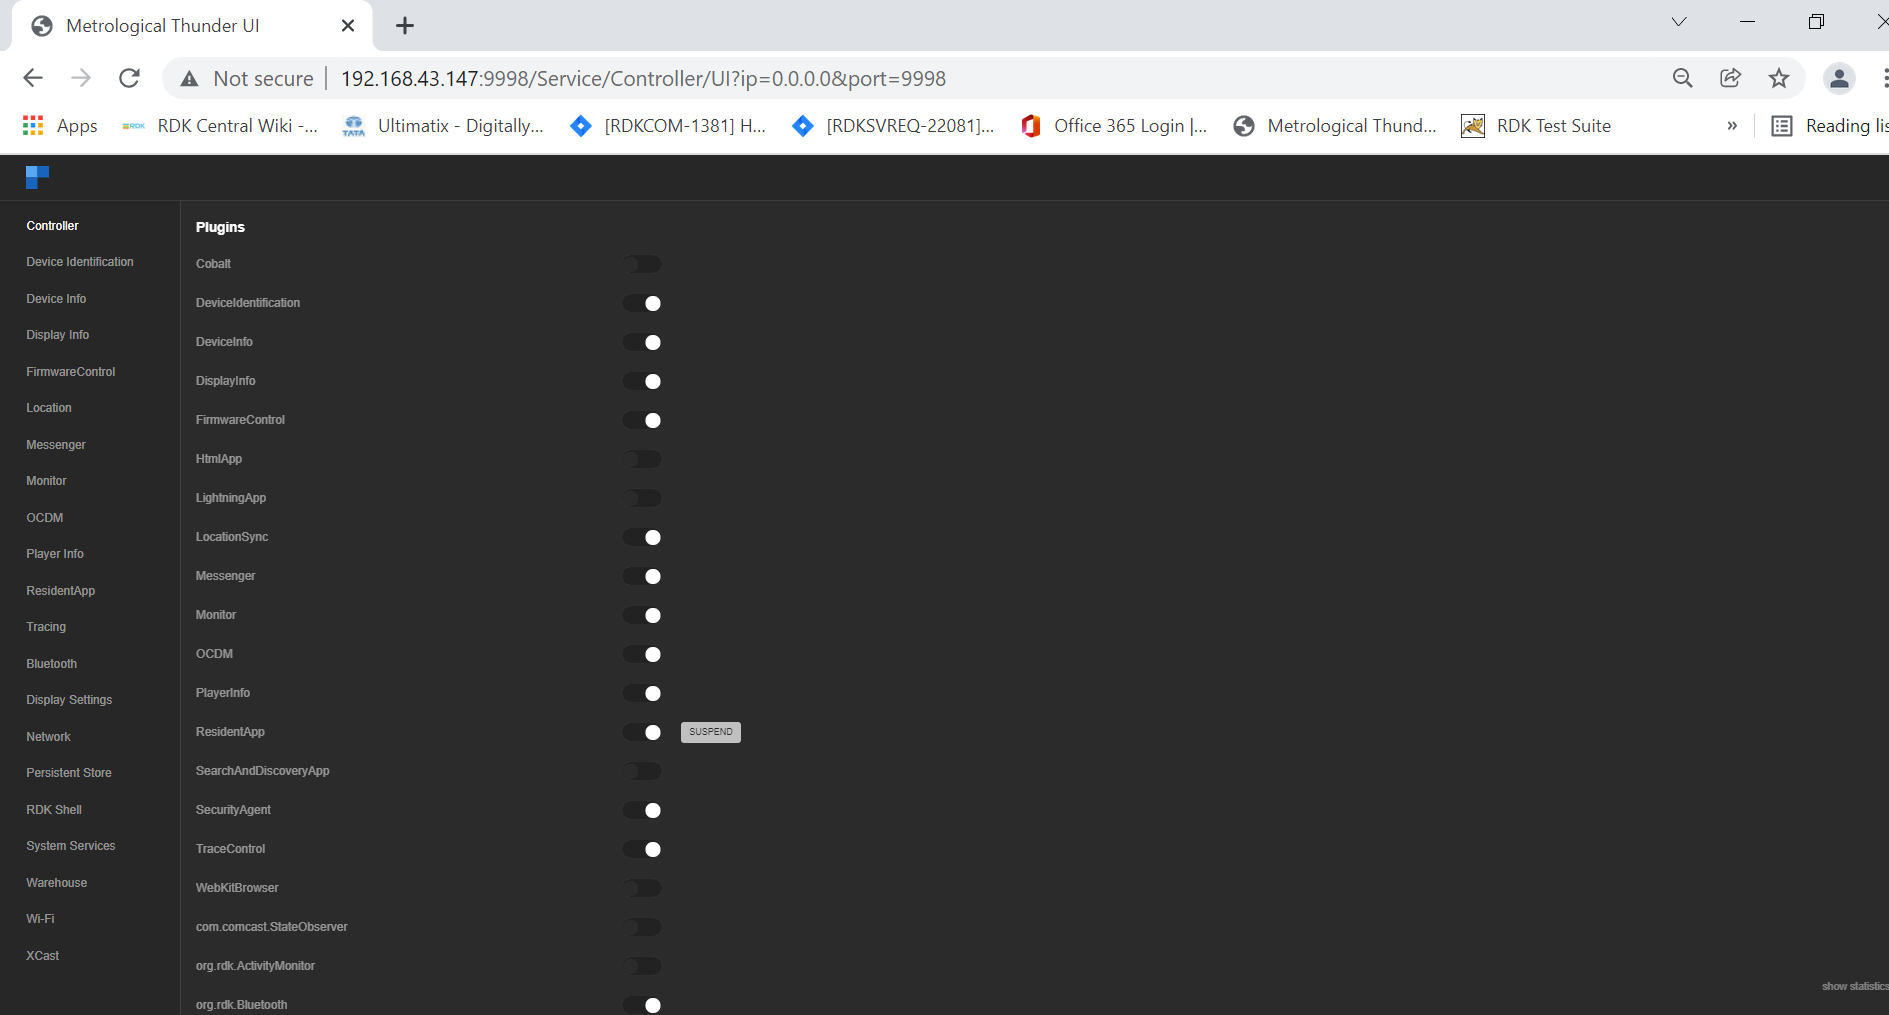
so that the controller plugin identify it and list it in the WebUI ( controller UI ).
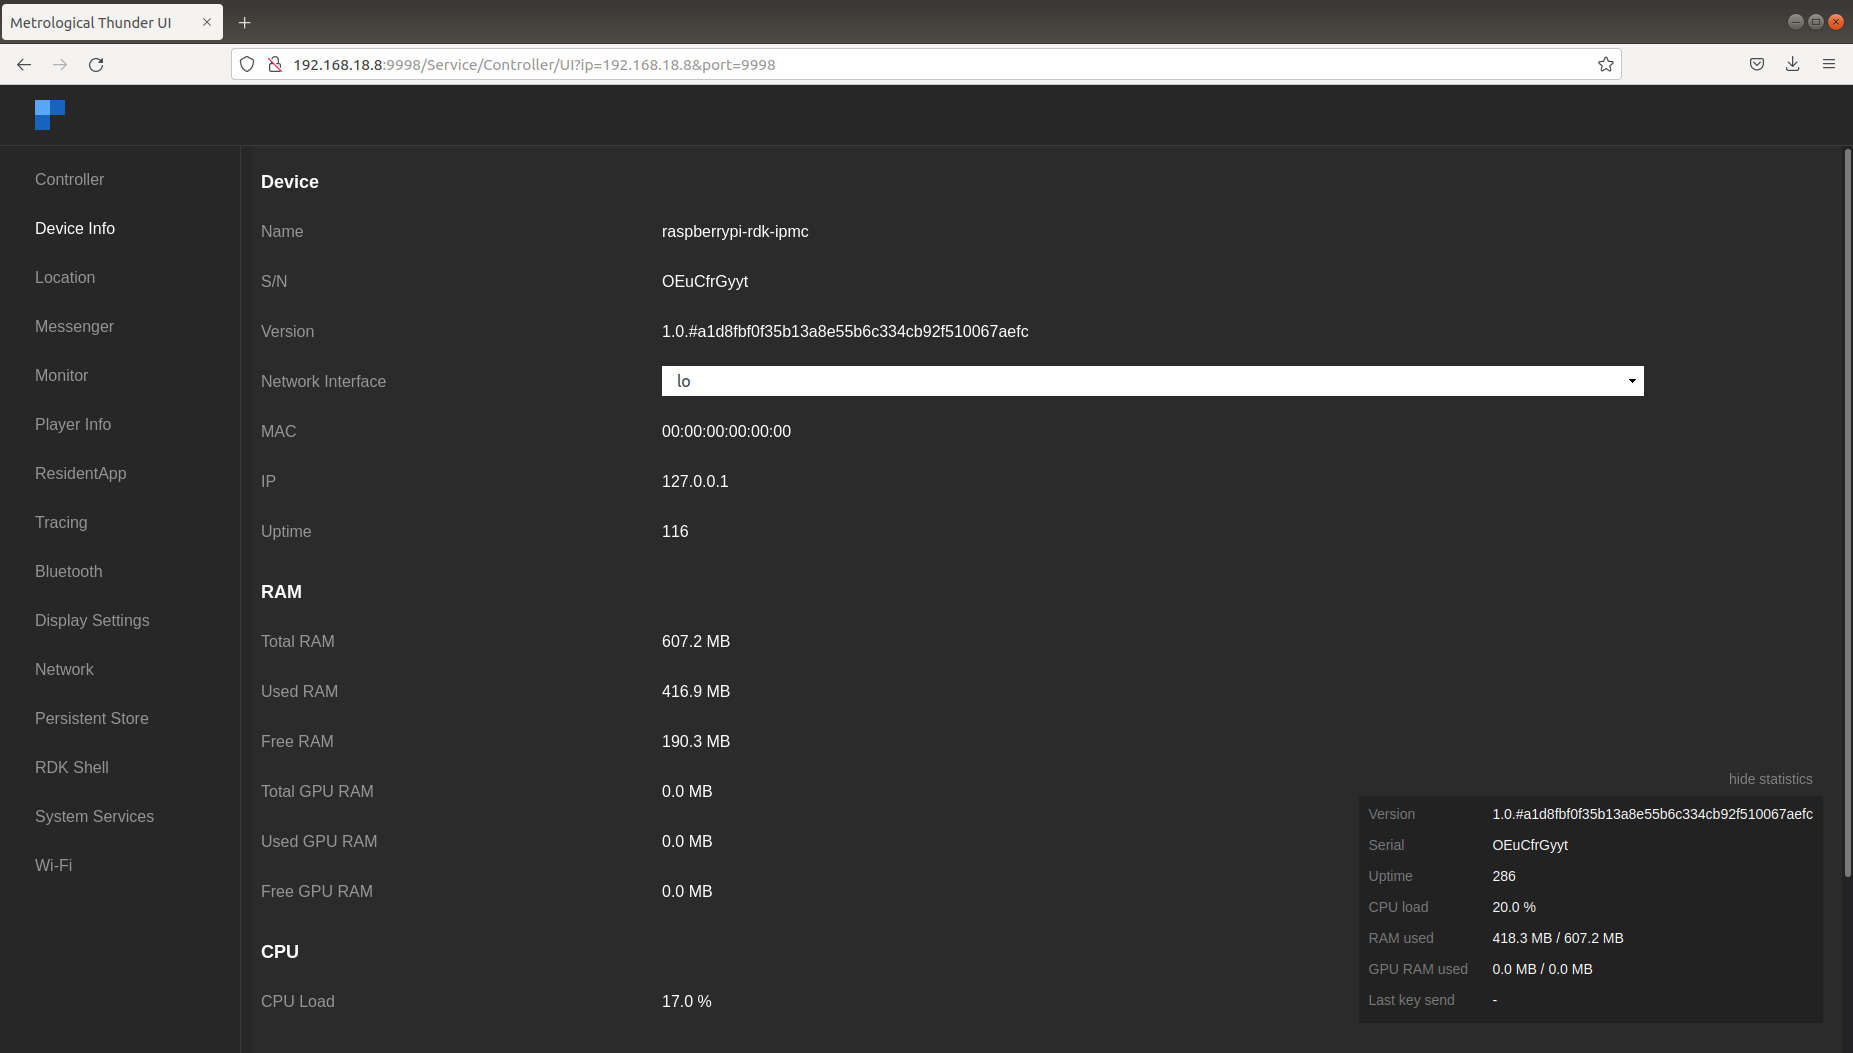
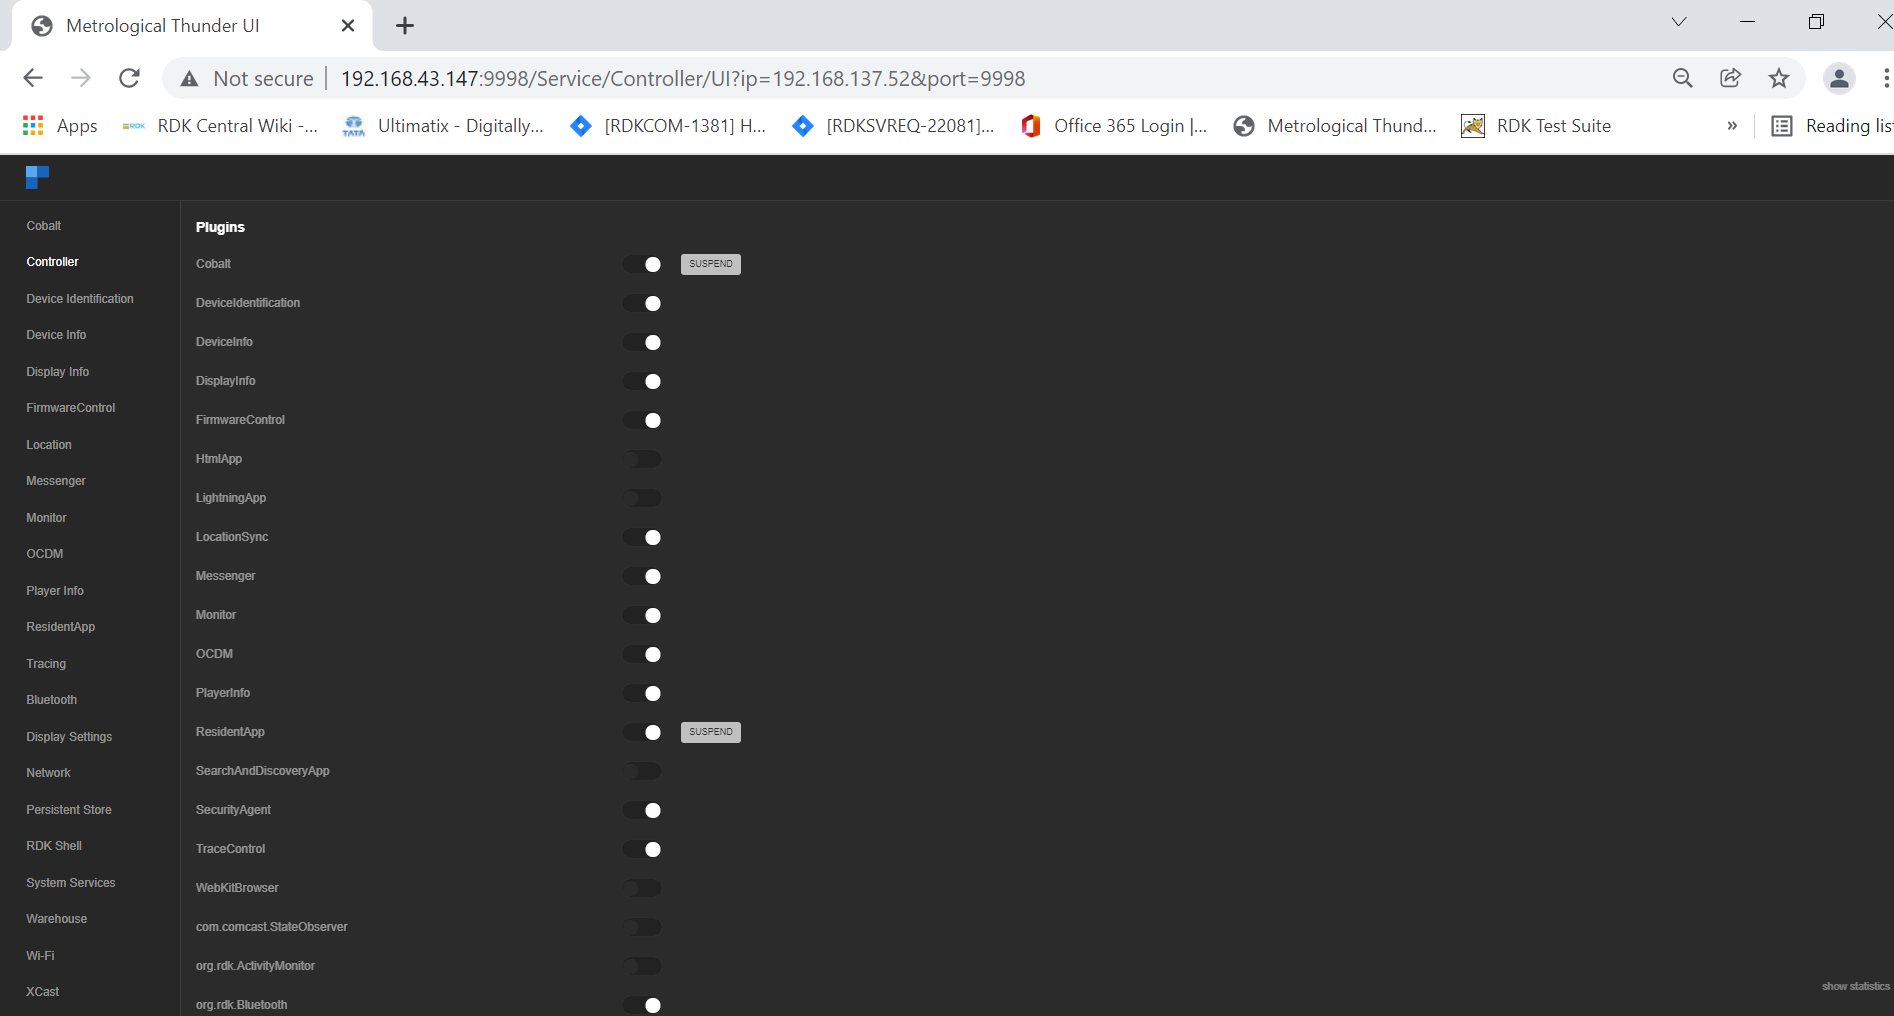
Controller UI is a web UI that can be launched from a host machine's (machine under the same network where RPi resides) browser. This UI can be loaded with the RPi box's IP address with Thunder's port number configured (here). RDKServices uses 9998 as port.
URL: http://<IP address of the Target device>:9998
Defalut page of Controller UI shall be loaded on web-browser and that will be of Controller tab. Controller tab allows all available plugins to be enabled or disabled.
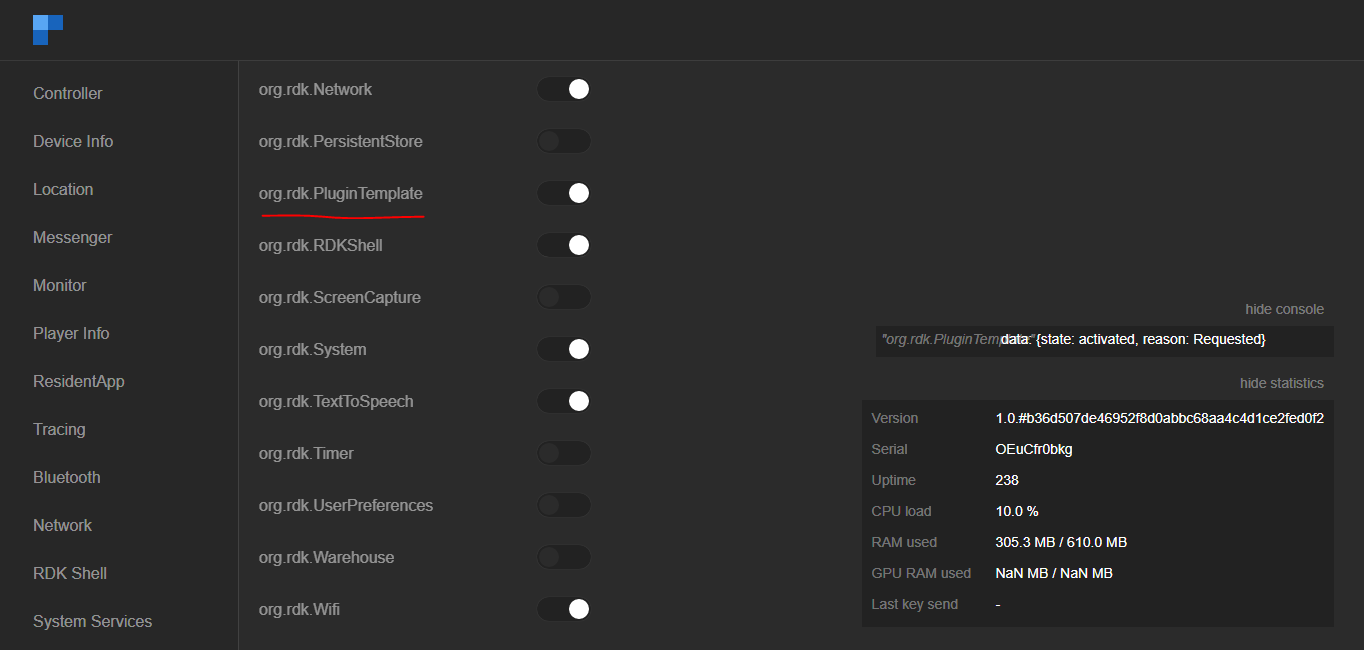
Each RDK Service can be validated through JSON RPC Commands through HTTP. It has a request and response in JSN format.
Note: the argument is case sensitive.
"callsign":"org.rdk.PluginTemplate"
| Function | Request | Response | Remarks |
|---|---|---|---|
| Activate controller | curl http://127.0.0.1:9998/jsonrpc --header "Content-Type: application/json" --request POST --data '{ "jsonrpc":"2.0", "id":3, "method":"Controller.1.activate", "params":{"callsign":"org.rdk.PluginTemplate"} }' | {"jsonrpc":"2.0","id":3,"result":{"success":true}} | |
| Deactivate controller | curl http://127.0.0.1:9998/jsonrpc --header "Content-Type: application/json" --request POST --data '{ "jsonrpc":"2.0", "id":3, "method":"Controller.1.deactivate", "params":{"callsign":"org.rdk.PluginTemplate"} }' | {"jsonrpc":"2.0","id":3,"result":{"success":true}} | |
| getPluginStatus | curl http://127.0.0.1:9998/jsonrpc --header "Content-Type: application/json" --request POST --data '{"jsonrpc":"2.0", "id":3, "method":"org.rdk.PluginTemplate.1.getPluginTemplateStatus"}' | {"jsonrpc":"2.0","id":3,"result":{"connection status from plugin":["CONNECTED"],"success":true}} | |
| getPluginTemplateList | curl http://127.0.0.1:9998/jsonrpc --header "Content-Type: application/json" --request POST --data '{"jsonrpc":"2.0", "id":3, "method":"org.rdk.PluginTemplate.1.getPluginTemplateList"}' | {"jsonrpc":"2.0","id":3,"result":{"Supported plugin list":["plug-A","plug-B","plug-C","plug-D","plug-E"],"success":true}} | |
| getPluginTemplateInfo | curl http://127.0.0.1:9998/jsonrpc --header "Content-Type: application/json" --request POST --data '{"jsonrpc":"2.0", "id":3, "method":"org.rdk.PluginTemplate.1.getPluginTemplateInfo", "params":{"plugin_name":"plug-A"}}' | {"jsonrpc":"2.0","id":3,"result":{"supportedTvResolutions":["xyz-plugin","no:430HT5"],"success":true}}root@raspberrypi-rdk-mc:~# | |
| event API when hdmi connected | curl http://127.0.0.1:9998/jsonrpc --header "Content-Type: application/json" --request POST --data '{"jsonrpc":"2.0", "id":3, "method":"org.rdk.PluginTemplate.1.getConnectedVideoDisplays"}' | {"jsonrpc":"2.0","id":3,"result":{"connectedVideoDisplays":["HDMI0"],"success":true}}root@raspberrypi-rdk-mc:~# | |
| event API when hdmi not connected | curl http://127.0.0.1:9998/jsonrpc --header "Content-Type: application/json" --request POST --data '{"jsonrpc":"2.0", "id":3, "method":"org.rdk.PluginTemplate.1.getConnectedVideoDisplays"}' | {"jsonrpc":"2.0","id":3,"result":{"connectedVideoDisplays":[],"success":true}}root@raspberrypi-rdk-mc:~# |

Here the plugin is developed as out of process, which runs as a separate thread from WPEFramework. Services each other or a particular service can be COMRPC ( for communication between plugins) or JSONRPC (for external communication). it has a web-based controller UI.
OutOfProcessPlugin/
├── CMakeLists.txt
├── OutOfProcessPlugin.config
├── OutOfProcessPlugin.cpp
├── OutOfProcessPlugin.h
├── OutOfProcessPluginJsonRpc.cpp
├── OutOfProcessPlugin.json
├── Module.cpp
├── Module.h
├── OutOfProcessPlugin.md
<PluginName>.json
This file contains the plugin's information like schema, information and interface json file. Here the outofprocess will be true, which indicates that the plugin run as a seperate process.
eg: OutOfProcessPlugin.json
| Code Block | ||
|---|---|---|
| ||
{

 "locator":"libWPEFrameworkOutOfProcessPlugin.so",

 "classname":"OutOfProcessPlugin",

 "precondition":[

  "Platform"

 ],

 "autostart":true,

 "configuration":{

  "root":{

   "outofprocess":true

  }

 }

} |
<PluginName>.config
.config files are files used to configure the parameters and initial settings for some computer programs.
Here outofprocess is set to true, to make plugin as out of process plugin.
| Code Block | ||
|---|---|---|
| ||
set (autostart true) set (preconditions Platform) map() kv(outofprocess true) end() ans(rootobject) |
<PluginName>.h
Declare the plugin class in this which should contain all the structures, variables, and methods which are needed for plugin implementation.
| Code Block | ||
|---|---|---|
| ||
 namespace WPEFramework {

  namespace Plugin {

   class PluginName : public PluginHost::IPlugin, public PluginHost::IWeb, public PluginHost::JSONRPC {

   public:

     PluginName()

      : _skipURL(0)

      , _service(nullptr)

      , _subSystem(nullptr)

     {

      RegisterAll();

     }

     virtual ~PluginName()

     {

      UnregisterAll();

     }

   }

   ---------------------------------------

   ---------------------------------------

  }

} |
<PluginName>.cpp
This class does contain all the definitions for the methods declared in the Plugin.h and those definitions should be defined inside the below namespace.
The plugin should register using service registration MACRO as declared below :
| Code Block | ||
|---|---|---|
| ||
 namespace WPEFramework {

   namespace Plugin {

    SERVICE_REGISTRATION(Plugin, 1, 0);

    ---------------------------------------

    ---------------------------------------

    ---------------------------------------

   }

} |
To initialize and deinitialize or activate or deactivate handler for the plugin services :
| Code Block | ||
|---|---|---|
| ||
const string OutOfProcessPlugin::Initialize(PluginHost::IShell* /* service */)

    {

    //shared pointer initialized

    //initialize external library

        LOGINFO();

        return (string());

        }

void OutOfProcessPlugin::Deinitialize(PluginHost::IShell* /* service */)

        {

    //shared pointer deinitialized

    //deinitialize external library

        LOGINFO();

} |
Process handler plugin services to receive request and sent responses based on the services :
| Code Block | ||
|---|---|---|
| ||
Core::ProxyType<Web::Response> OutOfProcessPlugin::Process(const Web::Request &request)

{

  Core::ProxyType<Web::Response> result(PluginHost::IFactories::Instance().Response());


  //Handle the service request and send the responses

  -----------------

  -----------------

  return result;

} |
eg: refer OutOfProcessPlugin.cpp
<PluginNameJsonRpc>.cpp>
The PluginNameJsonRpc file contains the registration for methods and properties which are declared in PluginName.h
| Code Block | ||
|---|---|---|
| ||
namespace WPEFramework {

    namespace Plugin {

          //registration

         void OutOfProcessPlugin::RegisterAll()

          {

               // methods and properties declared in Plugin.h are registered here

                  -------------------

                  -------------------

          }

         void OutOfProcessPlugin::UnregisterAll()

         {

         }

    }

} |
CMakeLists.txt
Using the CMake utility this file contains the task needed to be done to make a plug-in. Also contains packages, libraries needed to compile, its path, and other plugin-in configuration option.
This file contains a set of directives and instructions describing the project's source files and targets (executable, library, or both).
| Code Block | ||
|---|---|---|
| ||
set(PLUGIN_NAME OutOfProcessPlugin)                          # to set a environment variable set(<variable> <value>)

set(MODULE_NAME ${NAMESPACE}${PLUGIN_NAME})

find_package(${NAMESPACE}Plugins REQUIRED)               # to Finds and loads settings from an external project.


#Adds a library target called <name> to be built from the source files listed in the command invocation. The <name> corresponds to the logical target name and must be globally unique within a project.

add_library(${MODULE_NAME} SHARED

    OutOfProcessPlugin.cpp

    OutOfProcessPluginJsonRpc.cpp

Module.cpp) |
The Code flow, Compilation and Install steps are similar to the PluginTemplate.
The last step,
Copy the Plugin.json (eg: OutOfProcessPlugin .json) file to “/etc/WPEFramework/plugins” in Raspberry Pi
Copy the plugin library (libWPEFrameworkOutOfProcessPlugin.so) to “/usr/lib/wpeframework/plugins”
so that the controller plugin identify it and list it in the WebUI ( controller UI ).
Controller UI is a web UI that can be launched from a host machine's (machine under the same network where RPi resides) browser.
URL: http://<IP address of the Target device>:9998
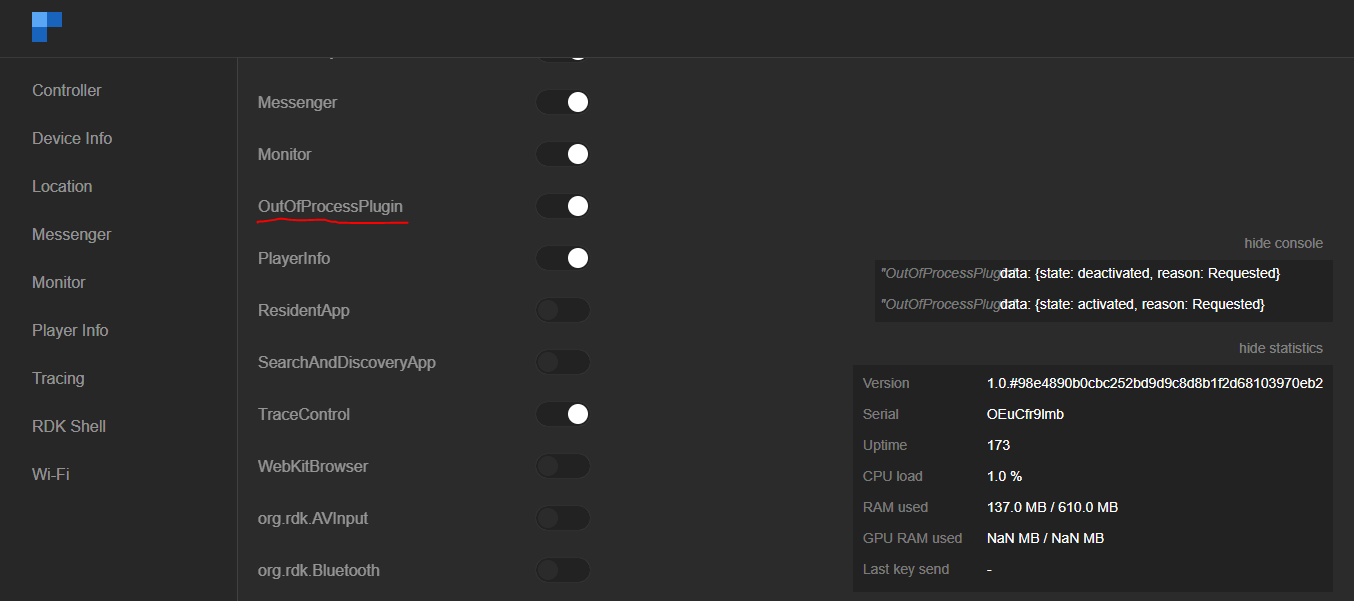
Each RDK Service can be validated through JSON RPC Commands through HTTP. It has a request and response in JSON format.
Note: the argument is case sensitive.
"callsign":"OutOfProcessPlugin"
| Function | Request | Response | Remarks |
|---|---|---|---|
| Activate controller | curl http://127.0.0.1:9998/jsonrpc --header "Content-Type: application/json" --request POST --data '{ "jsonrpc":"2.0", "id":3, "method":"Controller.1.activate", "params":{"callsign":"OutOfProcessPlugin"} }' | {"jsonrpc":"2.0","id":3,"result":{"success":true}} | |
| Deactivate controller | curl http://127.0.0.1:9998/jsonrpc --header "Content-Type: application/json" --request POST --data '{ "jsonrpc":"2.0", "id":3, "method":"Controller.1.deactivate", "params":{"callsign":"OutOfProcessPlugin"} }' | {"jsonrpc":"2.0","id":3,"result":{"success":true}} | |
| Get fps | curl http://127.0.0.1:9998/jsonrpc --header "Content-Type: application/json" --request POST --data '{"jsonrpc":"2.0", "id":3, "method":"OutOfProcessPlugin.1.fps"}' | {"jsonrpc":"2.0","id":3,"result":32} | |
| Get plugin id | curl http://127.0.0.1:9998/jsonrpc --header "Content-Type: application/json" --request POST --data '{"jsonrpc":"2.0", "id":3, "method":"OutOfProcessPlugin.1.getpluginid"}' | {"jsonrpc":"2.0","id":3,"result":6501} |
| Background Color | ||
|---|---|---|
| ||
Interface with other RDK services |
| Expand | ||||||||||||||||||||||||||||||||||||||||||||||||||||||||||||||||||
|---|---|---|---|---|---|---|---|---|---|---|---|---|---|---|---|---|---|---|---|---|---|---|---|---|---|---|---|---|---|---|---|---|---|---|---|---|---|---|---|---|---|---|---|---|---|---|---|---|---|---|---|---|---|---|---|---|---|---|---|---|---|---|---|---|---|---|
| ||||||||||||||||||||||||||||||||||||||||||||||||||||||||||||||||||
JSONRPC/COMRPC Process transparency
Most important part of framework is to make sure we can run processes & separate process, we can run nano/micro services out of process. So, we need to communicate to nano/micro services throughout API's. These API's are actually incremented in 2 ways.
COMRPCCOMRPC is a binary RPC migration.
InterfacesC header files with a struct definition and pure abstract methods
COMRPCQueryInterface/AddRef/Release
Communication Layers
COMRPC migration is part of WPEFramework. If we have COMRPC 'C' migration, the communication layer below are main sockets for TCP Server. It means we could communicate with any interface to other host. JSONRPCJSONRPC is to communicate JSON object messages.
JSON data objects, boiler plated handlers and documentation are generated from a JSON specification file!! JSONActual exchange data in JSON format : RFC4627
JSONRPCFor deeper and detailed information of JSONRPC ,Please refer https://www.jsonrpc.org/specification Communication Layers
|
| Background Color | ||
|---|---|---|
| ||
Interface with Lightning apps |
ThunderJS is used to make easy to make API calls to Thunder (WPEframework) over a Websocket connection. ThunderJS can also be used to listen to (and act upon) notifications broadcasted by Thunder. ThunderJS is an isomorphic library, which means it can be used in a browser environment as well as a NodeJS environment.
Lightning is a Javascript TV app development framework based on NodeJS environment. So ThunderJS can be easily integrated to the Lightning apps.
ThunderJS dependencies can be added manually to the lightning projects by adding ‘"ThunderJS": "github:rdkcentral/ThunderJS",’ to the package.json under ‘devDependencies’ and then run ‘npm install’.
OR
ThunderJS can be installed into your project via NPM command. Then the package.json will be updated with the thunder dependency "npm install github:rdkcentral/ThunderJS"
Snippet of package.json is given below .To use the ES6 syntax, we need add the Babel dependency also.
| Code Block | ||
|---|---|---|
| ||
  }
},
"devDependencies": {
 "@babel/core": "^7.7.2",
 "ThunderJS": "github:rdkcentral/ThunderJS",
 "babel-eslint": "^10.0.3",
 "dashjs": "^3.1.3",
 "eslint": "^6.6.0",
 "eslint-config-prettier": "^6.7.0",
 "eslint-plugin-prettier": "3.1.1",
 "hls.js": "^0.13.2",
 "husky": "^3.1.0",
 "lint-staged": "^9.4.3"
 "prettier": "^1.19.1"
  }
} |
Next you can import the ThunderJS dependency into your own script like given below.
import ThunderJS from 'ThunderJS',
The library can be initialised by passing the IP, port and other parameters mentioned below
| Code Block | ||
|---|---|---|
| ||
const config = {
 host: '192.168.1.100', // defaults to localhost,
 port: 2020, // defaults to 80  endpoint: '/api', // defaults to '/jsonrpc'
 protocol: 'wss://', // defaults to 'ws://'
 subprotocols: 'notification', // WebSocket sub-protocols, defaults to 'notification'
}
const thunderJS = ThunderJS(config) |
Example:
| Code Block | ||
|---|---|---|
| ||
this.config = {
	host: '127.0.0.1',
	port:'9998'
}
try {
	this.thunderJS = ThunderJS(this.config)
}	catch (err) {
	Log.error('Error in initialising the Thunder JS' , err)
|
The library supports 2 ways of making API calls, depending on your coding style preferences.
Option 1 - Argument based
| AUI Tab Group |
|---|
The result can be processed in two ways also
| AUI Tab Group |
|---|
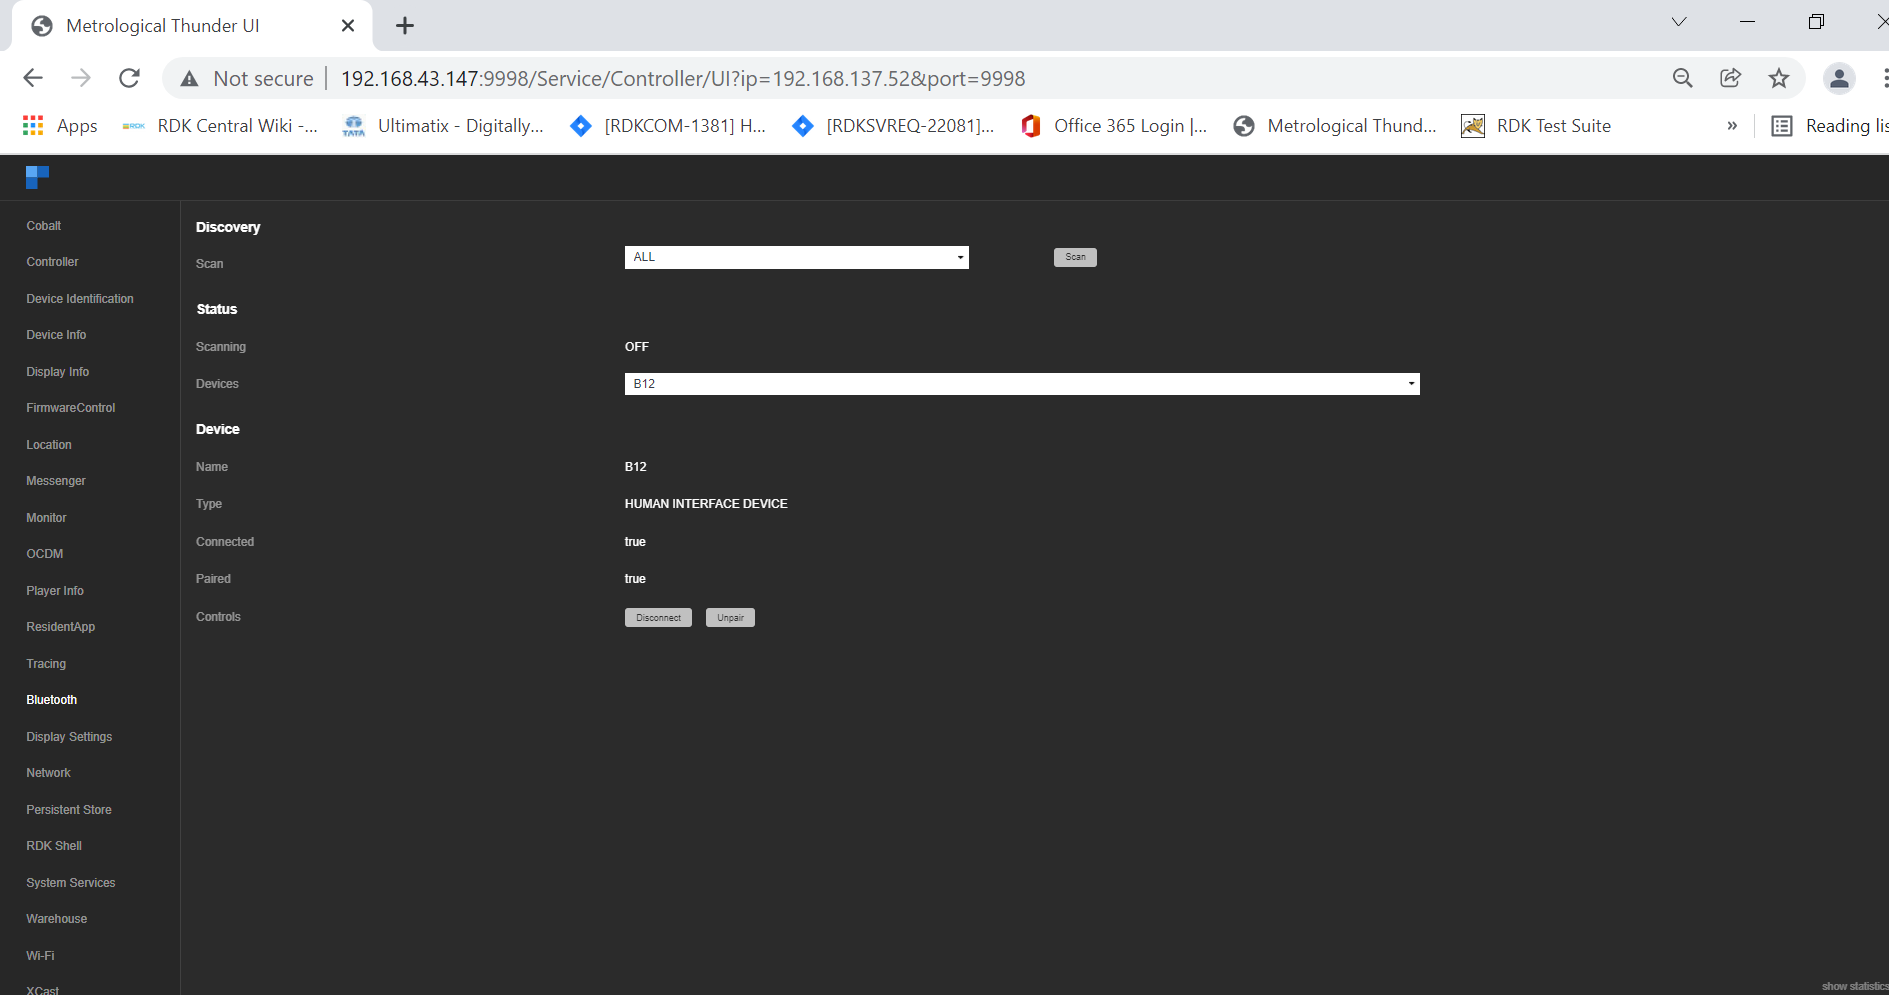
Example for Argument based call for Bluetooth plugin is given below where the result is processed in callback based method
Bluetooth plugin pair method - https://github.com/rdkcentral/rdkservices/blob/sprint/2107/Bluetooth/doc/BluetoothPlugin.md#pair-method
Corresponding implementation in ThunderJS
| Code Block | ||
|---|---|---|
| ||
   this.thunderJS.call('org.rdk.Bluetooth', 'pair', { deviceID: deviceIDval },

      (err, result) => {

        if (err) {

          Log.info('\n Bluetooth Pair error' + JSON.stringify(err))

        } else {

          Log.info('Pairing success' + JSON.stringify(result))

        }

      }

) |
Notifications
Thunder (WPEframework) broadcasts notifications when events ocur in the system. However it will only broadcast those events that the client has subscribed to.
ThunderJS makes it easy to subscribe to specific events, and execute a callback-function upon every notification of each event.
Example for notification event subscriptions is given below.
Bluetooth onDiscovered event - https://github.com/rdkcentral/rdkservices/blob/sprint/2107/Bluetooth/doc/BluetoothPlugin.md#ondiscovereddevice-event
Corresponding implementation in the Lightning App
| Code Block | ||
|---|---|---|
| ||
/**
* Event listener to listen to device discovered
*/
this.thunderJS.on('org.rdk.Bluetooth','onDiscoveredDevice',notification =>{
	Log.info('<<Device discovered event>>'+JSON.stringify(notification))
})


/** |