RDK Resources
[*RDK Preferred*]
Code Management Facility
RDK Forums
[RDK Conferences]
RDK Support
Archives
Papers & Presentations Archive![]()
Papers & Presentations Archive![]()
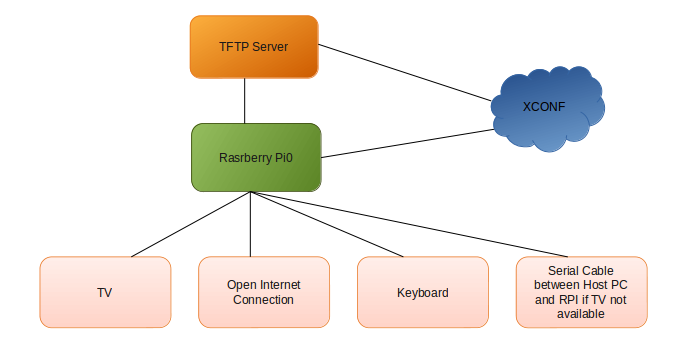
The Firmware upgrade will upgrade higher or lower version of the current image in RPI target with the help of Xconf server and Local TFTP server.
This page dedicated to bringing up and validation of Firmware upgrade in R-Pi Zero.

Refer below link for RPI-0 Environment setup
Refer below link to build camera image
RDK-C Build Instructions for R-Pi
$ sudo dd if="Image Name" of="Device Name" bs=4M

Example:
sudo dd if=rdk-generic-camera-image_default_20200130060729.rootfs.rpi-sdimg of=/dev/sdb bs=4M
STEP 1:
Install xinetd and tftpd-hpa application in your local PC to setup tftp server by using below command
sudo apt-get install xinetd
sudo apt-get install tftpd-hpa
STEP 2:
Create checksum file for your upgrading image.
md5sum "<imagefile_name>.rootfs.rpi-sdimg" > imagefile_name.txt

for Ex:
upgrading image file is rdk-generic-camera-image_default_20200329074421.rootfs.rpi-sdimg
md5sum "rdk-generic-camera-image_default_20200329074421.rootfs.rpi-sdimg" > rdk-generic-camera-image_default_20200329074421.txt
STEP 3:
Create new folder for example "tfphome" in your PC home direcotry to maintain checksum file and upgrading image file.
Keep upgrading image file and checksum file in your created folder.
For Ex:
Keep rdk-generic-camera-image_default_20200329074421.rootfs.rpi-sdimg and rdk-generic-camera-image_default_20200329074421.txt files in your tftphome folder.
STEP 4:
Check tftp file is there or not in /etc/xinetd.d/ directory. if it is not there then create tftp file under this /etc/xinetd.d/ direcotry and add below content.
vi /etc/xinetd.d/tftp
service tftp
{
protocol        = udp
port            = 69
socket_type     = dgram
wait            = yes
user            = nobody
server          = /usr/sbin/in.tftpd
server_args     = -c -v -s /home/xyz/tftphome ( Give upgrading file and checksum file maintained directory )
disable         = no
}
STEP 5:
Verify /etc/default/tftpd-hpa file content
vi /etc/default/tftpd-hpa
# /etc/default/tftpd-hpa

TFTP_USERNAME="tftp"
TFTP_DIRECTORY="/home/xyz/tftphome" ( Give upgrading file and checksum file maintained directory )
TFTP_ADDRESS="0.0.0.0:69"
TFTP_OPTIONS="--secure"
STEP 6:
Start tftp server and xinetd server
sudo apt-get install xinetd
sudo apt-get install tftpd-hpa
STEP 1:
http://35.155.171.121:9093/admin/ux
Please follow the below procedure in xconf server for placing new firmware for upgrade to specific device and model ( RPI in this case ) as a reference.
→ RPI will support only tftp protocol . No http protocol support is provided yet.
STEP 2:
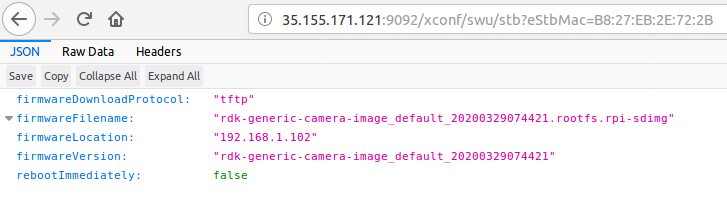
Verify that XConf Server configuration displays the Json response from the mentioned URL:
http://<Xconf Server IP:port no.>/xconf/swu/stb?eStbMac=<MAC address of Rpi board>
For Ex: http://35.155.171.121:9092/xconf/swu/stb?eStbMac=B8:27:EB:2E:72:2B
Please find the summary on firmware upgrade explained above
Note :
1. RPI will go for reboot while booting for the first time, since two more partition needs to be created which requires reboot. Depends on the image present in xconf and RPI, further reboot will happen for upgrade. Please refer to design (High level design approach - RDK Camera - 2020 - M5) for how firmware upgrade works with bank switching
2. SD card should be zero filled formatted before starting the firmware upgrade procedure. DriveWipe software is used for this. Please refer the you-tube video link for the SD card full format process.
