Pre-requisite
- Access to Raspberry Pi terminal.
- Access to Xconf server from browser https://xconf.rdkcentral.com:9093/admin/
- For Admin mode(read and writ permission) -> username : admin, password: RdkXcadm$2120
- For User mode(only read mode) -> username: user, password: RdkXcusr@2210
Admin UI: Common Configuration
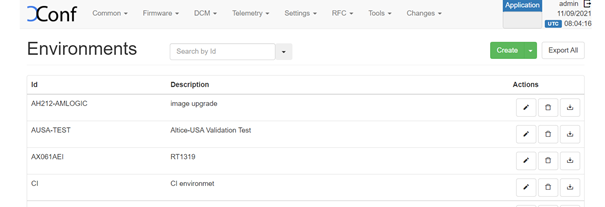
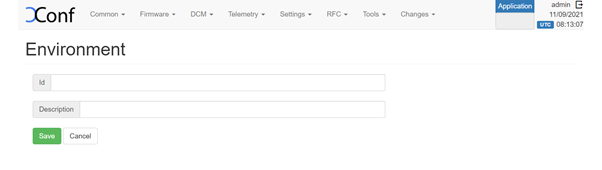
Flow: Xconf-server -> Common -> Environments
Click on Create Button.
Click on Create, Enter the ID and Description fields, click on Save.
ID : <Unique Identifier> ; Description : <Description>
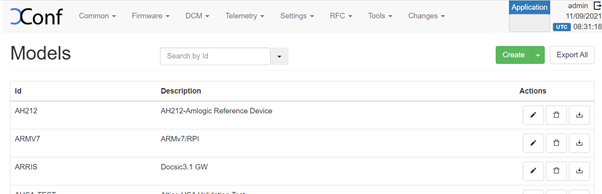
Flow: Xconf-server -> Common -> Models
Click on Create, Enter the ID and Description fields, click on Save.

Flow: Xconf-server -> Common -> MAC Lists -> Create -> Add your Device MAC address -> Save.

Flow: Xconf-server -> Common -> IP Lists -> Create-> Create -> Add your device IP address -> Save.

Feature Validation: LogUpload
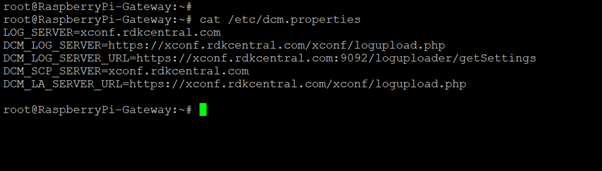
- In Raspberry Board, add the server details for log upload.
- Configure the Bellow details to dcm.properties and comment out the other details .
File : /etc/dcm.properties
LOG_SERVER=xconf.rdkcentral.com
DCM_LOG_SERVER=https://xconf.rdkcentral.com/xconf/logupload.php
DCM_LOG_SERVER_URL=https://xconf.rdkcentral.com:9092/loguploader/getSettings
DCM_SCP_SERVER=xconf.rdkcentral.com
DCM_LA_SERVER_URL=https://xconf.rdkcentral.com/xconf/logupload.php
- In Xconf UI Change Application to stb in top right corner of the window.

- Defining the Upload repositories
Flow: Xconf-server -> DCM -> Upload repository -> create ->save
Name: <Unique Identifier>
Description: <Unique Identifier>
URL: HTTP: http://35.161.239.220/xconf/telemetry_upload.php

Flow: Xconf-server -> DCM -> Formulas -> Create
Name: <unique name for log upload>
Description: <Short description for log upload>
Percentage: 100
Build condition: estbMacAddress IS <MAC Address> OR estbIP IS <IP Address>
(or) estbMacAddress IS <MAC Address> AND model is <Model Name> (Model name is already configured under Common Tab)

- As soon as the formula is saved, then a ‘define Settings’ tab with ‘Create Device Settings’, ‘Create log settings’, Create VOD settings’ will be available.

- Click on 'Create Device Settings' tab and edit the Device Settings.

- Click on ‘Create Log Update setting’ and Edit the Log upload Setting (Create schedule & add the upload repository created beforehand).
Name: Enter the name given during Log Upload Formula Creation.
Note: The formula will be effective only if we select 'Are Settings Active' option to 'true' in 'Create Device Settings' and 'Log Upload settings'.

Verification at Xconf UI.
- Test Page for Log Upload
Flow: Xconf-Server -> DCM ->Test Page
- Parameters: give a parameter that will match the one of the formulas that you have created.
- estbMacAddress < MAC Address> or
- estbIP <IP Address>
- model <Model Name>

Log Upload: Client End Verification (In RPI)

- On successful Log upload, conf file will be created under /tmp directory. This file contains the details of log upload settings which are already configured in the server.
File : /tmp/DCMSettings.conf

- Verify the logs in /rdklogs/logs/dcmscript.log file
- The log file contains the details of
- Service status, tftp details, reboot flag , check on reboot flag ,
- Upload settings details – location, protocol.
- Shows list of files which are to be uploaded to the server as a tar file (logs will be zipped and creates a tar file on every bootup/service restart), Backup folder details (/rdklogs/logs/PreviousLogs_backup)
- HTTP request processing status.
- Log files are stored in .tgz format and markers are stored in <mac_address>-TELE-<date>.json


- Log files are stored in .tgz format and markers are stored in <mac_address>-TELE-<date>.json

Feature Validation: Telemetry
- Telemetry configuration can be done by adding a permanent profile which contains below objects
- Upload repository
- Profile options (Header, content, frequency etc.)
- Creating a targeting rule which is basically mapping the profile to a set of MAC/IP/Device etc
- Note: DCM settings should be already done for the devices that you are going to set telemetry configuration.
- Create a new Telemetry Profile.
Flow: X-conf-server -> Telemetry -> Permanent Profiles -> Create button
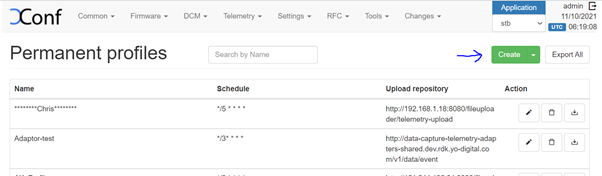
- The permanent profile must have the below entries
- Name of the RPI device profile
- Upload Repository (HTTP/TFTP, HTTP : http://35.161.239.220/xconf/telemetry_upload.php)
- Telemetry profile Entries(We can add multiple telemetry profiles using “+” button.
- In the Telemetry Permanent Profile page, there will be a 5th column that allows a component name to be entered. The component name is optional and may be present for only some of the entries in the Telemetry profile.

- Once you save the permanent profile, you will get a message overlay ‘Profile added to the pending changes’. Then go to Changes -> select the profile you create -> Click on “Approve selected changes”.

- Then the permanent profile will be listed under Telemetry - > Permanent profiles.
- Creating targeting rules for RPI
- Flow: X-conf-server -> Telemetry -> Targeting rules -> Create
- Name : Name of the Targeting Rule
- Rule : ex : estbMacAddress IS <MAC Address>
- Bound Profile : Choose the Permanent Profile

- Verification of telemetry test page.
After creating the permanent profile and targeting rules, go to Telemetry->Test page and give a parameter that will match the one of the rules that you have created. Then matched rule will be displayed like below.

Sample Output

- Server configuration that we set in Xconf server is copied to /tmp/DCMSettings.conf file.

- Logs and Telemetry markers are uploaded via HTTP to the xconf server https://xconf.rdkcentral.com/xconf/upload/
- Log files are stored in .tgz format and markers are stored in <mac_address>-TELE-<date>.json
Sample Log is as below
- Telemetry Log Markers


- All the Logs will be updated as .tgz format in xconf server.

Feature Validation: Telemetry2_0
Pre- requisites for enabling Telemetry2_0
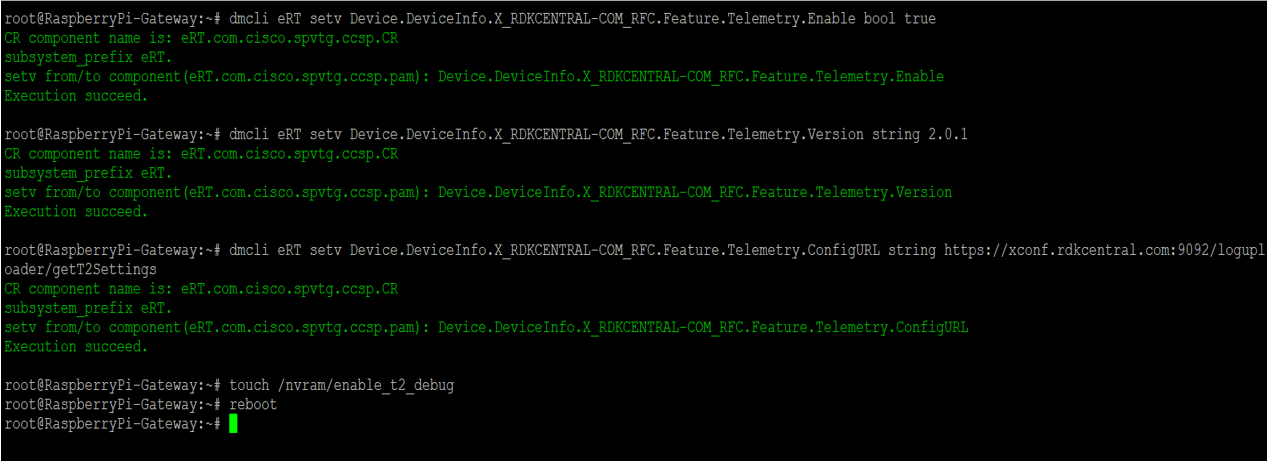
Telemetry Version: 2.0.1 (by default telemetry version as 1)
- Below are the steps for enabling telemetry 2.0.1 in RPI
- dmcli eRT setv Device.DeviceInfo.X_RDKCENTRAL-COM_RFC.Feature.Telemetry.Enable bool true
- dmcli eRT setv Device.DeviceInfo.X_RDKCENTRAL-COM_RFC.Feature.Telemetry.Version string 2.0.1
- dmcli eRT setv Device.DeviceInfo.X_RDKCENTRAL-COM_RFC.Feature.Telemetry.ConfigURL string https://xconf.rdkcentral.com:9092/loguploader/getT2Settings
- touch /nvram/enable_t2_debug
- reboot the device
- pidof "telemetry2_0" - check the running status of telemetry2
- T2 DataModel will be loaded
- Below screenshot for enabling the T2 process of version 2.0.1 in RPI
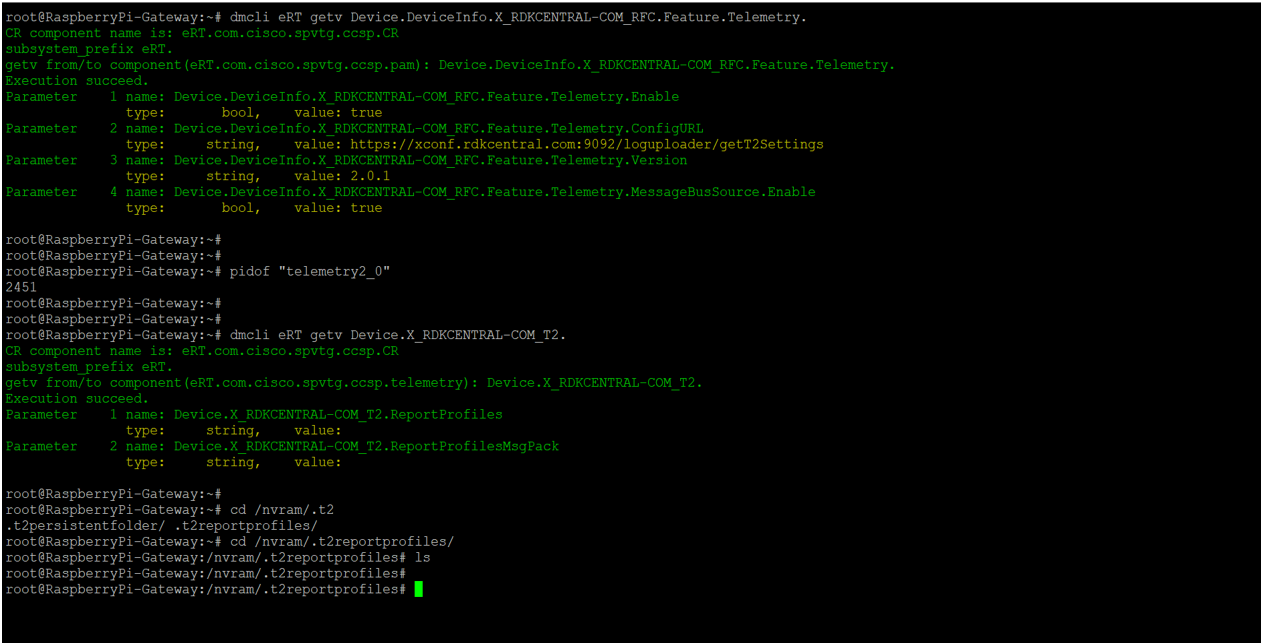
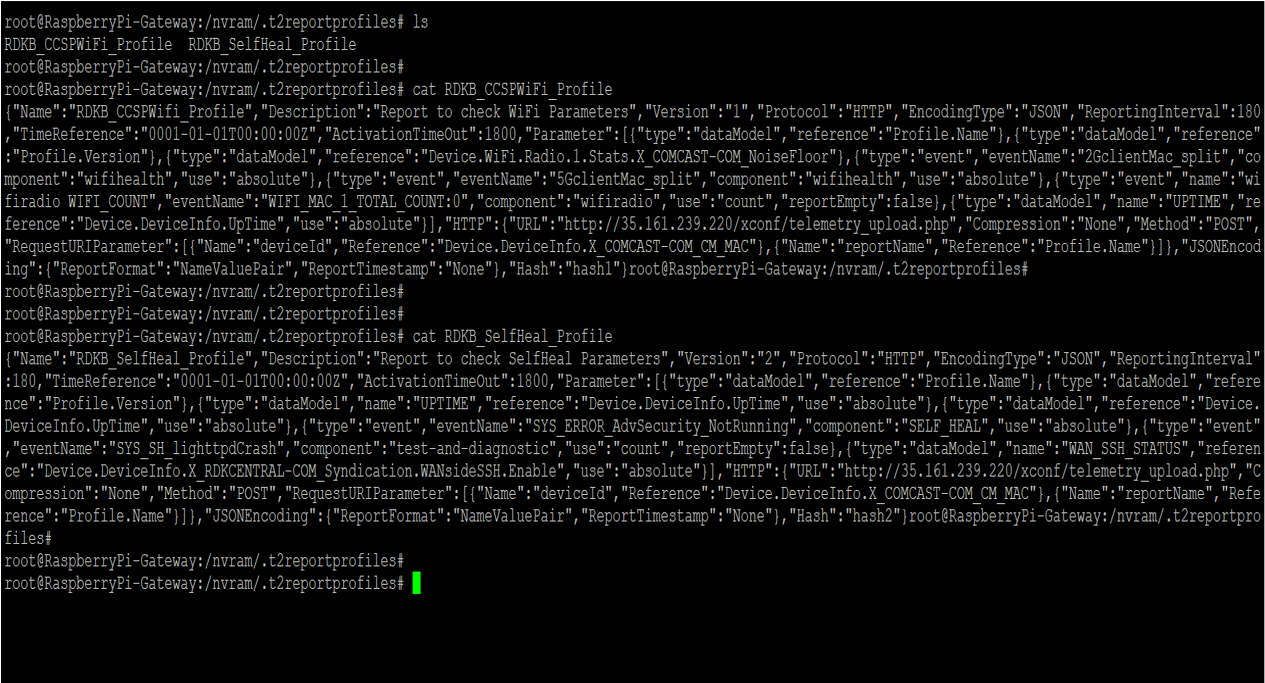
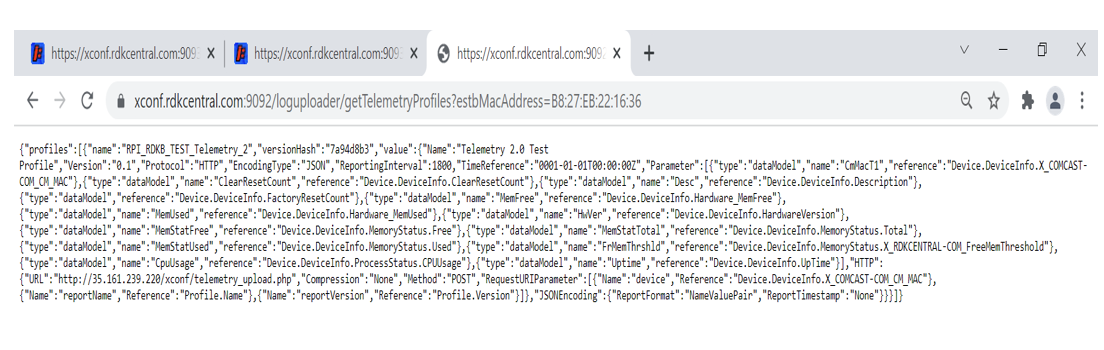
- Telemetry 2.0 Report Profiles
Telemetry 2 adds support for RDK Components to send their telemetry data to the T2 component for reporting. This allows for moving away from the CPU-intensive process of searching through log files for telemetry strings.
Telemetry 2.0 allows for an RDK device to be updated with a set of T2 profiles at any time.
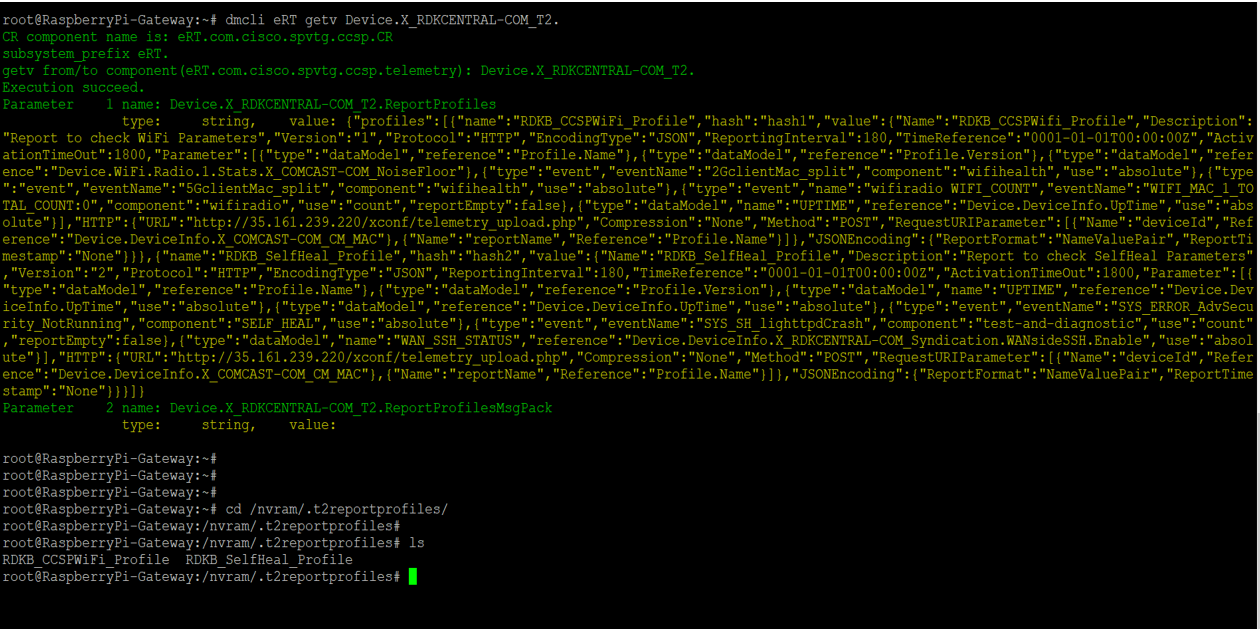
There are 2 parameters under T2 report profiles,
| DM | Description |
1 | Device.X_RDKCENTRAL-COM_T2.ReportProfilesMsgPack | Value must be JSON configuration blob in base 64 encoded msgpack format |
2 | Device.X_RDKCENTRAL-COM_T2.ReportProfiles | Value must be JSON configuration blob in string |
- DMCLI SET Command for T2 Report Profile
| dmcli eRT setv Device.X_RDKCENTRAL-COM_T2.ReportProfiles string '{"profiles":[{"name":"RDKB_CCSPWiFi_Profile","hash":"hash1","value":{"Name":"RDKB_CCSPWifi_Profile","Description":"Report to check WiFi Parameters","Version":"1","Protocol":"HTTP","EncodingType":"JSON","ReportingInterval":180,"TimeReference":"0001-01-01T00:00:00Z","ActivationTimeOut":1800,"Parameter":[{"type":"dataModel","reference":"Profile.Name"},{"type":"dataModel","reference":"Profile.Version"},{"type":"dataModel","reference":"Device.WiFi.Radio.1.Stats.X_COMCAST-COM_NoiseFloor"},{"type":"event","eventName":"2GclientMac_split","component":"wifihealth","use":"absolute"},{"type":"event","eventName":"5GclientMac_split","component":"wifihealth","use":"absolute"},{"type":"event","name":"wifiradio WIFI_COUNT","eventName":"WIFI_MAC_1_TOTAL_COUNT:0","component":"wifiradio","use":"count","reportEmpty":false},{"type":"dataModel","name":"UPTIME","reference":"Device.DeviceInfo.UpTime","use":"absolute"}],"HTTP":{"URL":"http://35.161.239.220/xconf/telemetry_upload.php","Compression":"None","Method":"POST","RequestURIParameter":[{"Name":"deviceId","Reference":"Device.DeviceInfo.X_COMCAST-COM_CM_MAC"},{"Name":"reportName","Reference":"Profile.Name"}]},"JSONEncoding":{"ReportFormat":"NameValuePair","ReportTimestamp":"None"}}},{"name":"RDKB_SelfHeal_Profile","hash":"hash2","value":{"Name":"RDKB_SelfHeal_Profile","Description":"Report to check SelfHeal Parameters","Version":"2","Protocol":"HTTP","EncodingType":"JSON","ReportingInterval":180,"TimeReference":"0001-01-01T00:00:00Z","ActivationTimeOut":1800,"Parameter":[{"type":"dataModel","reference":"Profile.Name"},{"type":"dataModel","reference":"Profile.Version"},{"type":"dataModel","name":"UPTIME","reference":"Device.DeviceInfo.UpTime","use":"absolute"},{"type":"dataModel","reference":"Device.DeviceInfo.UpTime","use":"absolute"},{"type":"event","eventName":"SYS_ERROR_AdvSecurity_NotRunning","component":"SELF_HEAL","use":"absolute"},{"type":"event","eventName":"SYS_SH_lighttpdCrash","component":"test-and-diagnostic","use":"count","reportEmpty":false},{"type":"dataModel","name":"WAN_SSH_STATUS","reference":"Device.DeviceInfo.X_RDKCENTRAL-COM_Syndication.WANsideSSH.Enable","use":"absolute"}],"HTTP":{"URL":"http://35.161.239.220/xconf/telemetry_upload.php","Compression":"None","Method":"POST","RequestURIParameter":[{"Name":"deviceId","Reference":"Device.DeviceInfo.X_COMCAST-COM_CM_MAC"},{"Name":"reportName","Reference":"Profile.Name"}]},"JSONEncoding":{"ReportFormat":"NameValuePair","ReportTimestamp":"None"}}}]}' |
|---|
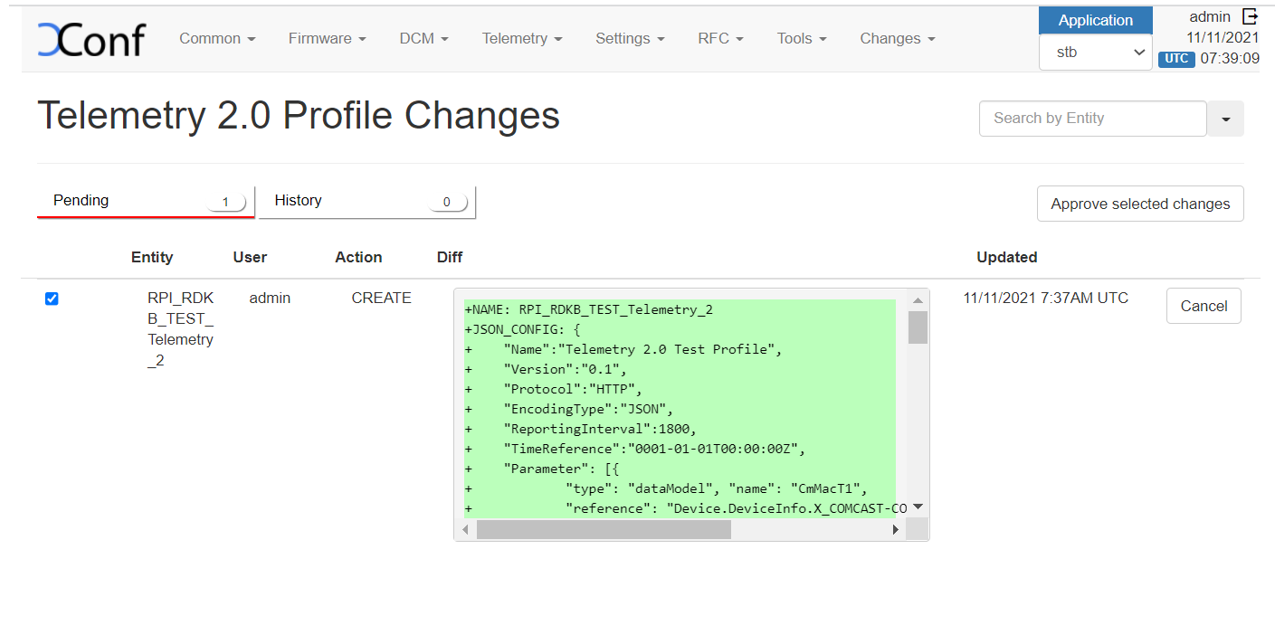
- Telemetry 2.0 Report Profiles Generation in xconf,
Flow: xconf Server UI -> Telemetry -> Telemetry 2.0 Profiles -> create
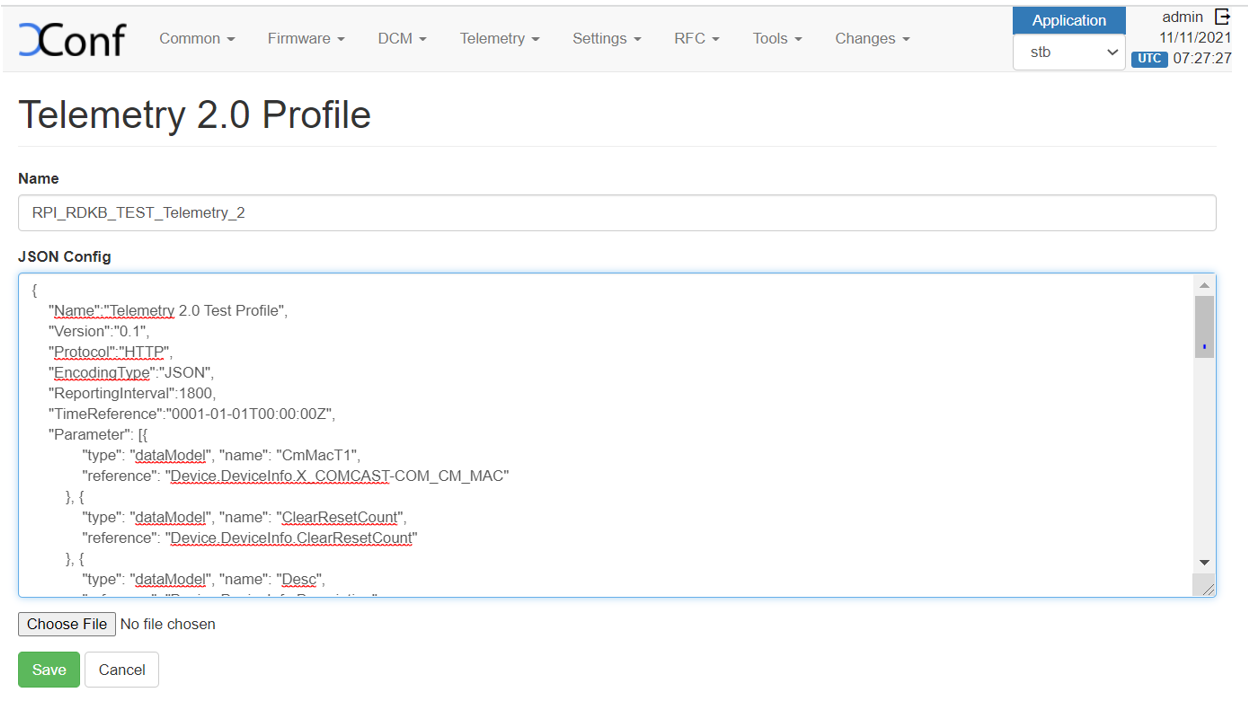
- Once you save the Telemetry 2.0 profile, you will get a message overlay ‘Profile added to the pending changes’. Then go to Changes -> select the profile you create -> Click on “Approve selected changes”.
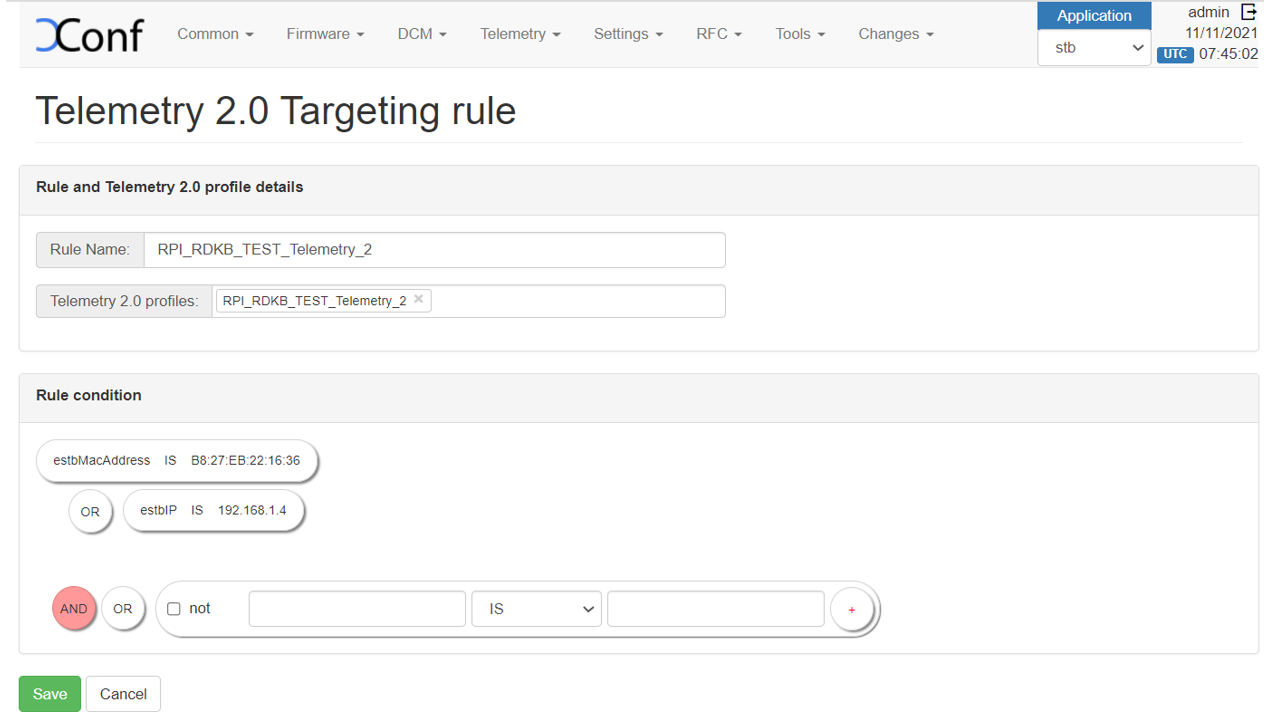
- Create Telemetry 2.0 Targeting Rule
Flow: Xconf Server -> Telemetry > Telemetry 2.0 Rules > create
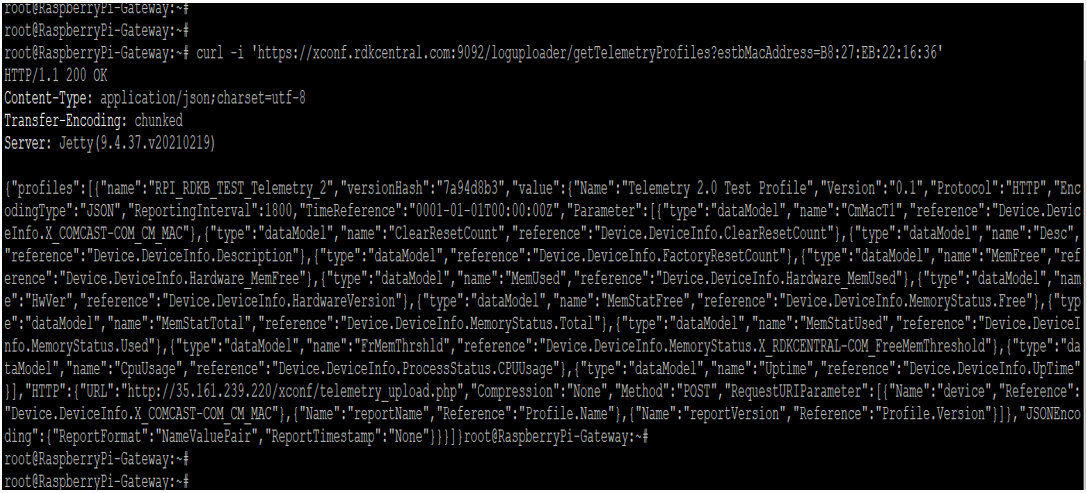
- Verification
Flow: Xconf -Server -> Telemetry > Telemetry 2.0 Test page

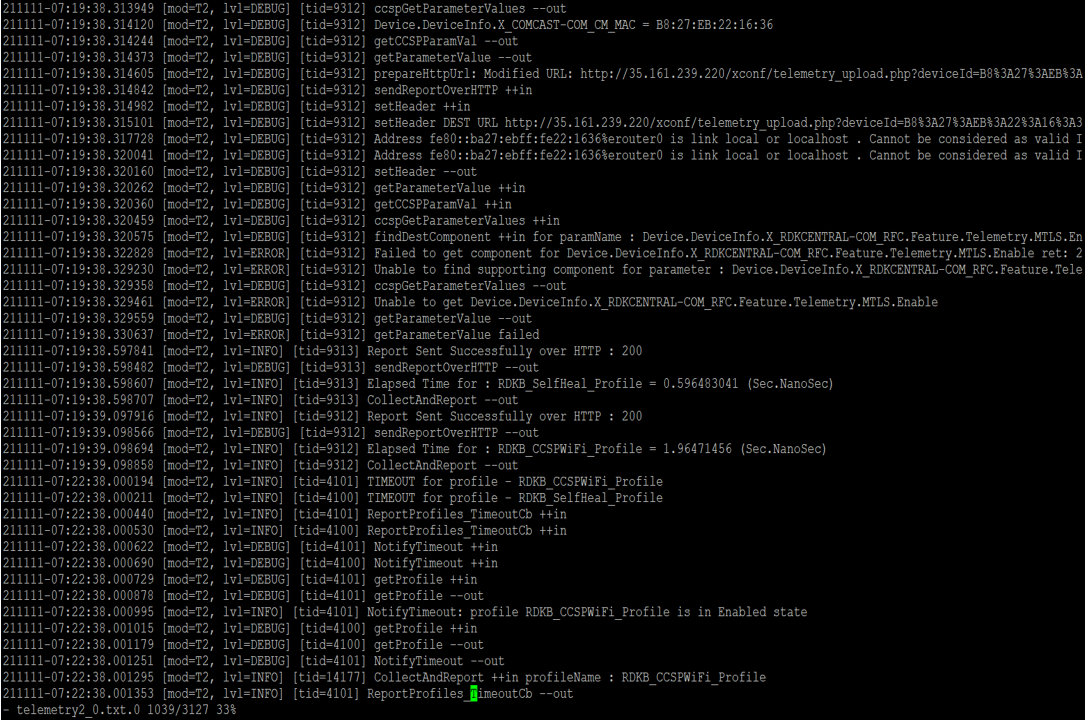
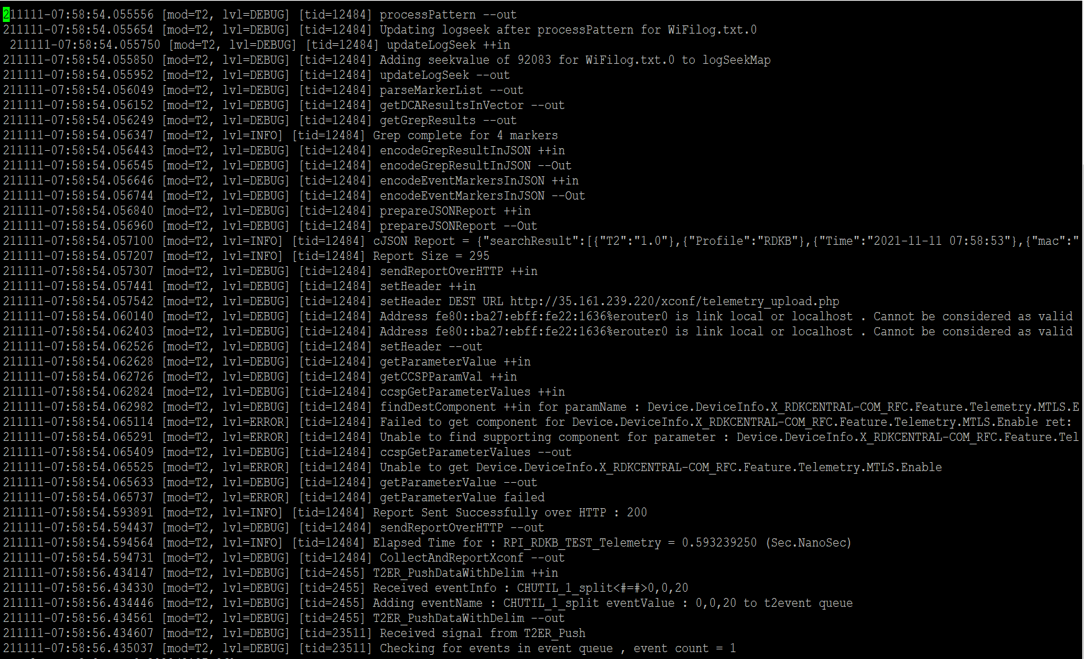
- Log Verification in RPI
Path: rdklogs/logs/
file: telemetry2_0.txt.0
Feature Validation: Remote Feature Control (RFC)

- Verify the existing(default) value of TR181 parameters
root@RaspberryPi-Gateway:~# dmcli eRT getv Device.X_Comcast_com_ParentalControl.ManagedSites.Enable Device.X_Comcast_com_ParentalControl.ManagedServices.Enable
CR component name is: eRT.com.cisco.spvtg.ccsp.CR
subsystem_prefix eRT.
getv from/to component(eRT.com.cisco.spvtg.ccsp.pam): Device.X_Comcast_com_ParentalControl.ManagedSites.Enable
Execution succeed.
Parameter 1 name: Device.X_Comcast_com_ParentalControl.ManagedSites.Enable
type: bool, value: false
Parameter 2 name: Device.X_Comcast_com_ParentalControl.ManagedServices.Enable
type: bool, value: true

- Xconf Server UI Configuration
Change Application to stb in top right corner of the window.
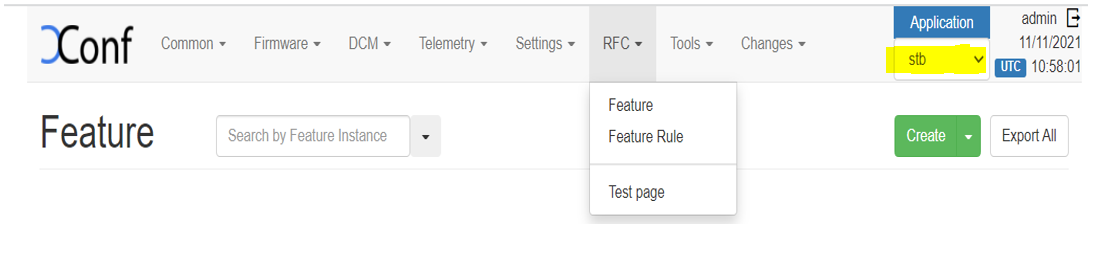
- Define the Feature
Flow : Xconf-Server -> RFC -> Feature ->Create
Feature Instance: <Unique Identifier>
Name: <Unique Identifier>
Config Data: < tr181 parameter with its new value>
Effective immediate: true
Enable: true

- Define the Feature Rule
Flow: Xconf-server -> RFC -> Feature Rule -> Create
Name : <Unique Identifier>
Priority: 1
Feature : choose your RFC feature ( Previously created)
Rule : estbMacAddress IS <MAC Address>
OR
estbIP IS <IP Address>

- RFC- Test Page
Flow: Xconf-server -> RFC -> Test Page
Parameter : estbMacAddress IS <MAC Address>
OR
estbIP IS <IP Address>

- Verification through Curl command
Restart the rfc service: systemctl restart rfc.service
curl -i 'http://<IP>:9092/featureControl/getSettings?estbMacAddress=<MAC-Address>&model=RDKB_RPI’

- Once it is successful, rfc-parsed.txt will be created under /tmp directory.
- Configured data’s that are parsed to the client can be verified at /tmp/rfc_configdata.txt


- Verify the logs in /rdklogs/logs/dcmrfc.log file


Firmware Upgradation for RPI using Xconf Server
- Introduction
The Firmware upgrade will upgrade higher or lower version of the current image in RPI target with the help of Xconf server and TFTP/HTTP protocol.
- TFTP Server Setup
STEP 1:
Install xinetd and tftpd-hpa application in your local PC to setup tftp server by using below command
sudo apt-get install xinetd
sudo apt-get install tftpd-hpa
STEP 2:
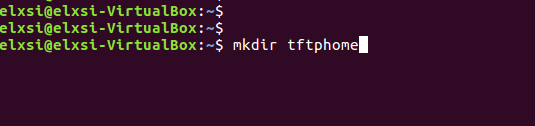
Create new folder ,for example "tfphome" in your PC home directory to maintain checksum file and upgrading image file.
STEP 3:
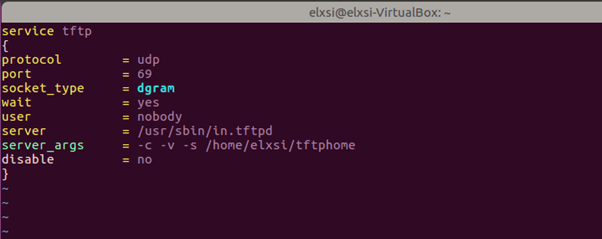
Check tftp file is there or not in /etc/xinetd.d/ directory. if it is not there then create tftp file under this /etc/xinetd.d/ direcotry and add below content.
vi /etc/xinetd.d/tftp
service tftp
{
protocol = udp
port = 69
socket_type = dgram
wait = yes
user = nobody
server = /usr/sbin/in.tftpd
server_args = -c -v -s /home/xyz/tftphome ( Give upgrading file and checksum file maintained directory )
disable = no
} |
|---|
File : /etc/xinetd.d/tftp
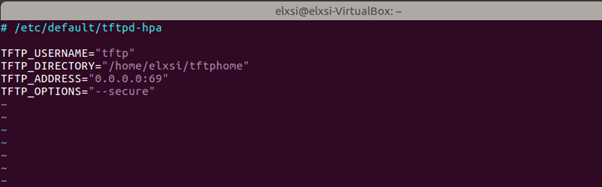
vi /etc/default/tftpd-hpa
# /etc/default/tftpd-hpa TFTP_USERNAME="tftp"
TFTP_DIRECTORY="/home/xyz/tftphome" ( Give upgrading file and checksum file maintained directory )
TFTP_ADDRESS="0.0.0.0:69"
TFTP_OPTIONS="--secure" |
|---|
File: /etc/default/tftpd-hpa
STEP 5: Start tftp server and xinetd server using below commands.
sudo service tftpd-hpa restart
sudo /etc/init.d/xinetd restart
- Procedure for image flashing
- Have 2 different broadband images and copy to the linux machine
- Flash a image to the SD card(SD card Minimum size should be 8GB)
→ for Morty version
sudo dd if=<image> of=/dev/sdb bs=4M
Example : $ sudo dd if=rdkb-generic-broadband-image_default_20190808132609.rootfs.rpi-sdimg of=/dev/sdb bs=1M
→ For dunfell version
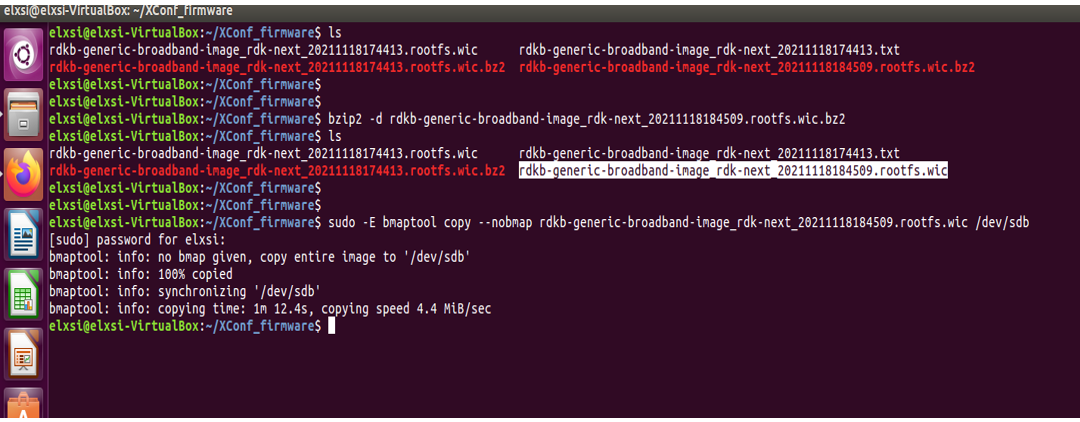
bzip2 -d <image>
sudo -E bmaptool copy --nobmap <image> /dev/sdb
Example:
$ bzip2 -d rdk-generic-broadband-image-raspberrypi-rdk-broadband.wic.bz2
$ sudo -E bmaptool copy --nobmap rdk-generic-broadband-image-raspberrypi-rdk-broadband.wic /dev/sd
- With another image
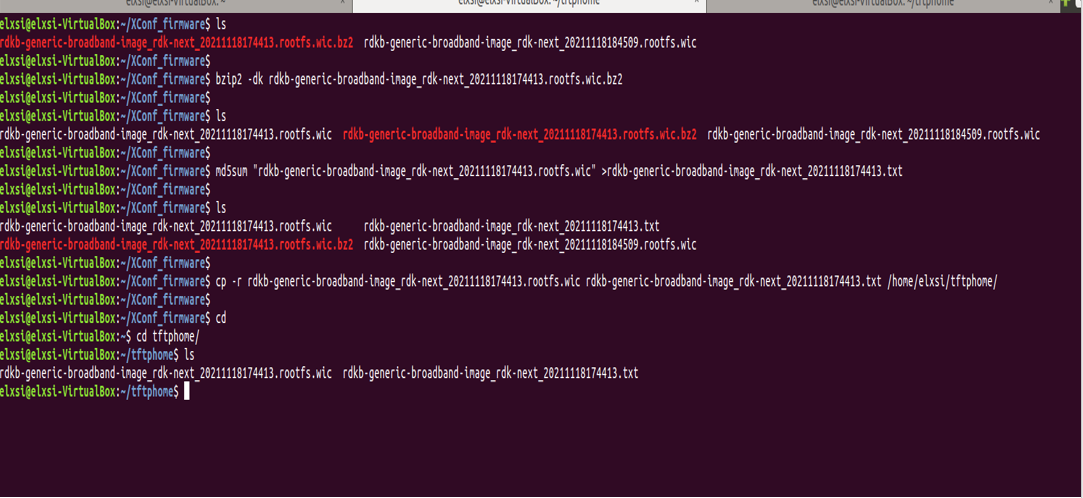
- Create checksum using the below command
md5sum "<imagefile_name>" > imagefile_name.txt
- Copy both (image as well as the checksum) to tftp server
for Ex:
md5sum "rdkb-generic-broadband-image_rdk-next_20211118174413.rootfs.wic" >rdkb-generic-broadband-image_rdk-next_20211118174413.txt
cp -r rdkb-generic-broadband-image_rdk-next_20211118174413.rootfs.wic rdkb-generic-broadband-image_rdk-next_20211118174413.txt /home/xyz/tftphome
Xconf Server UI Configurations
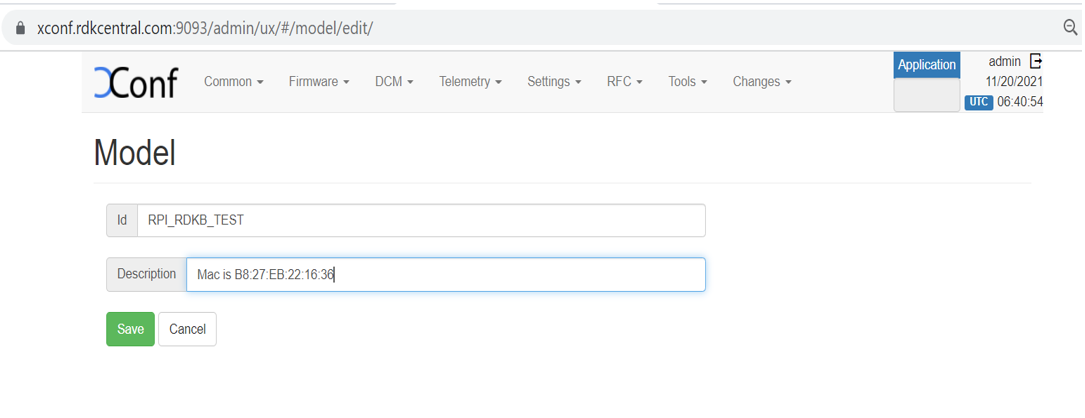
- Create Model
Flow: Xconf-Server ->Common ->Models
Give ID and Description to setup Model for your device and save that details in xconf server.
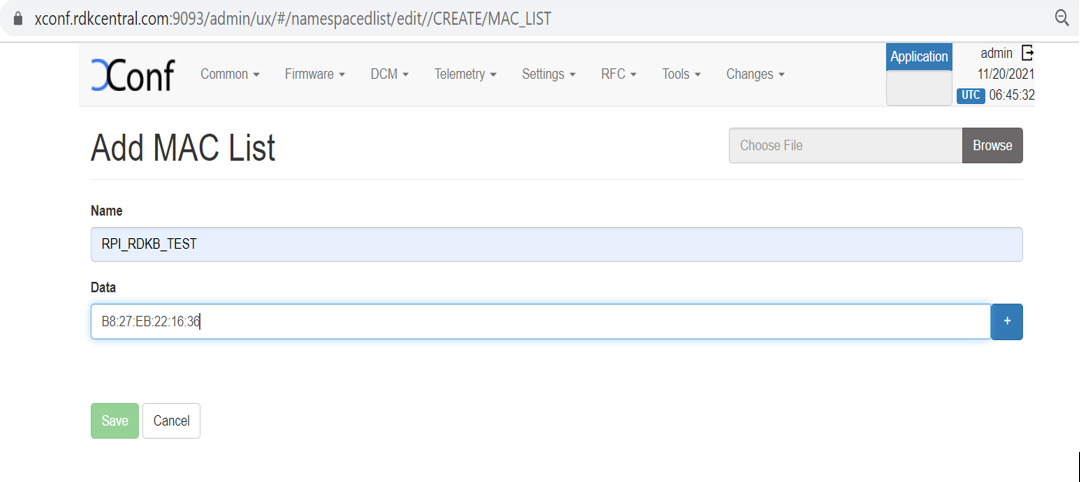
- Create MAC List
Flow: Xconf-Server->Common->MAC Lists
After entered MAC Lists page press create button to add your device MAC detail and save the details.
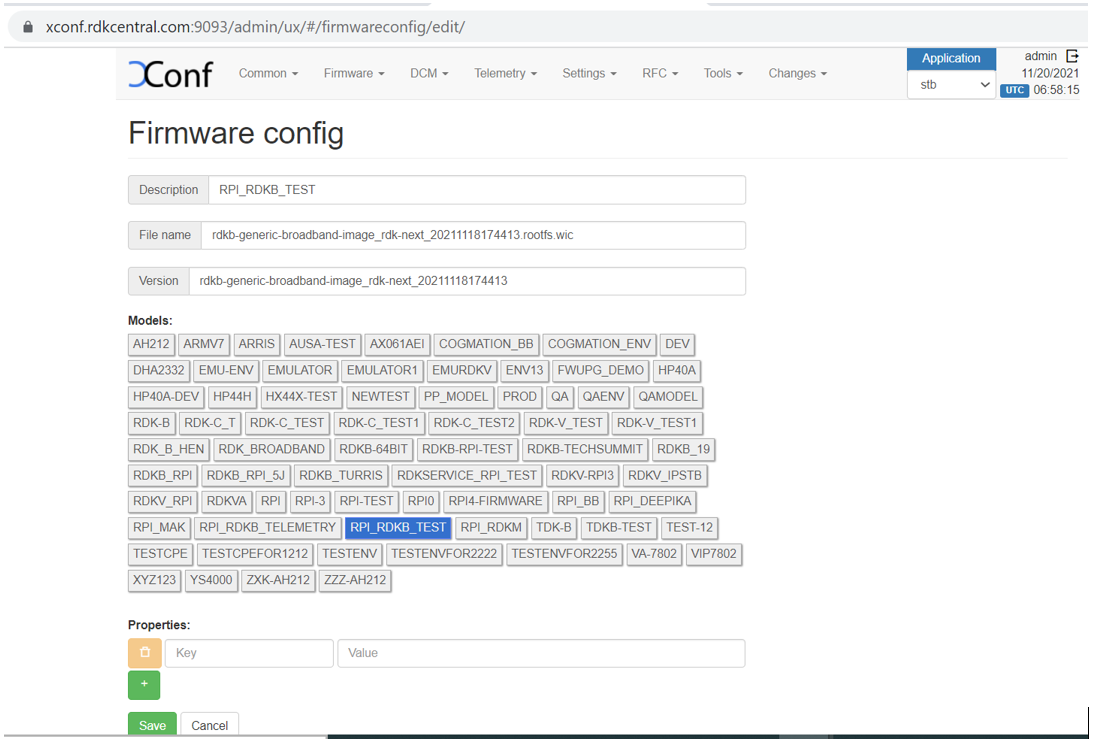
- Create Firmware config
Flow: Xconf-Server->Firmware->Firmware Configs
After entered Firmware Configs page press create button to add your device firmware configuration detail.
Give Description, File name, Version and select your model name and save the details in xconf server.
Description: <unique Identifier>
File Name :<Upgrading image name>
Version: <Upgrading image name without .rootfs.rpi.sdimg or .bz2.wic>
Model: <Model name configured under Common Tab>
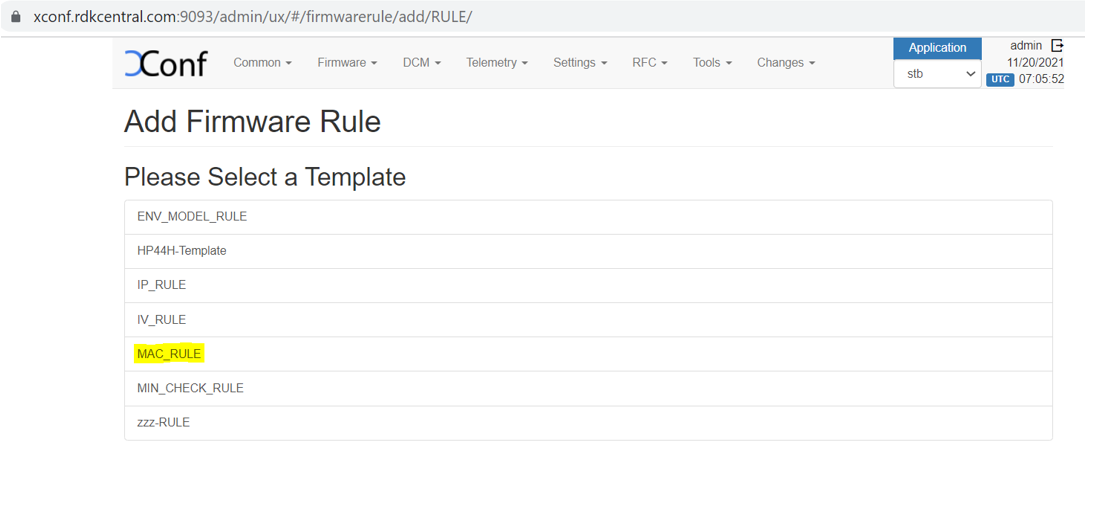
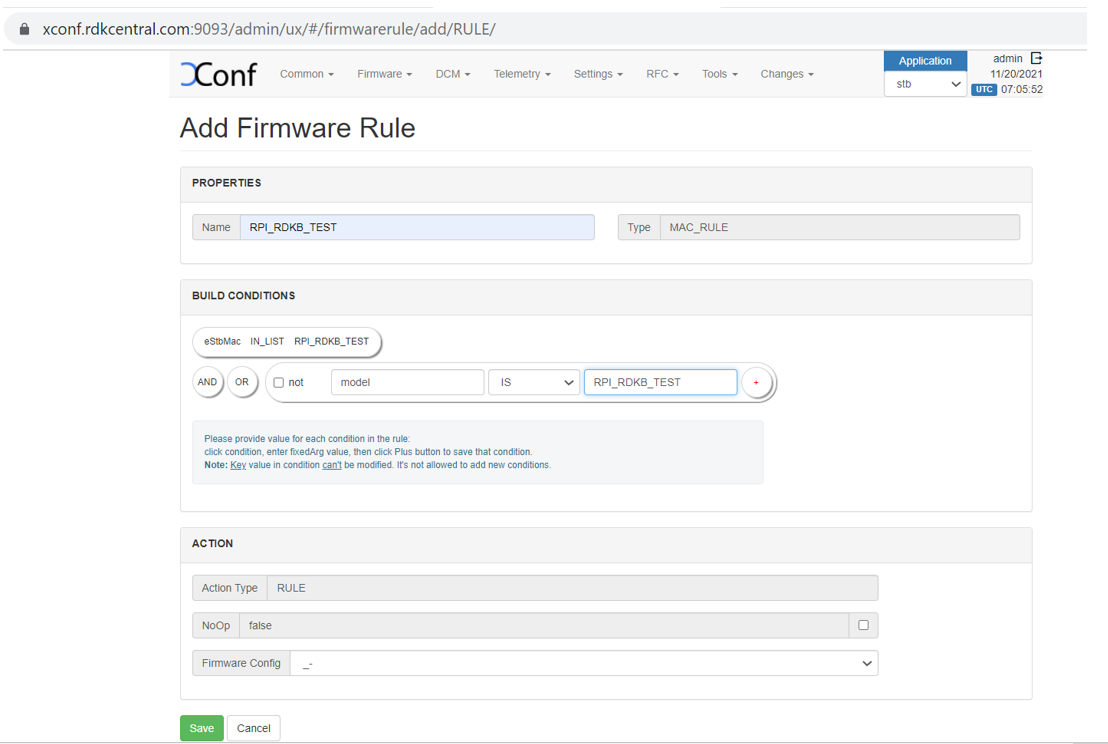
- Create Firmware Rule
Flow: Xconf-Server->Firmware->Firmware Rules
After entered Firmware Rule page press create button to add your device firmware Rule detail.
Please Select a Template : <MAC_RULE>
Name : <Name difined during firmware configs creation>
Type : <MAC_RULE>
Build Conditions:eStbMac IN_LIST <List-Id> AND model is <Model_Name>
Firmware Config:<select the same name defined during configs creation>
- Edit Download Location Round Robin Filter
Flow: Xconf-server -> Firmware -> Download Location Filter -> Edit
After entered Download Location Filter page press Edit button to add your Download Location detail.
Location (FQDN) : <xconf.rdkcentral.com>
Location (full HTTP Location) : <https://xconf.rdkcentral.com/xconf/upload/>
TFTP :< Tftp server IPv4 and IPv6 Address>

- Add TFTP location
An HTTP location will be returned by default to all devices. To enable tftp(If you have the download location of the firmware as tftp, then only you need to setup this)as download location for a particular set of devices, we need to override it from firmware rules.
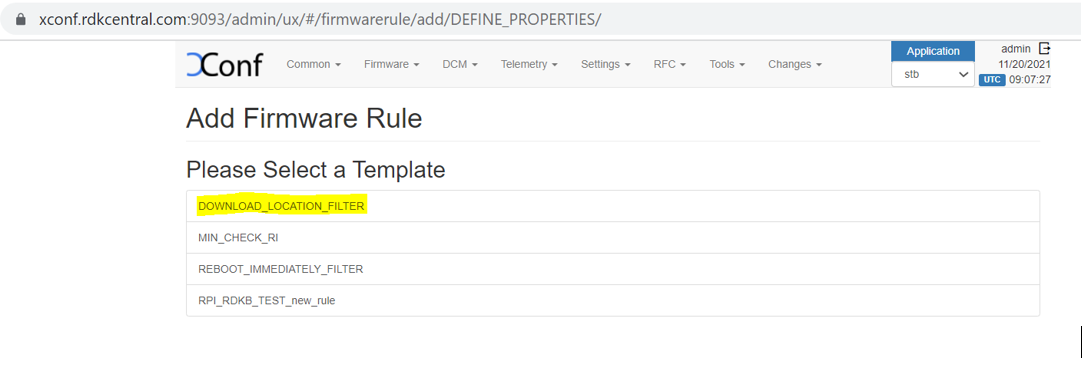
Flow : Xconf-server -> Firmware ->Firmware Rules -> Define Properties -> Create

- A page will be displayed with options to select the template. Select ‘DOWNLOAD_LOCATION_FILTER’ from the list.
- In this 'firmware rule’ page with type 'DOWNLOAD_LOCATION_FILTER', we need to specify the ‘Build Conditions’ and ‘Action’ , The build condition should be same as that we used to set rule actions(which will set rules for our intended devices). In ‘Properties’ option under ‘Action’, add ‘firmwareDownloadProtocol’ as ‘tftp’, ‘firmwareLocation’ as ‘your tftp location IPV4 address’. This property will override the default value set from ‘Download Round Robin location filter’.
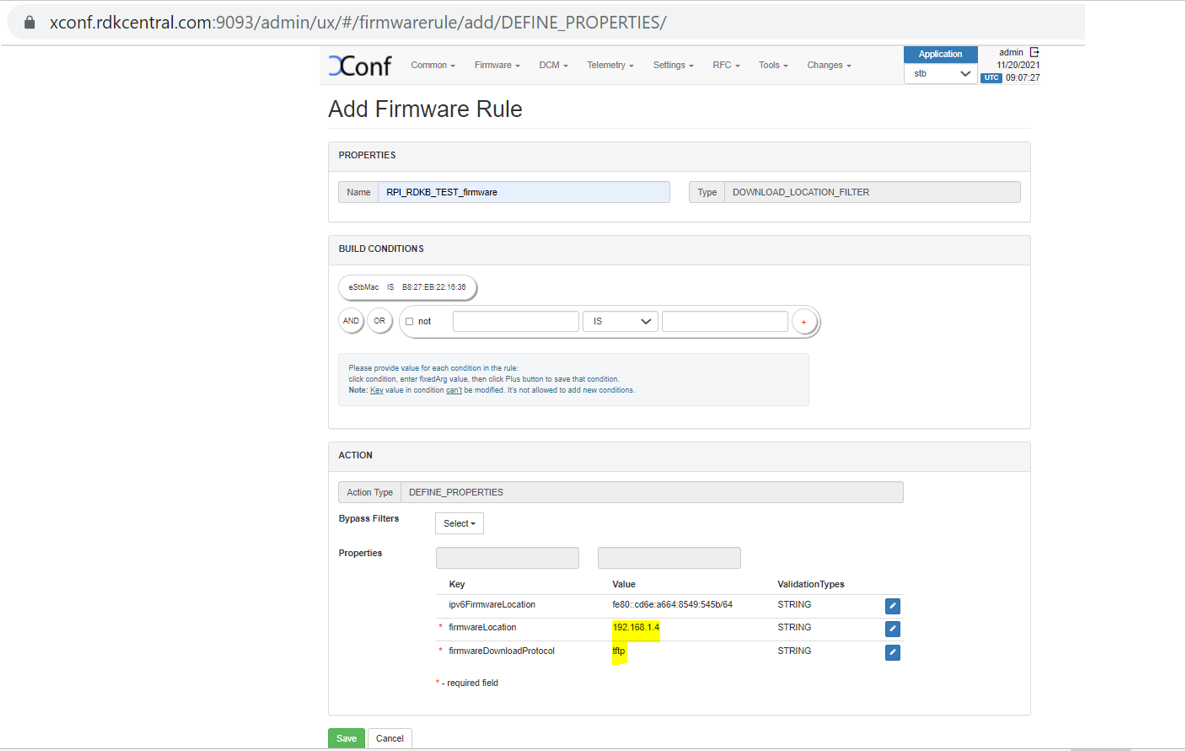
- Note: Setting up IPV4 locations via ‘Download Location Round Robin Filter’ is not supported. This can be set only by the property 'firmwareLocation' from the 'Define Properties' firmware rule page.
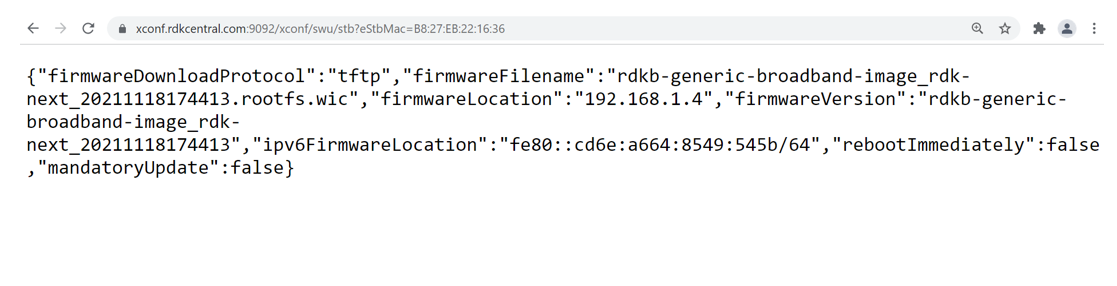
Just like we added tftp location and protocol here, we can also override the default value with http as well. For firmwareDownloadProtocol, add 'http' and for the 'firmwareLocation', add http location. - Response example for https://{xconf-ip}:{port}/xconf/swu/stb?eStbMac={mac}. Here the 'firmwareLocation' and 'firmwareDownloadProtocol' are overrided at 'Define Properties' firmware rule.
- The 'ipv6' addresses will be one of the addresses mentioned in the 'Download Filter' page . If you don't want "ipv6FirmwareLocation", then don't setup it in 'Define Properties' or in the 'Download location filter' pages and you will get only "firmwareLocation" in the response.
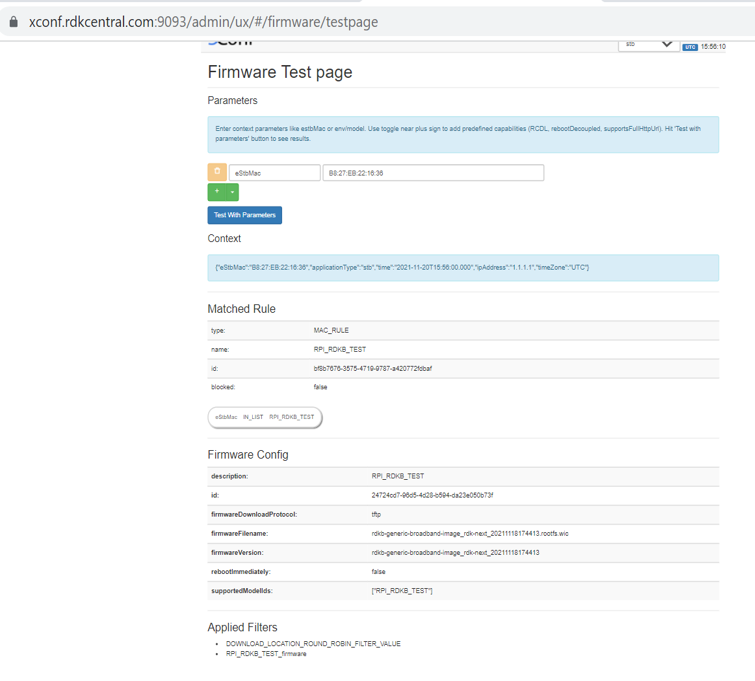
- Verification of Firmware test page
Flow : Xconf-server -> Firmware -> Test Page
Parameters : eStbMac <MAC-Address>


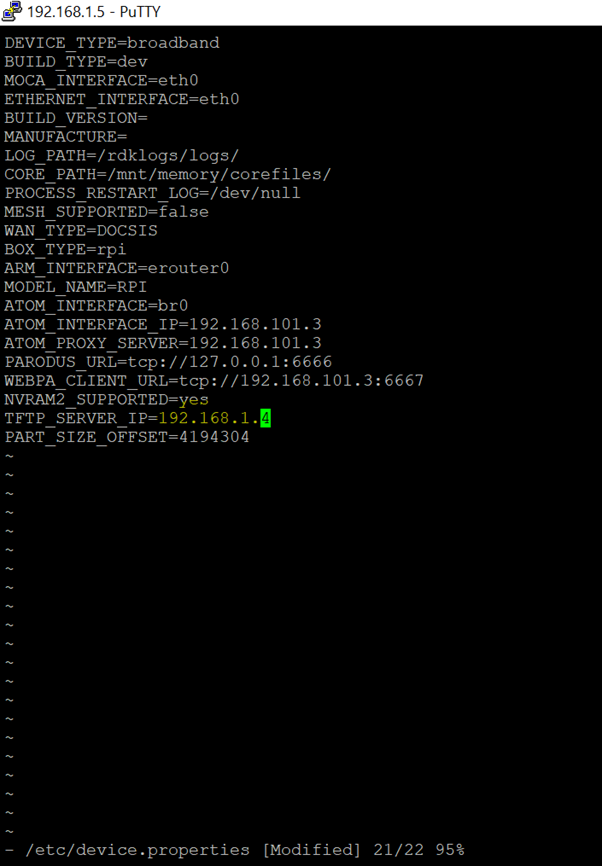
- Change the TFTP address in /etc/device.properties
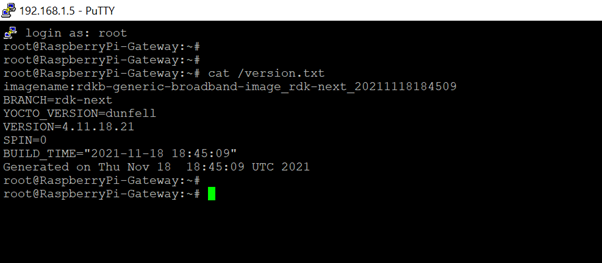
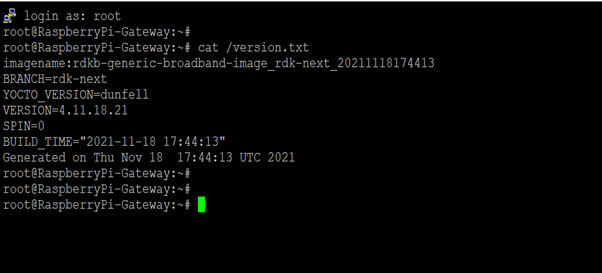
- Check the image version using “cat /version.txt”
- Restart the service using below command
root@RaspberryPi-Gateway:~# systemctl restart swupdate.service
else reboot the board.
Note: For the 1st time board go for automatic reboot when we give restart of swupdate service and creates 2 more partitions in sd card. - Check the response, xconf_curl_httpcode and swupdate log files under /rdklogs/logs/
- This log file contains the below details
service status, http code , MAC address , JSONSTR, cloud prototype (TFTP), cloud version , RPI version , Checksum ,Number of partitions Device type, Active and Passive bank partitions ,Upgrade successful message.
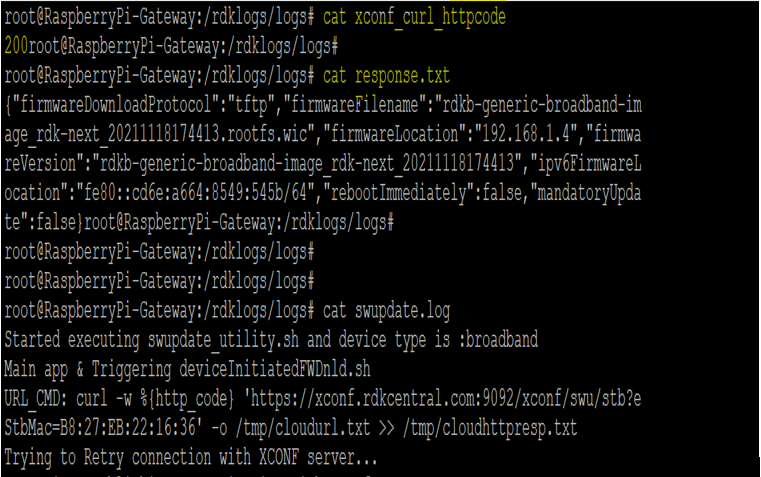
- Sample Log
root@RaspberryPi-Gateway:/rdklogs/logs#
root@RaspberryPi-Gateway:/rdklogs/logs# cat swupdate.log
Started executing swupdate_utility.sh and device type is :broadband
Main app & Triggering deviceInitiatedFWDnld.sh
URL_CMD: curl -w %{http_code} 'https://xconf.rdkcentral.com:9092/xconf/swu/stb?eStbMac=B8:27:EB:22:16:36' -o /tmp/cloudurl.txt >> /tmp/cloudhttpresp.txt
No error in curl command and curl http code is:200
cloud version is rdkb-generic-broadband-image_rdk-next_20211118174413
RPI version is rdkb-generic-broadband-image_rdk-next_20211118184509
Active bank is:2
rpiimageModel in dev is :rdkb
cloudimageModel is :rdkb
no of parts is :4
active bank is 0 so fetch info from passive and partition is:2
rpipassivebankimageModel:
passivebankVersion:
since bank1 p3 is broadband and pass bank is rdkv cloud is broadband check broadband version and upgrade if mismatches
check broadband versions and upgrade if mismatches !!
Device type is broadband !!
Image Upgrade During Bootup ..!
Main APP of devinitFWDNLD---
2021-11-22 07:15:14 version = rdkb-generic-broadband-image_rdk-next_20211118184509
2021-11-19 07:15:14 buildtype = dev
Mac in jsonstr:B8:27:EB:22:16:36&model=RPI&capabilities=RCDL&capabilities=supportsFullHttpUrl
2021-11-22 07:15:14 JSONSTR: B8:27:EB:22:16:36&model=RPI&capabilities=RCDL&capabilities=supportsFullHttpUrl
Trying to communicate with XCONF server
URL_CMD: curl -w %{http_code} 'https://xconf.rdkcentral.com:9092/xconf/swu/stb?eStbMac=B8:27:EB:22:16:36&model=RPI&capabilities=RCDL&capabilities=supportsFullHttpUrl' -o /rdklogs/logs/response.txt >> /rdklogs/logs/xconf_curl_httpcode
CKP: got no error in curl command!!!!!!!!!!!!!200
Curl return code : 0
ret = 0, http_code: 200 for XCONF communication
2021-11-22 07:15:15 HTTP request success. Processing response..
OUTPUT1 :
2021-11-22 07:15:16 cloudFWFile: rdkb-generic-broadband-image_rdk-next_20211118174413.rootfs.wic
2021-11-22 07:15:16 cloudFWLocation: 192.168.1.4
2021-11-22 07:15:16 cloudFWVersion: rdkb-generic-broadband-image_rdk-next_20211118174413
2021-11-22 07:15:16 cloudProto: tftp
2021-11-22 07:15:16 cloudImmediateRebootFlag: false
2021-11-22 07:15:16 myFWVersion = rdkb-generic-broadband-image_rdk-next_20211118184509
2021-11-22 07:15:16 myFWFile =
2021-11-22 07:15:16 lastDnldFile:
2021-11-22 07:15:16 cloudFWVersion: rdkb-generic-broadband-image_rdk-next_20211118174413
2021-11-22 07:15:16 cloudFWFile: rdkb-generic-broadband-image_rdk-next_20211118174413.rootfs.wic
Xconf image Check
Firmware versions are different myFWVersion : rdkb-generic-broadband-image_rdk-next_20211118184509 cloudFWVersion : rdkb-generic-broadband-image_rdk-next_20211118174413
cloudFWLocation192.168.1.4
cloudfile :rdkb-generic-broadband-image_rdk-next_20211118174413.rootfs.wic
protocol1
2021-11-22 07:15:16 Starting Image Flashing ...
2021-11-22 07:15:16 Upgrade Server = 192.168.1.4
2021-11-22 07:15:16 Upgrade File = rdkb-generic-broadband-image_rdk-next_20211118174413.rootfs.wic
2021-11-22 07:15:16 Reboot Flag = 0
2021-11-22 07:15:16 Upgrade protocol = 1
2021-11-22 07:15:16 PDRI Upgrade =
CKP !!!!!!!!! calling rpi_sw_install
Checking available partition for bank switch and image upgrade...
Creating additional partition for storage area and box will go for reboot...
storage partition mmcblk0p4 is available
file system type check count partition p3 is 0
Creating ext4 file system for partition mmc0blkp3...
Discarding device blocks: done
Creating filesystem with 524288 4k blocks and 131072 inodes
Filesystem UUID: 2fbcfc3a-6b84-48b0-a171-86dd13cbf82b
Superblock backups stored on blocks:
32768, 98304, 163840, 229376, 294912 Allocating group tables: done
Writing inode tables: done
Creating journal (16384 blocks): done
Writing superblocks and filesystem accounting information: done
file system type check count partition p4 is 0
Creating ext4 file system for partition mmc0blkp4...
Discarding device blocks: done
Creating filesystem with 524288 4k blocks and 131072 inodes
Filesystem UUID: 1c2075c1-9de9-4fb0-b9ab-f9ca277f54d7
Superblock backups stored on blocks:
32768, 98304, 163840, 229376, 294912 cloud proto is :1
set IPtable rules for tftp !!
cloudfile is:rdkb-generic-broadband-image_rdk-next_20211118174413.rootfs.wic
cloudlocation is:192.168.1.4
Downloading already deployed checksum file from server rdkb-generic-broadband-image_rdk-next_20211118174413.rootfs.wic
tftp download checksum file
checksum file to download is rdkb-generic-broadband-image_rdk-next_20211118174413.txt
Downloading rdkb-generic-broadband-image_rdk-next_20211118174413.rootfs.wic ... |
|---|
- Verify the tftp download is happening by noticing the change of file size using below command:
ls /extblock/tftpimage/imagedwnldls -sh (use this command frequently to verify the file size change)

- Once image download completed, the RPI board will auto reboot and come up with downloaded image.
- Once the board comes up, check the image loaded in the box using “cat /version.txt” command .It will be upgraded with the image from xconf-server.
NOTE : Every time need to flash the different images . Because, here they are using the bank switching approach (https://wiki.rdkcentral.com/display/RDK/RDKB+RPI+Firmware+Upgrade+-+Design+-+2019+M7) where the images will be stored in the cloud.
So for the next time, when you try to flash the same image to SD card , the firmware upgrade will not happen . The reason is, it will check in the bank (cloud – active and passive banks). If the image is already available in any one of the bank, then it will not go for image upgrade.
Sample Log: After retries...No error in curl command and curl http code is:200
cloud version is rdkb-generic-broadband-image_rdk-next_20211118174413
RPI version is rdkb-generic-broadband-image_rdk-next_20211118174413
Active bank is:2
rpiimageModel in dev is :rdkb
cloudimageModel is :rdkb
no of parts is :4
active bank is 0 so fetch info from passive and partition is:2
rpipassivebankimageModel:rdkb
passivebankVersion:rdkb-generic-broadband-image_rdk-next_20211118174413
since both banks has broadband alone and cloud also has broadband-compare versions with cloud
atleast one bank matches broadband
root@RaspberryPi-Gateway:/rdklogs/logs# tail -f swupdate.log
RPI version is rdkb-generic-broadband-image_rdk-next_20211118174413
Active bank is:2
rpiimageModel in dev is :rdkb
cloudimageModel is :rdkb
no of parts is :4
active bank is 0 so fetch info from passive and partition is:2
rpipassivebankimageModel:rdkb
passivebankVersion:rdkb-generic-broadband-image_rdk-next_20211118174413
since both banks has broadband alone and cloud also has broadband-compare versions with cloud
atleast one bank matches broadband |
|---|
