RDK Resources
[*RDK Preferred*]
Code Management Facility
RDK Forums
[RDK Conferences]
RDK Support
Archives
Papers & Presentations Archive![]()
Papers & Presentations Archive![]()
This page dedicated to bringing up and validation of RMS and CVR use case with bootup service file.
RMS: The RDKC Media Server is much more than a multi-format, multi-protocol server that delivers your media rich content across multiple screens and platforms. The RDK camera software runs on RPi-0/RPI-3 device. With RTSP streaming we can able to play live streaming content in VLC player.
CVR: It using pipewire callback to receive frames from v4l2 and also it using AWS Kinesis Video Stream( KVS ) to perform 24/7 video recording with AWS IOT credential.
Refer below link to build camera image
Morty:
RDK-C Build Instruction for RPI-0
RDK-C Build Instruction for RPI-3
Dunfell:
RDK-C rdk-next Yocto 3.1 dunfell build for Raspberrypi
STEP 1:
Add require SSID and PSK in /etc/wpa_supplicant.conf file in below format
network={
ssid="username"
psk="password"
}
ctrl_interface=/var/run/wpa_supplicant
ctrl_interface_group=0
update_config=1

network={
ssid="XXXX"
psk="YYYYYYYYY"
}
STEP 2:
AWS Account and IOT credential creation steps
1.AWS account is needed for to validate CVR use case. so, Refer below link to create AWS account.
Procedure To Create AWS Account
After the AWS account creation, Refer same link to create Access key ID ,Secret Access Key and Region Name of your AWS account.
2. After the AWS account creation, Need to create IOT credential with AWS CLI interface to validate CVR use case.
Use the below link to install AWS CLI interface package for to create AWS IOT credential.
Please install this AWS CLI package in your local linux pc. we can interact AWS account through our local linux pc with this AWS CLI interface.
https://docs.aws.amazon.com/cli/latest/userguide/install-cliv2-linux.html#cliv2-linux-install
Follow the below command to create config and credentials file in your local PC to interact AWS account
$ aws configure

AWS Access Key ID [None]: XXXXXXXXX	( Give your AWS account Access Key ID )
AWS Secret Access Key [None]: YYYYYYYYYYYYY ( Give your AWS Secret Key )
Default region name [None]: ZZZZZZZZZZ ( Give your Region Name )
Default output format [None]: json
Oncw you done this aws configure in your local PC automatically below files will be create with below content. so, please cross check whether that is created or not
vi ~/.aws/config

[default]
region = ZZZZZZZZZZ
output = json
vi ~/.aws/credentials

[default]
aws_access_key_id = XXXXXXXXX
aws_secret_access_key = YYYYYYYYYYYYY
use the below link to create AWS IOT credential
https://docs.aws.amazon.com/kinesisvideostreams/latest/dg/how-iot.html
After created the IOT credential you will get below list of details
Stream Name, Default Region, IOT Credential Endpoint, Certificate key, Private Kay, Role Alias and cacertificate key
Move the certificate.pem,private.pem.key and cacert.pem keys into your RPI /etc/ssl/certs/ directory
STEP 3:
Copy certificate.pem,private.pem.key and cacert.pem keys into your RPI /etc/ssl/certs/ directory
Give AMS STREAM_NAME,AWS_DEFAULT_REGION,IOT_GET_CREDENTIAL_ENDPOINT and ROLE_ALIAS values in your RPI /usr/local/cvr/cvr.conf file
STEP 4:
Reboot the Target
After Reboot don't do step 1 to 4.
Note : Step 1 to 4 is only applicable for fresh target boot-up with new image.
STEP 1:
WiFi/Ethernet connection is must needed for validation
Check WiFi/Ethernet connection by using below command.
ifconfig
root@raspberrypi3-rdk-camera:~# ifconfig
eth0      Link encap:Ethernet  HWaddr B8:27:EB:87:67:91
          UP BROADCAST MULTICAST  MTU:1500  Metric:1
          RX packets:0 errors:0 dropped:0 overruns:0 frame:0
          TX packets:0 errors:0 dropped:0 overruns:0 carrier:0
          collisions:0 txqueuelen:1000
          RX bytes:0 (0.0 B)  TX bytes:0 (0.0 B)

lo        Link encap:Local Loopback
          inet addr:127.0.0.1  Mask:255.0.0.0
          UP LOOPBACK RUNNING  MTU:65536  Metric:1
          RX packets:89842 errors:0 dropped:0 overruns:0 frame:0
          TX packets:89842 errors:0 dropped:0 overruns:0 carrier:0
          collisions:0 txqueuelen:1000
          RX bytes:25639748 (24.4 MiB)  TX bytes:25639748 (24.4 MiB)

wlan0     Link encap:Ethernet  HWaddr B8:27:EB:D2:32:C4
          inet addr:192.168.43.146  Bcast:192.168.43.255  Mask:255.255.255.0
          UP BROADCAST RUNNING MULTICAST  MTU:1500  Metric:1
          RX packets:44 errors:0 dropped:0 overruns:0 frame:0
          TX packets:103 errors:0 dropped:0 overruns:0 carrier:0
          collisions:0 txqueuelen:1000
          RX bytes:4484 (4.3 KiB)  TX bytes:10216 (9.9 KiB)
STEP 2:
check loaded module by using below command
lsmod
root@raspberrypi3-rdk-camera:~# lsmod
Module                  Size  Used by
bcm2835_v4l2           40563  0
v4l2_common             4809  1 bcm2835_v4l2
videobuf2_vmalloc       6264  1 bcm2835_v4l2
videobuf2_memops        1528  1 videobuf2_vmalloc
videobuf2_v4l2         12640  1 bcm2835_v4l2
videobuf2_core         27389  2 bcm2835_v4l2,videobuf2_v4l2
videodev              154457  4 v4l2_common,videobuf2_core,bcm2835_v4l2,videobuf2_v4l2
media                  23307  1 videodev
brcmfmac              258239  0
brcmutil                7590  1 brcmfmac
snd_bcm2835            21405  0
cfg80211              492836  1 brcmfmac
snd_pcm                79872  1 snd_bcm2835
rfkill                 19936  3 cfg80211
snd_timer              20294  1 snd_pcm
snd                    52949  3 snd_timer,snd_bcm2835,snd_pcm
lirc_rpi                6840  0
lirc_dev                7533  1 lirc_rpi
uio_pdrv_genirq         3469  0
uio                     8703  1 uio_pdrv_genirq
fixed                   2876  0
sch_fq_codel            9662  2
ipv6                  384101  18
STEP 3:
check camera device there or not by using below command
ls /dev/video0
root@raspberrypi0-rdk-camera:~# ls /dev/video0
/dev/video0
STEP 4:
RMS Output
On VLC player, for RTSP streaming
need to enter media → Open Network Stream option and then give rtsp URL to play streaming content in VLC
Example :rtsp://192.168.43.146:5544/stream2
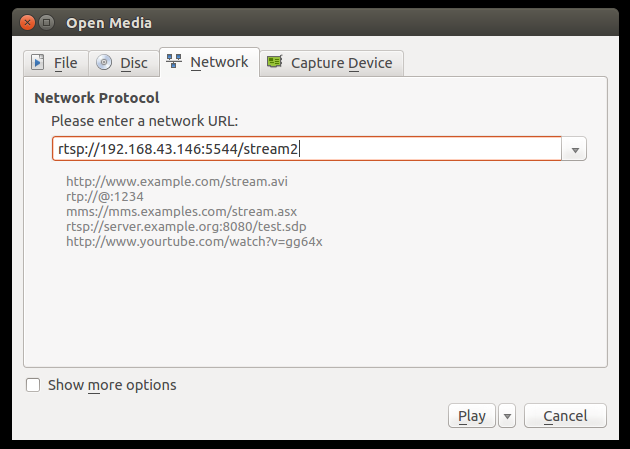
We can able to see the live streaming content on VLC Player.
Note: VLC player available PC and RPI target should run in same network.
STEP 5:
CVR Output
Enter into AWS account and select the corresponding video stream service which was we created for streaming.
Press "Media Playback" option on the video stream player.
Streaming video content should decode properly on AWS.

